summer linguine with fresh hand formed mozzarella
July 24, 2013 § 49 Comments
Right now heirloom cherry tomatoes are starting to appear in the markets in great quantities and I could not be happier. Although I have five different cherry sized heirloom varietals growing in my own garden, which still need a few more weeks to ripen, I found myself with a basket of them at the checkout stand. This particular market makes their own hand formed mozzarella and offers the best artisanal crusty breads the city has to offer. With my greek basil bush doing so well I decided I would make bruscetta “caprese style” for lunch today.

We sliced the tomatoes in half, put them in a bowl with fresh bush basil leaves, a drizzle of olive oil and a sprinkling of salt. We let it sit and marinade for 30 minutes. The tomatoes were placed on top of crusty bread and a slice of fresh mozzarella. A fabulous lunch, of which I did not photograph.
With a large bowl of marinaded tomatoes and half of the fresh mozzarella left I extended the caprese idea into a summer pasta.
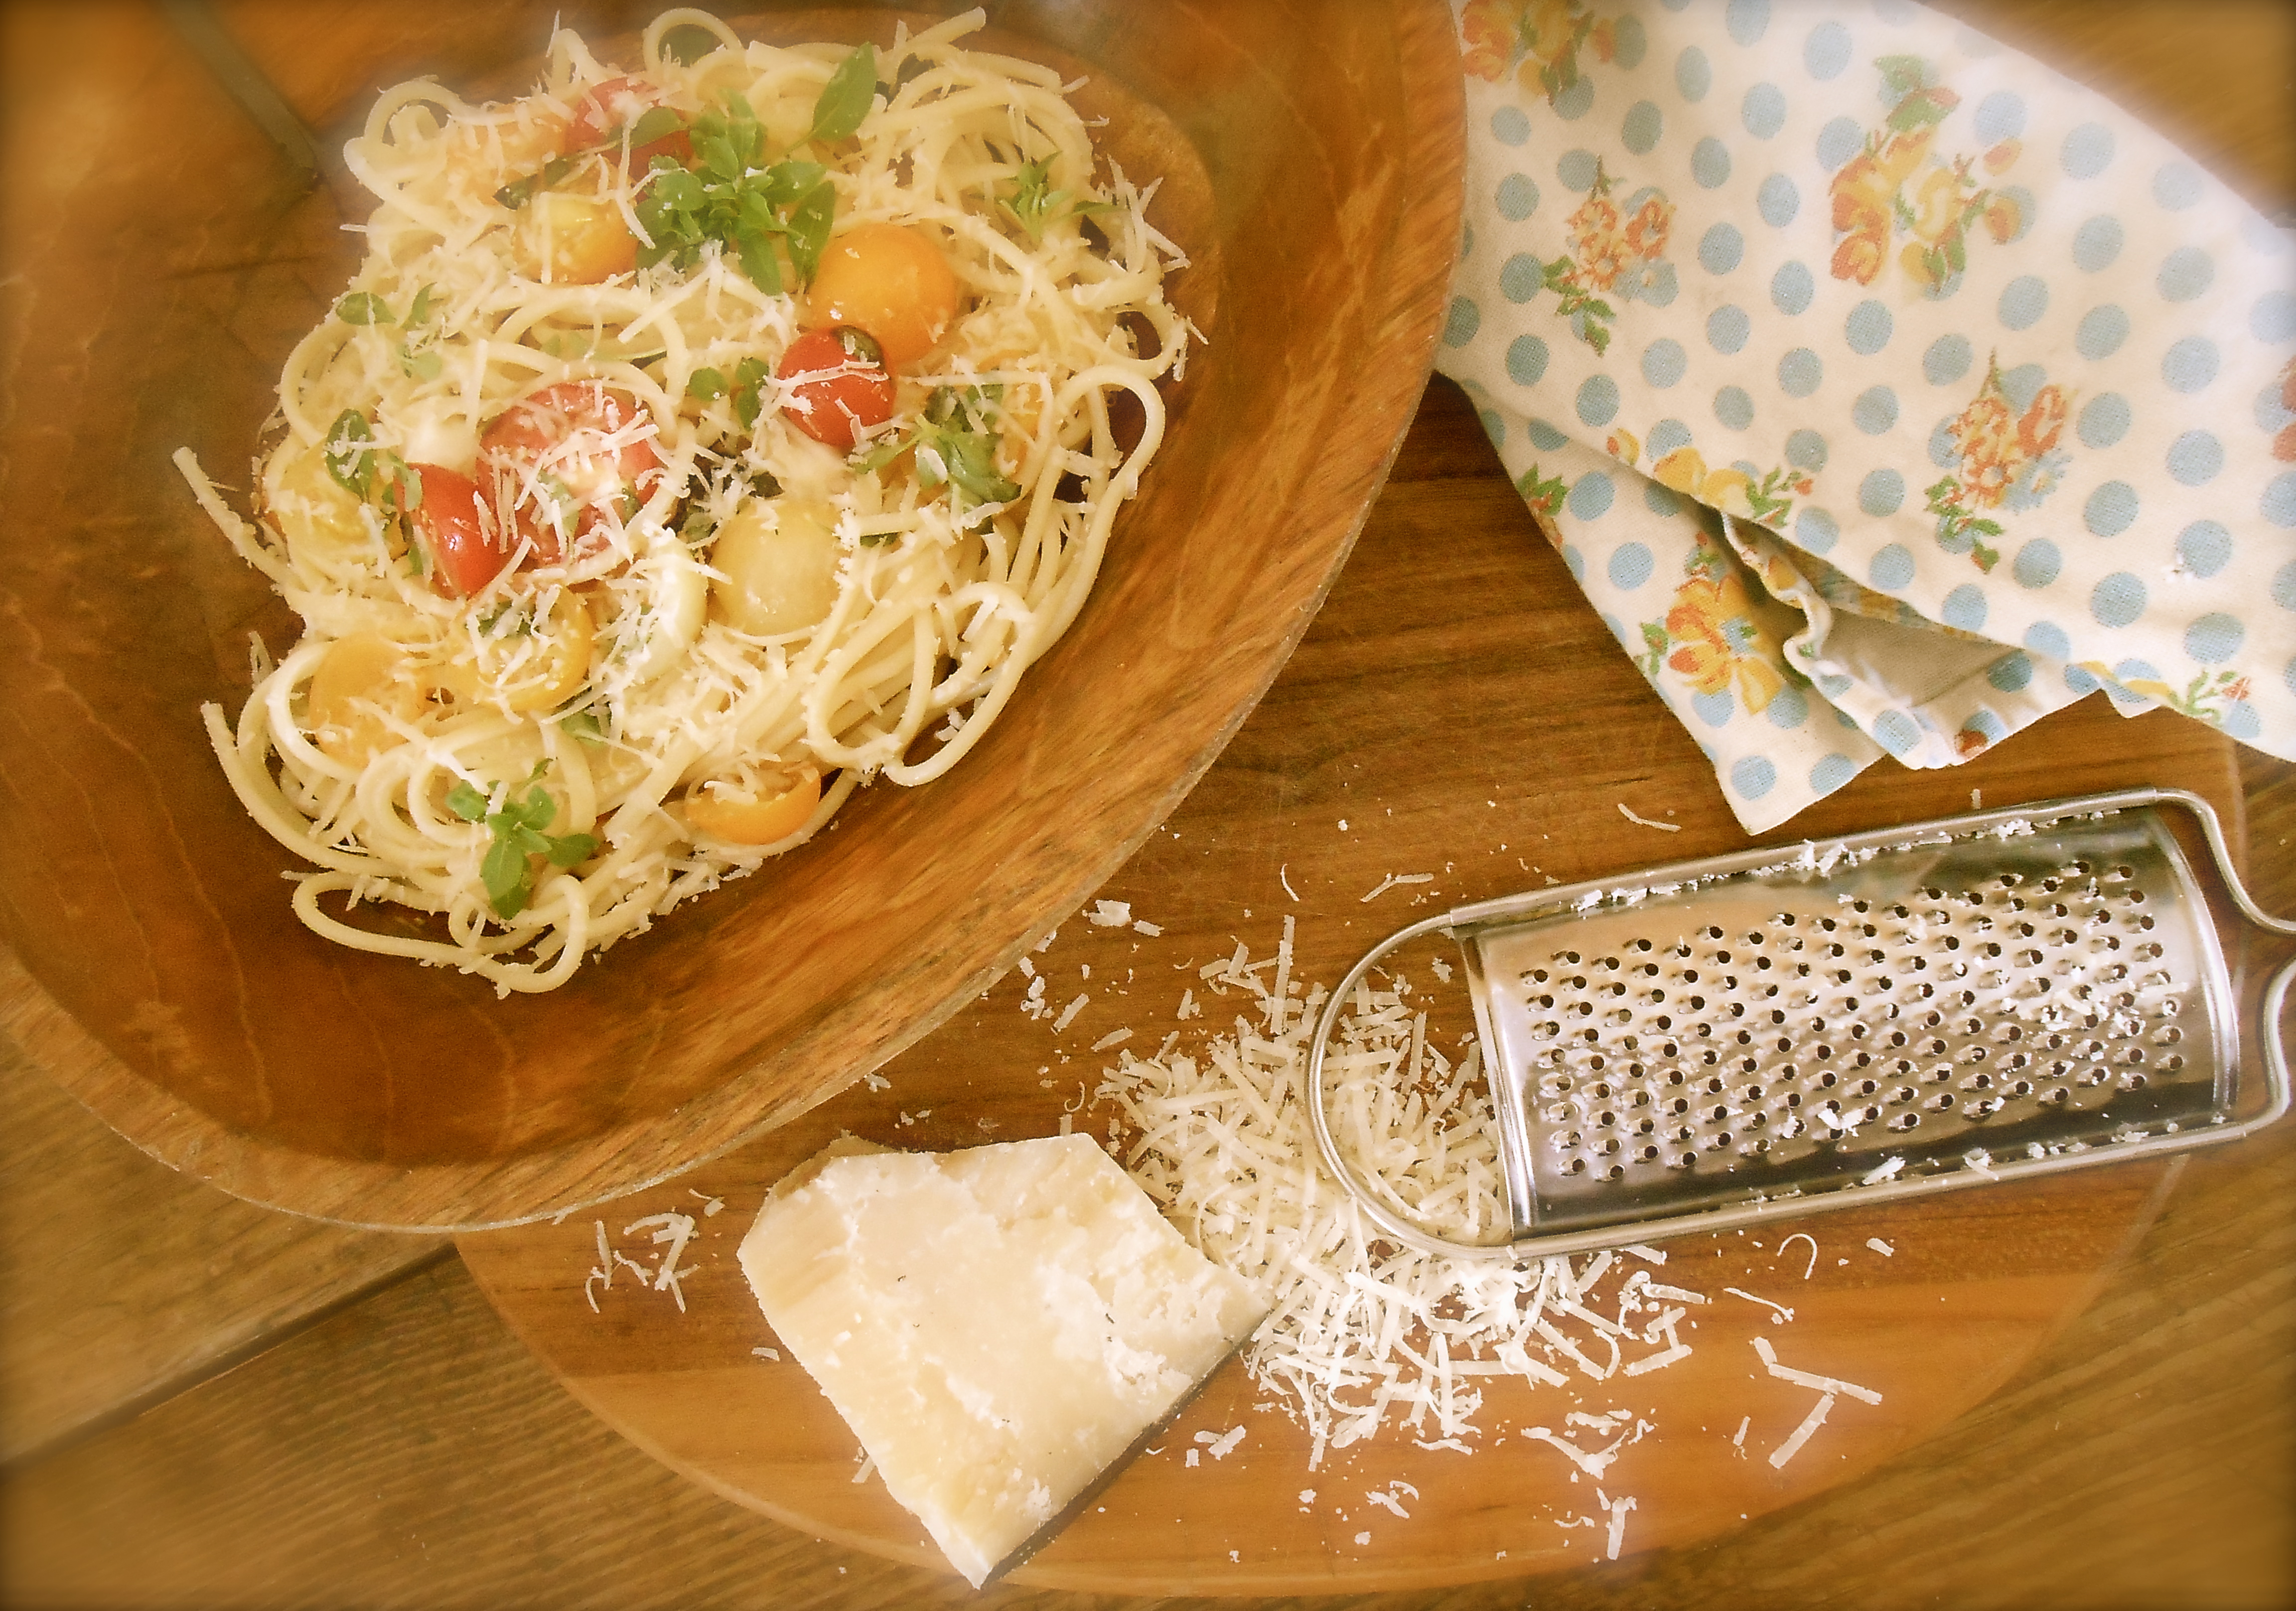
To the marinaded tomatoes I added minced garlic, a little more basil and some of the best cheese I have had in awhile…Grana Lodigiano. A hard texture cheese much the same as Grana Padano. I liked it’s black rind which I learned is a tradition held onto for centuries. In ancient times the wheels were matured with a clay coating, grapeseed oil and charcoal. This compound gave it a black hue. Today the wheels are still hand coated with natural ingredients to create the same black hue to specifically set it apart from Parmesan. I do enjoy talking with the cheese monger at the market…
I n g r e d i e n t s
- 1 pint of heirloom cherry tomatoes, halved
- 4 cloves garlic, minced
- 1/2 cup shredded basil leaves
- 8 ounces fresh hand formed mozzarella cheese, diced
- 1/2 cup olive oil
- 1/4 cup reserved pasta water
- sprinkling salt and black pepper
- 3/4 pound linguine
- 1/2 cup freshly grated Grana Lodigiano cheese or Parmesan cheese
M e t h o d
Place the tomatoes, garlic basil, mozzarella, olive oil, salt and pepper in a large serving bowl. Stir to mix and set aside at room temperature for at least 1 hour. Cook the pasta until al dente. Drain briefly, reserving 1/4 cup of pasta water. Add pasta and reserved water to the tomato mixture. Add the Grana Lodigiano and toss to mix. Serve right away while the pasta is still warm.
Serves 4.
buon appetite
flounder salad
July 12, 2013 § 35 Comments
I found fresh wild caught flounder at the market the other day. My plan was to go home and make tacos. I knew I wanted something lightly spiced with garlic and herbs. What I didn’t expect was the flavor and texture of this fish to be astoundingly delightful. Once I tried a taste I knew this would be a great fish for salad and I gave up on the taco idea.

I dusted the flounder lightly with flour, added a little salt and pepper and pan cooked it in hot olive oil. Once the flounder was cooked, using the same pan, I added chopped garlic, cilantro, a squeeze of lemon juice and a sprinkling of pimentón de la vera (sweet smoked paprika). Topping the flounder with these crispy spicy bits was simply delectable.
The flounder was served on a bed of mixed wild greens, topped with grated purple cabbage, tzatziki, cilantro sprigs and a few lime slices. I made the tzatziki before starting the fish. I highly recommend using this in place of a salad dressing.
I n g r e d i e n t s
- 1.5 pound fresh wild caught flounder filets
- 4-5 tablespoons olive oil
- 1/4 cup flour
- salt and pepper
- 3 garlic cloves, chopped
- 1/2 cup cilantro, coarsely chopped
- juice of 1/2 lemon
- 1 teaspoon sweet smoked paprika (or to taste)
- three handfuls of mixed wild greens
- 1/2 cup grated purple cabbage for serving
- a few springs of cilantro for serving
- lime slices for serving
Wash the flounder and pat it dry with paper towels. Set a large skillet over medium high heat and add 3 tablespoons of olive oil. Dust both sides with flour. Set the fish in the skillet, sprinkle with salt and pepper and cook for 3-5 minutes until golden. Turn the fish and sprinkle the other side with salt and pepper. Continue to cook until golden and crisp around the edges. Remove the fish from the pan to clean paper towels. Turn the heat to low and add cilantro and garlic to the skillet. Mix around and when it has become aromatic add the lemon juice and allow it to bubble a little. Sprinkle the smoked paprika, move around with a spatula until well combined and a bit crispy. Turn off heat.
Plate each serving. First a handful of mixed greens, fish, crispy/spicy bits, a little grated purple cabbage, tzaziki, cilantro sprig and a few lime slices.
Serves 4.
conchiglie with yogurt, peas and chile
July 10, 2013 § 60 Comments
I love visiting food blogs specifically looking for something to prepare for dinner…”tonight”! The other day I visited one of my favorite blogs (I have too many to count) and found this recipe. I am a huge fan of Molly’s blog and I took heed to her urgency about cooking this pasta. I ran out and pick up what I needed, came home that late afternoon and made one of the most delicious pasta dishes we have ever had. I never imagined pasta prepared with yogurt sauce. This was so creamy, yet light, a bit spicy from the chile, yet a little sweet from the peas, nutty from the pine nuts and lightly salty from the feta. All melty hot and delicious.
I have yet to pick up my copy of Jerusalem, by Yotam Ottolenghi and Sami Tamimi. Convincingly after making this recipe I am heading out today to do so.
I could never in my wildest dreams come up with this so I am giving you Molly’s posted recipe “verbatim”. And if you haven’t read Molly’s book A Homemade Life it is quite charming and features some incredible recipes.

A s w r i t t e n o n O r a n g e t t e . . . .
Pasta with Yogurt, Peas, and Chile
Adapted slightly from Jerusalem, by Yotam Ottolenghi and Sami Tamimi
The original version of this recipe calls for conchiglie, or shell-shaped pasta, but you could use any small pasta shape you like: orecchiette, penne, farfalle, and so on.
If you have some exotic type of dried chile, like Urfa chile, Aleppo chile, or Kirmizi biber, you lucky lucky dog, this is a great place to use it. If not, you can use regular red pepper flakes. I happened to have some Aleppo chile, and though it was ground, not in flakes, and probably a few years old, it worked beautifully. Oh, and if you’re worried about the amount of heat, consider starting with a little less of the chile than what is called for – or just don’t put much chile oil on your pasta.
- 2 ½ cups (500 g) whole-milk Greek yogurt
- 2/3 cup (150 ml) olive oil
- 2 medium cloves garlic, crushed or pressed
- 1 pound (500 g) fresh or thawed frozen peas
- Kosher salt
- 1 pound (500 g) pasta shapes of your liking
- Scant ½ cup (60 g) pine nuts
- 2 teaspoons Turkish or Syrian chile flakes, or red pepper flakes
- 1 2/3 cups (40 g) basil leaves, coarsely torn
- 8 ounces (240 g) feta cheese, coarsely crumbled
In the bowl of a food processor, combine the yogurt, 6 tablespoons (90 ml) of the olive oil, the garlic, and 2/3 cup (100 g) of the peas. Process to a uniform pale green sauce, and transfer to a large mixing bowl.
Bring a large pot of water to a boil, and salt it until tastes like pleasantly salty seawater. Add the pasta, and cook until it is al dente. While the pasta cooks, warm the remaining olive oil in a small frying pan over medium heat. Add the pine nuts and chile flakes, and cook for 4 minutes, or until the pine nuts are golden and the oil is deep red. Also, warm the remaining peas in some boiling water (you could scoop out a bit of the pasta water for this); then drain.
Drain the cooked pasta into a colander, and shake it well to get rid of excess water that may have settled into the pasta’s crevices. Add the pasta gradually to the yogurt sauce; adding it all at once may cause the yogurt to separate. Add the warm peas, the basil, feta, and 1 teaspoon kosher salt. Toss gently. Serve immediately, with pine nuts and chile oil spooned over each serving.
Yield: about 6 servings
spaetzle with brown butter sage
July 8, 2013 § 35 Comments
I made spaetzle this weekend. I have been wanting to make this for years and decided it would be a nice side dish with our grilled salmon. I searched around and found several recipes which all differed slightly. I got caught up in the Smitten Kitchen blog reading her post and the 400+ comments regarding her spaetzle. I ended up using a recipe from this blog. I really like her uncomplicated approach. It was just what I needed when I was feeling a little intimidated by the numerous other recipes. Some things need not be complicated. Spaetzle is one of them. I used brown butter and sage to flavor the spaetzle, then at the last minute I added cream. In hindsight the cream was unnecessary. I knew it right when I poured it in the skillet. However, it was out of this world delicious! As comforting as a good homemade mac and cheese. If you are serious about making spaetzle take a look at The Tasty Kitchen blog for a detailed tutorial.
- 2 whole Eggs, Beaten
- ¾ cups Water
- 1-½ cup All-purpose Flour
- ¼ teaspoons Salt
- drizzle of olive oil
- 2 tablespoons butter
- 5 large fresh sage leaves, sliced
- 1/2 cup cream (optional)

Bring a large pot of water to boil and add a bit of salt .
Add flour and salt to a large bowl and mix together. Beat the eggs and add them to your flour mixture. Add water and stir well to work out all the lumps.
Using your colander and spatula, pour the dough into the colander. Keep the colander above the steam so it doesn’t cook before it gets pushed through the holes. Press the batter through the colander with the spatula. Drops will fall into the water and cook instantly. Boil for 3 to 4 minutes. Remove the spaetzle from the water and strain it into a bowl. Toss with a bit of olive oil to prevent it from sticking together.
Heat the butter in a large skillet over medium high heat. Add the sage cook until aromatic. Toss in the spaetzle and brown to your liking. Here is where I added the cream (unnecessary) and allowed to simmer for 5 minutes stirring occasionally.
Serves 4, as a side dish
finnish strawberry pancake
July 3, 2013 § 45 Comments
After rising early last week I sat down with a cup of coffee and started reading the latest posts on my favorite blogs. I found this marvelous breakfast recipe from thethankfulheart. Having all the ingredients on hand I stood up and made Rhonda’s finnish pancakes. Right then and there, I made it and it was out of this world. Rhonda used raspberries in her pancake and I only had strawberries. However, I am certain these finnish pancakes are wonderful whatever fruit is used. I imagine peaches a little later in the season.

You know this is good when you leave it on the stove with one piece missing only to come back an hour later and it was gone! Yes, the 15 year old of the house got ahold of it! He said he couldn’t stop eating it after pouring pure maple syrup on top.
Here is the recipe exactly how Rhonda posted it. However, I know you would enjoy a visit to her blog.
- 1 cup flour
- 2 tab. sugar
- 1/4 tsp. salt
- 2 cups milk
- 1/4 cup melted butter
- 2 eggs
- 1 tsp. vanilla
- 6 oz. box of raspberries [or in this case, strawberries](about a cup)
- 1/4 cup sugar
In a mixing bowl stir together the flour, sugar and salt. Then whisk in the milk, melted butter, eggs and vanilla. Pour is it all into a 10″ baking dish sprayed with cooking spray. Sprinkle the raspberries and sugar on top and pop it into a 400 even for 45 minutes until it’s puffy and nicely browned.
orecchiette pasta with cilantro pesto
July 1, 2013 § 32 Comments
We are finally having HOT sunny days here in Seattle. Thank goodness for the tomato plants who have been very patiently waiting for the sun during the past three weeks. Seattle can be a unkind to tomatoes. Typically my plants are late bloomers and by the time their skins should turn red a blanket of clouds cover the sun once again leaving them an orange hue rather than red and a good supply of green ones too. I have learned it is best to plant “little” tomatoes such as cherry, grape, sun gold and/or a medium size roma varietal for our short lived tomato growing season. However, it could just be me and my lack of tomato growing knowledge.

s u g a r p l u m g r a p e t o m a t o e s
I have a pasta recipe here which requires only one burner on your stove for boiling the orecchiette. A summery fresh pasta while keeping the heat out of the kitchen!
I n g r e d i e n t s
- 1 pound good quality orecchiette
- 2 bunches cilantro, washing and thick stems removed
- 3 cloves garlic, smashed and peeled
- 1/2 cup pecans
- 1/2 cup olive oil
- 2 heaping tablespoons plain greek yogurt
- 1/2 cup grated parmesan cheese
- salt to taste
- sugar plum grape tomatoes
Bring a large pot of salted water to a boil. Add the pasta, and cook until it is al dente. While the pasta cooks prepare the pesto.
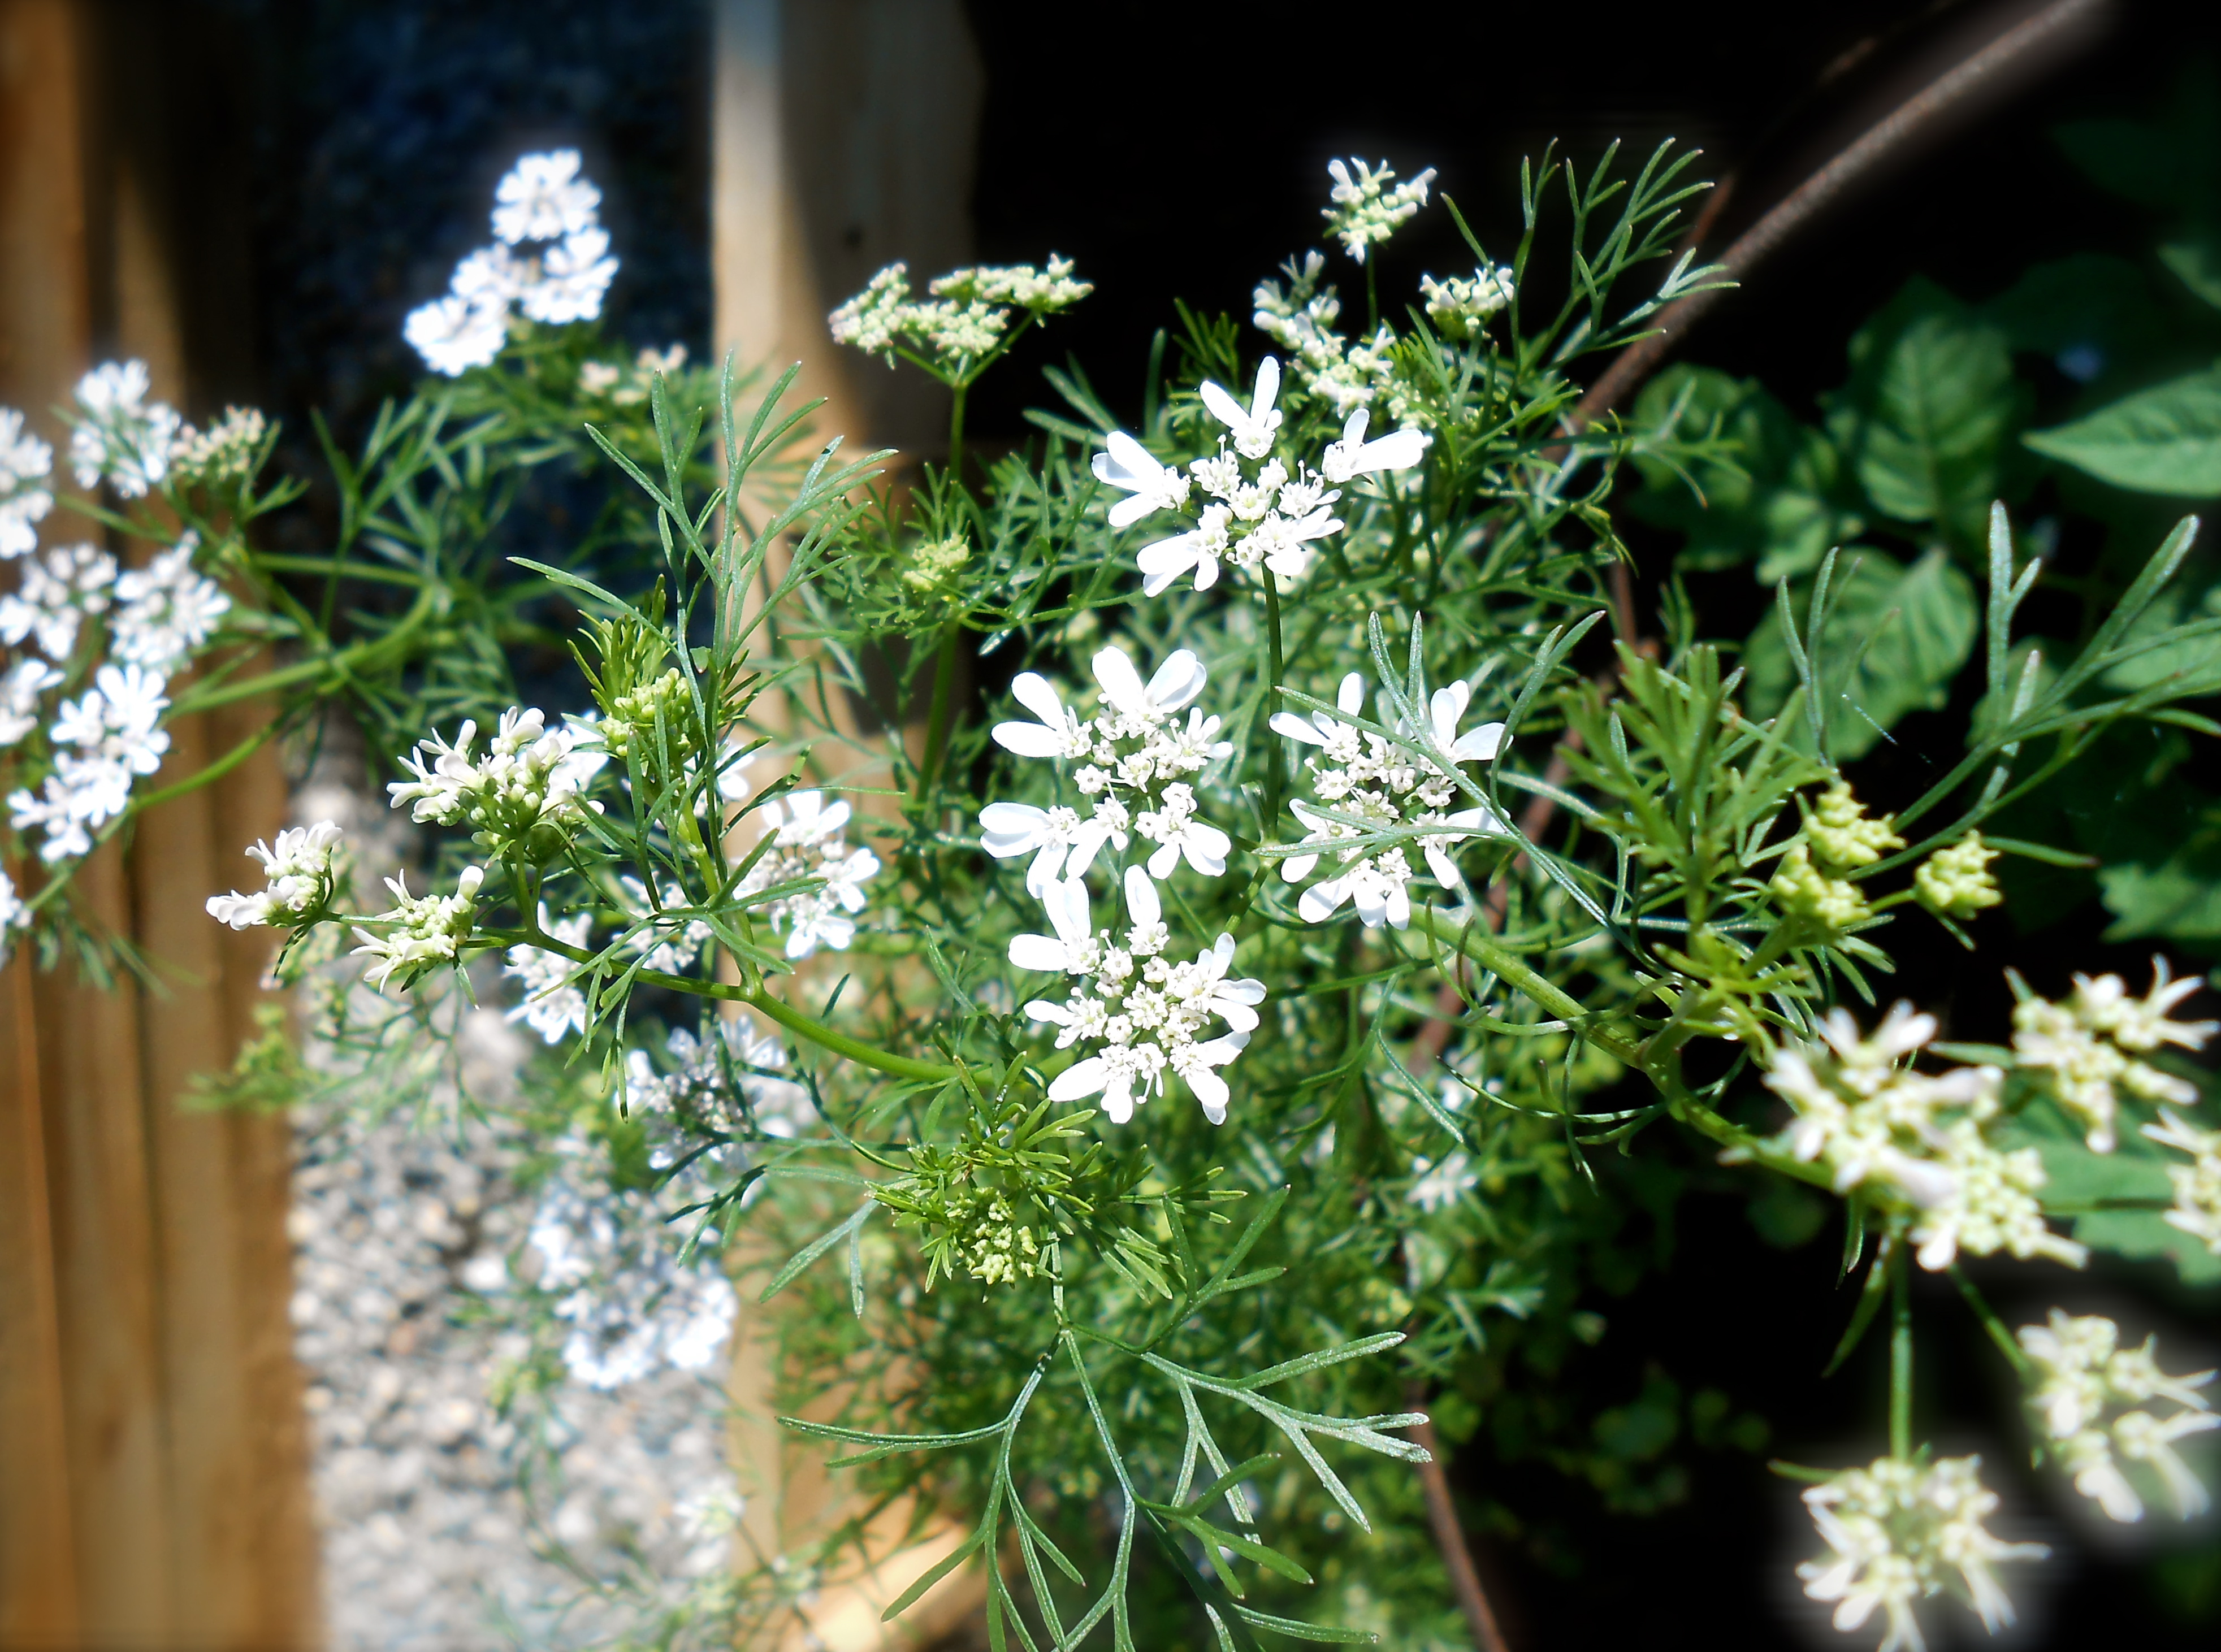
f l o w e r i n g c i l a n t r o
Place cilantro in food processor and whizz until finely chopped. Add the remaining ingredients and whizz until it is a well mixed pesto.
Slice sugar plum grape tomatoes into small bits and set aside.
Drain the cooked pasta without shaking the colander too much leaving a trace amount of the cooking water. Return to the pot and stir in the pesto. Taste to see if you need to salt. Place in serving bowls topped with sliced sugar plum tomatoes and a sprinkling of freshly grated Parmesan.
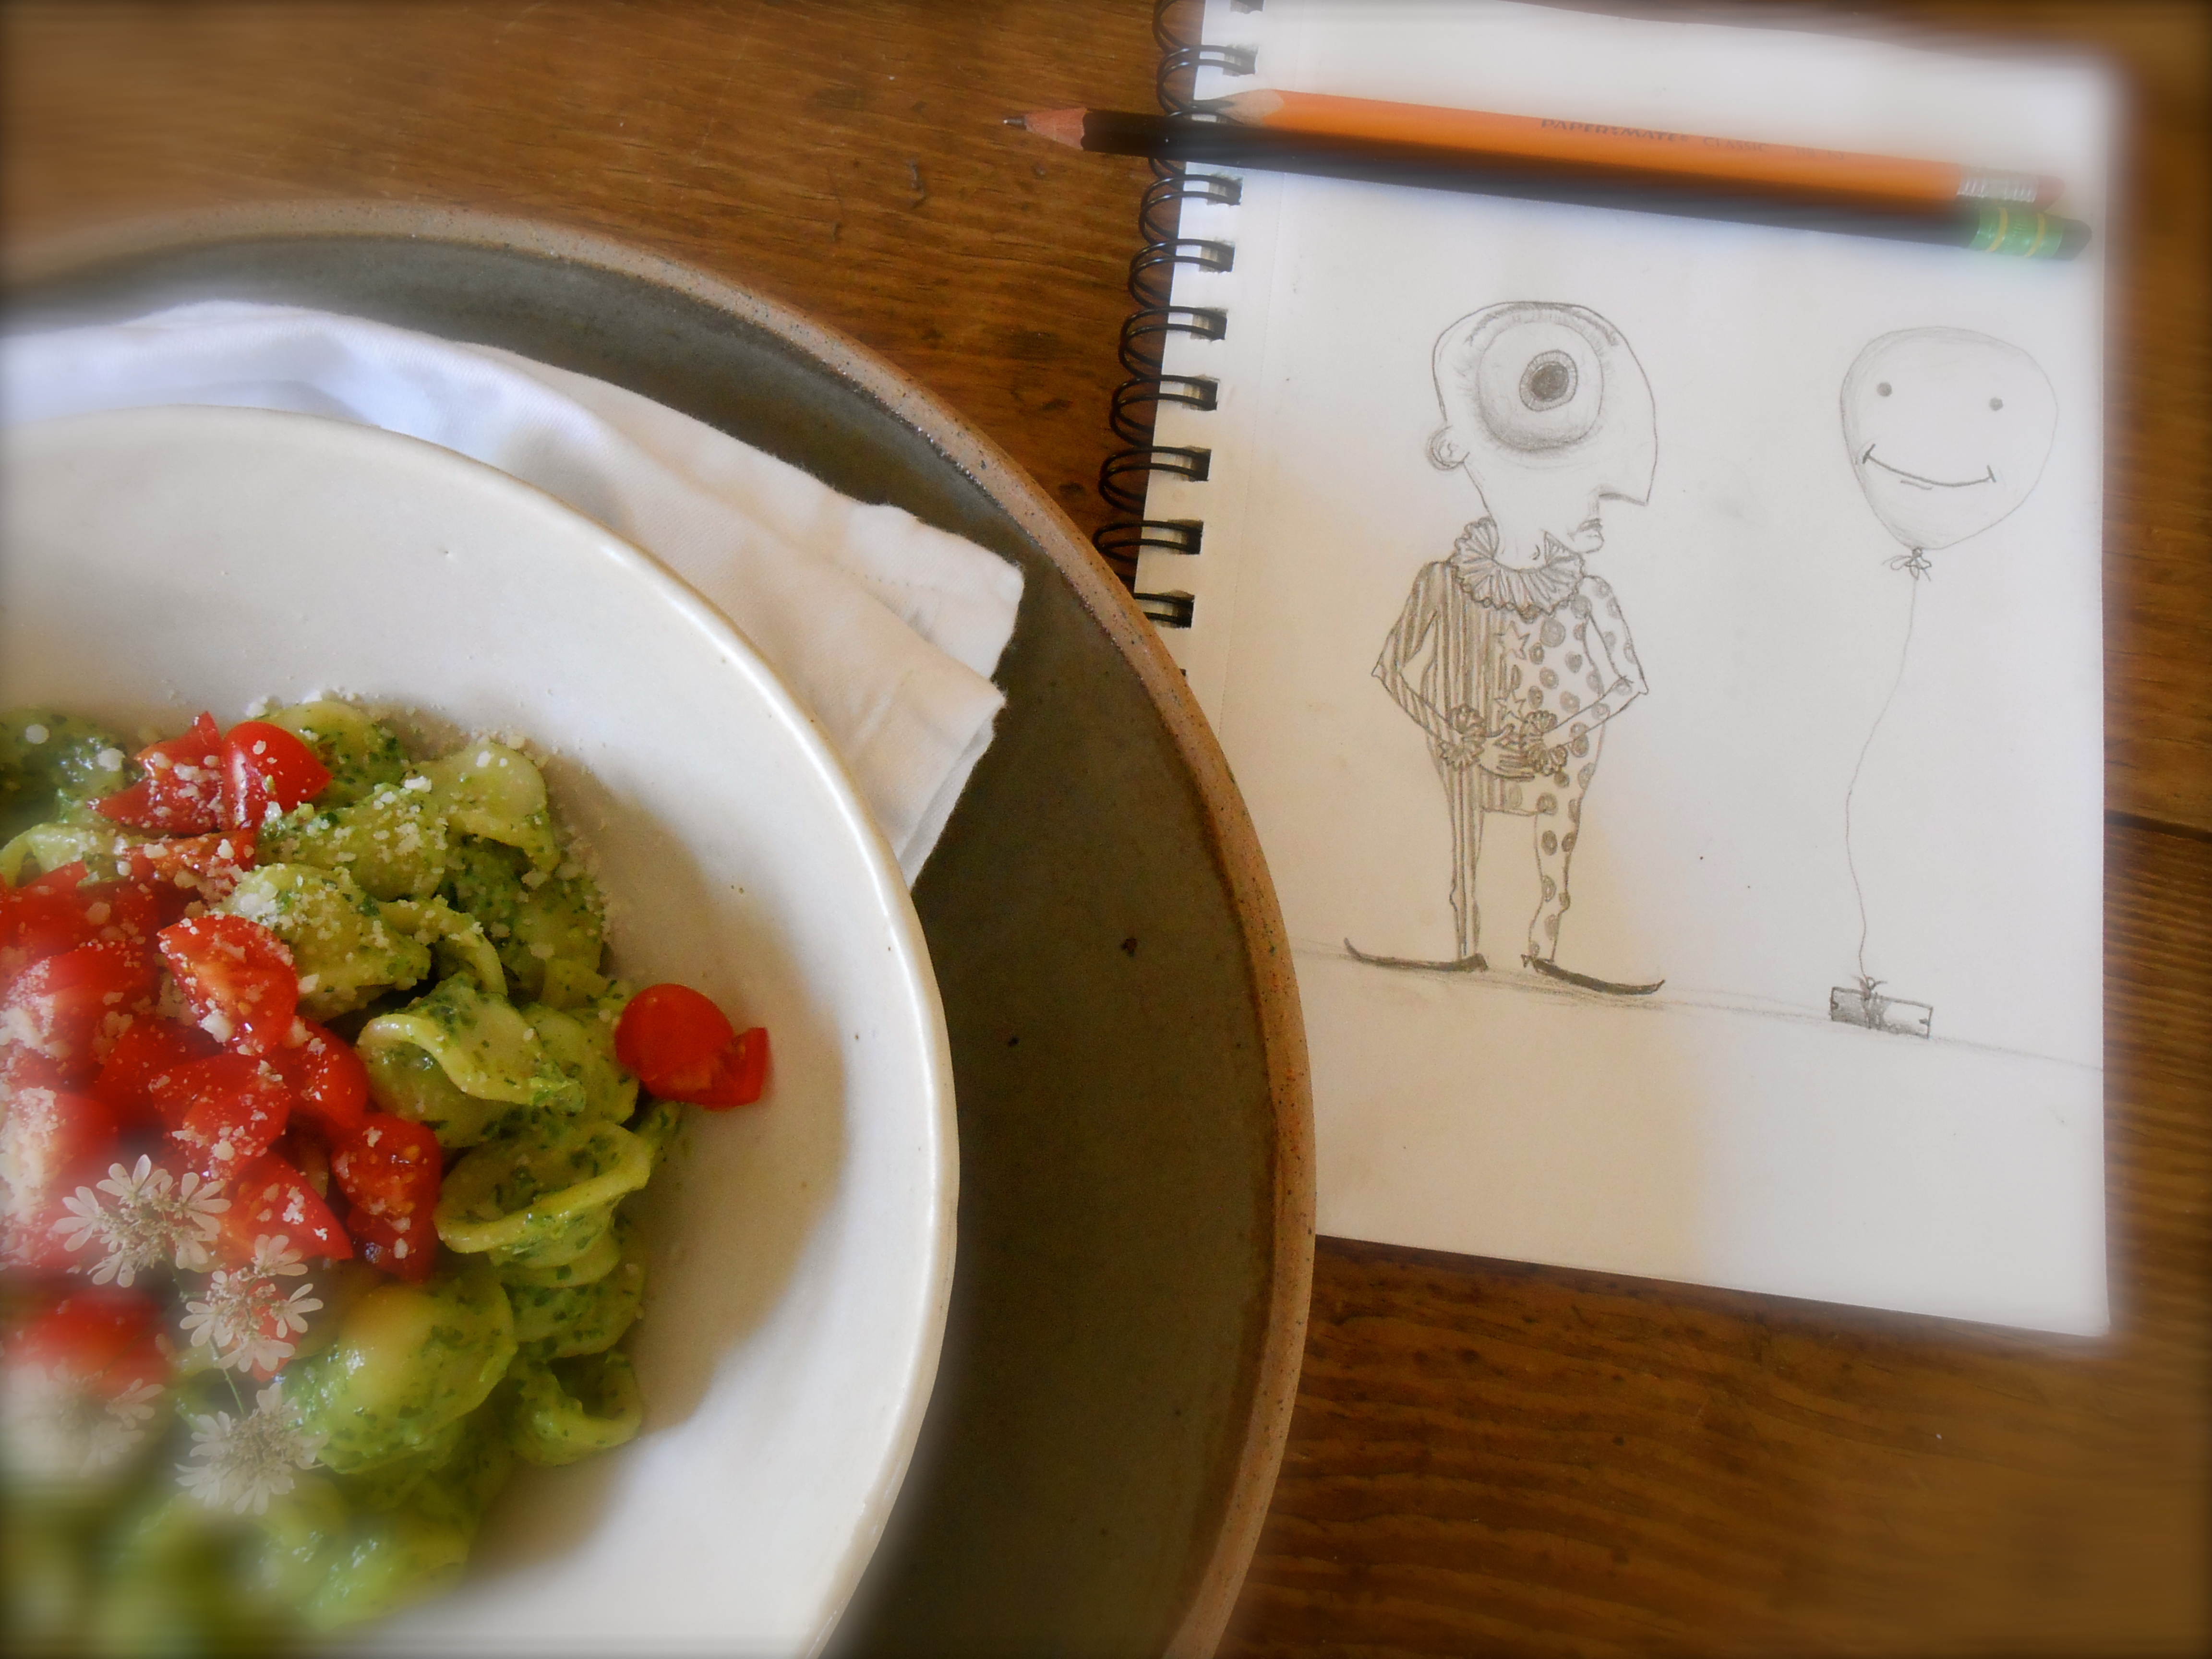
orecchiette pasta with cilantro pesto and a page in my son’s drawing journal
Serves 4
buon appetite.
walla walla sweet onion soup and herb farmers five cheddar biscuits
June 24, 2013 § 42 Comments
I am always delighted when mid June rolls around and I stumble upon the first harvest of Walla Walla Sweet Onions. Walla Walla is a county in southeastern Washington and is known for it’s sweet onions. These are a very pleasant mild onion which easily can be eaten raw on salads and sandwiches.
A cool rainy day always triggers my soup craving so I set out to make a light soup. I was toying with the idea of french onion soup when I spotted the Walla Walla Sweet Onions. I purchased four sweet onions, the most ripe juicy strawberries I have ever tasted and headed home.

I have a little cook book titled “Fresh” by John Bishop which features wonderful seasonal recipes made with local foods (Pacific Northwest). I found today’s soup recipe along with an herbed cheddar cheese biscuits. I struggle as a baker. I can usually bake a good simple quick bread, but if I have to knead or rise the dough, I fail. The recipe specifically said to “turn the dough onto a lightly floured surface and knead 10 times”. I figured, “how can I fail?”.

biscuits served with butter and sun dried tomato pesto
The biscuits would have made my mom proud. The soup was naturally sweet, creamy and keeping the spices at a minimum allowed the flavor of the onions to come through. While the soup is simmering, prepare the biscuits.
h e r b e d c h e d d a r c h e e s e b i s c u i t s
- 2 cups all purpose flour
- 1 tablespoon baking powder
- 1 teaspoon baking soda
- 1 teaspoon salt
- 1/3 cup butter
- 1 tablespoon finely chopped fresh thyme
- 2 teaspoons finely chopped fresh rosemary
- 3/4 cup grated cheddar cheese
- 3/4 cup plain yogurt
- 1 tablespoon milk
Preheat oven to 375° F. Line a baking sheet with parchment paper.
In a large bowl, combine flour, baking powder, baking soda and salt. Add butter and work into the flour mixture with your fingers until the dough has the consistency of cornmeal. Stir in thyme and rosemary. Make a well in the center of the dry ingredients.
Place cheese, yogurt and milk in a small bowl and stir to combine. Pour the yogurt mixture into the well and combine lightly until the dough forms a ball. Turn the dough onto a lightly floured surface and knead 10 times.
Roll out the dough to a thickness of 1 inch. Using a 2 inch round cookie cutter, cut out 12 biscuits. Arrange biscuits 2 inches apart on the baking sheet and bake in the top third of the oven for 15 to 20 minutes, until lightly golden. Transfer to a cooling rack.

s w e e t o n i o n s o u p
- 3 tablespoons butter
- 6 cups sweet onions, thinly sliced and quartered
- 4 cloves garlic, chopped
- 1/4 cup all purpose flour
- 1/2 cup dry white wine
- 6 cups stock, vegetable or chicken
- salt and pepper
- 1/2 cup whipping cream (optional)
- 2 tablespoons fresh spring onions, sliced
Melt butter in a stockpot on medium heat. Add onions and garlic. Cover, reduce the heat to low and cook for 15 to 20 minutes. Remove the lid, stir in flour and cook for 5 minutes. Deglaze the pot with wine.
Add stock, salt, pepper and increase heat to medium high. Bring to a boil, reduce the heat to low and simmer uncovered for 30 minutes. Stir in cream and simmer for another 10 minutes.
Ladle soup into warm bowls and sprinkle with freshly sliced spring onions.
Serves 4
buon appetite.
spaghetti carbonara
June 17, 2013 § 36 Comments

And yet, another pasta recipe. You see I have a thing about pasta. I would eat it everyday if I wasn’t thinking too hard about all the carbs I don’t need. After an extra long commute home the other day, I arrived, said my hello’s and headed to the kitchen. I didn’t have a dinner plan whatsoever. Looking through the refrigerator I found a little log of chavrie goat cheese, a little pancetta, a handful of parsley, a shallot and by this time a pasta sauce was formulating in my mind. I thought if I had Parmesan instead of goat cheese I could make Carbonara. Then I remembered I do have some Grana Padano! Realizing I have never made carbonara I took my copy of Marcella Hazen’s Essentials of Classic Italian Cooking off the shelf.
Now let just say when I was “with child” spaghetti carbonara was “my dish”. I craved it everyday and dined on it at least once a week for a good six months! And to imagine I have never made carbonara is quite nonsensical. I left it up to the chef at my favorite trattoria. I didn’t even want to try to prepare it because I knew I could never match the quality of La Trattoria’s carbonara. Well…Eureka! Success in the kitchen. Here it is, in my humble opinion, a most delicious carbonara. Of course in the spirit of improv I made a few very minor adjustments to Marcella’s recipe due to not having all of her listed ingredients. In place of the Grana Padana you could use a good quality Parmesan.
I n g r e d i e n t s
- 4 ounces of diced pancetta
- 1 shallot, finely diced
- 4 garlic cloves, smashed and peeled
- 3 tablespoons olive oil
- 2 large eggs
- 3/4 cup freshly grated Grana Padano cheese
- Black pepper
- 1/4 cup chopped parsley
- 3/4 pound spaghetti
M e t h o d
Place a large pot of water on the stove over high heat. Once your water is at a roaring boil add a tablespoon of coarse grain salt and drop your pasta in. Cook until al dente, spaghetti cooking time is approximately 9 minutes. Drain, reserving 1/4 cup of pasta water.
Meanwhile…
Put the garlic and olive oil in a large sauté pan over medium high heat. Sauté until the garlic is golden. Remove and discard garlic. Add the pancetta to the pan and cook until crispy, then add the shallot. Continue to cook until shallots are soft and turn off the heat.
Using a fork lightly beat two eggs in a medium size bowl. Add 1/2 cup grated Grana Padano, a grinding of black pepper and the chopped parsley. Once the spaghetti is cooked, slowly drizzle in reserved pasta water until smooth. Mix thoroughly, using something like these!

Briefly reheat the pancetta over medium high heat, turn off the pan and add spaghetti, toss to combine well. Add the egg mixture and continue to toss to combine and allow the egg to set without scrambling. Serve right away with freshly grated Grana Padano cheese.
Serves 4.
buon appetite.
baked zucchini and caramelized onion dip
June 14, 2013 § 38 Comments
Recently I saw a post on Reclaiming your Castle for baked zucchini. Her post struck a cord with me because when I was 18 years old living in my first apartment and not knowing much about cooking, I would go to the market and bring home random vegetables not knowing what in the world I was going to do with them. I knew I couldn’t go wrong with zucchini. As a little girl I loved zucchini. I remember walking through my dad’s garden and selecting one zucchini and asking my mom to cook it for me. Kindly and patiently she sliced it into rounds, boiled and put a pat of butter on it. I sat at the dining room table all alone enjoying my little bowl of comfort. There was a time when boiling vegetables (a little too much) was the default recipe for getting them on the table for a houseful of hungry folks. Therefore, at 18 years old when I discovered a breaded and baked zucchini recipe I was intrigued and knew it was going to be the first vegetable I wanted to learn to cook, rather than boil. And I remember cooking it over and over again. I used an egg dip, seasoned italian bread crumbs and dotted each one of them with butter before baking in a preheated 425° oven for approximately 25 minutes until nice and crispy. Revisiting this recipe after two decades (or so!) was like walking back into that little apartment kitchen.
This is a great side dish for the little ones around your table. Please visit Sara’s site for a more detailed recipe!

What really made these delicious was the caramelized onion dip. I followed Sara’s recipe with one minor change. I used greek yogurt rather than mayonnaise. Don’t get me wrong, I love mayonnaise. I didn’t have enough in house and I happened to have a full tub of yogurt. Honestly, this is the same recipe I make for our potato chips while we are watching games during football season.
c a r a m e l i z e d o n i o n d i p
- 1 medium sweet onion, sliced
- 1 tablespoon butter
- 2 tablespoon cider vinegar
- 2 tablespoons honey
- 1 tablespoon prepared mustard
- 1 cup greek yogurt
Melt the butter in a non stick pan over moderate heat. Add the sweet onion slices and cook stirring occasionally until the onion softens and caramelizes. This should take between 20 and 25 minutes, on medium-low heat. When the onions are a nice brown hue and caramelized remove from heat and cool.
Place the onions, vinegar, honey and mustard in a food processor or blender and process until smooth. Place in a serving bowl and stir in the yogurt.
Serves 4.
buon appetite.
roasted garlic scapes
June 10, 2013 § 47 Comments
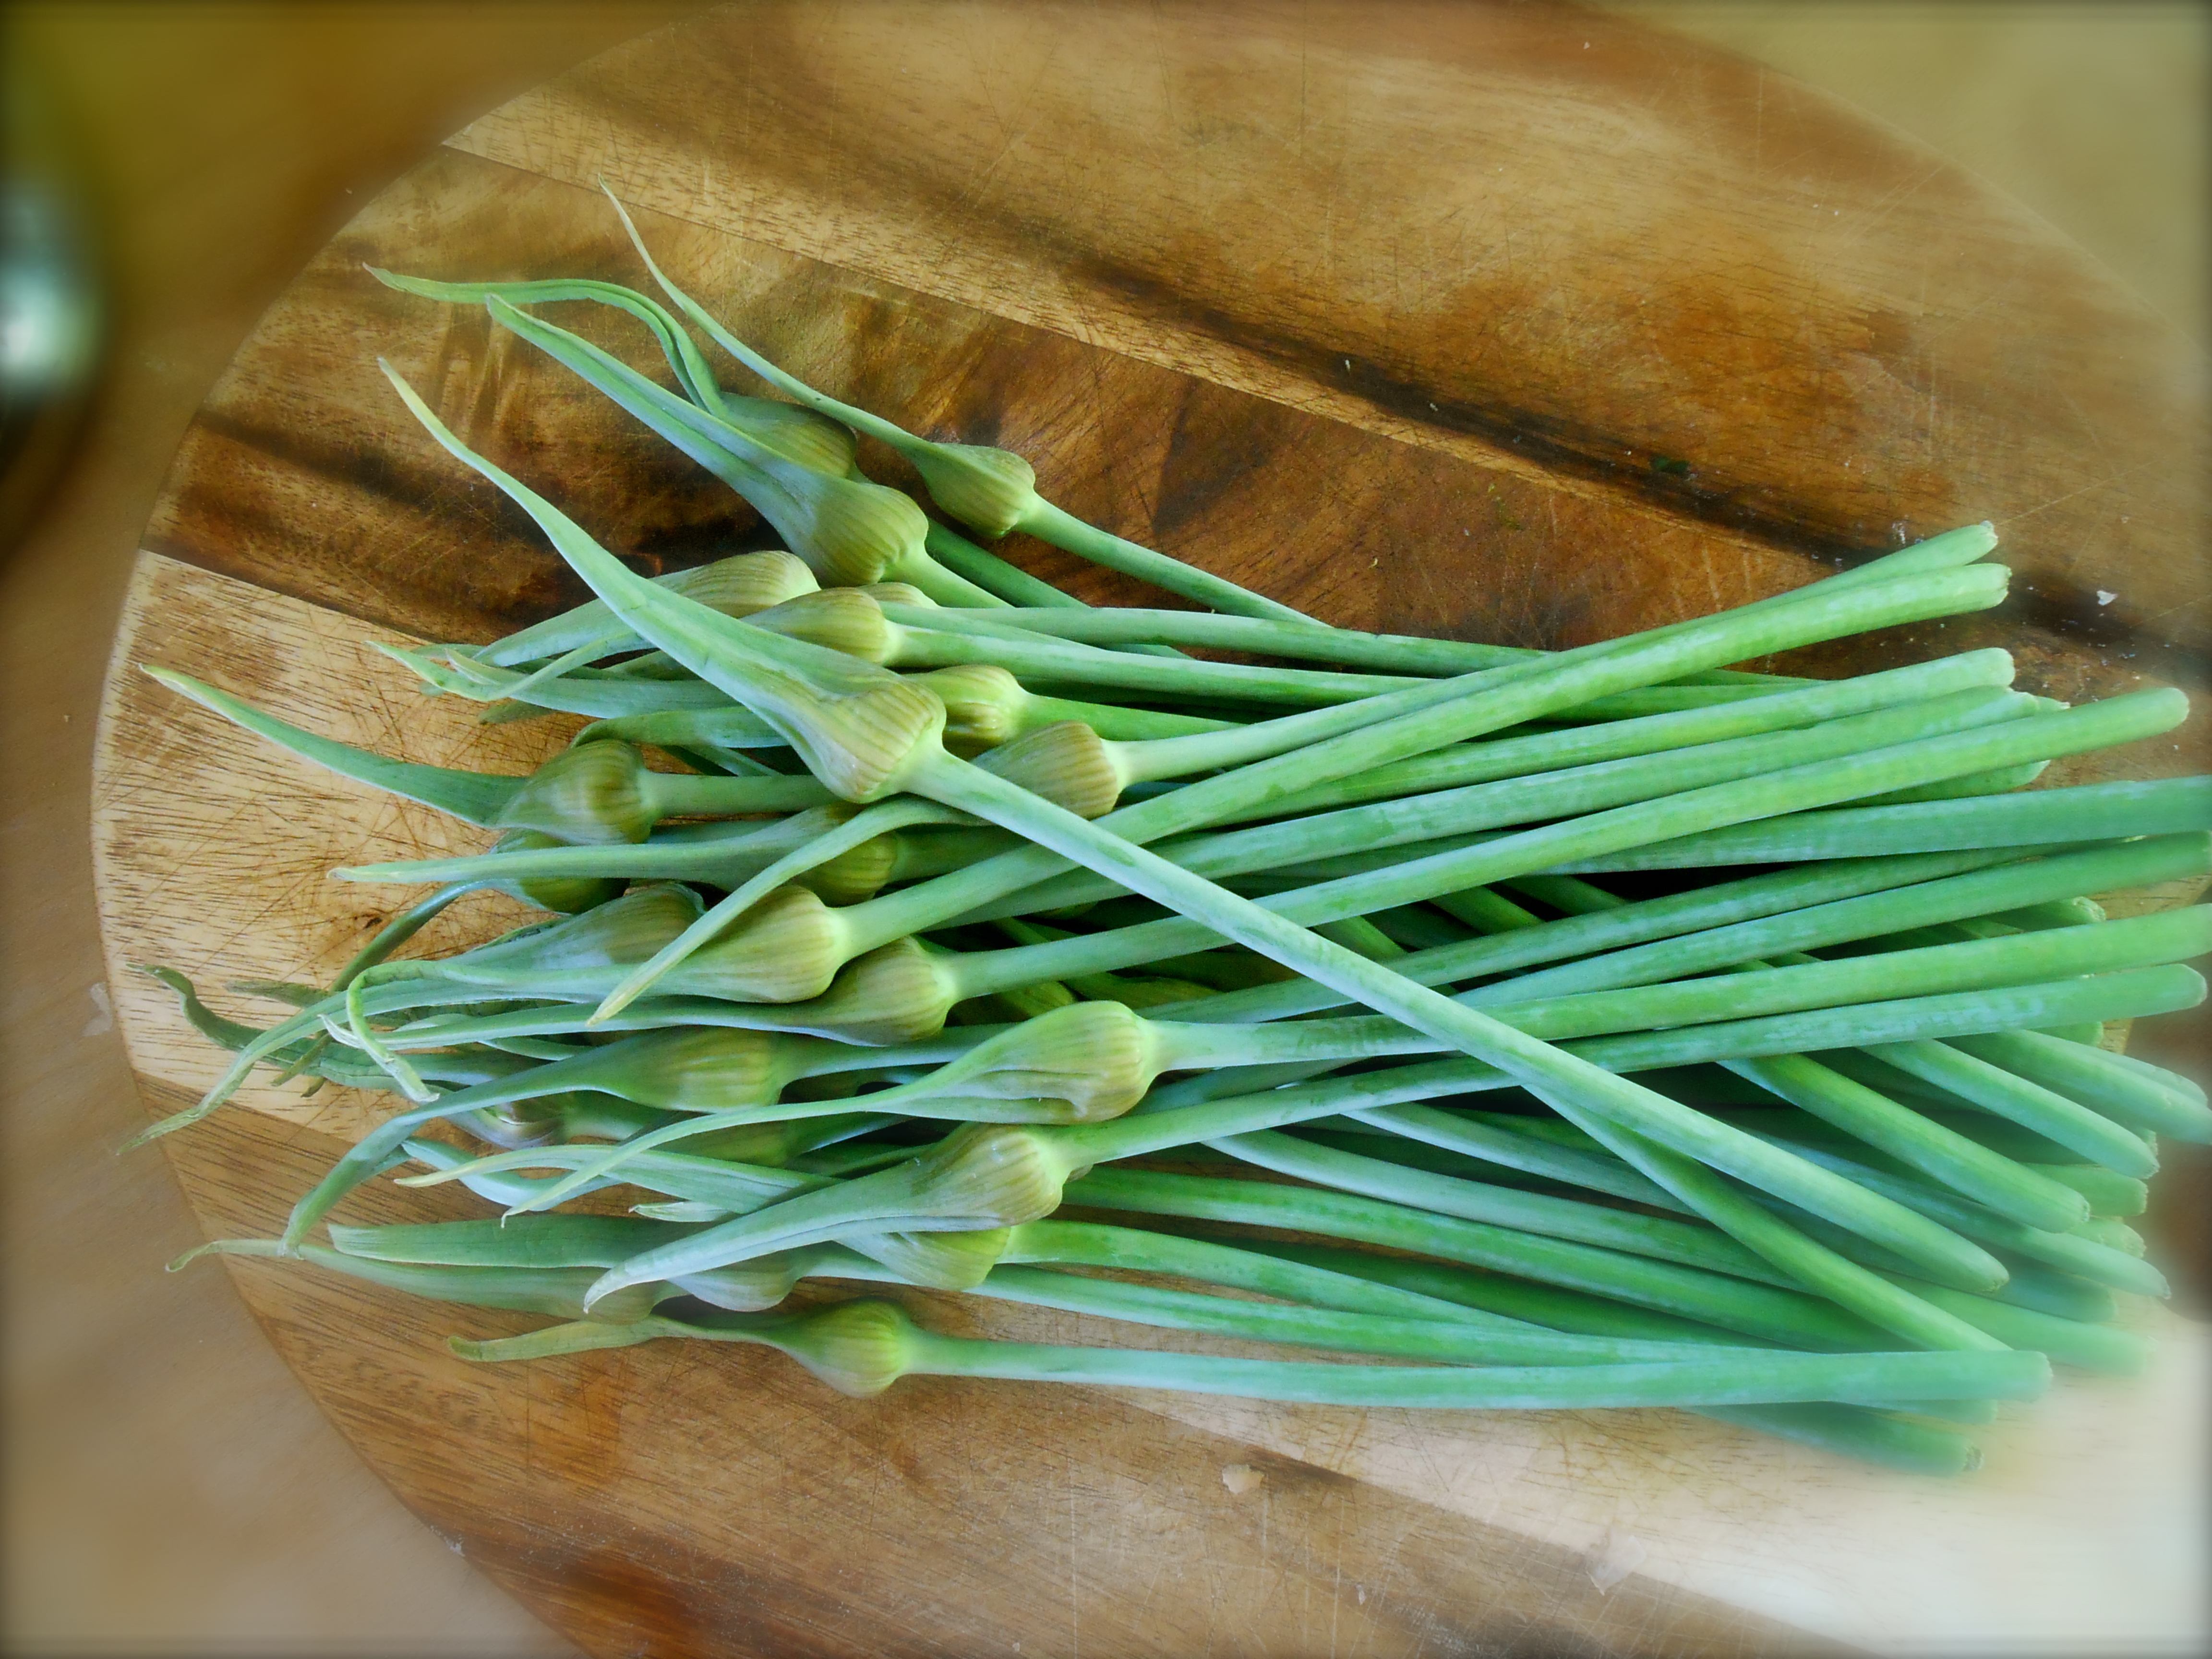
flower tops from elephant garlic
When cooked, garlic scapes have a very mild garlic flavor with a texture and taste somewhere between asparagus and artichoke. The whole spear may be eaten, as is. The previous statement was copied from the little piece of paper stuck in the rubber band of the bunch of scapes I acquired at Whole Foods. I brought them home because I loved how they looked. Even if I didn’t cook them I could put them in a vase! The little paper from the rubber band said to steam, sauté or puree’ into a wonderfully mild garlic soup. Or chopped raw they are very hot and will spice up your baked potatoes, salads or dips. I decided to roast them. A few years ago I had planted garlic and amateur as I am as a gardener when the tops popped up looking somewhat similar to these…they were very curly actually…I didn’t do anything with them other than be amused when I visited the garden bed. The buds did open up, flower and go to seed.

A drizzle of olive oil, coarse sea salt and ground pepper. Roast in a 425° oven for roughly 25-30 minutes. These were so unique and delicious. I roasted them until the tops were crispy. We especially enjoyed the crunchy tops.
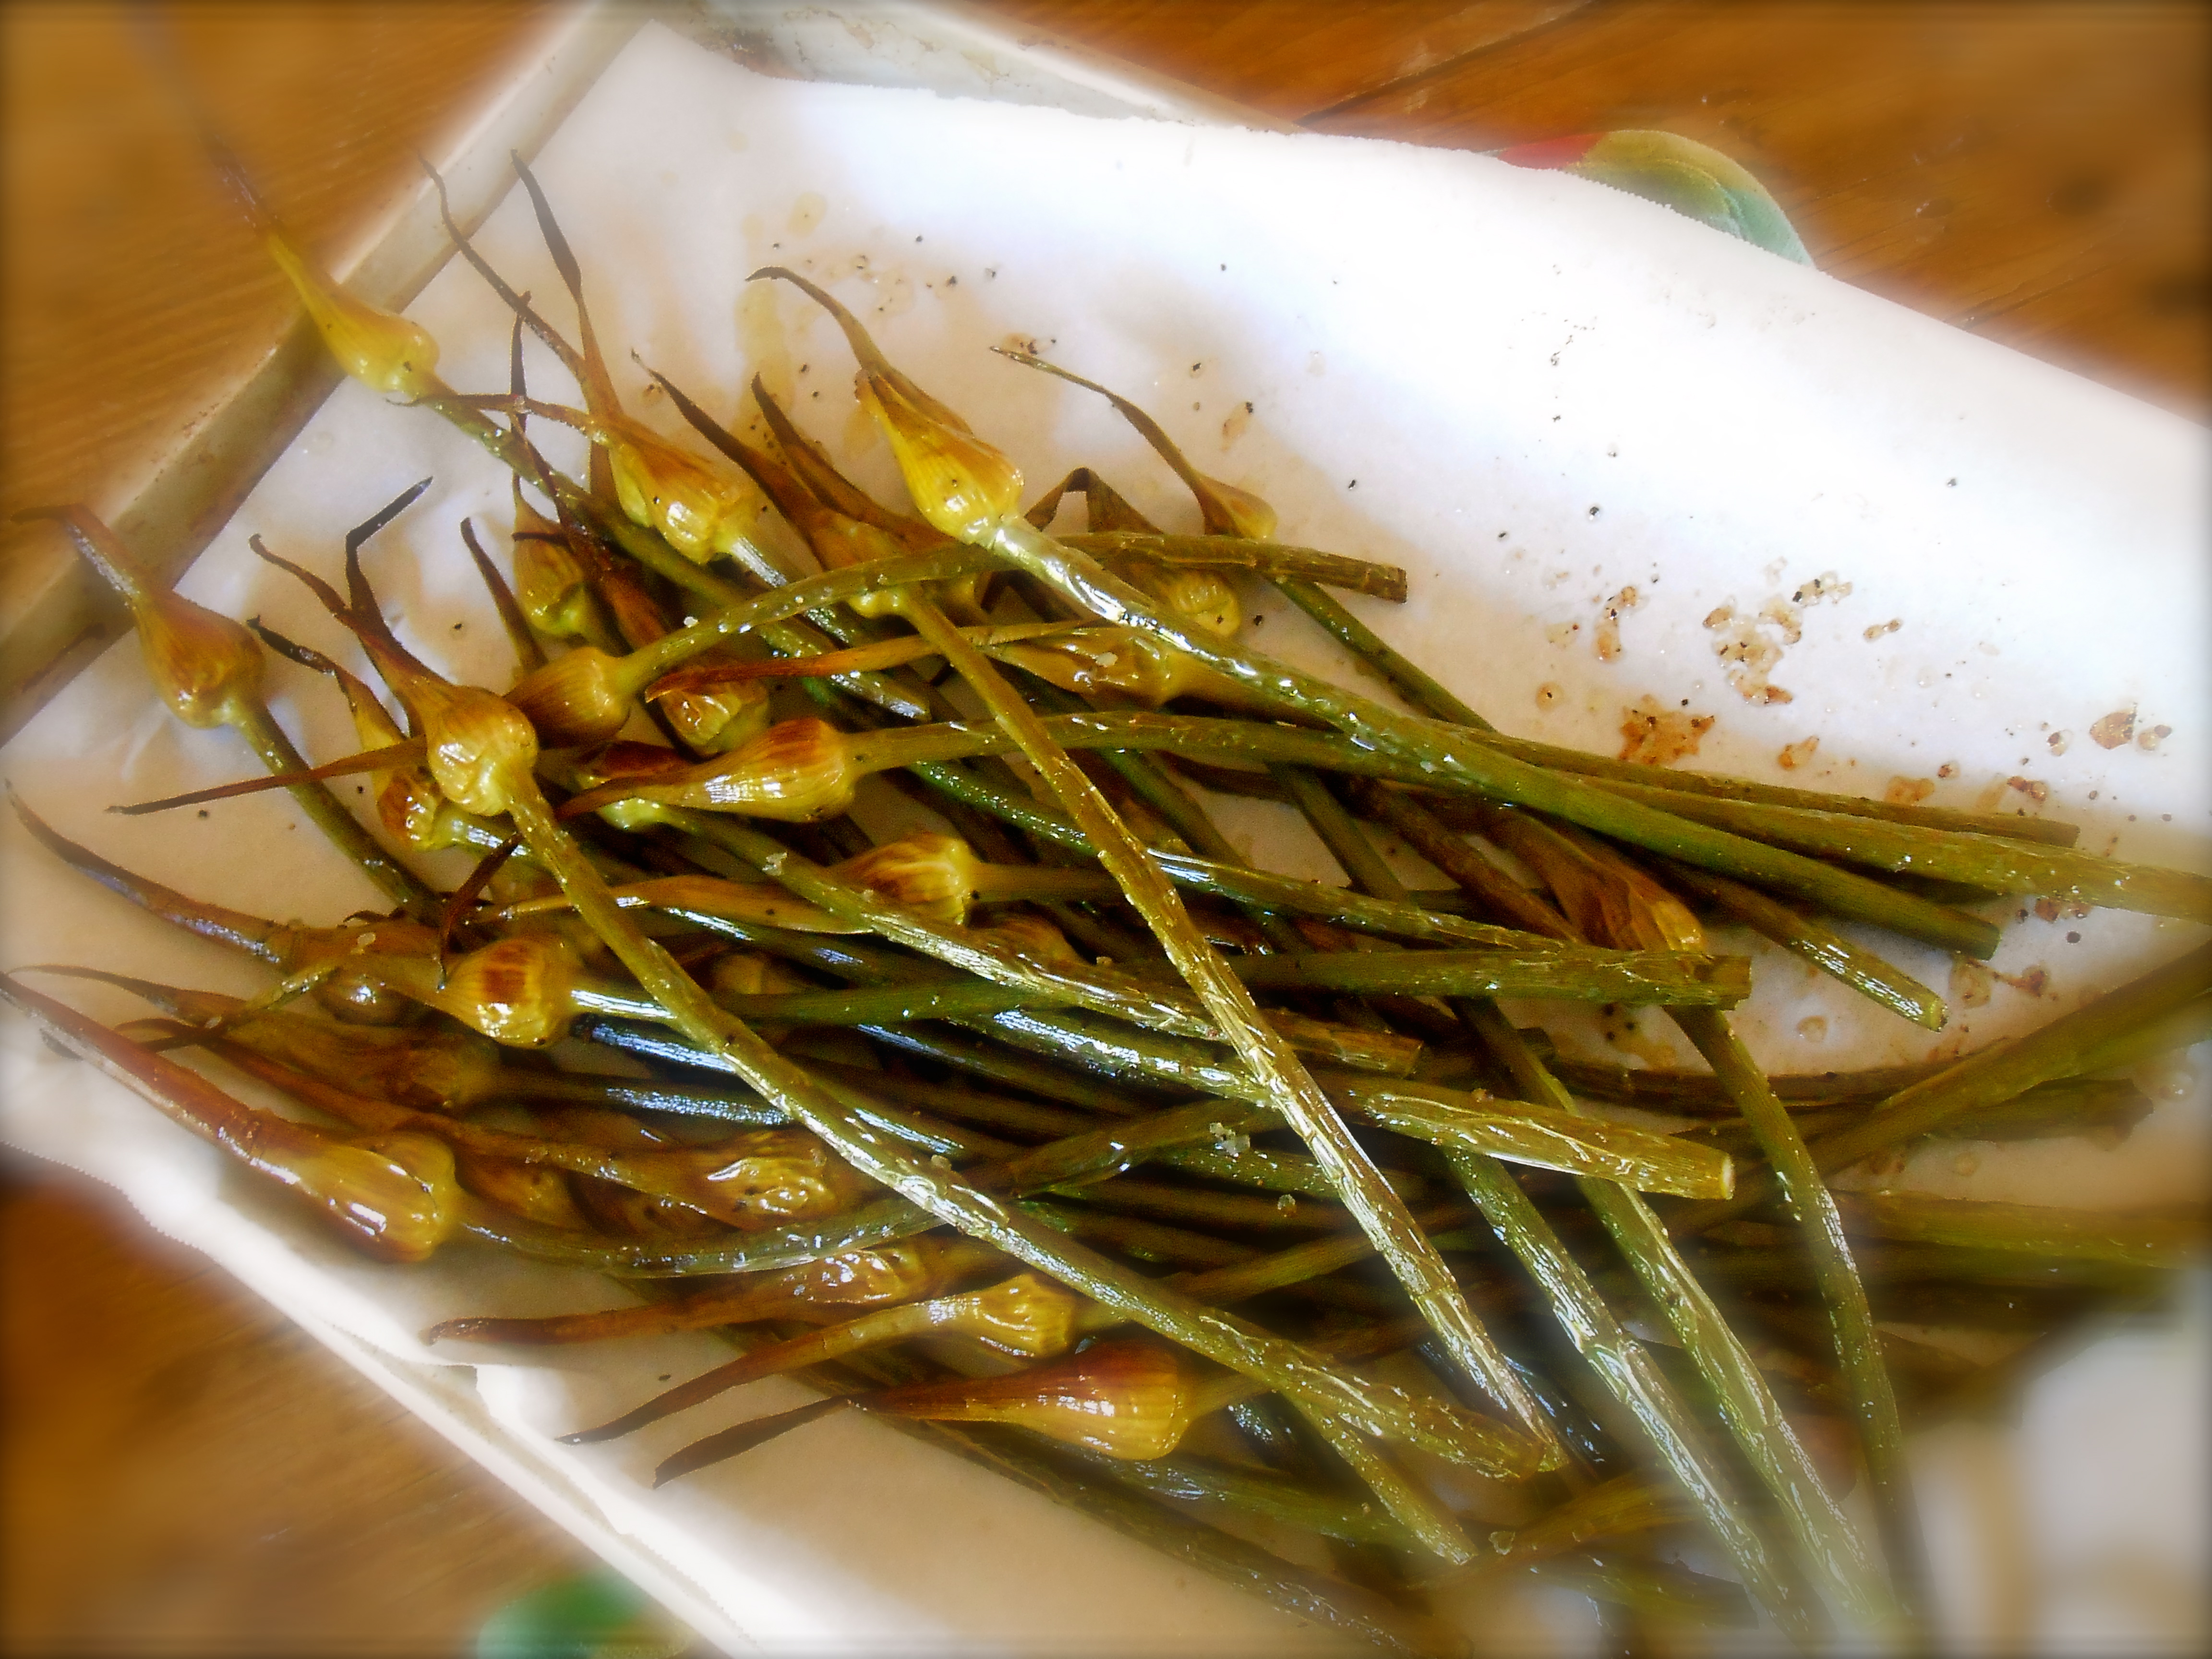
roasted garlic scapes
buon appetite.
