spring soup deux (potage aux primeurs)
April 3, 2013 § 7 Comments
I posted a spring soup a few weeks ago. Here is a second spring soup choice.

I stumbled across the most beautiful site today. Manger. All I could think was, stunning, charming, romantic, gorgeous. A recipe for a spring soup (potage aux primeurs) caught my eye and I knew right then I had to make it…tonight. I decided I wanted to experience the soup exactly how she created it. I would not go astray from her recipe. I went to the market and gathered all the ingredients. Sadly, fresh fava beans were not available, so, I had to omit them. Unswerving, I drove home looking forward to preparing what I thought will be a perfect soup with fresh, in season vegetables.
This soup and the spring soup I featured a few weeks ago are very similar. Particularly adding the whisked egg, to thicken, at the end. I thought the Manger soup was easier to put together and I especially loved the turnips. Turnip are so much lighter than potatoes. This soup brought such contentment. Very clean and fresh. This perfect soup is sincerely flawless.
I did add one ingredient. Fresh pea sprouts. I had them on hand from the other night and it was quite nice.
Thank you Manger for your recipe.

Ingredients:
- 2 leeks, white part only, cut in julienne strips
- 1 cup green peas (preferably fresh peas, but frozen are fine too)
- 1 cup fava beans (shelled)
- 1 large carrot, cut in julienne strips
- 2 turnips, diced finely
- 2 quarts chicken or vegetable stock
- A handful of celery leaves, chopped
- A handful of parsley, chopped (to be sprinkled on soup when served)
- Salt and black pepper, for seasoning
- 4 egg yolks
Croutons
- Half a stale baguette/ small country bread
- Olive oil
- Salt
- 1 garlic clove
Slice stale bread into small cubes. Place in a bowl, add the ground garlic, salt and drizzle with olive oil. Mix well. Place on a baking tray (lined with parchment paper) and place in pre-heated 350° oven.
For the soup
Wash all vegetables, slice and chop according to ingredients list. In a large pot, bring the stock to a boil and add all the vegetables. Turn the heat down and leave to simmer for 15 minutes, or until the vegetables are tender.
Whisk egg yolks in a small bowl, add a few tablespoons of the soup to blend. Take soup off the heat and add the egg yolks, making sure to whisk continuously to avoid any egg curdling.
Spoon soup into bowls, season with salt and pepper to your taste, sprinkle a few parsley leaves and croutons. Serve immediately.

Serves 4
buon appetite.
this potato soup will hug you…be comforted.
April 2, 2013 § 1 Comment
I thought twice about posting a potato soup today. I mean, after all…it is spring. Well, it is cloudy. It is 50° outside. I decided to post it anyway.

I am fond of tradition. And I love family recipes. So, years ago I called my mom-in-law and asked her what my guy’s favorite birthday dinner was when he was growing up. She said he always asked for potato soup. She dug around and found the recipe and here it is! It is nice to top it off with some crispy bacon and chives. I topped this particular one with crispy sage leaves. (Heat some olive oil in a non-stick skillet and cook whole sages leaves on both sides, using tongs to turn, until crispy. Salt them a little.)
What you will need for this dish:
- 4 russet potatoes
- 1 onion, any color
- little olive oil
- 3 celery stocks
- cube of butter
- 1/2 cup flour
- powered mustard
- 2 cups milk
- steak sauce (like A-1)
- 6 oz. cheddar cheese
- salt / pepper
- small handful of parsley
- crispy bacon…optional
- chives…optional
- sage leaves….optional
grandma’s potato soup
- 3 tablespoons olive oil
- 1 onion, any color, diced
- 1/2 cup celery, diced
- 4 russet potatoes, peeled and diced
- 4 cups boiling water
- 1/2 cup butter, melted
- 1/2 cup flour
- 1 teaspoon powdered mustard
- 2 cups milk
- 3 tablespoons steak sauce
- 6 oz. cheddar cheese, shredded
- small handful of parsley, chopped fine
- salt / pepper
In a large pot heat the olive oil over med high heat and cook the onions and celery until softened. Add the potatoes and mix together coating the potatoes well. Season with salt and pepper. Continue cooking for 5 minutes. Add the boiling water, increase to high heat and bring back to a boil. Lower heat to a slow boil and continue to cook 15 minutes until potatoes are tender.
Meanwhile, melt the butter in a sauce pan. Whisk in the flour until smooth and thick. Stir in the mustard and add the milk continuing to whisk until a smooth sauce forms. Stir in the steak sauce.
When potatoes are tender pour the buttery sauce into the soup pot and stir well. Add cheddar cheese and parsley, stir until cheese is melted. Serve topped with your choice of crispy bacon, chives or crispy sage leaves. (or all three!)
Generously serves 4.
buon appetite!
watercress and radicchio salad
March 31, 2013 § 8 Comments
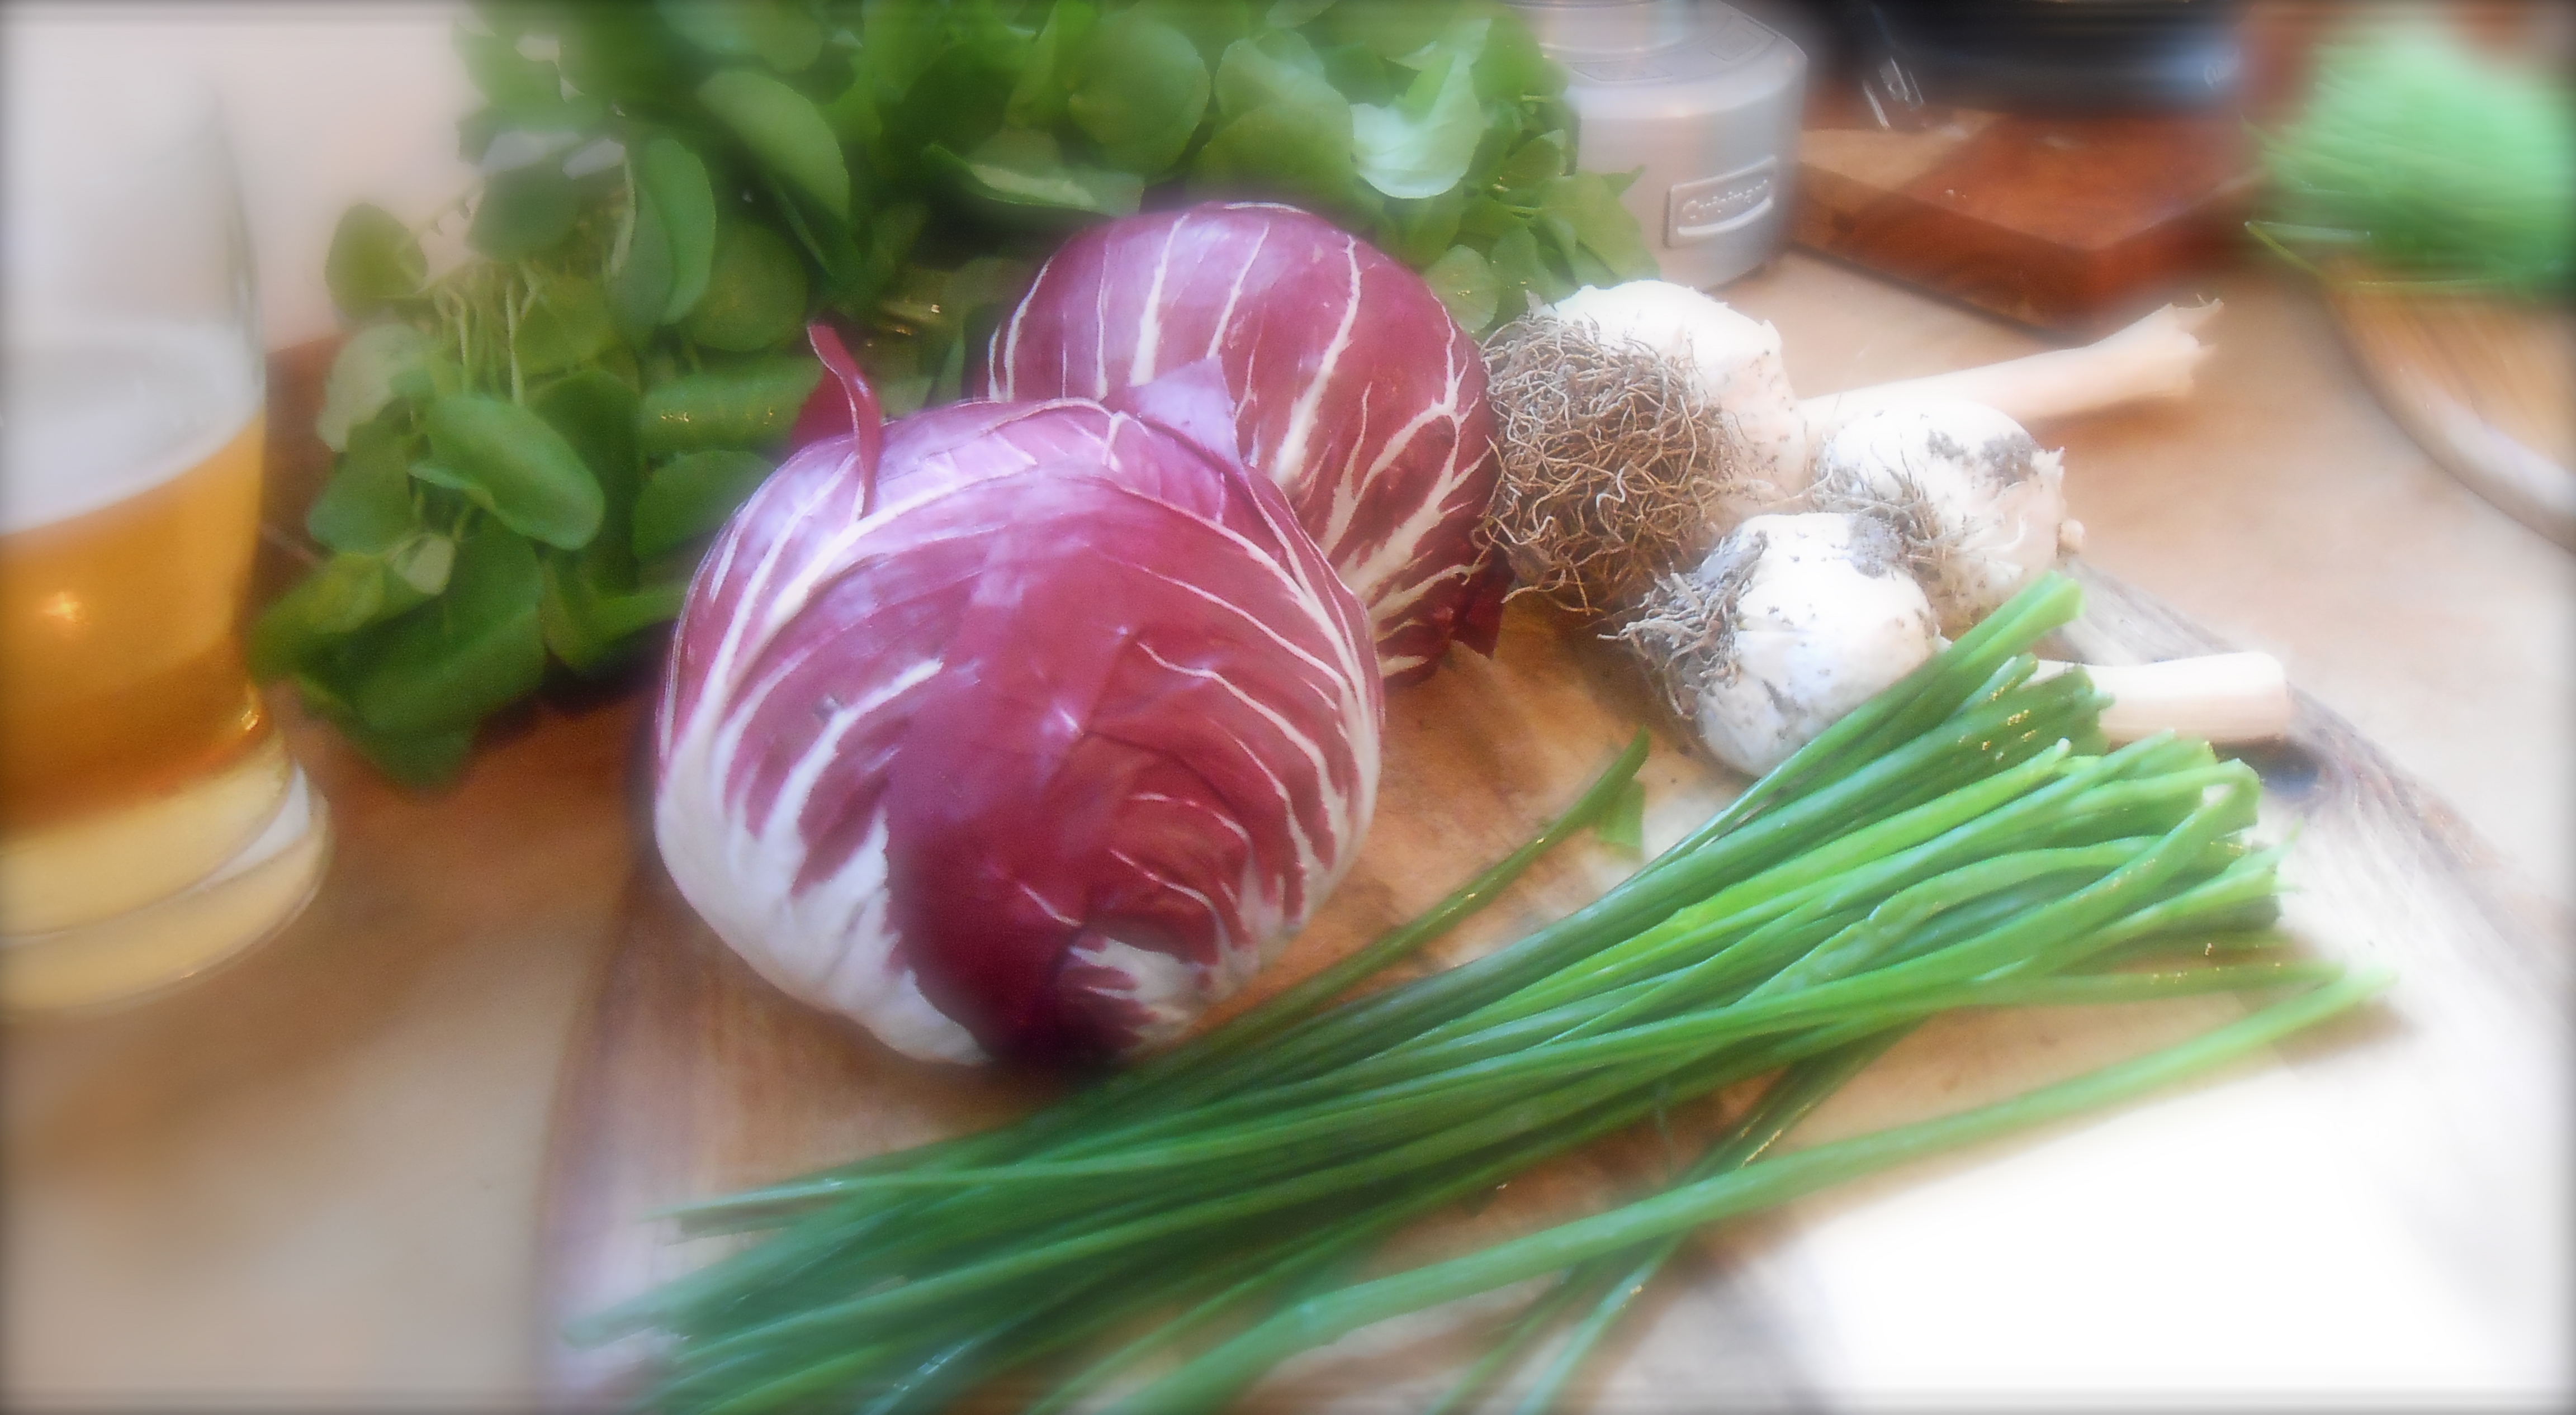
This colorful salad is a delight to put on the table. I love the slight bitterness of the radicchio and using a crushed garlic clove in the dressing, then removing it upon serving is a nice way of giving a subtle garlic flavor without overwhelming. Sometimes I plan my meals taking color into consideration. I always make sure our plates have plenty of green. And then sometimes I even think to add red, purple, yellow and orange! It’s a fun way to arrange the plate and perhaps put something on the table you wouldn’t normally serve at dinnertime. Like, a bowl of strawberries along side grilled carrots and asparagus. Or roasted beets along side peeled mandarins and steamed green beans.
- 1/3 cup olive oil
- 2 tablespoons red wine vinegar
- 1 tablespoon flat leaf parsley, chopped finely
- 1/2 teaspoon dijon mustard
- 1 garlic clove, crushed
- 2 bunches watercress, trimmed, washed and spun dry
- 2 small heads of radicchio, shredded washed and spun dry
- bunch of chives, chopped
- freshly shaved parmesan
- salt and pepper
In a small bowl whisk together the olive oil, vinegar, mustard, parsley and garlic. Remove the whole crushed garlic and toss the watercress, radicchio, chives and dressing in a large salad bowl until well coated. Top with shaved parmesan and serve.
Serves 4
buon appetite
croutons…for soups and salads!
March 30, 2013 § 2 Comments
The young man of the house is running track right now. His already sizable appetite has increased and trying to work out the weeks “school lunch” options creates a head scratcher. With that in mind, we buy a nice crusty loaf of rustic bread for his sandwiches. We are very fortunate to have some astounding commercial bread bakers in Seattle. And since we never seem to finish the full loaf by the end of the week I freeze what is left to use later. I grind it for recipes calling for fine breadcrumbs, dip it in milky eggs for french toast and make croutons for soups and salads. I love these croutons because they have a crispy edge while still a bit chewy on the inside. I use whatever fresh herbs I have on hand. Since I have thyme, rosemary and oregano growing in my yard I normally use all three. I always make extra because they seem to disappear out of the skillet before they make it to the salad bowl!

What you will need
- 4 slices of firm, good rustic bread
- 1/3 cup olive oil
- 3 tablespoons of fresh herbs finely chopped
- 4 garlic cloves, finely chopped
- salt
Stack your bread and slice into bite size, irregular shaped cubes. Heat olive oil in a large skillet over medium high heat. Cook garlic and herbs together until fragrant, making sure not to brown your garlic. Add the bread to the skillet and coat well with oil and herbs. If your bread seems dry after soaking up the oil you may need to add a little more. Continue cooking on medium heat, moving around with a spatula, until bread is toasted and browned. Salt to taste. Remove from heat and cool prior to tossing with salad.
Try your croutons with this…
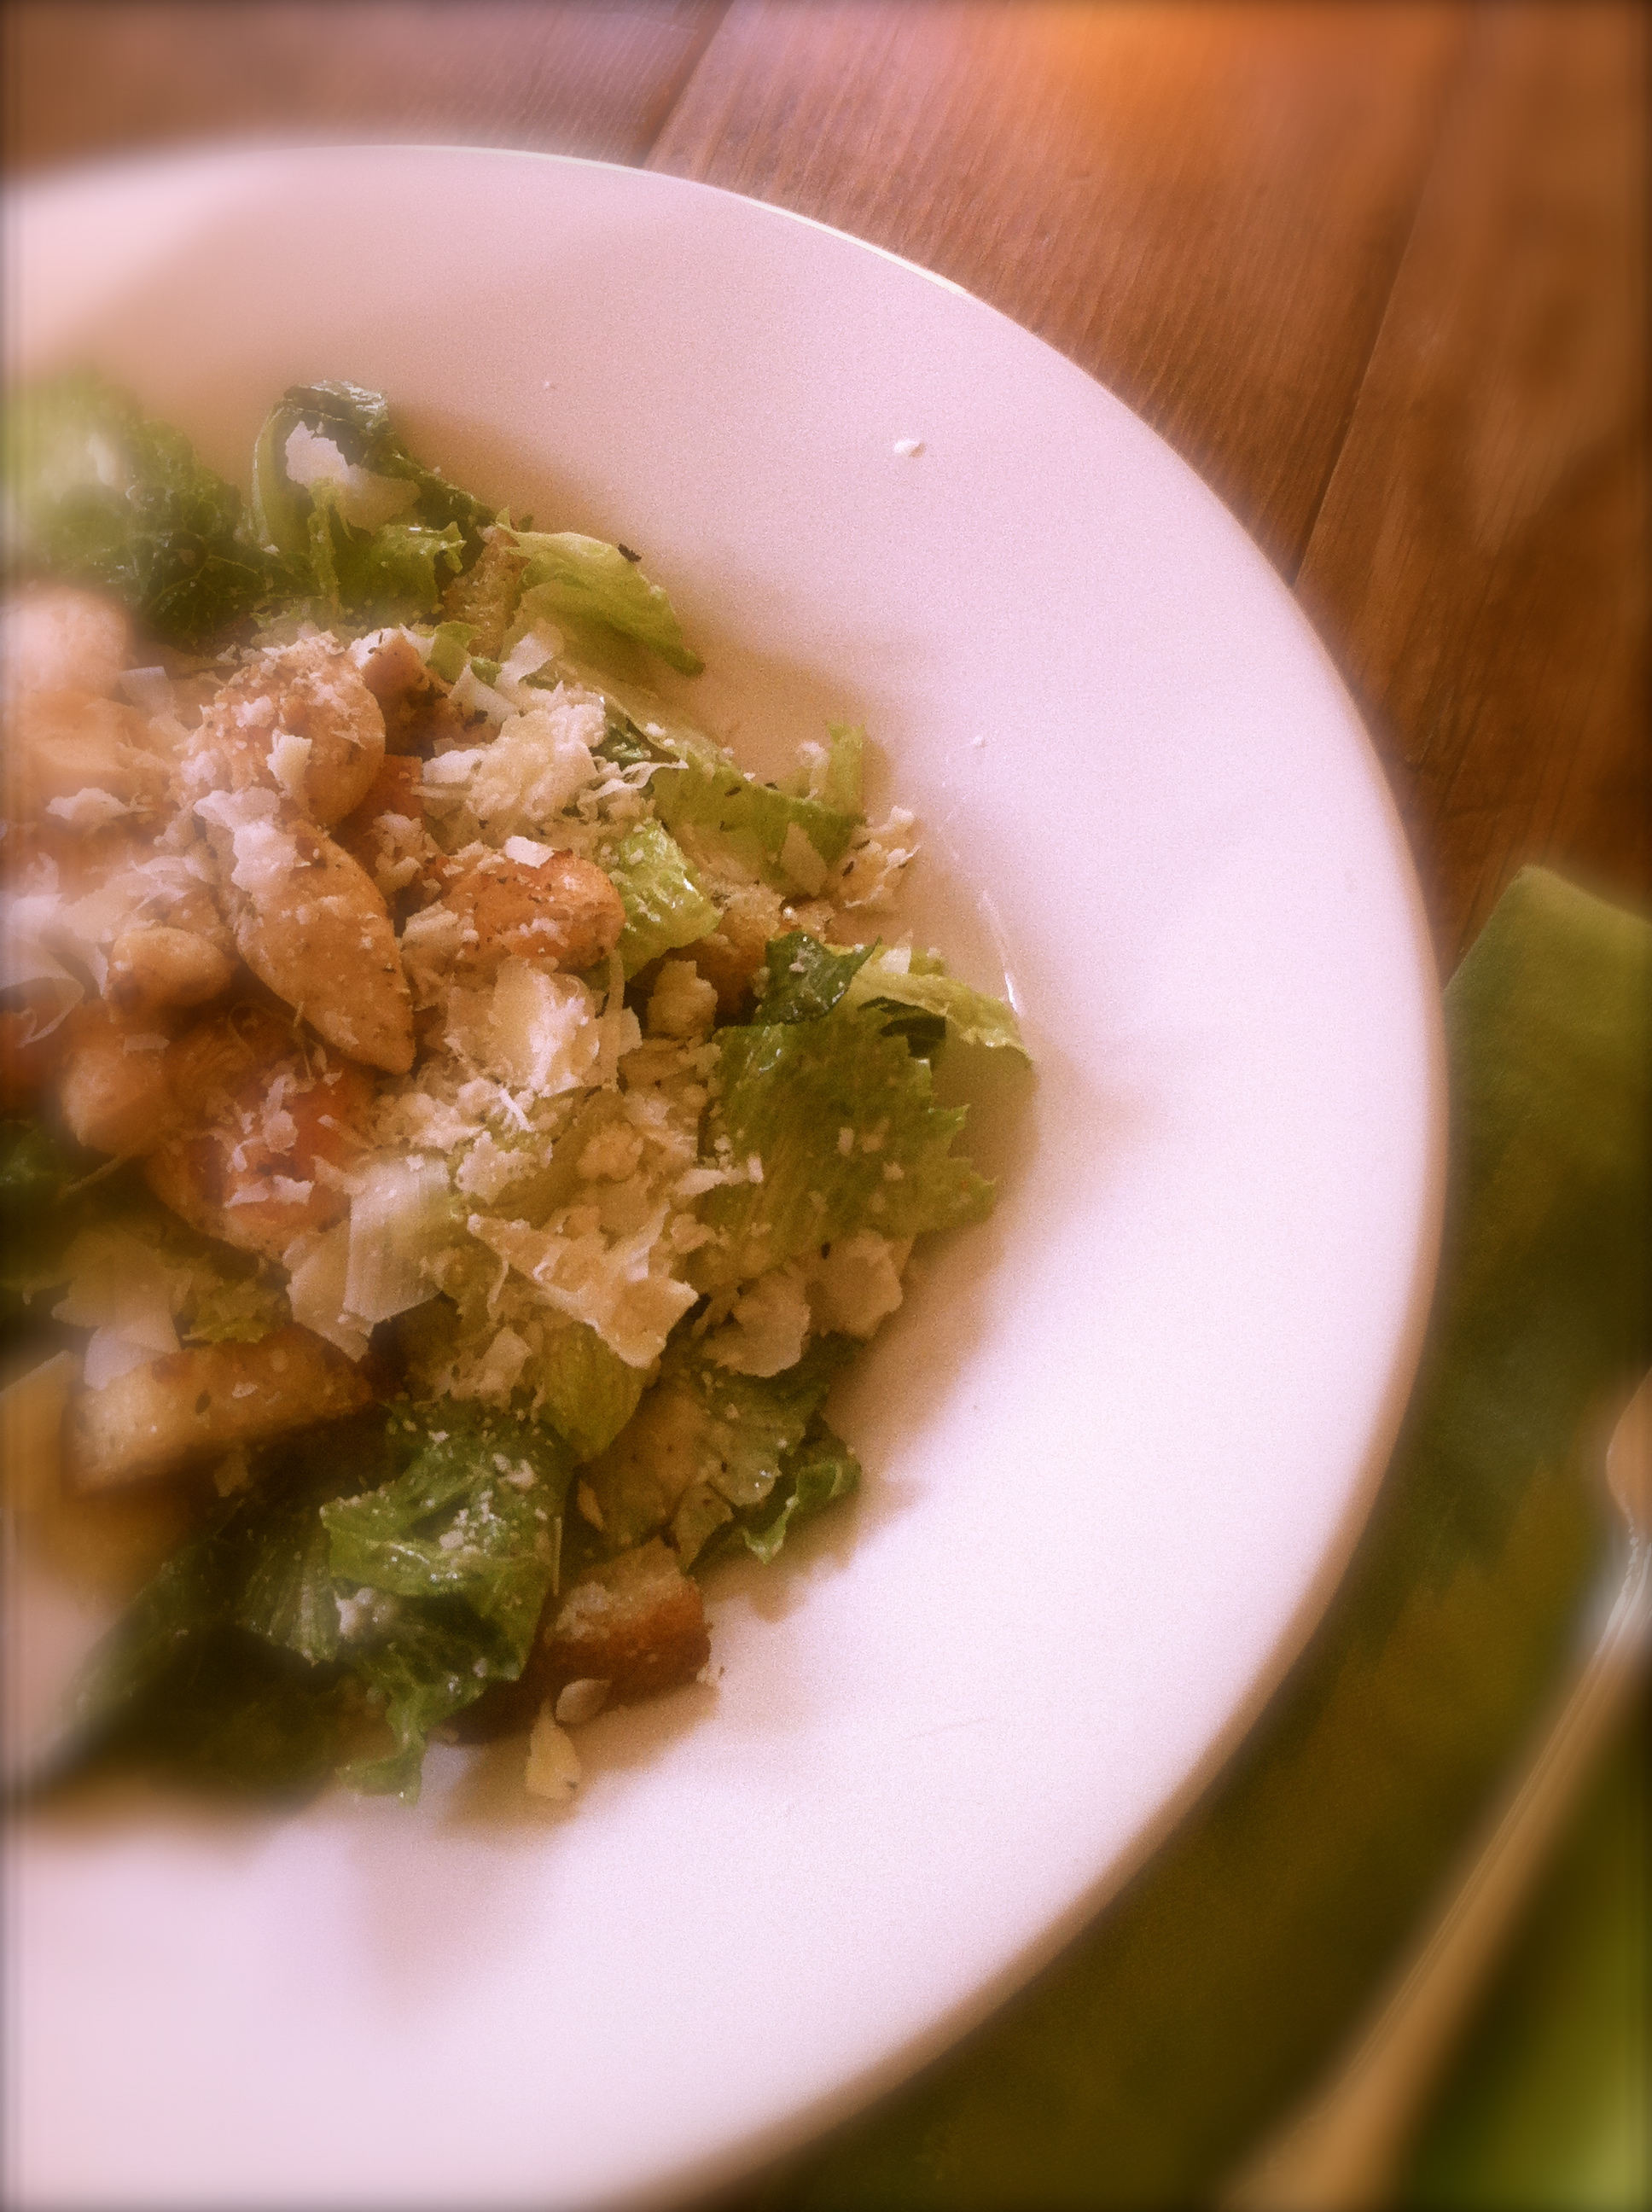
caesar salad
This is a very simple caesar salad. This recipe omits the anchovies. However, if you prefer, use two anchovies and smash them into the dressing to create a paste like consistency. I realize some take issue with using raw eggs. If you would prefer not to use the raw yolk I have read a substitution of 1 tablespoon of mayonnaise will work fine.
What you will need:
- 1 head romaine, cleaned and cut into bite size pieces
- 2 garlic cloves, minced
- 1 egg yolk
- 1/2 teaspoon salt
- 1 teaspoon coarsely ground black pepper
- 1 teaspoon Dijon mustard
- 2 tablespoons fresh squeezed lemon juice
- 1 teaspoon Worcestershire sauce
- 1/2 cup olive oil
- 1 cup freshly grated parmesan
Slice one clove of garlic in half, completely rub the inside of your wooden salad bowl with the garlic halves. Place the garlic, salt (and anchovies, if using) in the bowl and mash into a paste. Whisk in the remaining ingredients.
Add the romaine, croutons and 1/2 of the parmesan cheese to the bowl and toss well. Serve right away topped with additional freshly grated parmesan.
Serves 4
buon appetite!
sushi, at home
March 23, 2013 § 5 Comments

We love to go out for sushi. We actually enjoy a nice sushi meal at least four times a month. Lately we have been talking about trying to prepare sushi at home. I am not talking about sushi rolls. I am talking about nigiri. A raw piece of fish on top of an oblong brick of sticky white rice.
Yesterday I decided I would go to Uwajimaya, Seattle’s asian supermarket and pick up some sushi grade salmon. What I learned, you don’t just purchase fresh salmon for raw consumption. The salmon must be frozen first for a period of time to sufficiently kill any potential parasites. They had a plentiful supply of sushi grade fish available. I bought Atlantic salmon and “tako”, which is octopus. The octopus had been already steamed and sliced.
While I was at Uwajimaya, I decided to gather the ingredients to make a Pho style soup. I looked up a recipe for vegetarian pho broth. My favorite “go to” food blog, thekitchn had a very simple recipe I knew I could prepare. I collected the few ingredients I needed and I was off and running. I also picked up dessert. I found some delicious tiny bite size cream puffs, filled with fresh dairy cream and vanilla!
Well, I am sure we will still go out for sushi, on occasion. However, I have to say, as a family, we had a blast preparing this meal together.
nigiri sushi
- 3/4 lb. thinly sliced, sushi-grade salmon
- 1/4 lb. thinly sliced, steamed octopus
- 1/2 cup pickled ginger
- 1 tablespoon prepared wasabi
sushi rice
- 3 cups short grain rice
- 4 cups water
- 1/2 cup rice vinegar
- 2 tablespoons sugar
- 2 teaspoons salt
sushi rice
Wash the rice under running water for 1-2 minutes until the water runs clear, washing the starch out. Place rice in a 2 quart pan. Add 4 cups water and bring to a boil over high heat. Boil 1 minute on medium heat. Stir once, cover pan and turn heat down to low. I have read you should only use a wooden spoon to stir your rice. A metal spoon will damage the rice. Simmer for 20 minutes.
While rice is cooking, in a small pot combine vinegar, sugar and salt. Heat, over medium until all solids become liquid.
When the rice is done, transfer to a bowl. Stir in your seasoned rice vinegar and allow to come to room temperature.
assemble
Using wet hands, we formed little oblong bricks of rice, placed a little spot of wasabi, then topped with a slice of fish. Serve with little dishes of soy sauce for dipping.

Next…
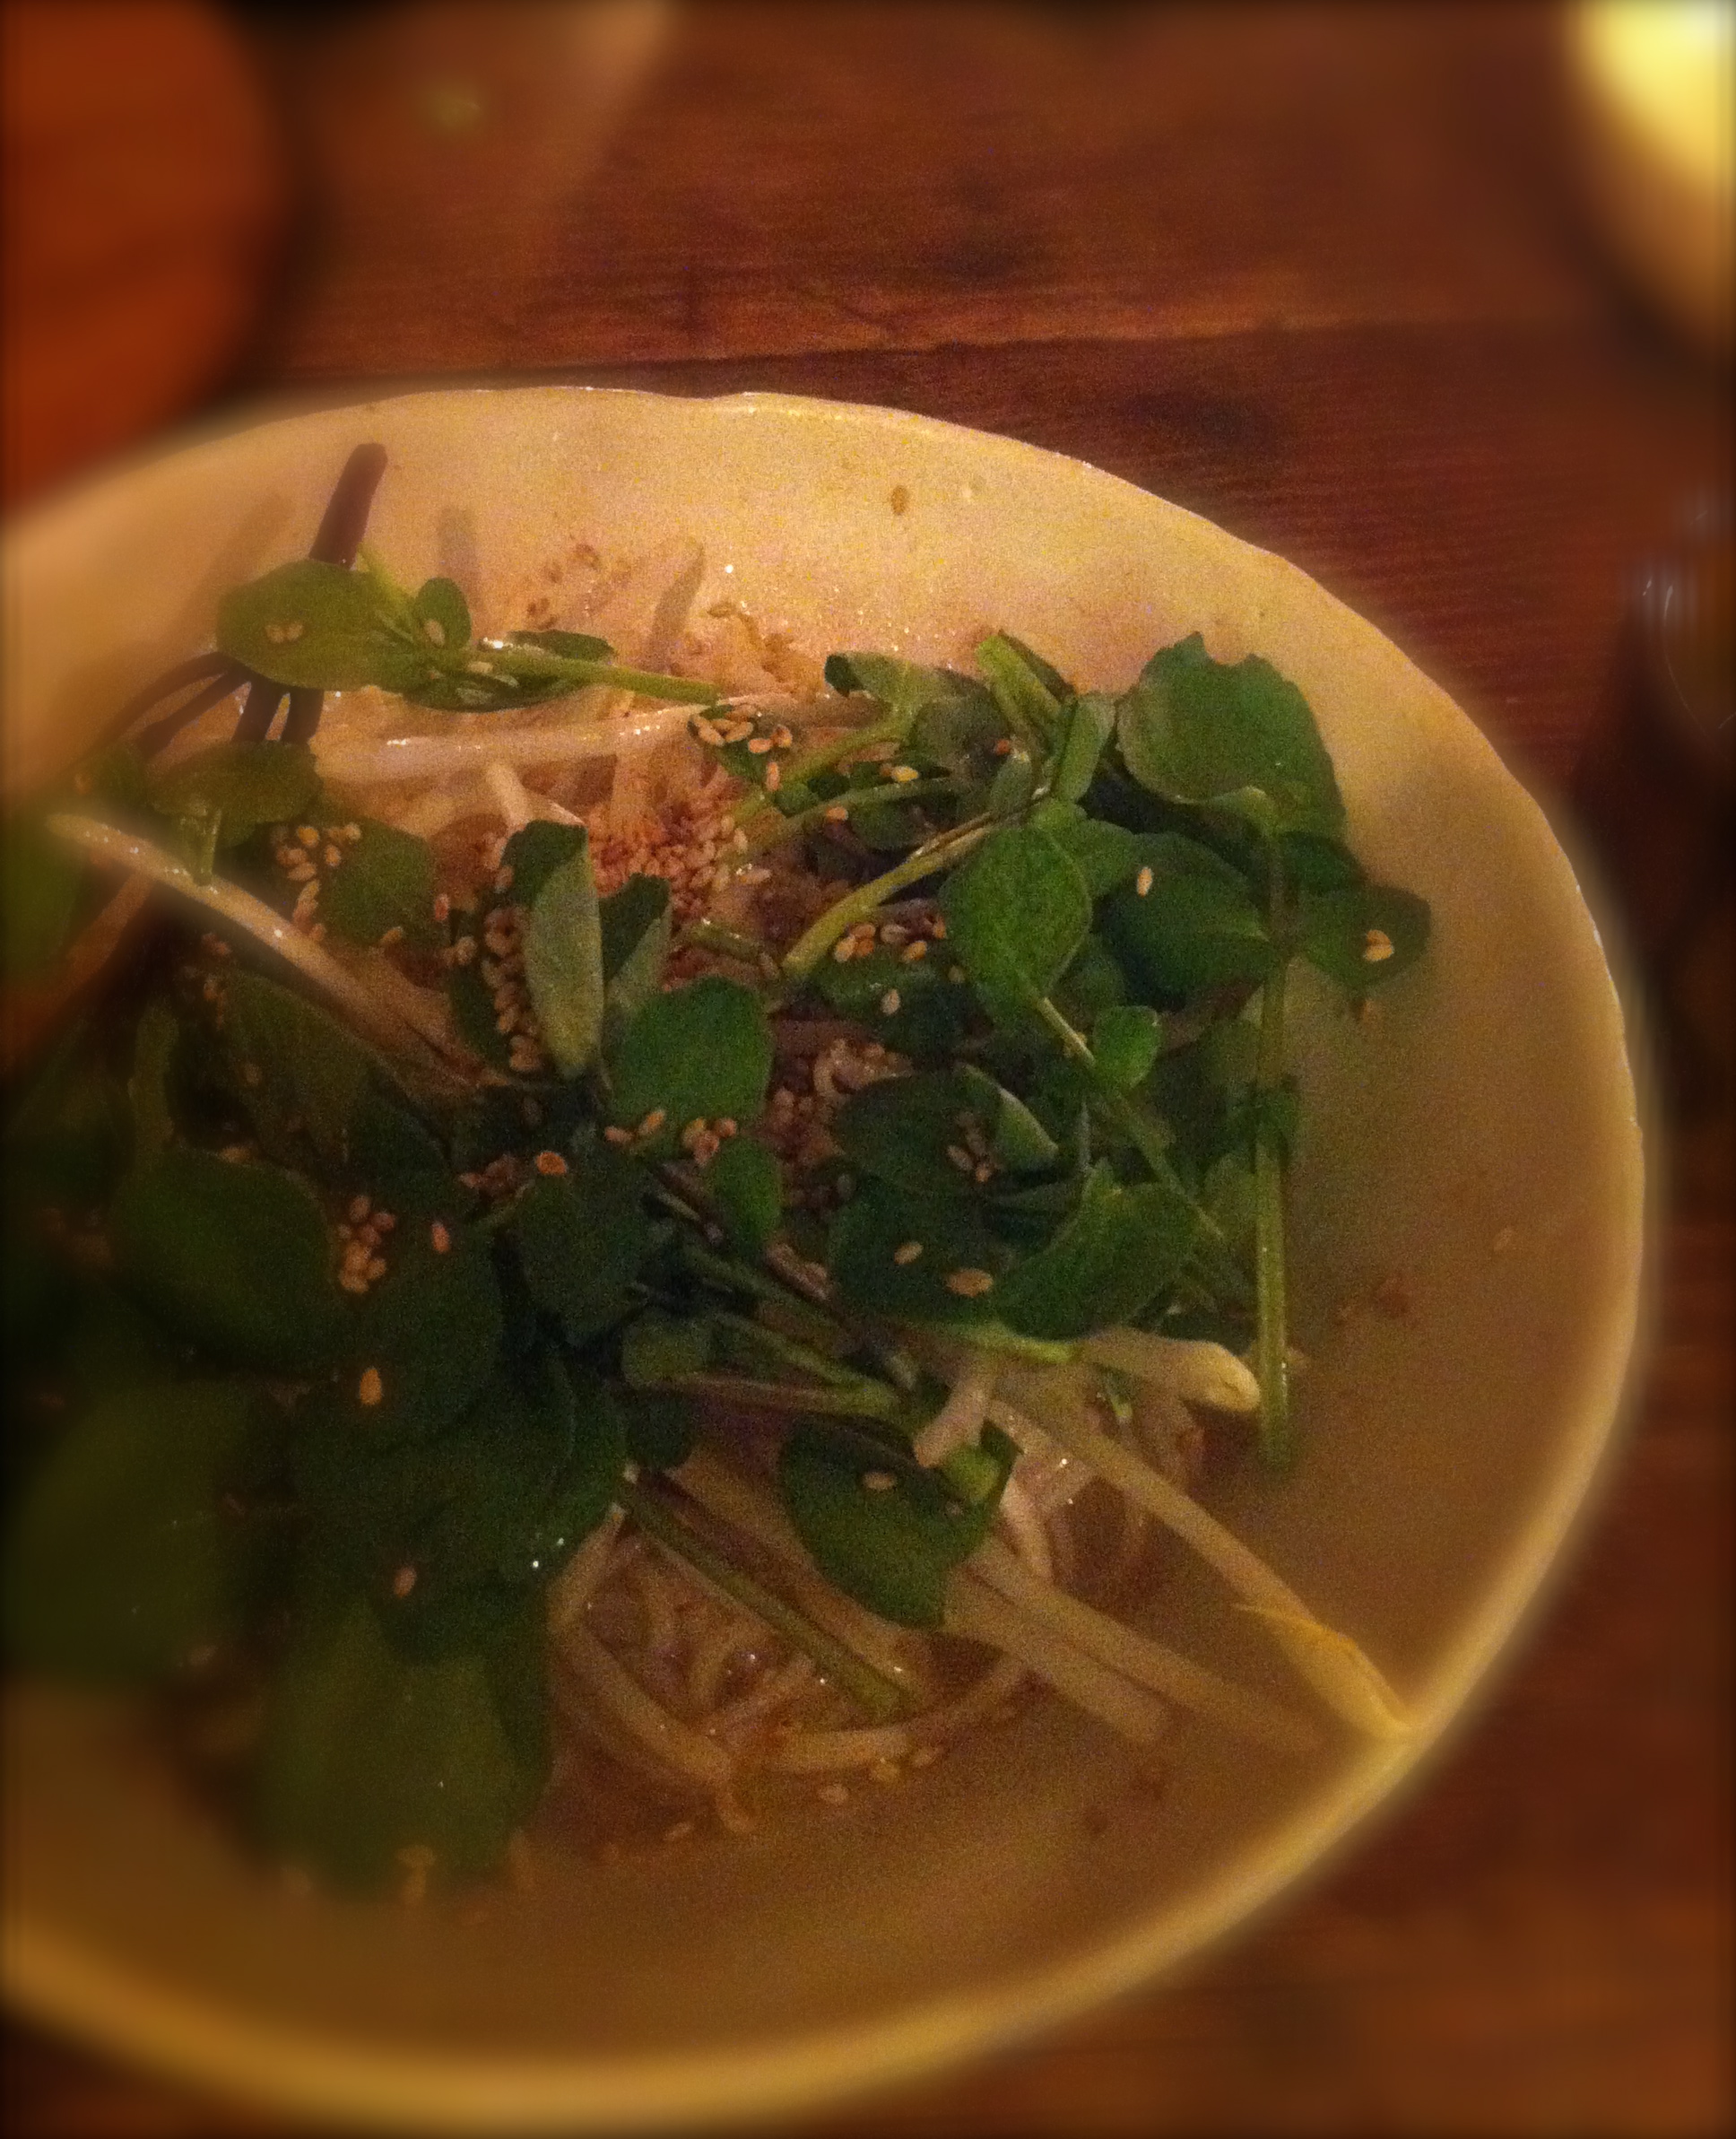
pho noodle soup
broth
- 1 large onion, peeled and halved
- 2 inch piece fresh ginger root, peeled and halved lengthwise
- 3 inch cinnamon stick
- 1 star anise
- 2 cloves
- 1 teaspoon coriander seeds
- 4 cups unsalted vegetable stock
- 2 teaspoons soy sauce
toppings
- handful of watercress, torn into small pieces
- a few sprigs of thai basil
- one cup of bean sprouts
- 1 lime, cut into wedges
- 2 tablespoons toasted sesame seeds
- 1/2 pound dry flat rice noodles
- (I realized I accidentally bought wheat soba noodles, used them anyway, it was still perfect)
- sriracha sauce (a thai-style hot sauce, typically made from sun-ripened chili peppers, vinegar, garlic, sugar and salt)
Since we were going to prepare sushi too, I prepared the broth a few hours before. I kept it on the stovetop, covered, and for the reason that it is vegetarian, without heat.
broth
Char the onion and ginger under a broiler until slightly blackened, about 5-7 minutes on each side. Rinse well with water.
In a large pot, dry roast cinnamon, star anise, cloves, and coriander over medium-low heat, stirring to prevent burning. When spices are aromatic, add vegetable stock, soy sauce, charred onion and ginger.
Bring broth to a boil, reduce heat, simmer, covered, for 30 minutes. Strain and keep aside until ready to serve.
toppings
While the broth is simmering, prepare and bring your toppings to the table.
noodles
Since I accidentally bought the soba wheat noodles, I boiled the noodle in the broth for a few minutes before serving. Otherwise, if you have rice noodles, place noodles in a large bowl and cover with hot water. Let stand for 20-30 minutes or until tender but still chewy. Drain.
to serve
Divide noodles between bowls, ladle about 2 cups of broth in each bowl. Serve, allowing diners to garnish their own bowls.
Oh, did I mention Sake?

Serves 4
buon appetite
cold spring day, hot spring soup
March 21, 2013 § 3 Comments
According to the calendar it is spring. However, you wouldn’t know it according to the weather. It has been very blustery and rainy here in Seattle. Still wearing the down coat.
I have a cookbook I have been in love with for six years. I use this book over and over again. I feel it is the cookbook my mom would have wrote for me. Although my mom’s cooking was very american, this book is very european. The recipes are very simple and the outcome is truly comforting.
Here is the book:

Apples for Jam by Tessa Kiros
Since spring is here our markets are full of beautiful green vegetables. Every imaginable leafy green, green scallions, english peas, snow peas, asparagus, the list goes on! I stroll around the vegetable area wanting to bag it all up and figure out what I am going to do with it once I get it home. I admit, I do shop like that often. But, today, I remembered a soup recipe from Apples for Jam. It seemed like it would be a perfect cold, blustery spring day meal. This was probably the sixth time I made this soup. It is so clean, nourishing and fresh. Before discovering this recipe, I never imagined putting lettuce in my soup! Oh, and here is a comment I heard at the dinner table tonight, “I have been waiting for this soup all my life! Whenever I have wanted vegetable soup, this is what I imagined!
Here it is,

green vegetable soup with egg and lemon
- 6 tablespoons olive oil
- 3 scallions, green and white parts, chopped
- a couple leafy celery stalks, chopped
- 4 small zucchini, cut into squares
- 2 medium potatoes, peeled and cut into squares
- 2/3 cup fresh shelled peas
- 1 1/2 cups shredded lettuce (romaine or butter)
- 1 1/2 cups watercress tips
- 6 cups water
- salt
- 2 1/3 cups shredded baby spinach leaves
- 2 eggs
- juice of one lemon
- grated parmesan cheese, to serve
Heat olive oil in large heavy stockpot. Gently sauté scallions and celery until soft, add zucchini, potatoes, peas, and half of the lettuce and watercress.

Add 6 cups water, salt well and bring to a boil. Lower the heat and simmer, covered for 30 minutes, making sure the potatoes are soft. Add the remaining lettuce and watercress and spinach and cook for a few more minutes.
Whisk the eggs in a bowl, add lemon juice and continue to whisk. Add a couple of ladlefuls of hot broth from the soup to the eggs to acclimatize them.
Remove the soup from heat and add the egg mixture to the soup. Continue to mix while putting the soup back on the lowest possible heat for just a few minutes, allowing the egg to cook without scrambling them. Taste for salt.
Serve warm with a generous sprinkling of parmesan cheese.

Serves 6
buon appetite
chicken enchiladas
March 19, 2013 § 4 Comments

My first job was working in the kitchen of a mexican restaurant my neighbor owned. It was a tiny little place call El Burro. The place was chockfull from the time the doors were unlocked until the closed sign was turned. The owner would spend all day making tamales and she was the person out front serving tables and collecting the cash. There were only two of us in the kitchen. The cook and me. I was the dishwasher! This was quite an experience for a 15 year old. Yes, I was only 15! It was a summer job. I got to the point where I would show up early just so I could watch and learn how to prepare the frijoles. Everything was made from scratch. I enjoyed watching him stuff the chile rellenos, roll the enchiladas and prep all the fresh sideline (my made up word) condiments. He prepared his own enchilada sauce. I loved it so much I could drink it! It had an orange hue to it. And for years I would always wonder how he made it. I have not tried to make my own enchilada sauce, however, I have found one pretty close to the one he made. It’s Hatch. I buy the medium spiced one. It is orange and it is delicious! At El Burro he placed shredded iceberg lettuce and a dollop of mashed avocado on the side of the plate. Knowing the nutritional value is higher in the darker lettuces, I usually avoid iceberg. Except when I make enchiladas. The flavor takes me back to when I was a kid. My mom made iceberg lettuce salads with thousand island dressing. Since we don’t use the whole head of iceberg with the enchiladas, a few days later, I end up making a salad with it and mixing up some 1000 island! For the tortillas, I have used both corn and flour. I think either one is good.
The ingredient list appears a little lengthy. It’s a very easy process once you get it all together.

What you will need for this dish:
- 2 chicken breasts
- little olive oil
- 1 onion any color, diced
- 4 cloves garlic, pressed
- 1/2 serrano pepper, chopped
- 1 tablespoon chili powder, or more to your liking
- 1 tablespoon cumin powder
- 1 teaspoon oregano
- 1 teaspoon smoked paprika
- 1/2 lime
- 4 oz. shredded cheese, cheddar/jack blend
- 1/4 brick of cotija cheese
- 1 -15 oz. can chopped black olives
- 1-15 oz. can enchilada sauce-Hatch!
- bunch scallions, chopped
- bunch cilantro, finely chopped
- sprinkling of salt / pepper
- 10-12 good quality corn or flour tortillas
- 2 avocados, smashed
- 1/2 head iceberg lettuce, shredded
- cup of sour cream or greek yogurt (optional)
For the chicken. Heat 2 tablespoons olive oil in a non-stick skillet over med-high heat. Add the chicken breast. Fully cook and brown the chicken great 5-7 minutes each side. Remove chicken to a cutting surface, let cool. Keep the olive oil/chicken bits concoction in the skillet.
While the chicken is cooking…
If you have one, use a food processor and chop the onion, garlic and serrano all together. Otherwise, dice, press and chop them. Using the same skillet the chicken was cooked in, cook onion mixture over medium high heat. Cook for 5 minutes until aromatic. Turn heat down to low.
Meanwhile, chop the chicken into small broken bits. Add chicken to the skillet, turn up heat to med high and mix well with the onions. Add chili, cumin, oregano, and smoked paprika. Mix and coat well. Squeeze the juice from 1/2 lime on top, mix in well. Salt and pepper to taste. Sometimes I end up adding more spices. Especially chili powder after tasting. Turn off heat.
For the tortillas. Warm another non stick skillet on medium low heat. Heat each individual tortilla until warm and soft. Keep them on the side in a kitchen cloth. For a quicker, easier heating method, place your tortillas in enough foil to completely cover, sprinkle a few water droplets on top and place in 350° oven for 10 minutes. Water droplets keep tortillas moist.
Bring your shredded cheese, chopped olives, chopped scallions and cilantro to your work area.
Rolling your enchiladas. Using one tortilla at a time, layer two large tablespoons chicken, sprinkle cheese, olives, cilantro and scallions on top and roll. Place the rolled enchilada, open side down, onto a 9 x 12 baking dish. Continue the process until you have 8-10 enchiladas packed in tight. Pour enchilada sauce over the top drenching them all. Top with the left over olives, cilantro, scallions and a sprinkling of Cotijta cheese. Cover with foil, bake 30 minutes in a 350° oven.
Uncover and let cool for 10 minutes. Serve with shredded lettuce, spoonful of smashed avocado and a dollop of sour cream or greek yogurt.
Serves 4 generously
buen apetito
peas and pancetta
March 18, 2013 § Leave a comment
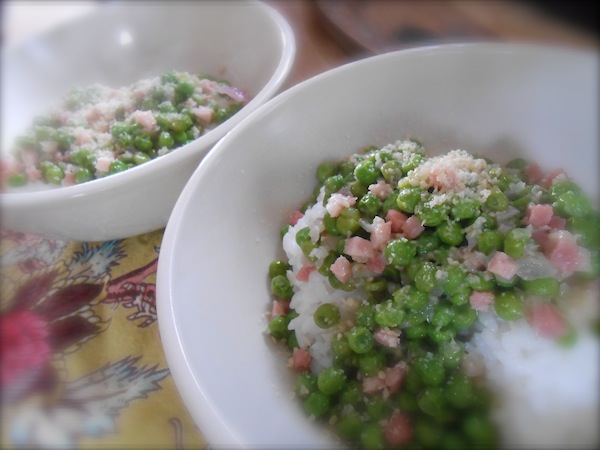
Served on rice with a sprinkling of parmesan.
Years ago I had a friend who spent a few years in Italy. She fell in love, married an Italian man and they moved to America. They ended up in my home town. We began sharing weekly meals together over the course of a year or so. It was as though I was in cooking school! She always made sure to include me while she was cooking. Whether it was chopping, grating or stirring, I felt “involved”. Sadly, she moved away. She found her dream job working for a winery in the Alexander Valley area of Northern California, catering their special events. What I wouldn’t do at the time to follow her!
This peas and pancetta recipe came from one evening cooking with her. I have changed it a little. She actually used ham. I think it was because the town we lived in didn’t have a market for good quality proscuitto or pancetta. Bacon is another good substitution. I think if I was to use bacon I would cook it crispy before adding it to the peas. This is a very italian style pea recipe. They become thick and creamy after simmering for a good 15 minutes. Delicious served on rice. That is how we had it for dinner tonight. With a generous sprinkling of parmesan.
- 3 Tbsp. unsalted butter
- 1/2 red onion, chopped
- 3 large garlic cloves, chopped
- 1 lb. fresh or frozen peas
- Salt/Pepper to taste
- About 4 oz. pancetta, proscuitto or 4 slices of crispy cooked bacon
Melt about half of the butter in a large skillet over medium heat. Add the onion and garlic, and cook slowly until it is softened and aromatic. Add the peas, stir to combine, and then add the remaining butter. Cook, stirring occasionally, until the peas are tender and sweet, about 15 minutes. Add your choice of cured meat and stir to mix. Then turn off the heat, cover the skillet, and allow to sit for 5 minutes. Taste, and season as needed.
Serves 4
buon appetite!
simple arugula salad
March 17, 2013 § 3 Comments
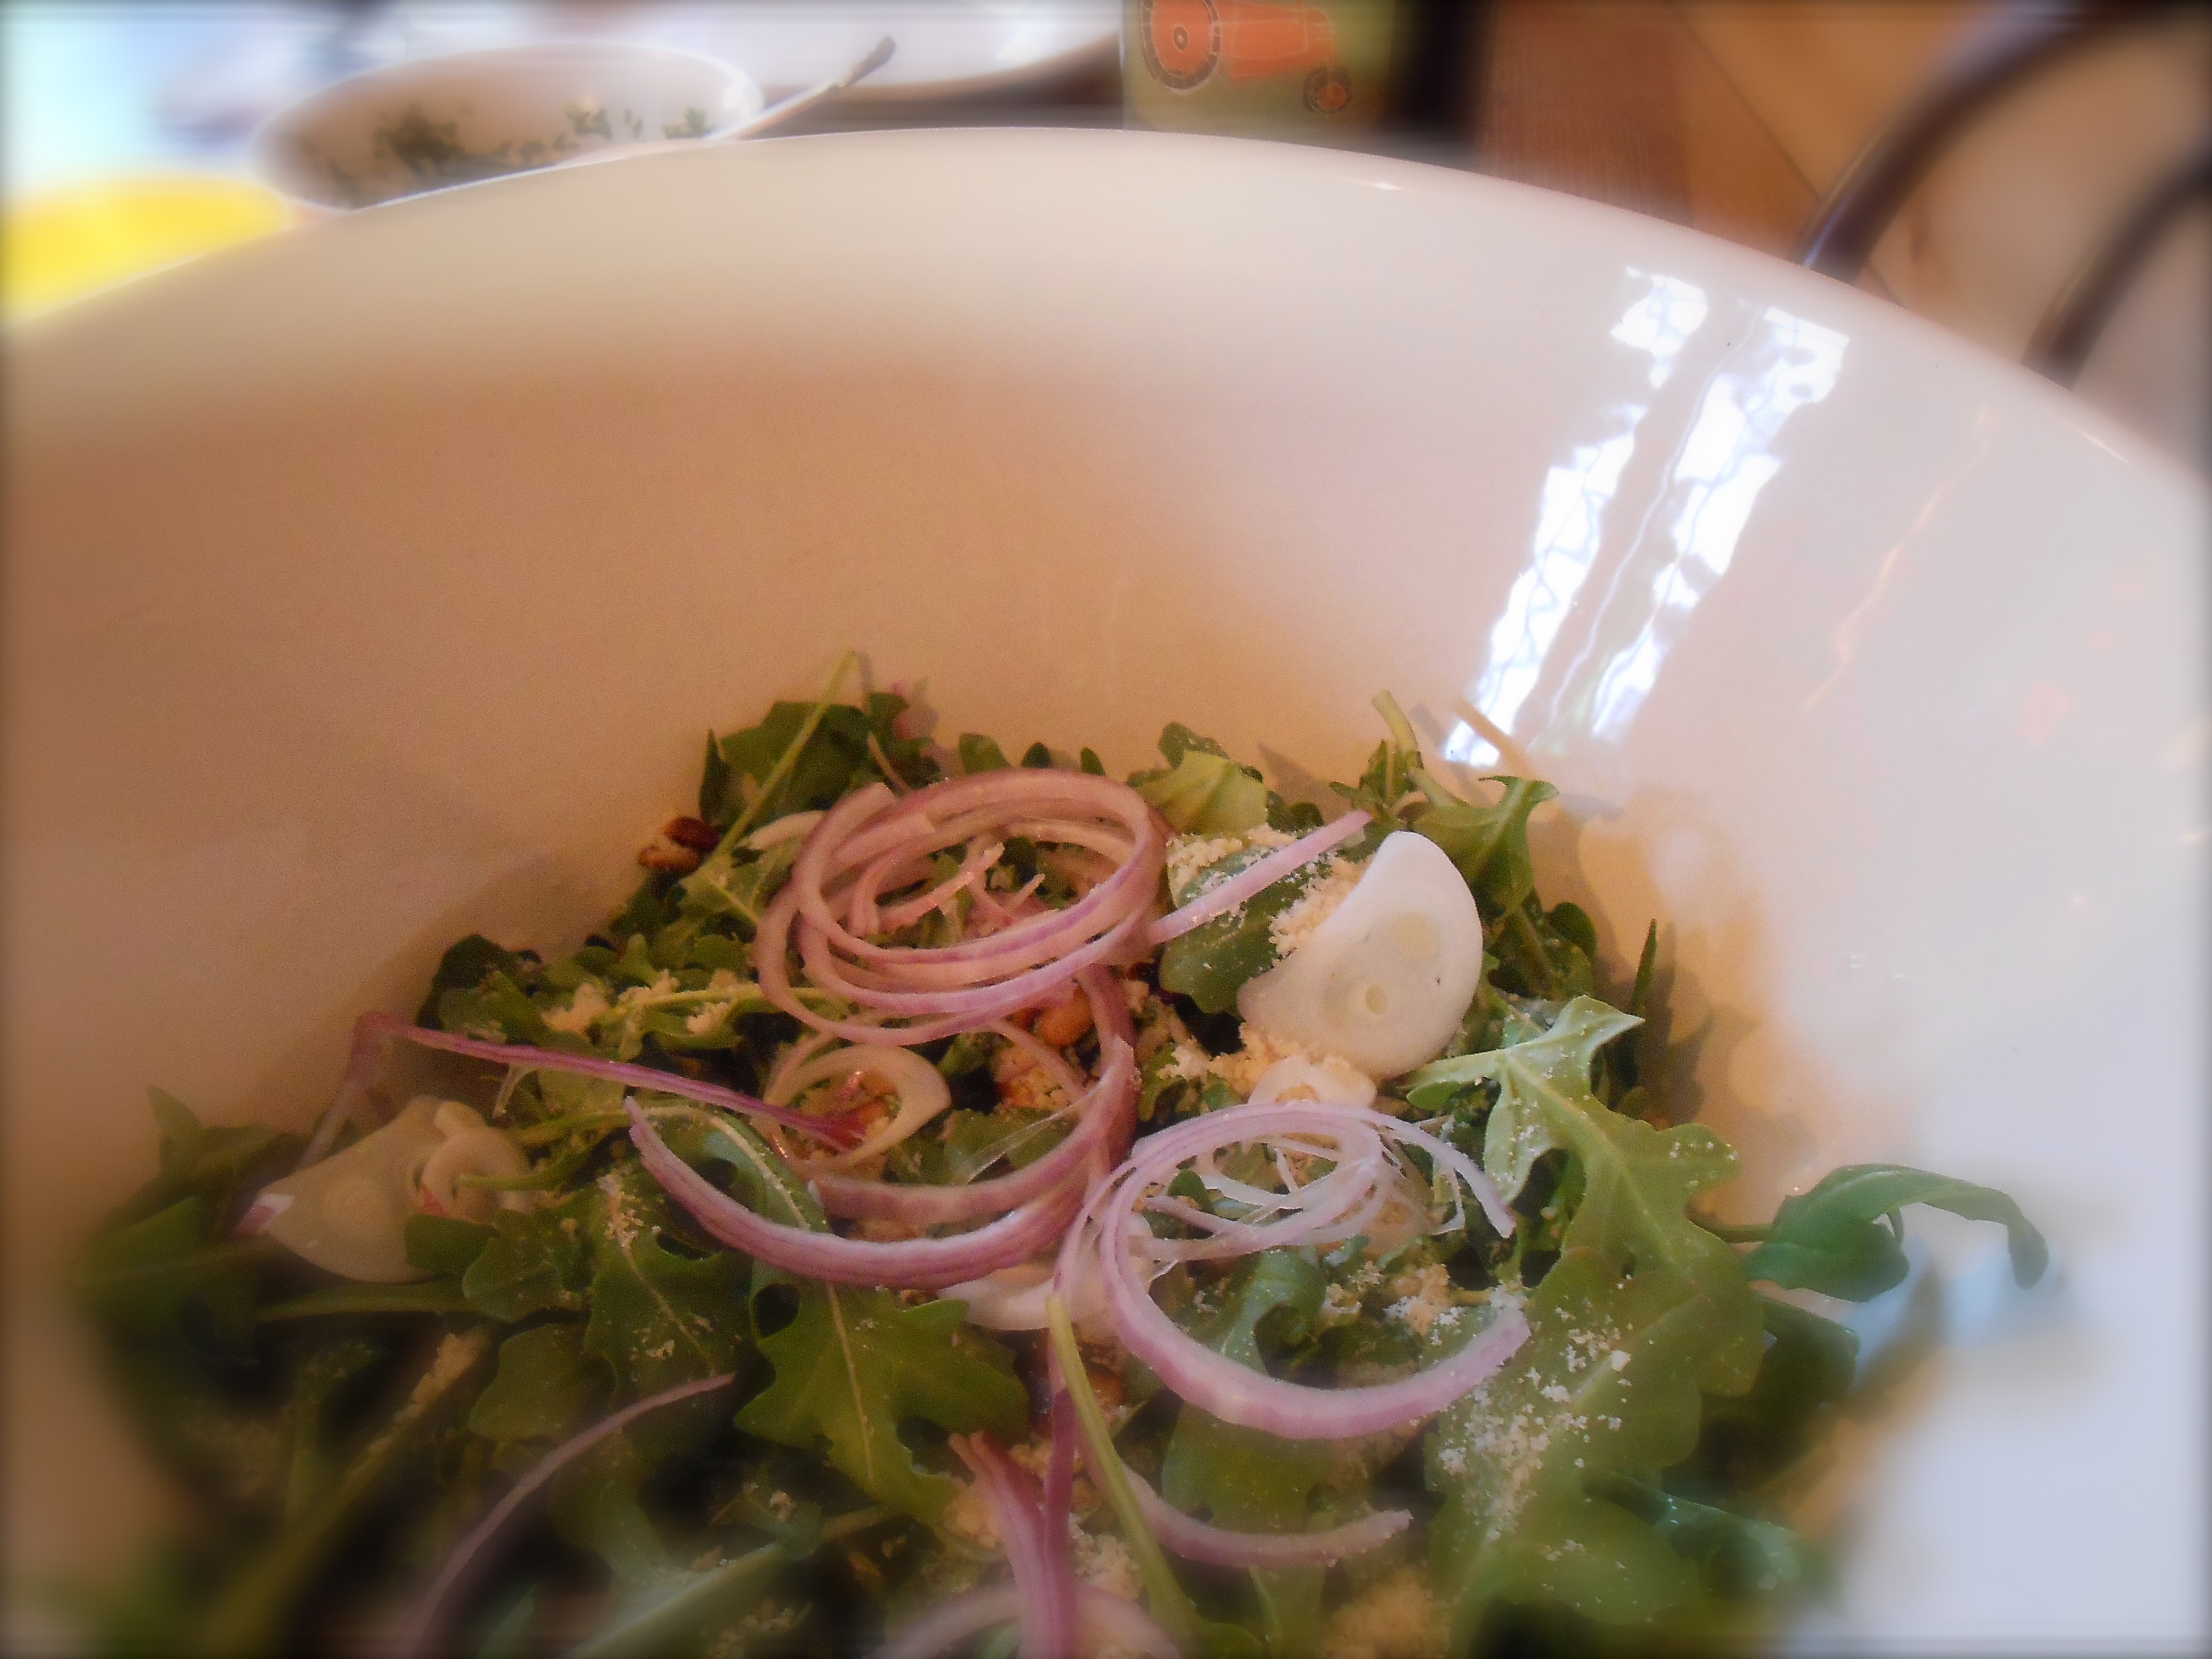
Serve this salad next time you make a steak. It’s perfect. I buy baby arugula in the little clear box, already cleaned and ready to eat. You can either use a sweet yellow or red onion. And always use freshly grated parmesan cheese!
What you will need for this dish:
- 2 big handfuls of arugula
- two tablespoons pine nuts
- 1/4 red or sweet yellow onion, sliced very thin
- 1/4 cup olive oil
- good sprinkling freshly grated or shaved parmesan cheese
- pinch salt
Using a non stick skillet on medium high heat, toast the pine nuts. Give the skillet an occasional shake to brown all sides. Remove from heat and let cool.
Place the arugula in a large salad serving bowl. Spread the onion on top. Next sprinkle the pine nuts and a generous amount of grated or shaved parmesan. When you are ready to sit down, drizzle the olive oil on top, salt a little and toss well.
Serves 2
buon appetite
“steak in the oven” w/parsley chimichurri
March 15, 2013 § 2 Comments
I was visiting one of my favorite food blogs yesterday, “the kitchn” and read: how to cook perfect steak in the oven. Inspired, I drove to my neighborhood market. Thank goodness this market features fine grass fed beef. I bought 2 lbs. of rib-eye and gave the “Steak in the Oven” a try. I use a Weber with mesquite briquettes when we grill, therefore, I have been wanting to find an oven recipe that would turn out a nice steak. And I found it! This was perfect, melt in your mouth steak. If you are like me sometimes you just don’t want to build a briquette fire. Also, if you are somewhat like me sometimes you’ll discover you haven’t cleaned the ashes out in awhile and that adds another daunting task! Not to mention living in Seattle….rain. I wish I would have known about this all those years I lived in an apartment.
I found the parsley sauce a few summers ago in a copy of Martha Stewarts Food Everyday cookbook. I always serve this with our steaks. I call it chimichurri rather than sauce. Chimichurri is an herb condiment sauce that is considered a culinary specialty of Argentina. Typically served with grilled or roast beef. I read one definition of chimichurri being a “condiment for food” and loosely translated as “a mixture of several things in no particular order”.
And of course…if you have a palette for it, don’t forget the horseradish!
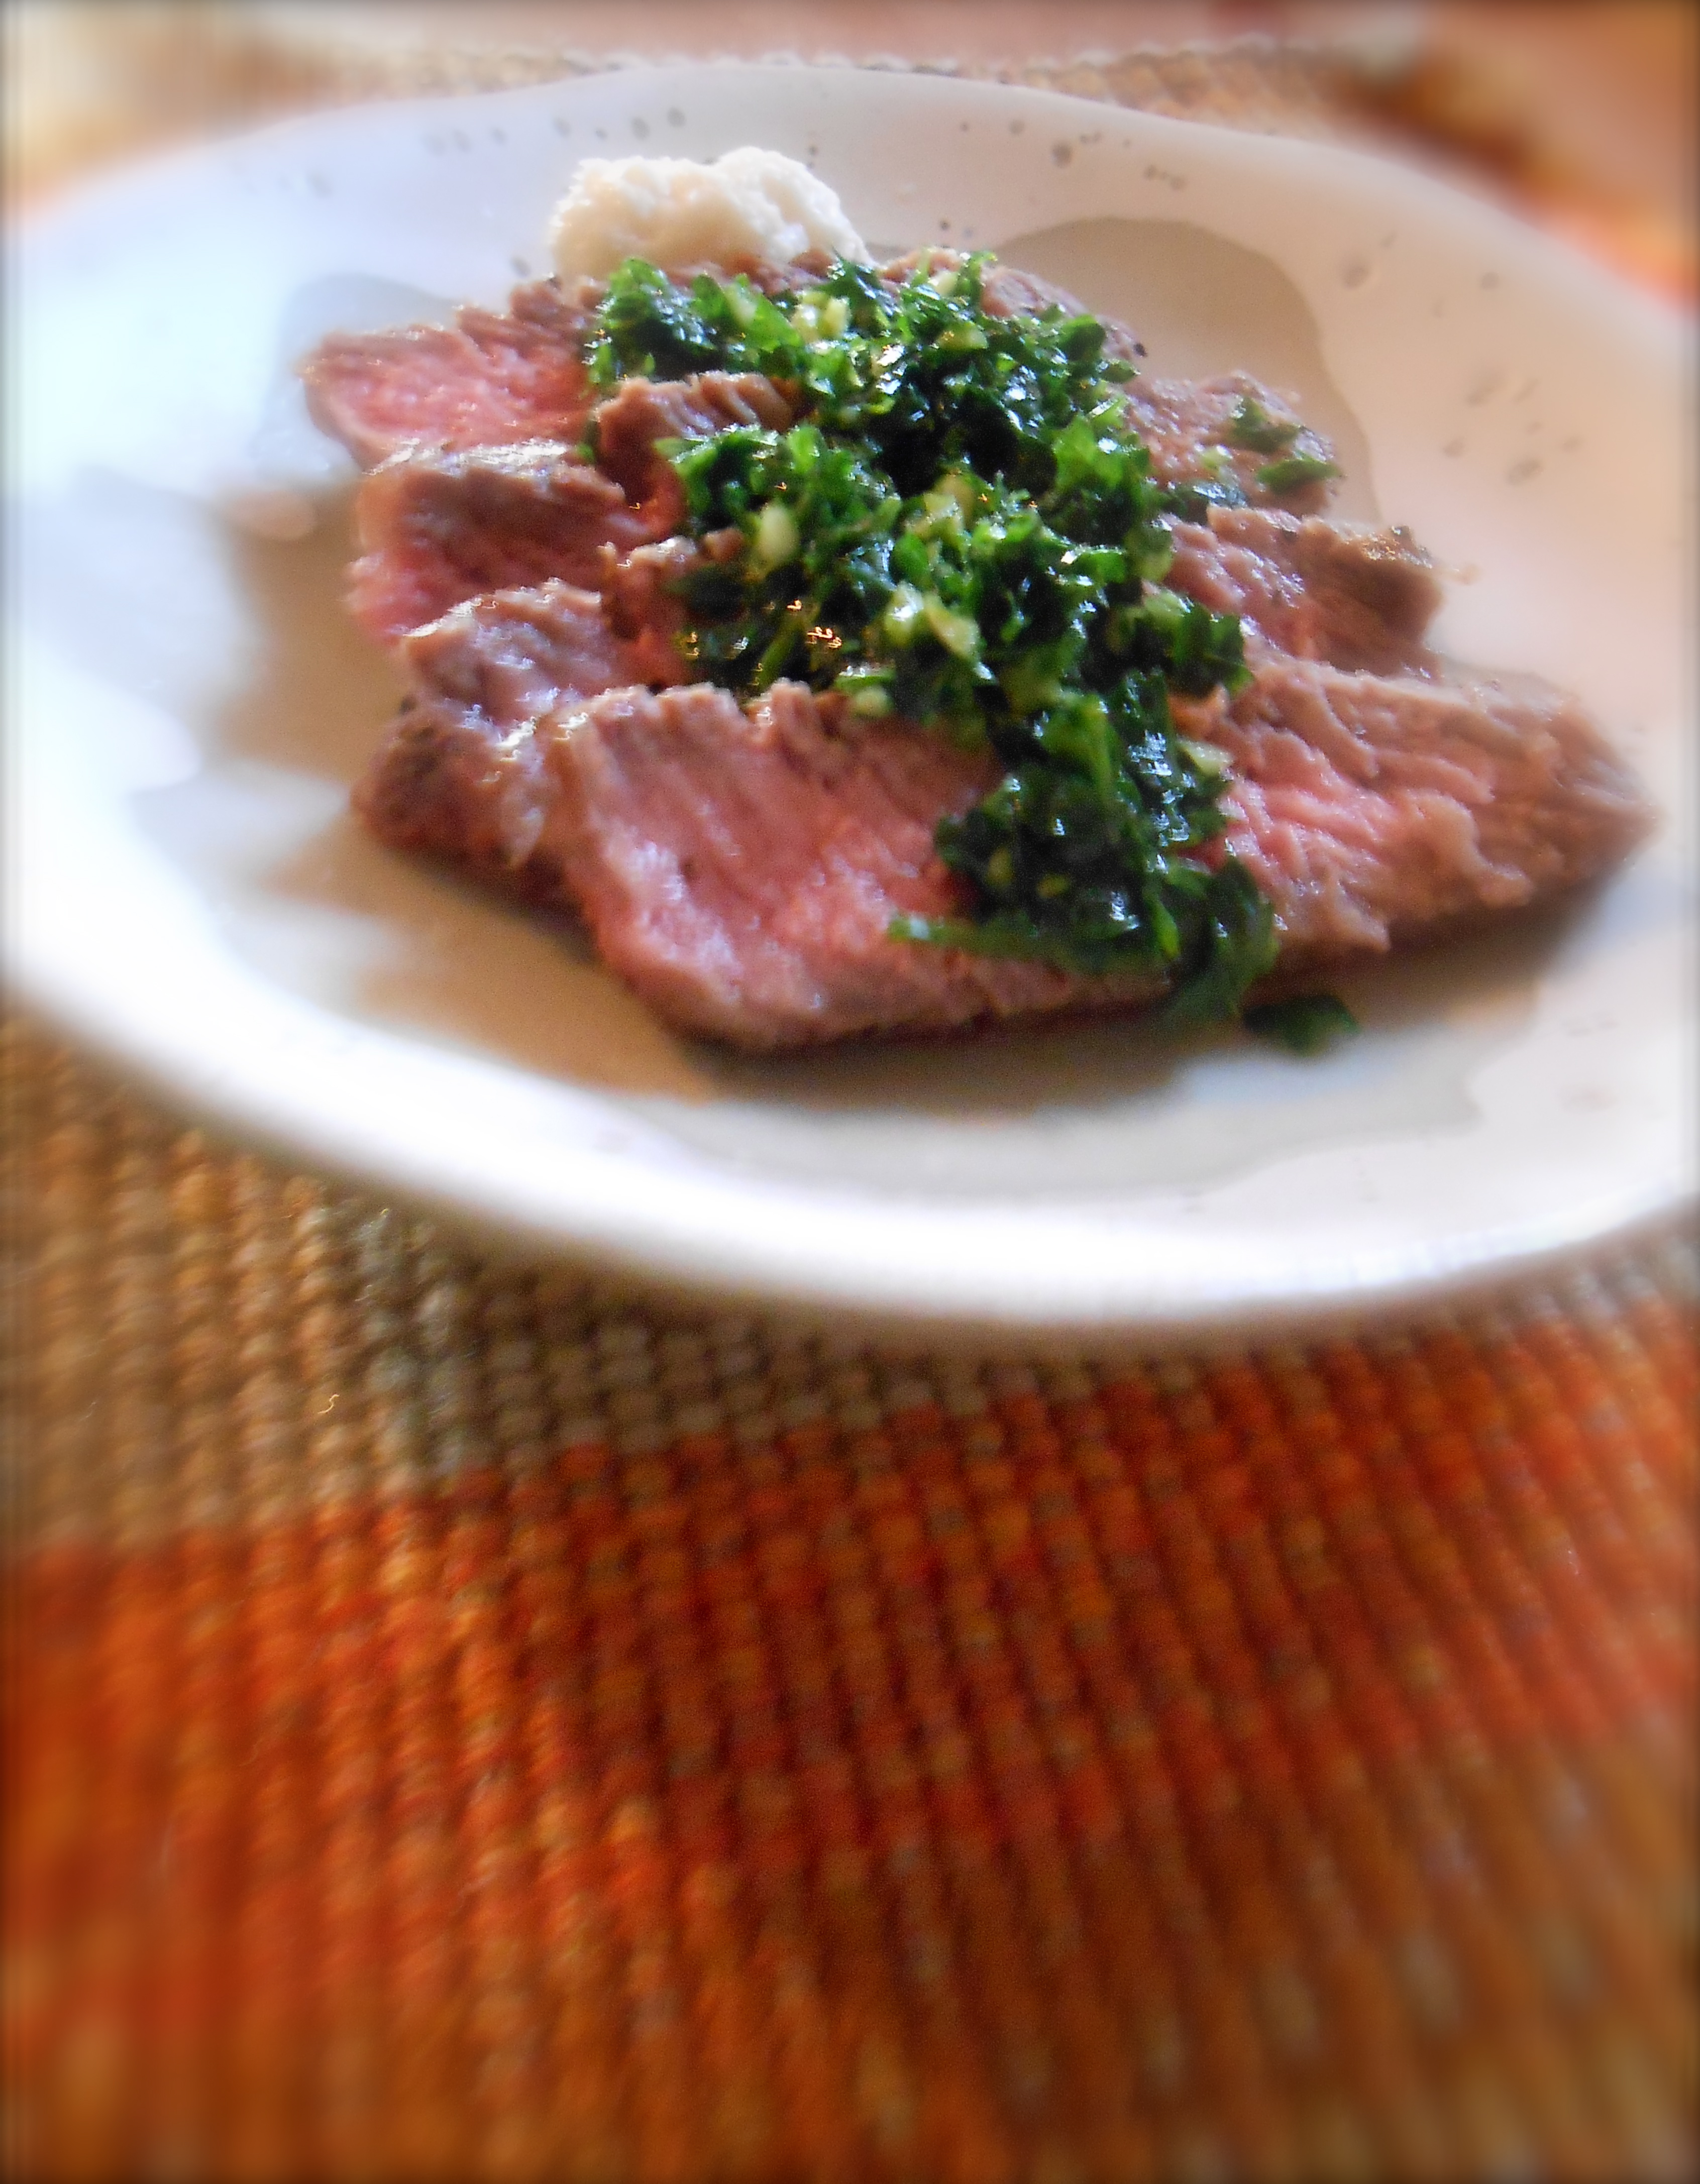
Everything you will need for this dish:
- 2 lbs. good quality rib eye steak
- a little salt and pepper
- olive oil
- 2 garlic cloves
- handful of parsley
- a few tablespoons horseradish….optional
- cast iron skillet or heavy oven proof skillet
steaks
As mentioned in the kitchn recipe, the most important step is buy a good steak. Grass fed and humanely butchered. For a more intense flavor buy a dry aged steak. You will spend a little more, and it is worth it. We only have steak once in awhile so I don’t mind spending a little more on good quality beef.
Use a paper towel and blot your steak dry and allow it to come to room temperature.
Turn on your oven to broil. Place a cast iron skillet in the oven, allow it to heat up as the oven is heating.
Generously brush one side of your steak with oil. I used olive oil instead of canola or vegetable oil. I read some folks may have had a problem with the oil smoking while it was broiling. I didn’t. It worked perfect for me. Sprinkle salt and pepper and pat it into the steak so it will stick. Turn the steak over and do the same on the other side. Brush oil on the edges too.
Turn your stove top burner on high heat. Remove cast iron skillet from oven, place it over the high heat burner. Using tongs place the steak in the hot skillet. Cook for 30 seconds! I counted 1001, 1002, 1003…etc. Using tongs flip it over and do the same on the other side. Then return the skillet to your broiler. Cook the steak 2 minutes for medium rare, 3 minutes for medium. Make sure to use a timer! Using tongs, flip the steak over and do the same on the other side.
Remove steak from oven and put it on a large cutting surface. Using foil make a tent and place it over the steaks for about 5 minutes allowing it to rest.
For presentation, rather than just serving your steak as a whole piece of meat, slice the steak. Slice it against the grain. I like slices to be 1/4″ thick. Serve with a spoonful of parsley chimichurri on top.
parsley chimichurri
- 2 garlic cloves, chopped
- 1 cup loosely packed fresh parsley leaves
- 1/4 cup olive oil
- course salt and fresh ground pepper
In a blender, puree the garlic, parsley, olive oil, and 3 tablespoons water until smooth. Season with salt and pepper.
Serves 4
buon appetite
