chicken meatballs in spicy tomato sauce
May 21, 2015 § 57 Comments
 My plan for dinner on this particular evening was to make chicken meatballs, Italian style with garlic, onion, parmesan, parsley, egg and breadcrumbs, but I couldn’t get past my craving for spicy Indian flavors. Rather than a complete dinner makeover I decided to stick with the meatball plan and change up the ingredients to include chili powder, cumin, coriander, garam masala and a jalapeño pepper.
  We have been discovering some interesting substitutes for glutinous ingredients and dry roasting 1/4 cup of quinoa on your stovetop and whizzing it in your spice blender or food processor will create quinoa flour and it can be used to bind your meatball’s together without using breadcrumbs.
  Simple clean ingredients include organic free range chicken, one egg, chili powder, cumin, coriander, garam masala, onion, cilantro, quinoa flour, ginger, garlic, jalapeño and a generous amount of salt. Most meatball recipes call for browning them in a pan and then finishing them in the oven. I only baked them. It’s great to just put them in the oven and walk away. Clean-up is also very easy, thanks to the parchment paper on the sheet pan.
  The resulting meatballs have a touch of jalapeño heat and exude a wonderfully spiced fragrance. After the meatballs are nicely brown and cooked they are simmered in a spicy tomato sauce. Simmer them just long enough to absorb the sauce so they will become even more flavorful and juicy. They would be delicious with couscous, or stuffed in pita with chopped cucumber and plain yogurt or even just stacked on rice with a cool salad on the side. This recipe is inspired from several online recipes for spicy Indian style meatballs.
For the meatballs:
- 1-1.5 pounds lean cut ground chicken (you can use lamb/turkey too)
- 1 medium onions – finely chopped
- 1 tablespoon ginger – minced
- 1 tablespoon garlic – minced
- 1 cup cilantro – finely chopped
- 1 tablespoon chilli powder ( I used spicy Kashmiri chili powder)
- 1 teaspoon coriander powder
- 1 jalapeno pepper – chopped (optional)
- 1 teaspoon cumin powder
- 1 teaspoon garam masala
- 1 egg
- 1/4 cup powdered quinoa (dry roast and grind them to a coarse powder)
- 1 tablespoon olive oil
- Salt to taste
- 1/2 tablespoon olive oil
- 1 large onions – finely chopped
- 1 tablespoon ginger – minced
- 1 tablespoon garlic – minced
- 1-28 ounce can pureed tomatoes
- 1 teaspoon chili powder
- 1 tablespoon coriander powder
- 1 teaspoon garam masala
- 1/4-1/2 cup water
- Salt to taste
- Cilantro to garnish
Pre-heat the oven to 350F. Place the ground chicken in a large bowl and add the onions, ginger, garlic, jalapeño, spices, cilantro and salt, mix well to combine. Add the beaten eggs, oil and quinoa. Mix well using your hands. Roll into balls and place them on a parchment lined baking tray. Bake for 30 minutes until they turn golden brown on the outside. Remove and let them rest.
pasta with yogurt, peas and chili oil
May 15, 2015 § 56 Comments
 A very similar pasta recipe was posted here several months ago and the only difference between the two is the type of pasta used. We have been using quinoa pasta as of late and honestly I really love both the texture and flavor of the noodles. I have tried a couple of different quinoa products and the best, in my opinion, is a corn free brand called Andean Dream, which is made with only two ingredients, organic quinoa flour and organic rice flour.
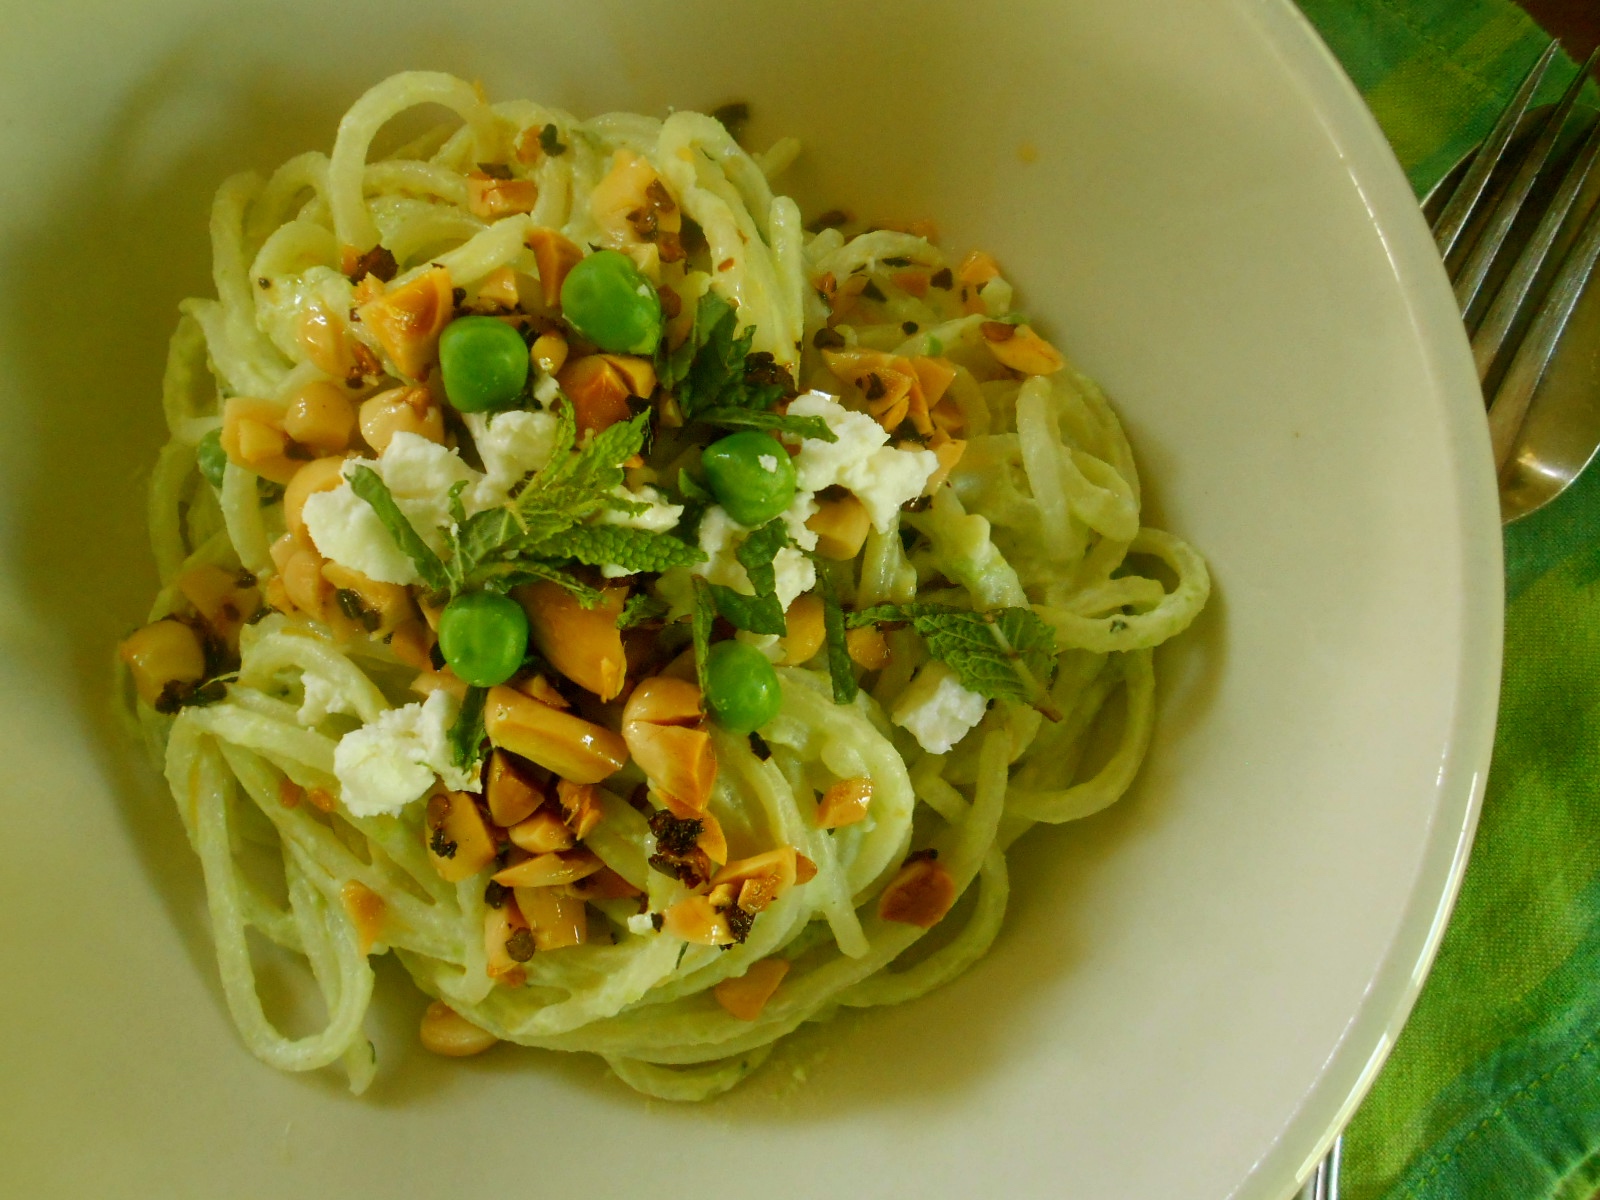
 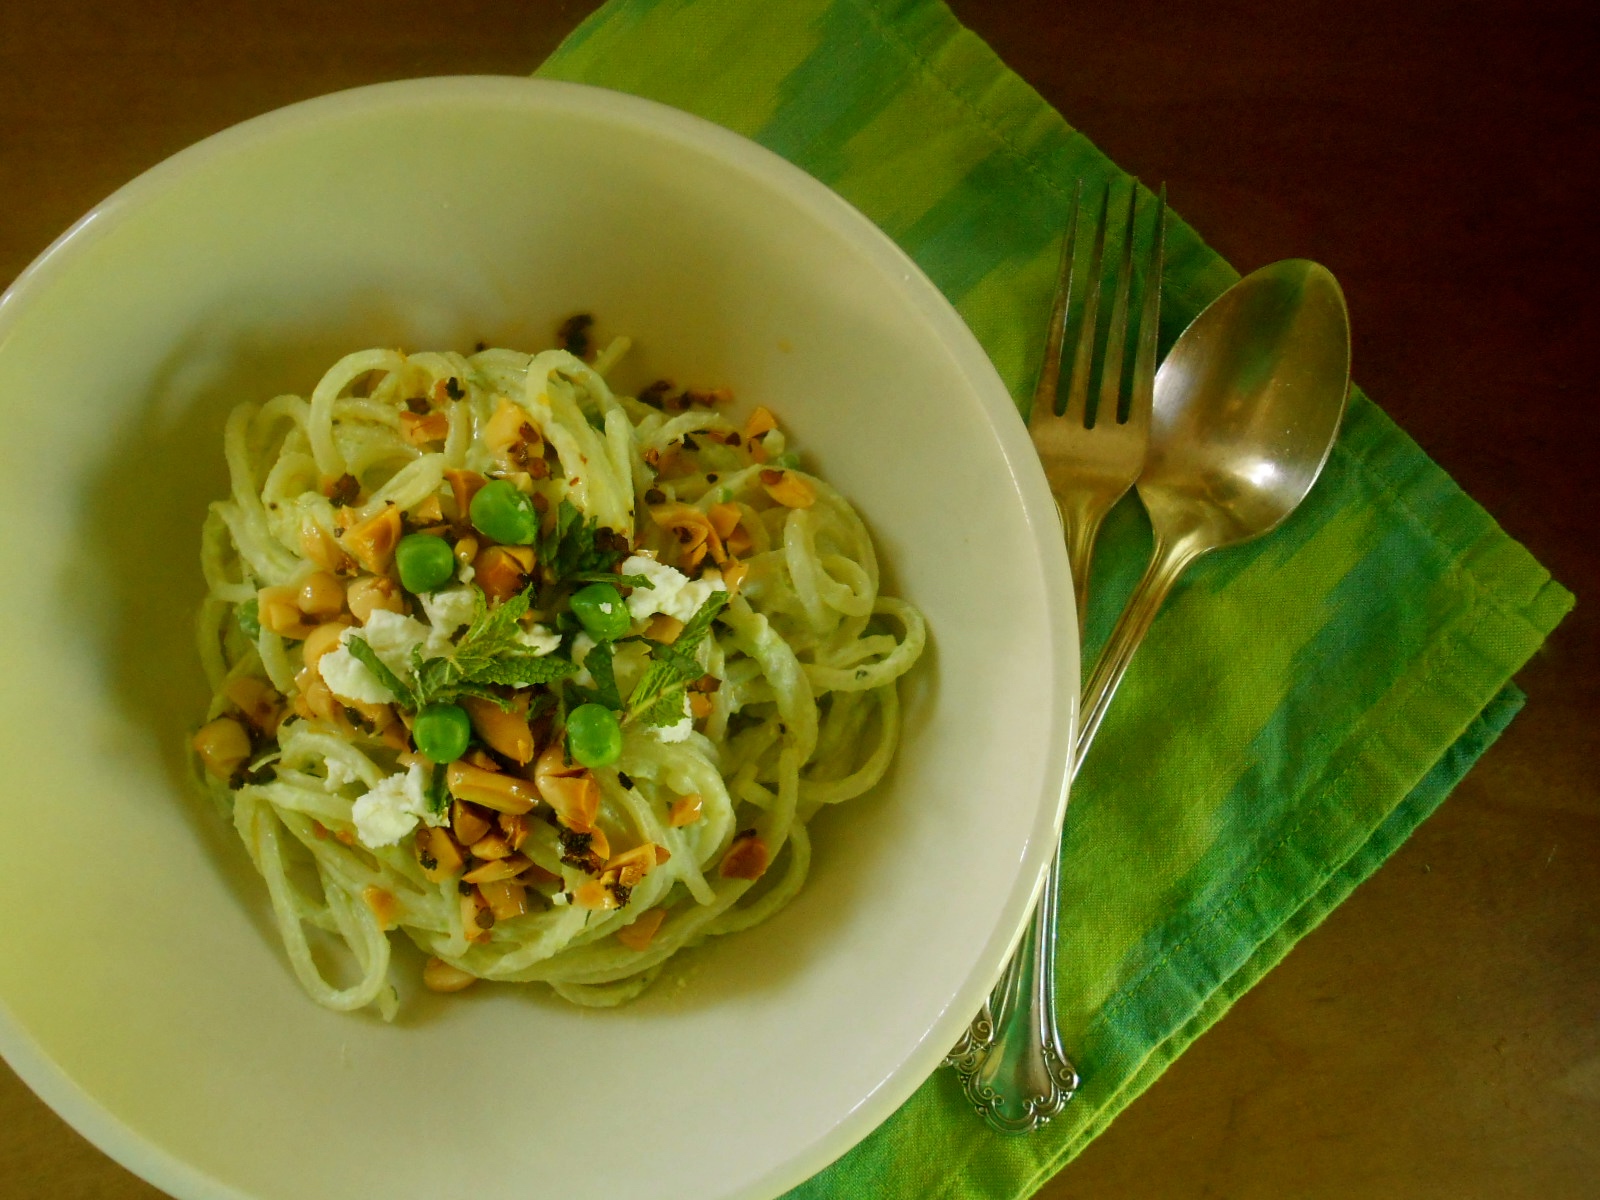 It may seem a bit odd to use yogurt in a pasta sauce but it really works here. The overall effect is a tad sour and creamy but not heavy. And with pea harvest in full swing (at the co-op) now is the time to make as many pea recipes as you can during this short lived season. This is a wonderfully light springtime dinner. Adapted slightly from Jerusalem, by Yotam Ottolenghi and Sami Tamimi The original version of this recipe calls for conchiglie or shell-shaped pasta, but you could use any pasta shape you like. If you’re worried about the amount of heat, consider starting with a little less chili than what is called for – or lightly drizzle the chili oil on your pasta.
- 2 ½ cups (500 g) whole-milk Greek yogurt
- 2/3 cup (150 ml) olive oil
- 2 medium cloves garlic, crushed or pressed
- 1 pound (500 g) fresh or thawed frozen peas
- Kosher salt
- 1 pound (500 g) pasta shapes of your liking, we used quinoa
- ½ cup (60 g) pine nuts
- 2 teaspoons red chili flakes
- 1- 2/3 cups (40 g) basil (or mint) leaves, coarsely torn
- 8 ounces (240 g) feta cheese, coarsely crumbled
In the bowl of a food processor, combine the yogurt, 6 tablespoons (90 ml) of the olive oil, the garlic, and 2/3 cup (100 g) of the peas. Process to a uniform pale green sauce, and transfer to a large mixing bowl. Bring a large pot of water to a boil, and salt it until tastes like pleasantly salty seawater. Add the pasta, and cook until it is al dente. While the pasta cooks, warm the remaining olive oil in a small frying pan over medium heat. Add the pine nuts and chile flakes, and cook for 4 minutes, or until the pine nuts are golden and the oil is deep red. Also, warm the remaining peas in some boiling water (you could scoop out a bit of the pasta water for this); then drain. Drain the cooked pasta into a colander, and shake it well to get rid of excess water that may have settled into the pasta’s crevices. Add the pasta gradually to the yogurt sauce; adding it all at once may cause the yogurt to separate. Add the warm peas, the basil, feta, and 1 teaspoon kosher salt. Toss gently. Serve immediately, with pine nuts and chile oil spooned over each serving. Serves 4, generously.
luxurious mushroom soup
May 11, 2015 § 59 Comments
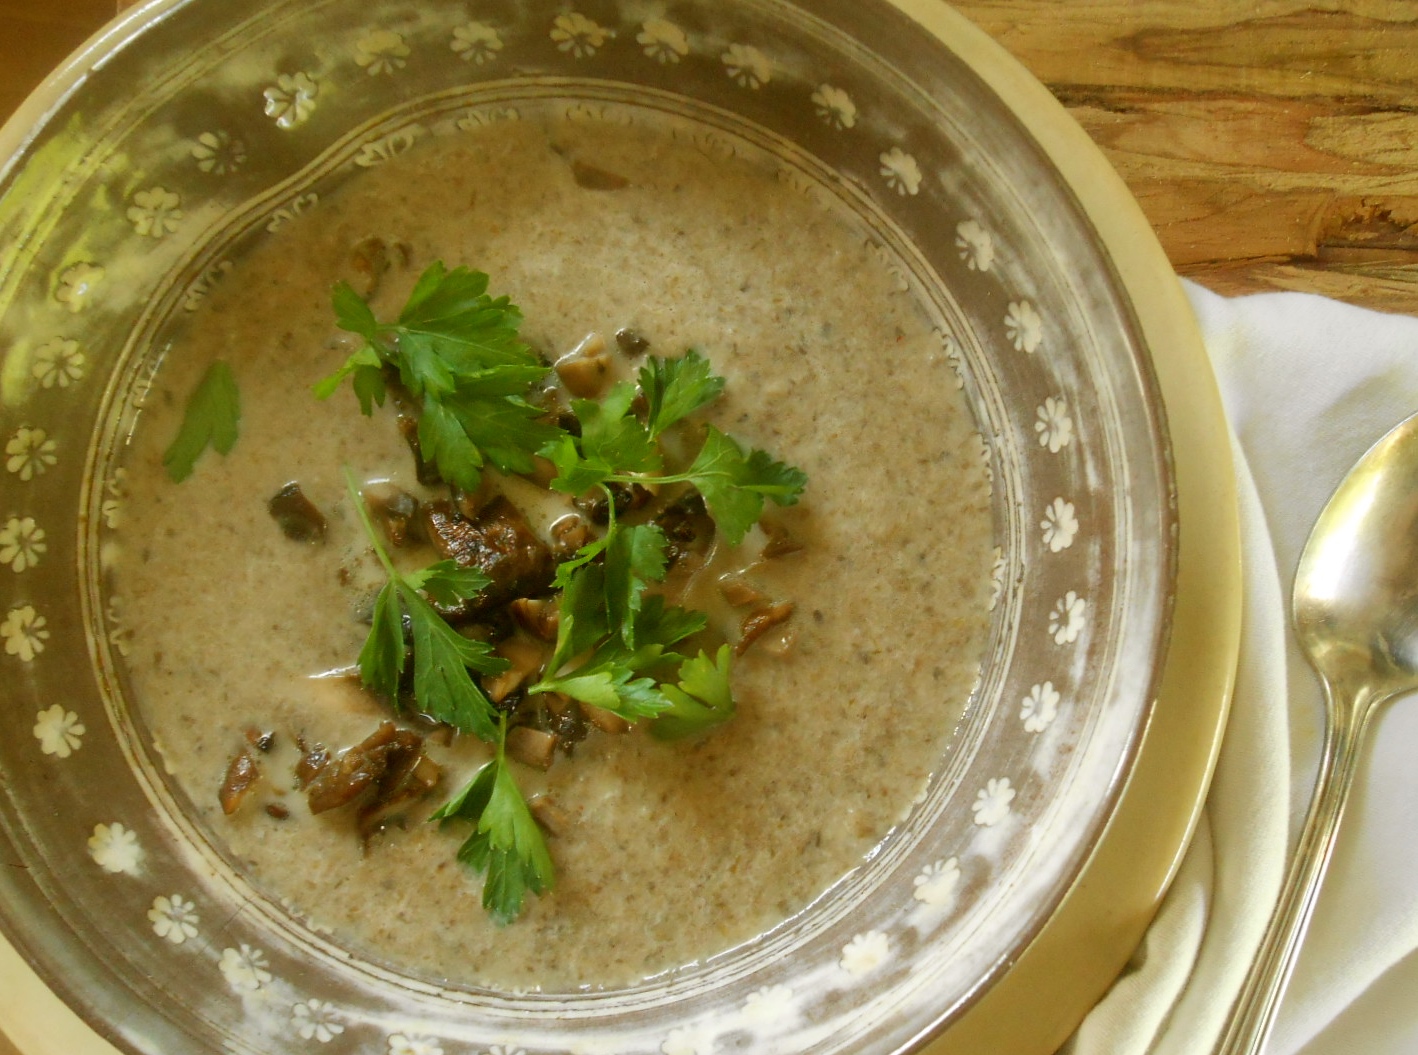
This soup transpired from of a conversation in the comment section on my sautéed mushroom post a few weeks ago. The conversation with Johnny went like this: “That’s how I like my mushrooms. In fact, to make soup I then just add organic vegetable stock and blitz, add a little cream, adjust the seasoning and viola! So simple.” I responded: “I had no idea mushroom soup could be so easy! I’m surely going to make some.” And I did.


The conversation went on a bit and Johnny left clear and concise suggestions for this delicious mushroom soup. This comment conversation brought me to realize how much I enjoy blogging and corresponding with so many wonderfully inspiring individuals around the world who have a love for cooking. It’s lovely to know that there are a number of like minded folks out there, so spirited about what they are creating in their kitchens and preparing delicious meals for themselves, friends and family. Posting is fun and I really enjoy the process of taking photographs and hoping they turn out. But what I’m really fond of is the lovely correspondence with all of my readers.
We were delighted with the soup. The ease of putting it together, the lush creamy consistency and it’s pure mushroomy goodness are what makes this a perfect soup on a cool, cloudy, misty day.
I n g r e d i e n t s
- 2 pounds cremini mushrooms, cleaned & sliced
- 2 tablespoon butter
- 4 tablespoon olive oil
- 3 cloves of minced garlic
- 4 tablespoons minced parsley or 2 tablespoons thyme
- 2 tablespoons flour
- 3 cups organic vegetable stock
- 1 bay leaf
- a pinch of red pepper flakes
- a little cream – 1/4 cup
Heat the butter and 2 tablespoons olive oil in a sauté pan over medium heat. When the butter’s foaming, add the mushrooms and coat well. Allowing them to sit in the pan for the first 5 minutes to brown, and then stir occasionally until they soften. If you are using wine add it now and allow the liquid to evaporate. Stir in the garlic and parsley (or thyme) and continue to cook for 30 minutes on low heat until caramelized.
In the meantime, place a soup pot over low heat. Stir 2 tablespoons olive oil and flour together in the pot and heat until it bubbles slightly. Add stock, bay leaf, a pinch of red pepper flakes and bring to nearly boiling. When the mushrooms are cooked and caramelized add them to the stock (optional: put a few mushrooms aside for garnish) remove the bay leaf and blitz with a hand held blender. If you don’t own a hand blender you may use a regular blender and work in small batches. Taste for seasoning and stir in a little cream. Garnish with mushrooms and parsley.
Serves 3
zucchini noodles
May 6, 2015 § 59 Comments
I’m easily over-stimulated in large department stores, especially ones that involve home & kitchen products. I find it difficult to concentrate and I end up spending way too much time walking the isles in sensory overload. But on this visit I was on a mission. I needed to find a spiralizer and I knew BB&B would have one.
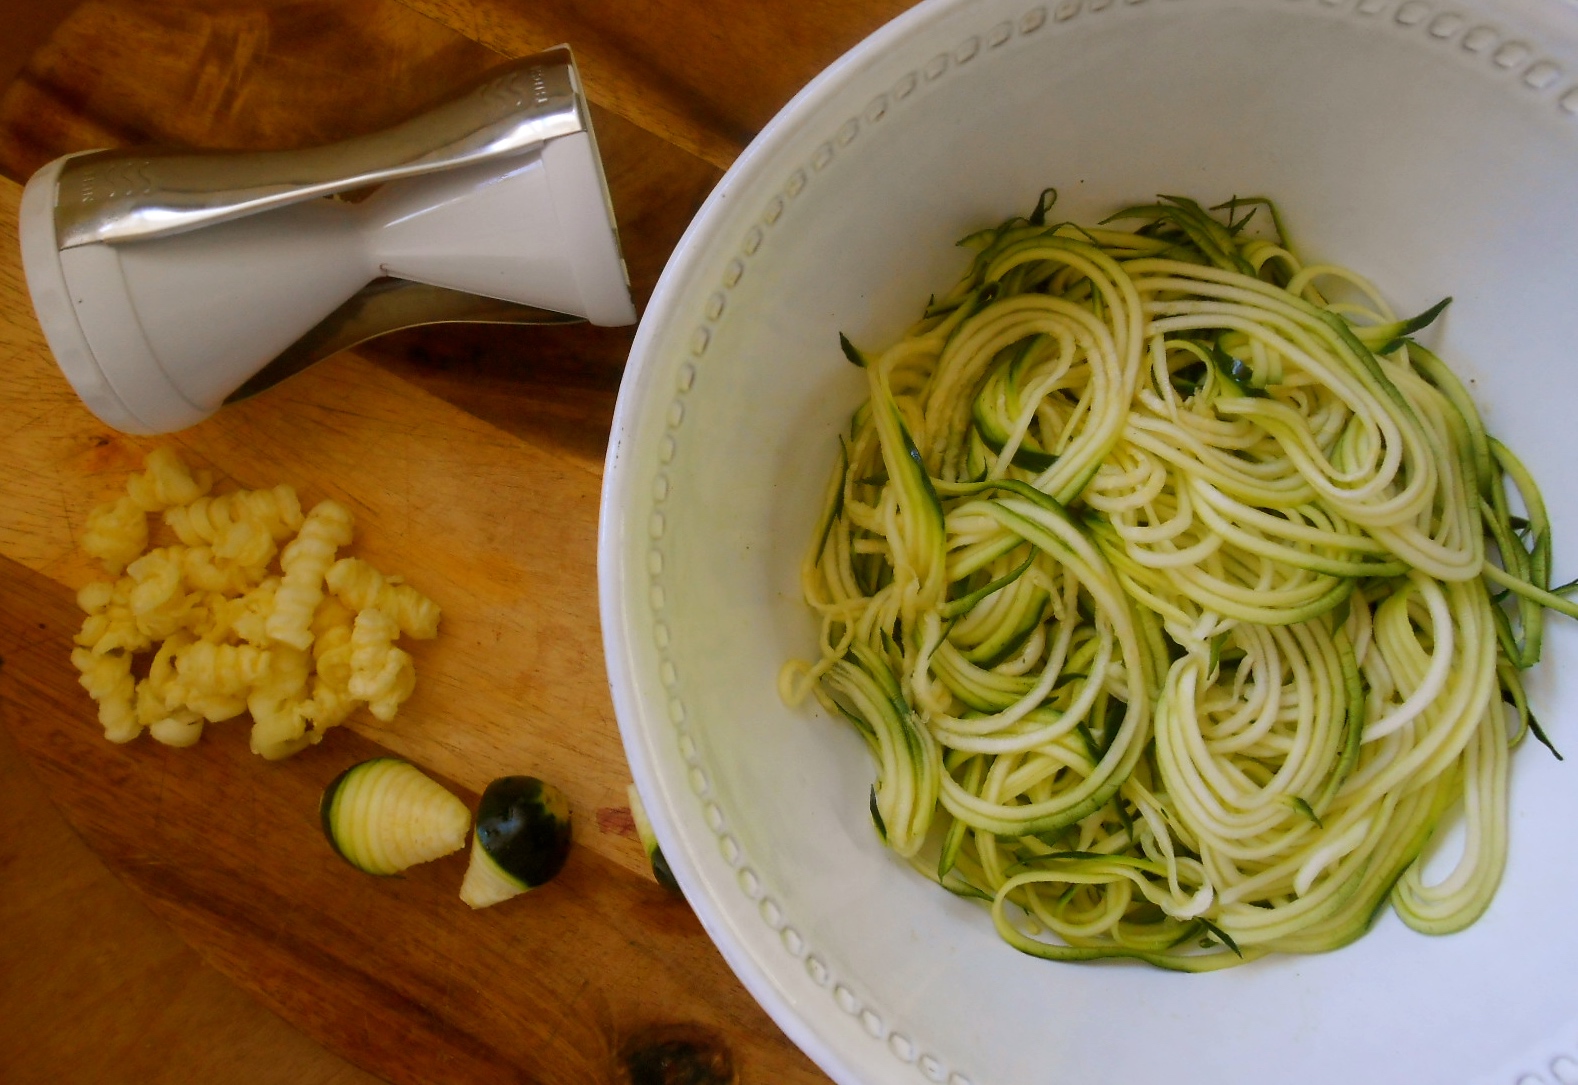
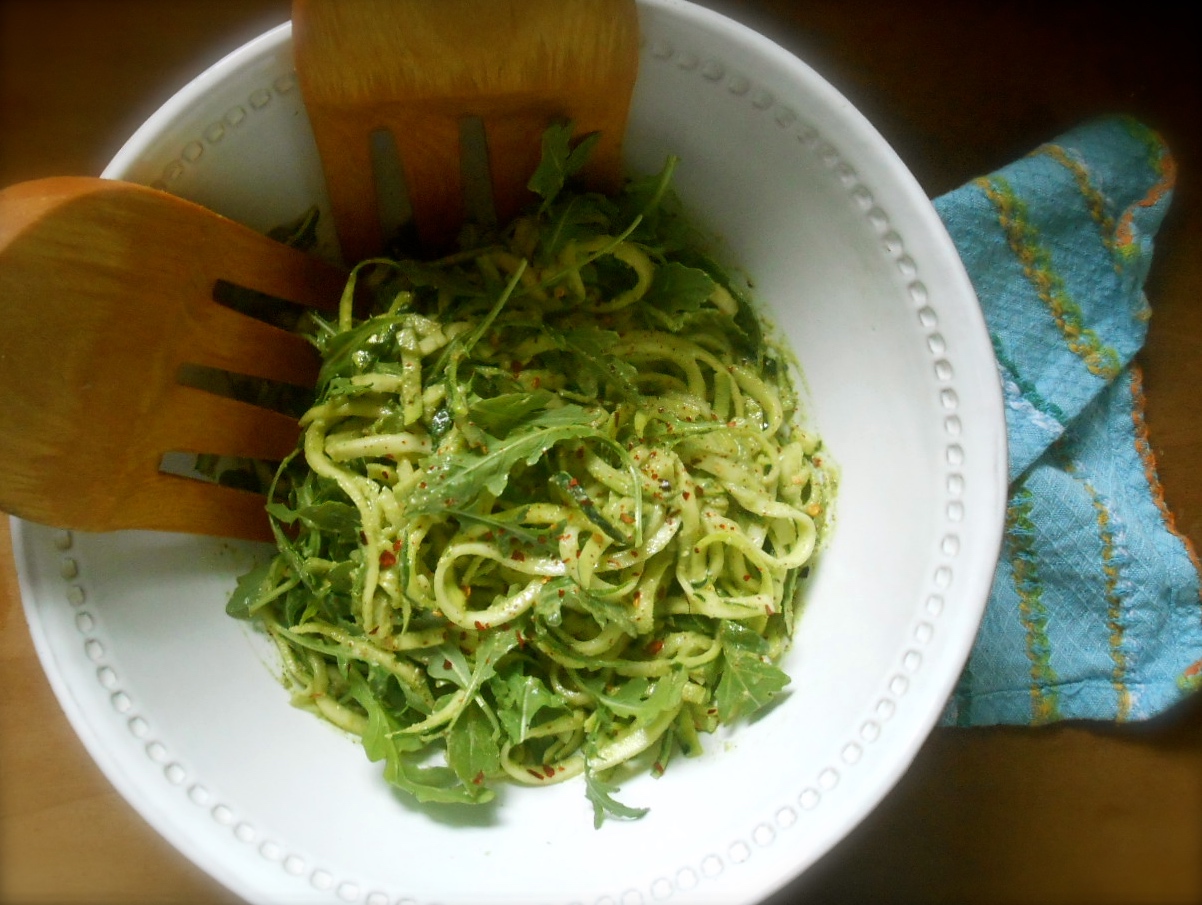
And sure enough. I found this kitchen tool. A spiralizer. After paying for it I headed over to the co-op and picked up 3 medium sized organic zucchini. My plan for the day was to prepare zucchini noodles for dinner and toss them in my favorite parsley pesto.

I am not a kitchen gadget & tool person. If you can believe it I don’t own a blender, food processor (it stopped working), Kitchenmaid mixer, slow cooker or microwave (well, we have one but it’s in the basement). I guess you could call it an ill equipped kitchen, but we get along just fine. However, this gadget…the spiralizer is something I have grown very fond of. It creates beautiful strings of vegetables. You can even twirl your freshly spiraled vegetables around your fork and have the same wonderful sensation that only spaghetti can satisfy. It’s a hot item and most likely considered a trend, but I am convinced it is a nice alternative to enjoy a bowl full of delicious healthy noodle-like textured vegetables similar to semolina pasta. If you are unable to obtain a spiralizer you can achieve the same wonderful pasta like “noodle” by using a vegetable peeler and shaving your zucchini into thin ribbony Pappardelle.
I n g r e d i e n t s
- 3 medium sized zucchini’s – spiraled or shaved with a vegetable peeler
- large handful fresh parsley (about 1 cup once it is finely chopped)
- 1/2 cup freshly grated parmesan
- 2 small cloves garlic, peeled
- 1/2 cup extra virgin olive oil
- 1/4 cup pecans, walnuts or pine nuts (I used pecans)
- 1/2 teaspoon chili flakes
- salt (about 1/2 teaspoon)
- large handful arugula
Spiralize the zucchini and set aside.
If you don’t own a food processor finely chop parsley, garlic and pecans. Combine with olive oil, parmesan and chili flakes. Toss zucchini, arugula and pesto in a large bowl. Taste and add a little more parmesan and / or salt to your liking.
If you own a food processor…place the parsley, parmesan, garlic, pecans and salt in a food processor and pulse for a few seconds to combine. Scrape down the sides of the bowl, then pulse again. Drizzle in the olive oil while the machine is running just long enough to incorporate the oil. Toss zucchini, arugula and pesto in a large bowl. Taste and add a little more parmesan and / or salt to your liking.
mexican chicken noodle soup
April 30, 2015 § 50 Comments

Incredible wonderful Mexican soup. I found this recipe while scrolling through photographs on Food52 and just in time for Cinco de Mayo. It’s a matter of fact we cooked two different Mexican soups this week and I will be sharing the other one soon. Once again I am preoccupied and slightly obsessed with Mexican food. We have a tendency to get on this kick once or twice a year and it usually involves spicy soups, enchiladas, molé and various other spicy latin influenced foods.

This is such an invigorating soup. A bit spicy, but not too much. It’s very simple to put together once you have the ingredients prepped and ready to go. The recipe calls for the seeds to be remove from one jalapeño pepper but we removed only 1/2 the seeds to allow a little more heat, feel free to keep them all if you like it hot. The heat was just enough to linger for a moment until the next spirituous bite. Quinoa pasta may be used to keep it gluten free. If you do so we found it was best to pre-cook the quinoa pasta and rinse before adding to the soup just to prevent too much starch in the broth. Oh, and the three of us finished the whole pot of soup in one sitting. Yes, it’s delicious.

I n g r e d i e n t s
- 2 tablespoons olive oil
- 1 yellow onion chopped
- 1/2 cup chopped celery
- 1 cup chopped carrot
- 4 garlic cloves finely chopped
- 1 pound skinless chicken breast
- 6 cups chicken stock
- 1 – 28 ounce can of roasted tomatoes
- 1 1/2 cups vermicelli noodles, angel hair or quinoa pasta broken in small pieces
- 1 jalapeno pepper (remove seeds) and mince
- 1/2 teaspoon coriander
- 1 teaspoon cumin
- 1/2 teaspoon turmeric
- 1/2 teaspoon salt to taste
- 1 teaspoon freshly ground pepper
- 1 cup fresh cilantro roughly chopped
- 2 limes juiced
- cotija cheese
In dutch oven or soup pot, heat oil on medium heat and add onion, celery, carrots until onions are translucent. Add chopped garlic and jalapeño and stir about one more minute. Add tomatoes and stock and chicken and bring to boil. Once chicken is cooked, remove from pot, let cool and shred. Simmer on low heat and put chicken in pot and add noodles (pre-cooked and rinsed if using quinoa pasta), dry spices (salt, pepper, coriander, turmeric and cumin) and juice from two limes. Keep on low heat or remove from heat when noodles are cooked, about 5 minutes.
Serve with cilantro leaves, slices of lime and crumbled cotija cheese.
shaved asparagus salad with feta and peas
April 27, 2015 § 58 Comments
After taking one bite of this shaved asparagus salad my eyes lit up and despite what I learned as a child I spoke with my mouth full. Oh my gosh, this is the best salad I’ve ever had… is what I said.  Rarely do I get taken aback with salad. And honestly I hesitated to even put it together because the thought of eating raw asparagus didn’t really appeal to me. But something about the combination of arugula, peas, feta and pistachios felt right on a warm spring evening. Don’t let the idea of eating raw asparagus keep you from preparing this salad. It’s wonderful and enjoying it in the woodshop while the sun was setting deepened the charming appearance of the salad and crisp garden-fresh spirit of the new season. All credit given to Kendra Vaculin for her Food52 recipe. What you’ll need:
- 1 bunch asparagus, washed and well-dried (tough ends removed)
- 1 big handful arugula
- 1/4 cup green peas, fresh or frozen and thawed
- 1/8 cup (2 tablespoons) deshelled pistachios, roughly chopped
- 2 ounces feta, crumbled
- Juice from half a lemon
- Good olive oil
- Fresh ground pepper
- Flaky sea salt
Using a potato peeler shave the asparagus into ribbons. Holding the base of the stalk with one hand, run the peeler down to the tip. I allowed some small tips to remain whole. Continue, rotating the asparagus 90° each time you shave, until each stalk is shaved through. Keep the ends to toss in to a stir fry or soup the following evening. Toss asparagus ribbons with arugula, peas, pistachios, and feta. Dress with lemon juice and a generous drizzle of olive oil, and season with fresh ground pepper and a hit of flaky salt. Serve right away. Shaved asparagus means a lot of vegetable flesh surface area exposed to the elements, which can make your salad soggy if left alone. Don’t assemble this until right before you want to serve.
whole roasted spiced cauliflower
April 23, 2015 § 80 Comments
 I know some of you are thinking not another roasted cauliflower recipe. How many different recipes do we really need for the same vegetable? But please give me your attention for just a second because I am here to tell you the many wonders of this particular version. Not only is it in the oven lickety-split to free you up for your other high maintenance dishes you may be preparing, but you could just forego the other dishes and have this for dinner, period.
  Other than simplicity of putting this together there are a couple of things you’ll love about this. One is the crispy aromatic outer layer. We went a little heavy on the olive oil just to achieve this result. And with the lovely spices there is no denying the alluring aroma that will fill your kitchen – or in our case, the entire house. Spicy crispy outer layer, soft nutty tender inside, this is why I posted another cauliflower recipe. The lovely cream sauce kept us dipping until the whole head of cauliflower was finished.
This recipe comes from the beautiful blog An Edible Mosaic.
What you will need:
c a u l i f l o w e r
- 1 head cauliflower
- 3 tablespoons olive oil or more to coat the entire head of cauliflower
- 1 teaspoon garam masala
- 1/2 teaspoon coarse salt
- 1 teaspoon cumin powder
- 1/2 teaspoon ground yellow mustard powder
- 1/4 teaspoon ground turmeric
- 1/8 teaspoon ground cayenne pepper (more or less to taste)
- 1/8 teaspoon ground black pepper
- small handful of coarsely torn parsley – for garnish
- 1/4 cup pine nuts, dry roasted and coarsely chopped – for garnish
c r e a m y s a u c e
- 1/4 cup mayo
- 1/2 cup plain greek yogurt
- 1 teaspoon coarse mustard
- 1 teaspoon horseradish
- 1/2 teaspoon Worcestershire sauce
- 1/2 teaspoon ground sweet paprika
- 1/4 teaspoon garam masala
- 1/8 teaspoon black pepper
- 1/8 teaspoon ground cayenne pepper (more or less to taste)
Preheat oven to 425F. Line a large baking sheet with parchment paper. Remove the outer green leaves from the cauliflower and use a paring knife to cut out the core, leaving enough core intact so that the florets stay together. Place the cauliflower on the prepared baking sheet and rub generously with the olive oil. Combine all the spices for the cauliflower in a small bowl, and evenly rub the spices onto the oiled cauliflower. Cook until the cauliflower is tender inside and golden outside, about 1 hour 15 minutes, rotating the baking sheet once halfway through. While the cauliflower is roasting combine creamy sauce ingredients in a bowl and set aside. Cool for 5 minutes and transfer the cauliflower to a serving dish. For serving either slice the cauliflower into “steaks” or separate the florets. Serve with the creamy sauce for dipping.
enchiladas with red chard and turkey
April 20, 2015 § 47 Comments

It’s unbelievable how often we have enchiladas for dinner. I’m at the point where start to oven only takes 30 minutes and then after 30 minutes of baking, dinner is on the table. Most likely the efficient process of putting these together is the reason we have them so often. No, it has to be because this is a succulent supper and it is sure to satisfy your soul.

When preparing enchiladas it is very helpful to have all your ingredients ready to go. Prep work is a must.
There are so many ways to fill an enchilada and we switch around the ingredients quite often. Although these may not be what you would find in Mexico, they are certainly tasty and you’ll love to find them on your dinner table, especially with homemade enchilada sauce. Once you make your own enchilada sauce you’ll never buy it in a can ever again. The recipe below is a mild version and you may spice it up with cayenne, chili’s or add jalapeños in chipotle sauce.
I n g r e d i e n t s
- 1 pound ground turkey, chicken or beef
- 2 tablespoons coconut or olive oil
- 1 small red onion, diced
- 2 cloves garlic, pressed
- 1 tablespoon chili powder, or more to your liking
- 1 tablespoon cumin powder
- 1 teaspoon oregano
- sea salt to taste
- 1 bunch red chard, cleaned and diced
- 3 cups shredded cheese, your choice
- 1 cup black or green olives, sliced
- 5 or 6 scallions, sliced
- 6 – 8 good quality tortillas, corn or flour
- homemade enchilada sauce or 28 ounce can if you are pressed for time
Prepare homemade enchilada sauce first and set aside.
h o m e m a d e e n c h i l a d a s a u c e
- 3 tablespoons olive oil
- 1/3 cup onion finely diced
- 2 cloves garlic, minced
- 1/2 teaspoon salt
- 2 teaspoons cumin
- 3 tablespoons chili powder
- 1/2 teaspoon oregano (dried or fresh)
- 1 tablespoon flour
- 1 cup crushed tomatoes
- 1 tablespoon honey
- 2 cups vegetable stock
Sauté onion until soft. Add garlic and spices and cook 2 minutes then stir in the flour and and cook an additional 2-3 minutes. Add the vegetable stock and whisk until smooth. Add tomatoes and honey and cook 15-20 minutes. You may use your sauce chunky or smooth. If you would like it smooth either use a hand blender and whizz or transfer ingredients to a blender and blend until smooth.
e n c h i l a d a s
Preheat oven 350°F. Heat your choice of oil in a skillet over medium high heat. Add the onions and cook until soft. Add garlic and spices and cook for one or two minutes. Add ground turkey, chicken or beef and continue cooking until browned. Taste and season with sea salt to your liking. Turn off the heat.
Warm tortillas are easier to work with, they become pliable and will not break when you roll them. Either warm the tortillas individually in a hot skillet and place them in a folded kitchen towel or stack them in foil and place them a 350°F oven for 8-10 minutes.
Rolling your enchiladas. Using one tortilla at a time, layer two large tablespoons of choice meat, sprinkle cheese, olives, and scallions on top and roll. Place the rolled enchilada, folded side down onto a large baking dish. Continue the process until you have 6-8 enchiladas packed in tight. Pour enchilada sauce over the top drenching them all. Top with the left over olives, scallions and a sprinkling of cheese. Cover with foil, bake 30 minutes in a 350° oven.
butter leaf lettuce wraps
April 16, 2015 § 49 Comments
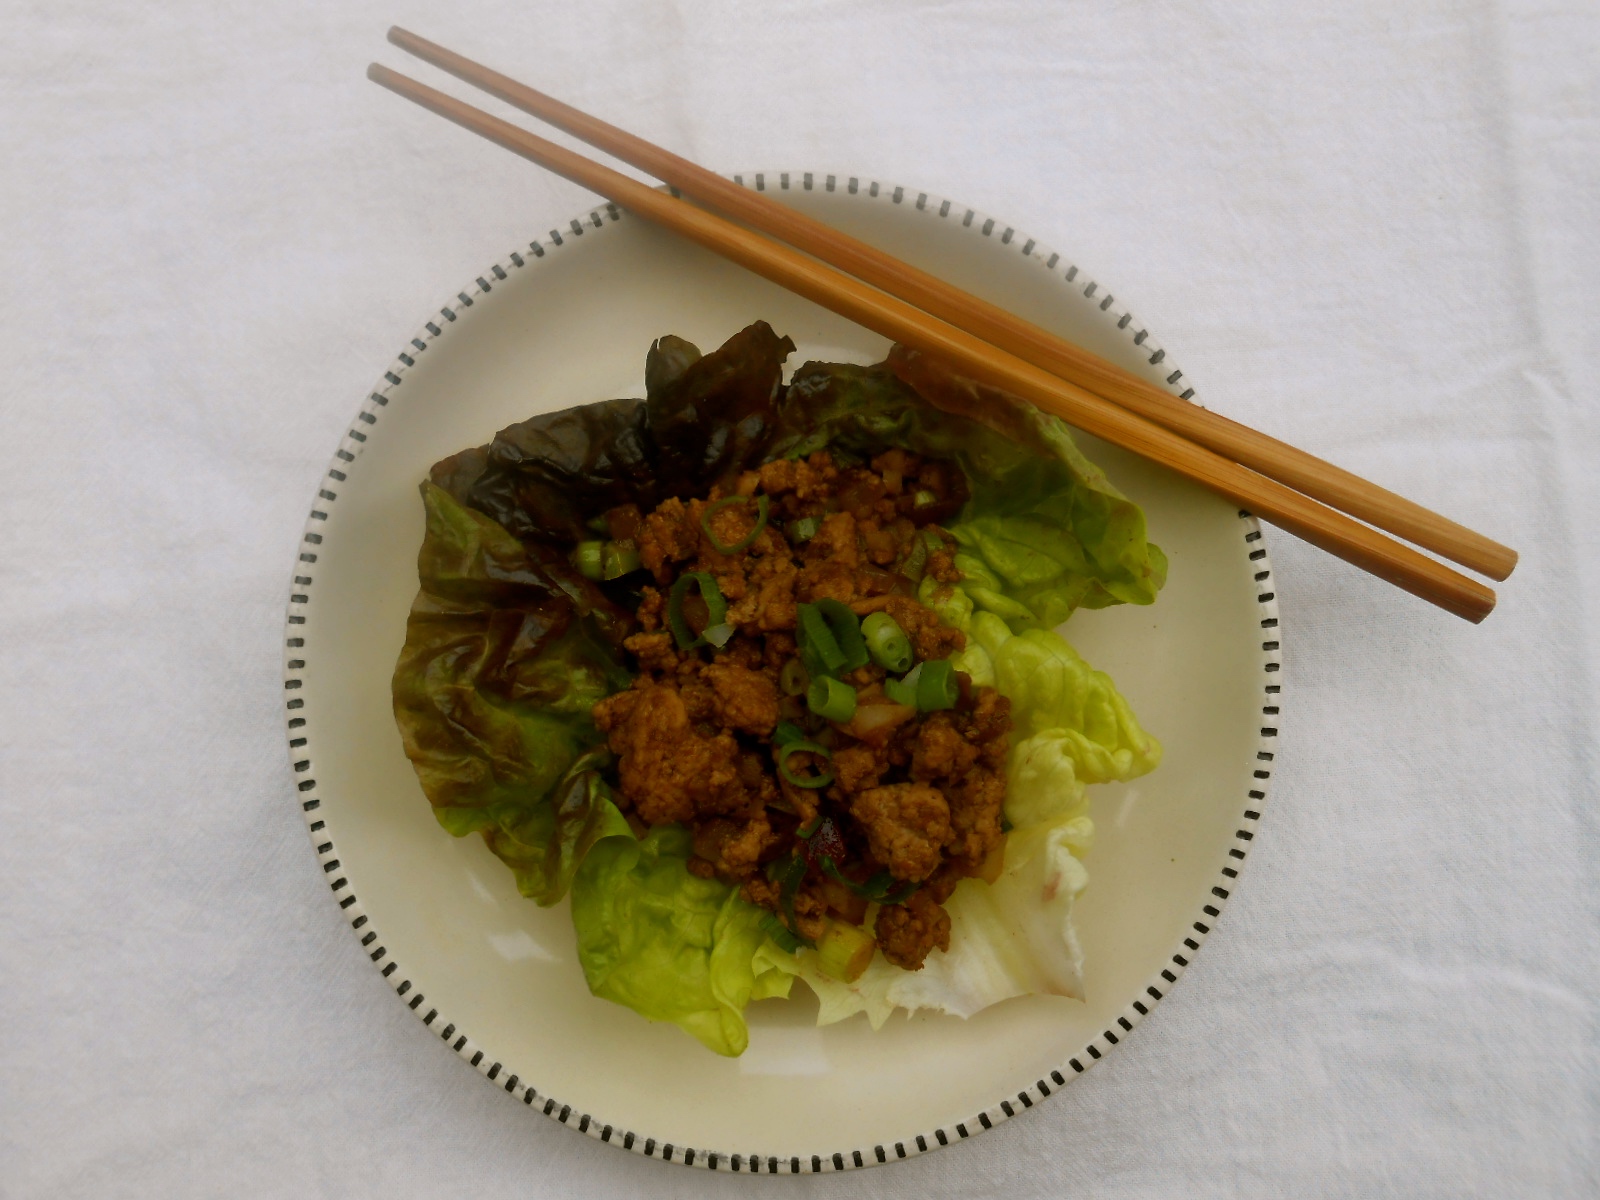 If you are considering cutting out carbs for an evening you might want to consider this for dinner. We have been working our way through a new cookbook Clean Eats by Alejandro Junger. This collection of recipes focus on whole organic foods prepared in a simple manner using good fats and healthy cooking techniques.
 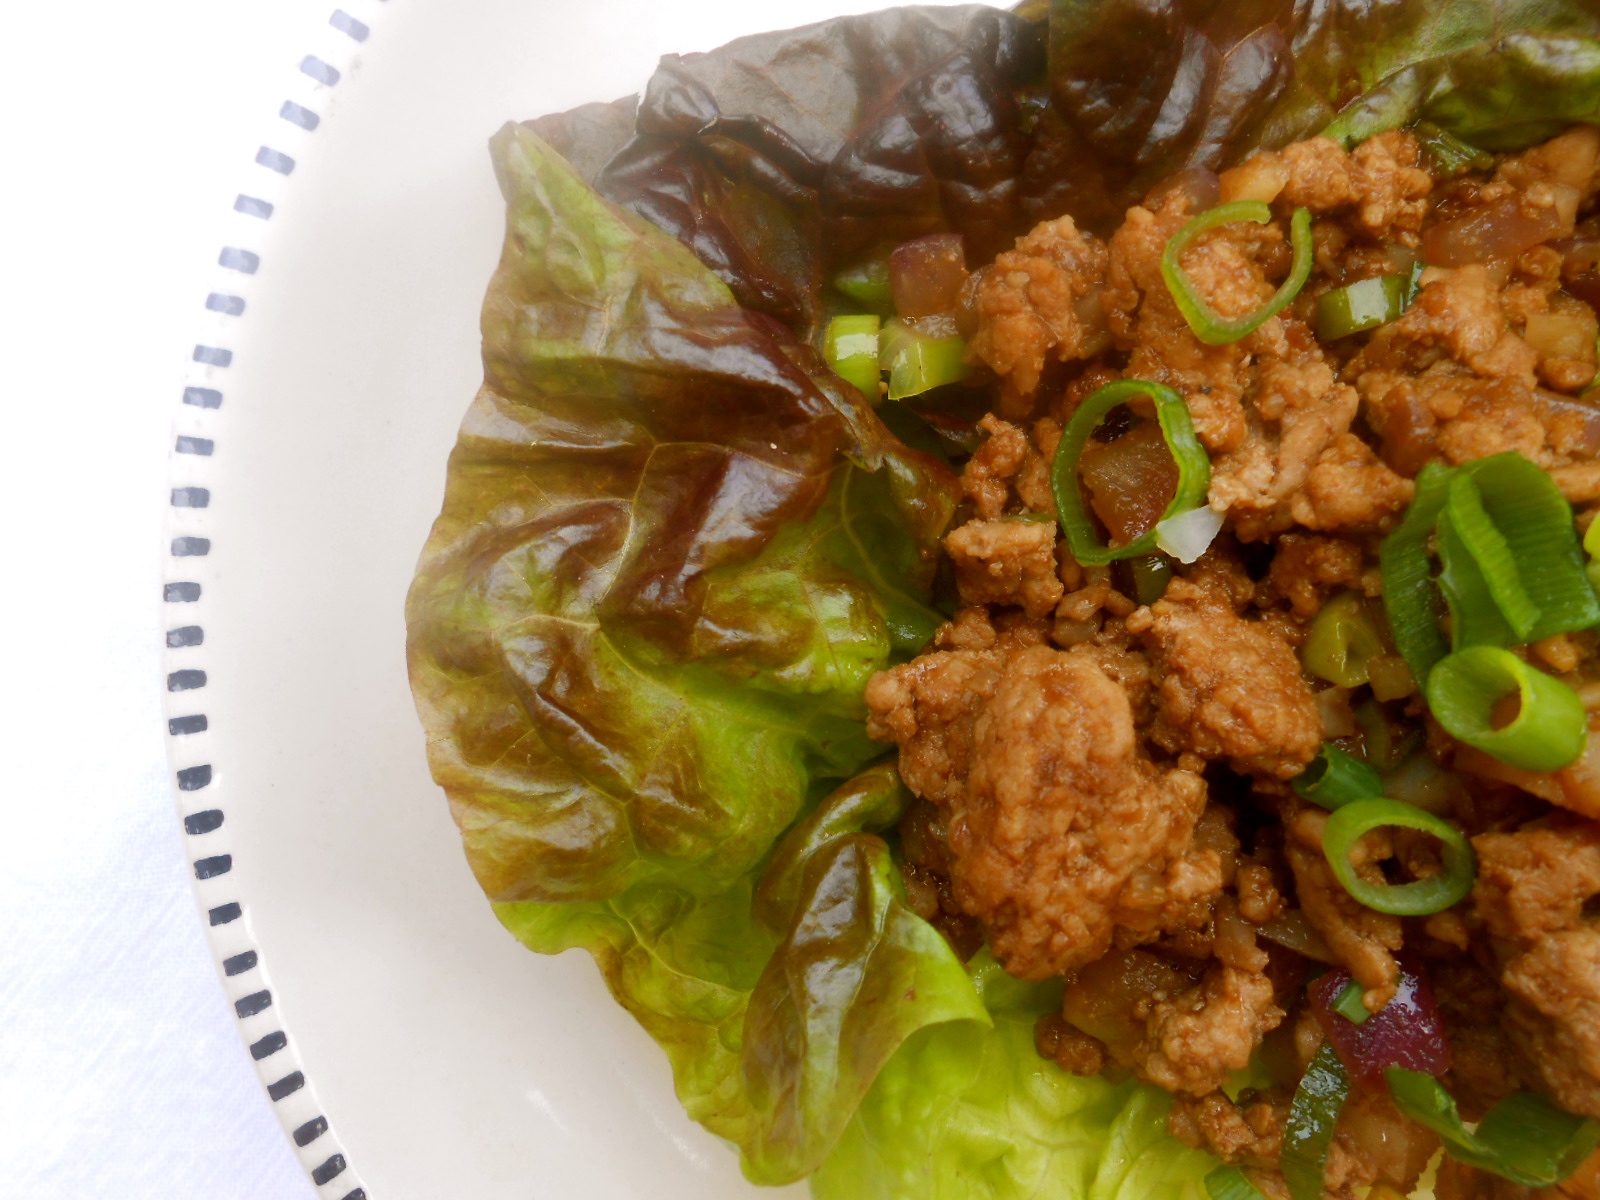 Clean eating is about enjoying organic unprocessed foods that taste good and nourish you. And these butter leaf lettuce wraps are a perfect example of eating clean, well combined whole foods. Although this recipe did not call for spicy ingredients I think it would be lovely with red pepper flakes or finely diced jalapeños.
  I n g r e d i e n t s
- 16 Boston or butter lettuce leaves
- 1 pound organic pasture-raised ground chicken
- 2 tablespoons organic extra virgin coconut oil
- 1 medium red onion, finely diced
- 1 tablespoon wheat-free tamari (or soy sauce)
- 2 tablespoons grated ginger
- 1 tablespoon rice wine vinegar
- 1/2 cup teriyaki sauce (recipe included below)
- 1 – 8 ounce can water chestnuts, drained and finely chopped
- 1 bunch scallions, chopped
- 2 teaspoons toasted sesame oil
for the teriyaki sauce
- 2/3 cup balsamic vinegar
- 2/3 cup coconut nectar (I omitted this)
- 2 teaspoons freshly grated ginger
- 1/2 teaspoon freshly ground black pepper
- 2 teaspoons brown rice miso
- 2 tablespoons water
First, make the sauce. In a small saucepan, combine the balsamic vinegar, coconut nectar, ginger and pepper. Bring the mixture to a boil then lower the heat and simmer for 10 minutes. Remove from heat and let it cool before stirring in the miso and water. Set aside. Rinse the whole lettuce leaves and pat them dry, being careful not to tear them. Set aside. In a medium skillet, brown the chicken or turkey in 1 tablespoon of the coconut oil, stirring often. Reduce the heat if the meat starts to brown too fast and turn too dark. With it is cooked through, set it aside to cool. In another skillet, heat 1 tablespoon of coconut oil and sauté the onion, garlic, tamari, ginger and vinegar, and add 1/2 cup of the teriyaki sauce. Stir until everything is well mixed and turning tender and slightly browned. Add the water chestnuts, scallions, sesame oil, and browned chicken. Continue cooking for about 2 minutes. Arrange the lettuce leaves around the outer edges of a large serving platter, and pile the filling mixture in the center of the plate. Serve allowing each person to spoon a portion of the filling into a lettuce leaf and wrap the leaf around the filling like a burrito. Dip your wrap in leftover teriyaki sauce.
grilled oysters
April 13, 2015 § 48 Comments

We picked up a dozen Penn Cove oysters the other day and they were beauties. We are very fortunate to live here in the Pacific Northwest where fish and shellfish are fresh and abundant. I found this little bit of information on the online oyster guide. “Beach-cultured in Samish Bay, then hung in the deep waters of Whidbey Island’s Penn Cove to purge, Penn Cove Oysters are one of the quintessential Northwest oysters, eternally popular. They always have a nice size—four inches or so—gray-green shells, and the crunchy freshness of a salted cucumber.” What’s not to love?

We placed our oysters cup side down on the hot grill. In approximately 5 minutes they began to open up and we topped them with a tiny dollop of herbed butter.

Recipes from Bon Appetit Magazine
Knowing a whole stick of herb butter was going to be too much for the three of us I reduced the Bon Appetit recipe by half and made a few other changes:
h e r b b u t t e r
- 1/2 cup fresh herb leaves (such as flat-leaf parsley & chives)
- 1 garlic clove
- 1/4 cup (1/2 stick) unsalted butter, room temperature
- 1/2 teaspoon finely grated lemon zest
- 1 teaspoon fresh lemon juice
- sea salt, freshly ground pepper
o y s t e r s
Prepare a grill for medium-high heat. Scrub oysters. Place, cupped side down, on grate, cover grill, and grill until oysters begin to open, about 5 minutes. Transfer opened oysters to a platter (discard any that do not open). Let cool slightly, then use an oyster knife or screwdriver (we just used a fork) to pry shells open, keeping cupped side down and retaining as much liquid as possible. Using an oyster knife or paring knife (we just used a fork), cut muscles connecting oysters to shells. Serve warm with butter, lemon wedges, and hot sauce.

