summertime corn soup
July 10, 2014 § 71 Comments
Despite the fact that it is summer and the heat has a way of killing our enthusiasm to turn on the stove, I did it anyway; I made corn soup. And what a delight! Sweet corn and tomatoes are the quintessential tastes of summer. Adding a nice plump jalapeño to the soup pot created a softly spiced bowl of summer goodness.
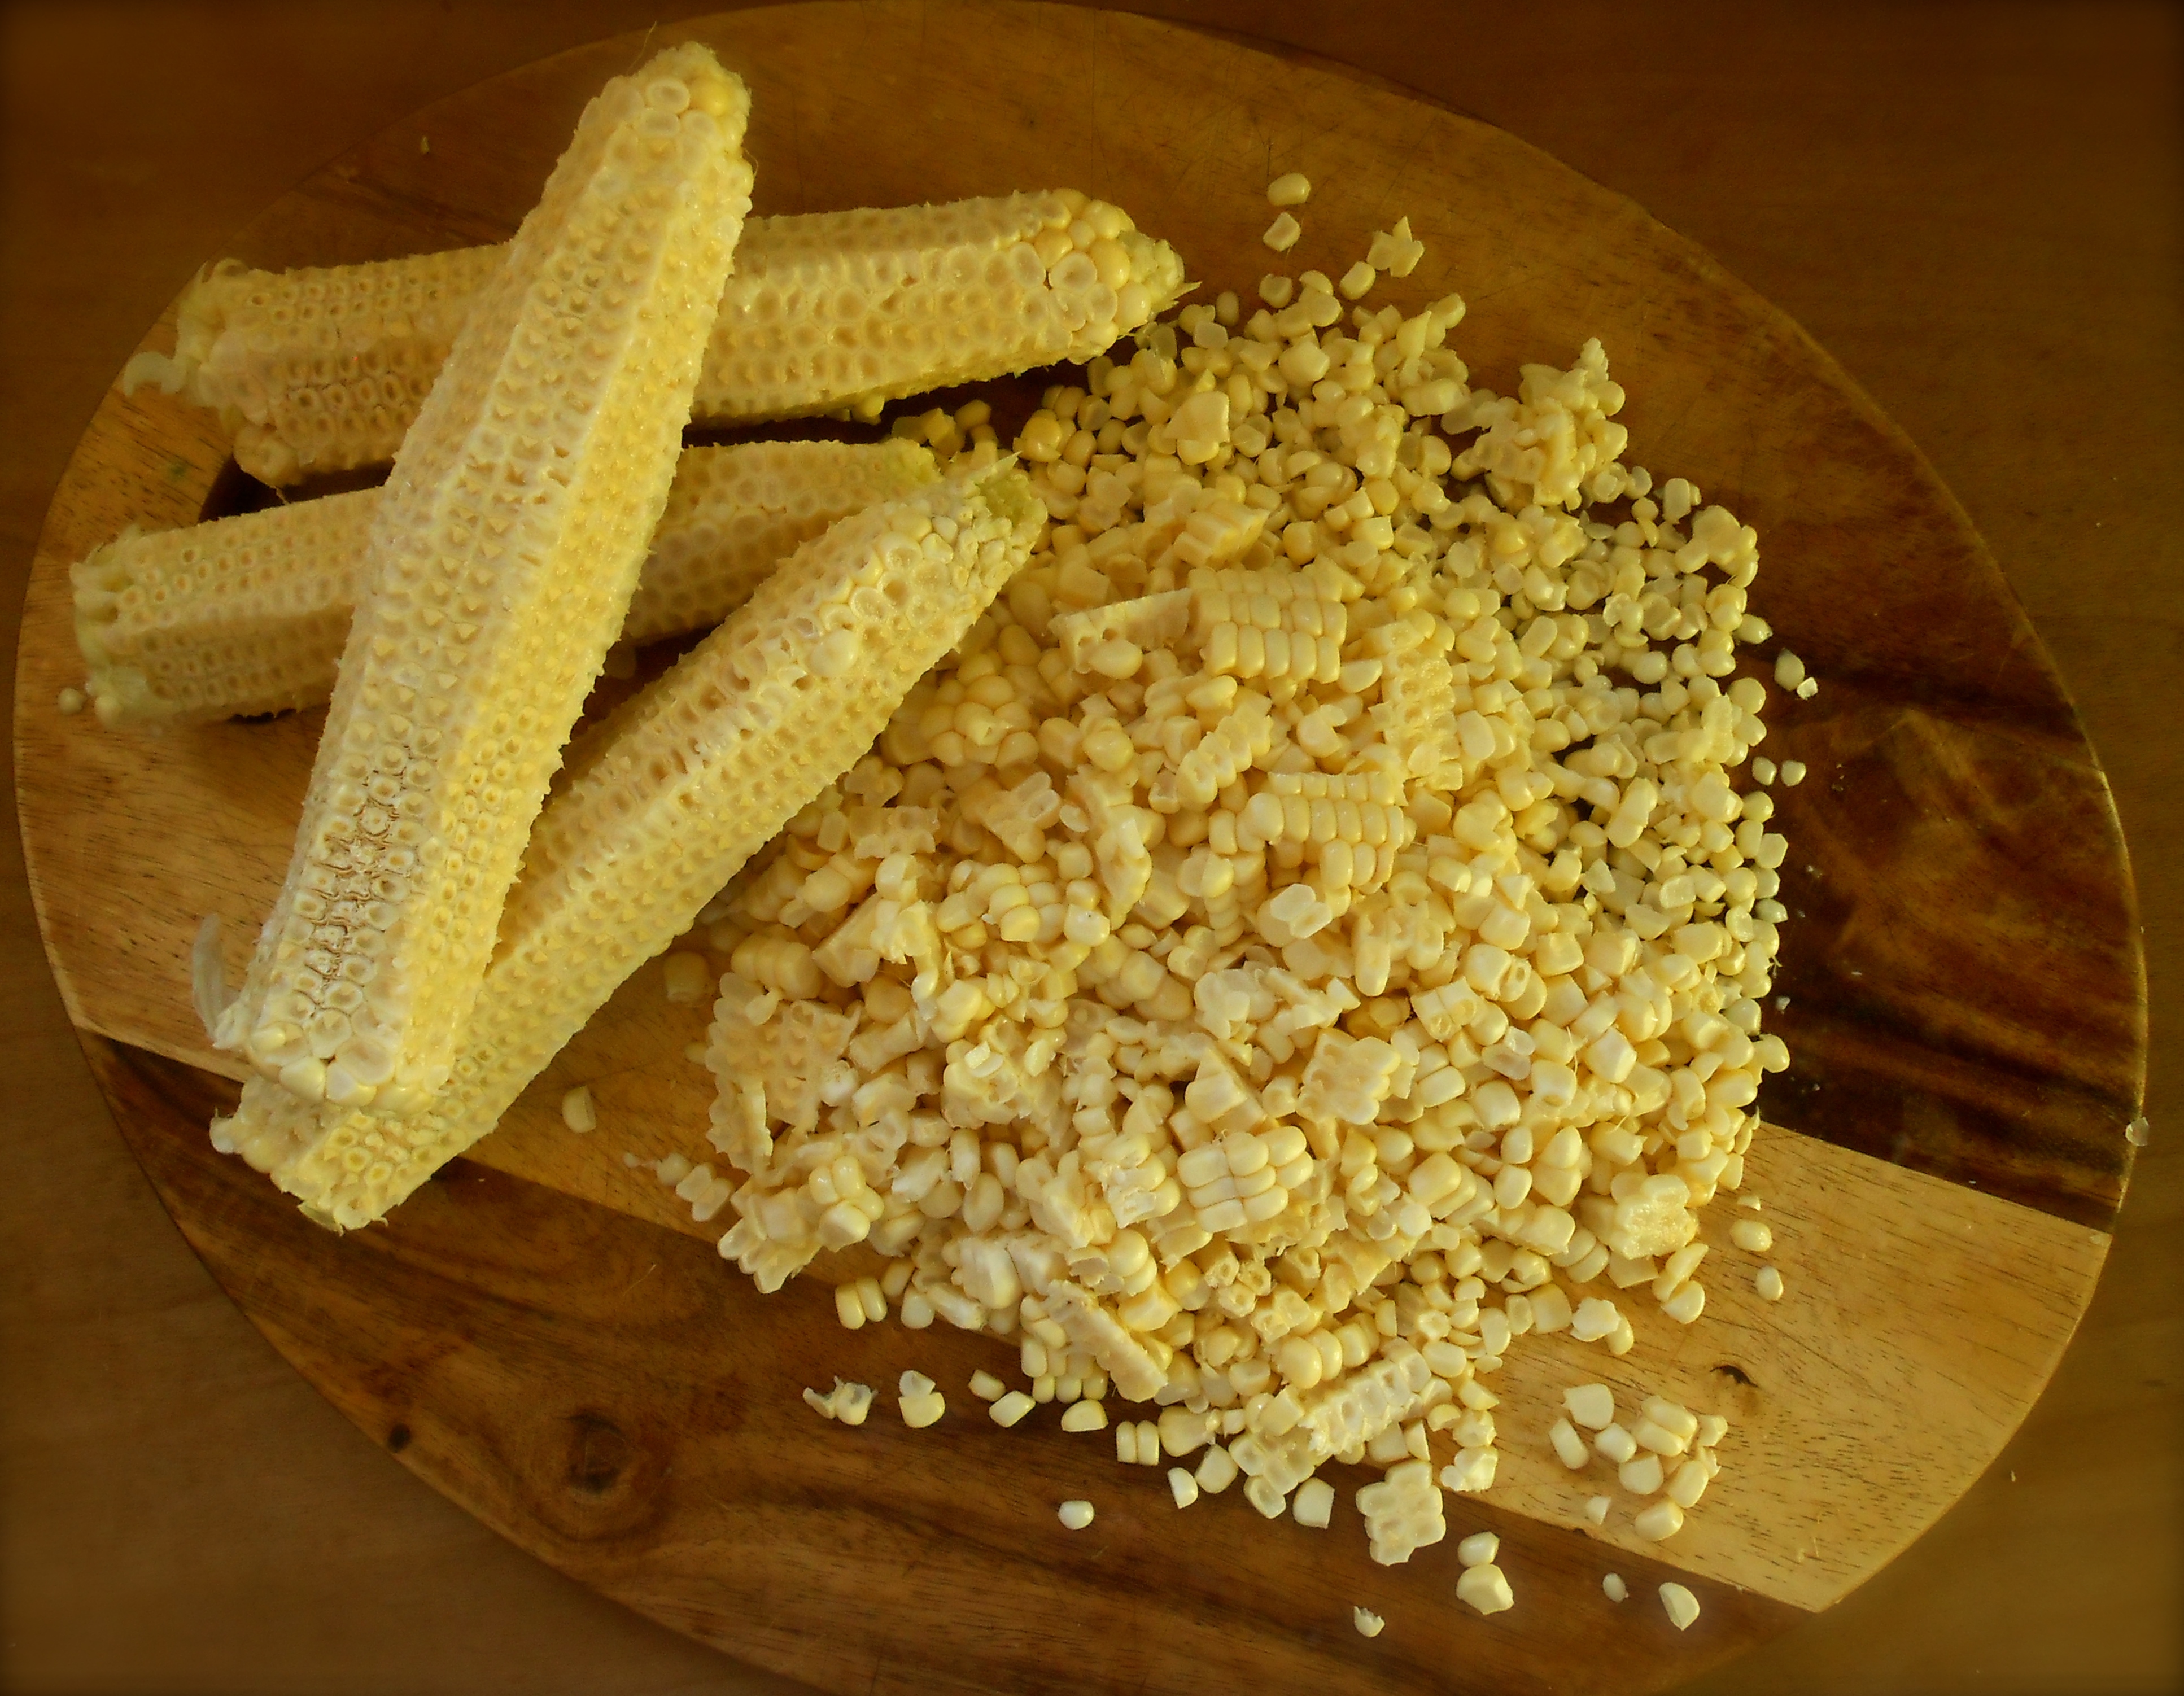
After shucking your corn and before cutting kernels for a soup you want to eliminate as much silk as possible. A helpful little technique in removing the silk from your corn is to dampen a paper towel and wipe the ear from tip to stem to capture any clinging strands. A few silk strands left on an ear of corn that’s destined for the grill is no big deal, as they will be quickly singed off. On the other hand, it is not very pleasant to come across a silk string in your soup. 
Recipe slightly adapted from Fine Cooking Magazine.
I n g r e d i e n t s
- 4 ears of corn, husks and silks removed
- 3 tablespoons olive oil
- 1 medium onion, chopped
- Sea salt
- 1 teaspoon cumin
- 1 teaspoon coriander
- 1 teaspoon chili powder
- 1 fresh jalapeño, seeded and minced
- 1 clove garlic, minced
- 5 medium tomatoes, peeled, seeded and chopped
- 3 medium red potatoes
- 1/2 cup half & half
- 1/2 cup grated cheddar
Hold each ear of corn with the flat end in a large bowl and use a sharp knife to cut down the cob, removing the kernels. You should have about 2 cups of kernels. Reserve the cobs. In a heavy based stockpot, heat the olive oil, then add the onions and 1/2 teaspoon salt. Cook over low heat until the onions are soft, about 10 minutes. Add the cumin, coriander, chili powder, jalapeños, and garlic to the pot and sauté until the jalapeños are slightly softened, 2 to 3 minutes. Add the tomatoes and cook until they release their juices and soften, about 10 minutes. Add the potatoes and reserved corncobs, and 3 cups of water. Cover and simmer until the potatoes are tender but still firm, 8 to 10 minutes. Add the corn kernels and cook for 1 minutes more, until the kernels are heated through. Remove the pot from the stove. Remove the corncobs. Using an immersion blender, blend the soup until about half of it is puréed, or put half of the soup in a blender and purée it, and then combine. Add the half and half and cheese and return the soup to the stove. Heat over low heat until the cheese is melted; do not boil. Taste and season with more salt as needed. Ladle into soup bowls and serve right away.
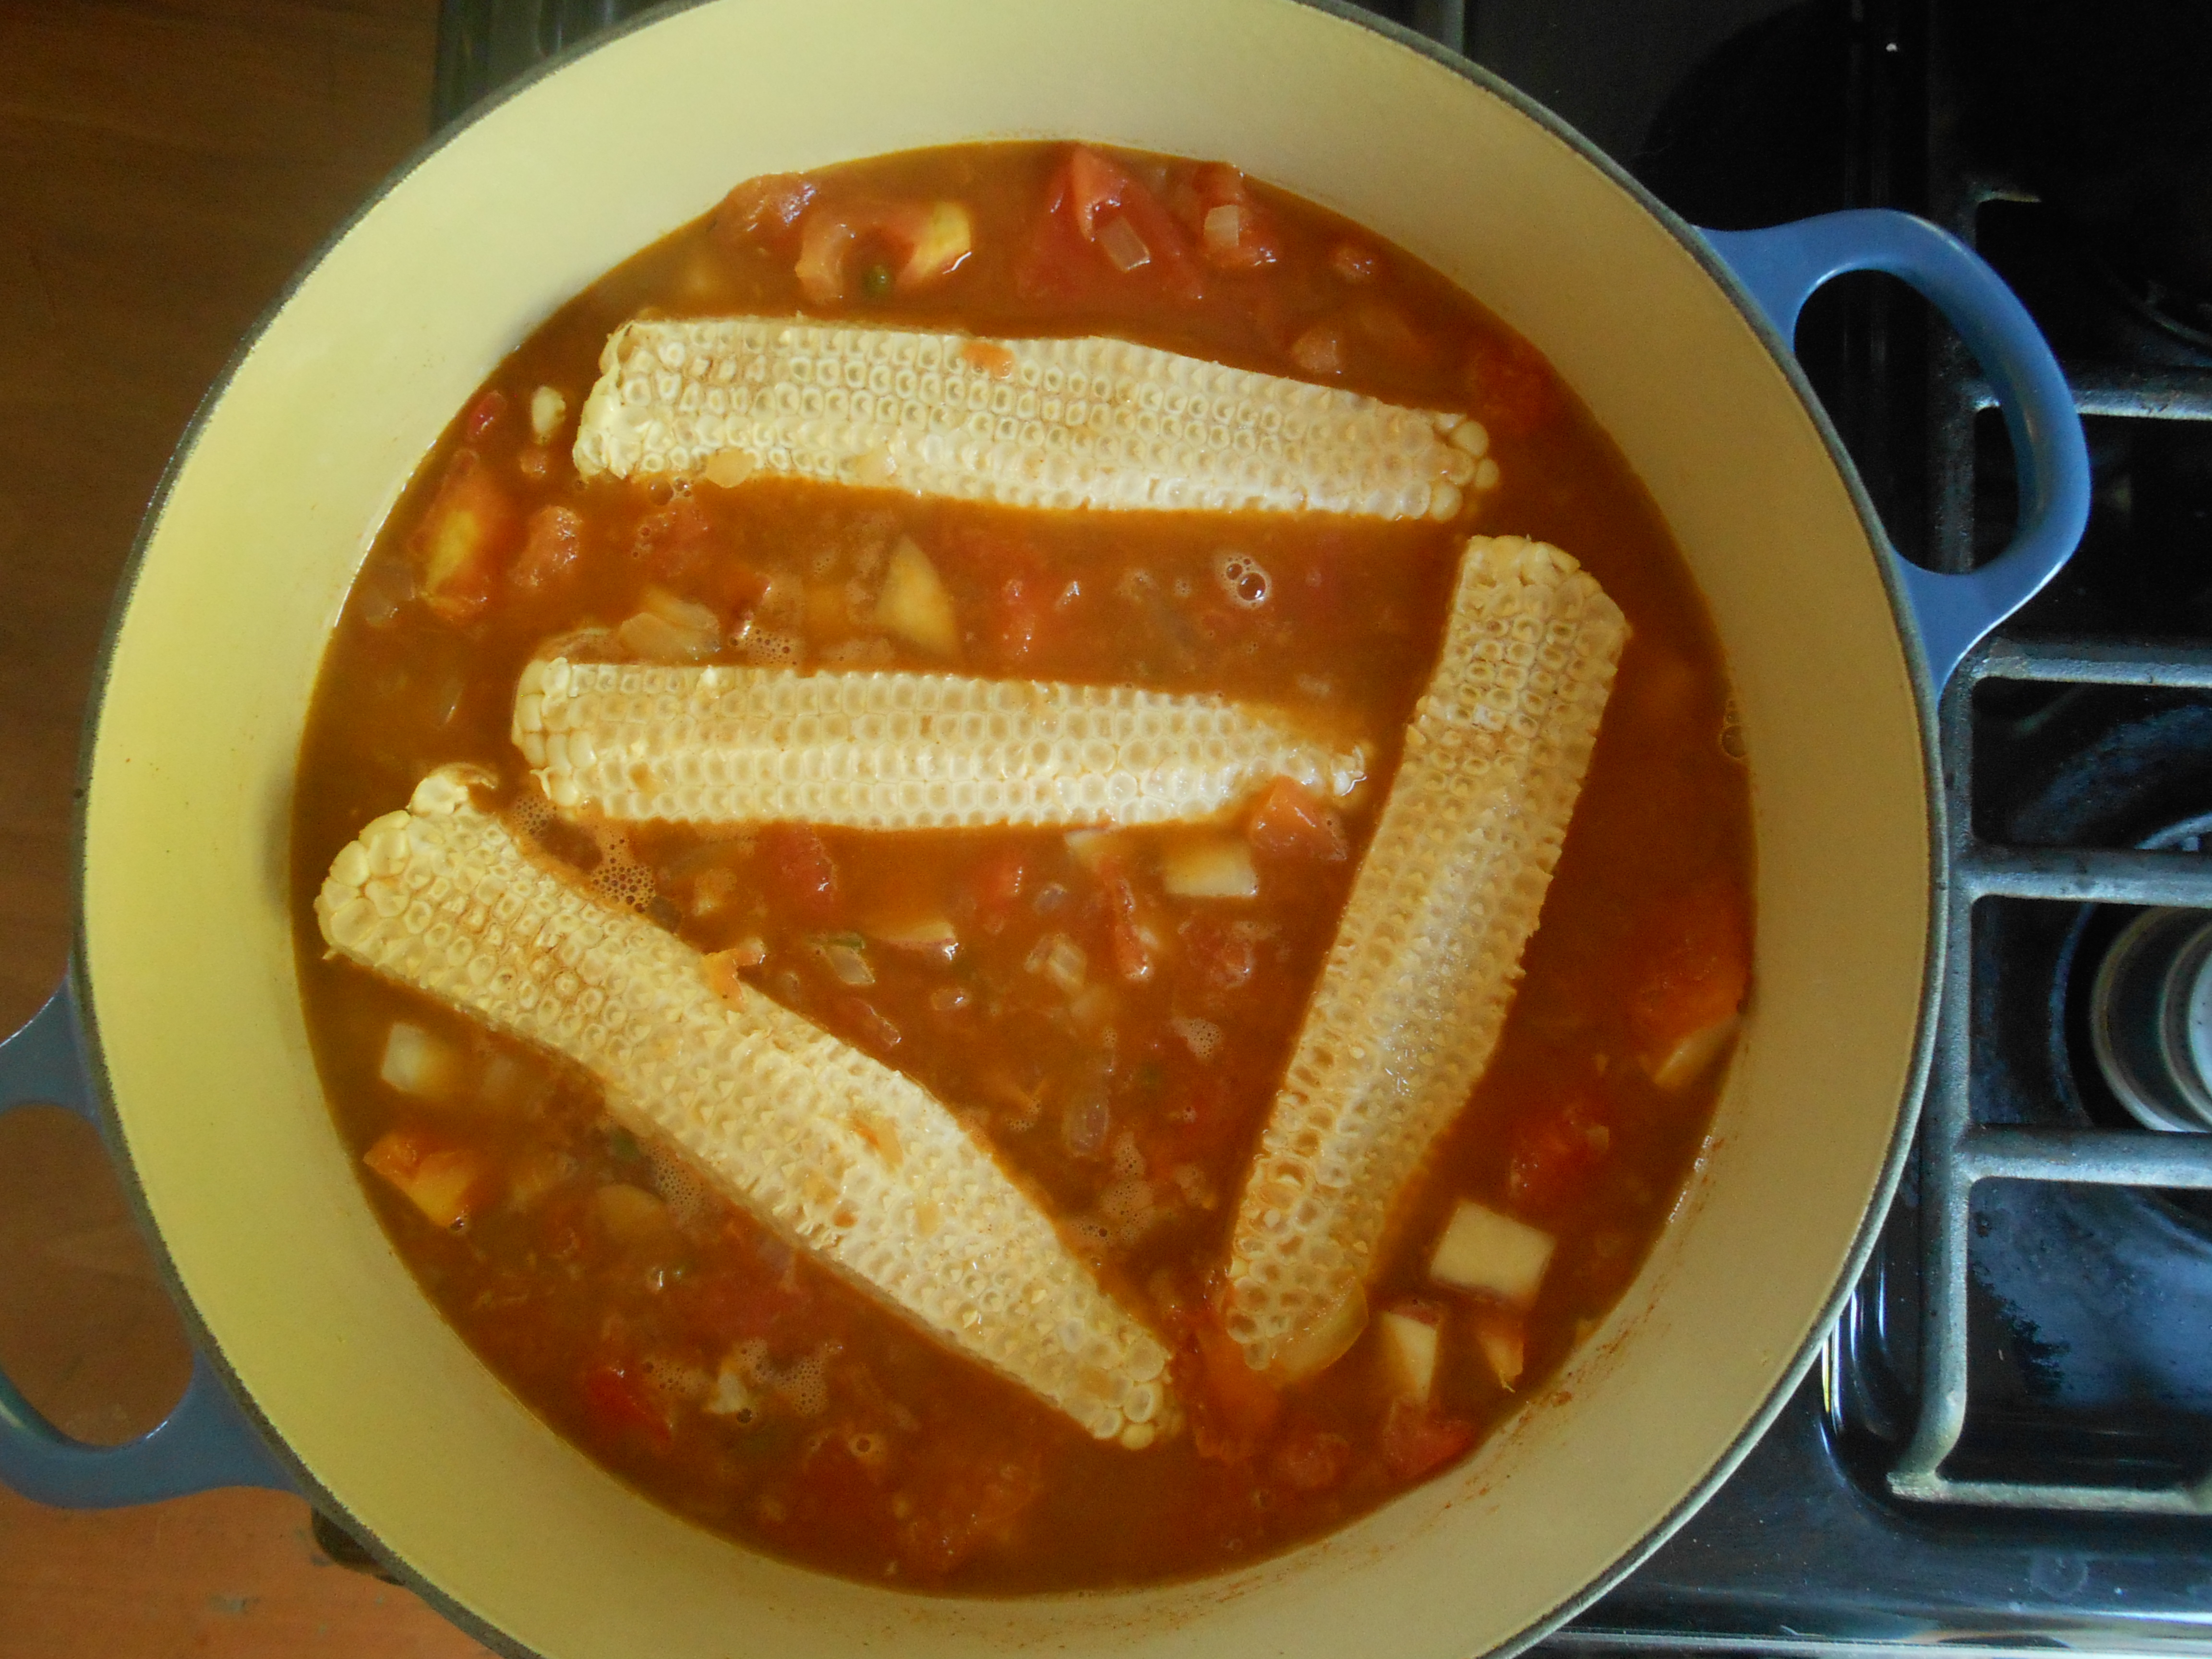
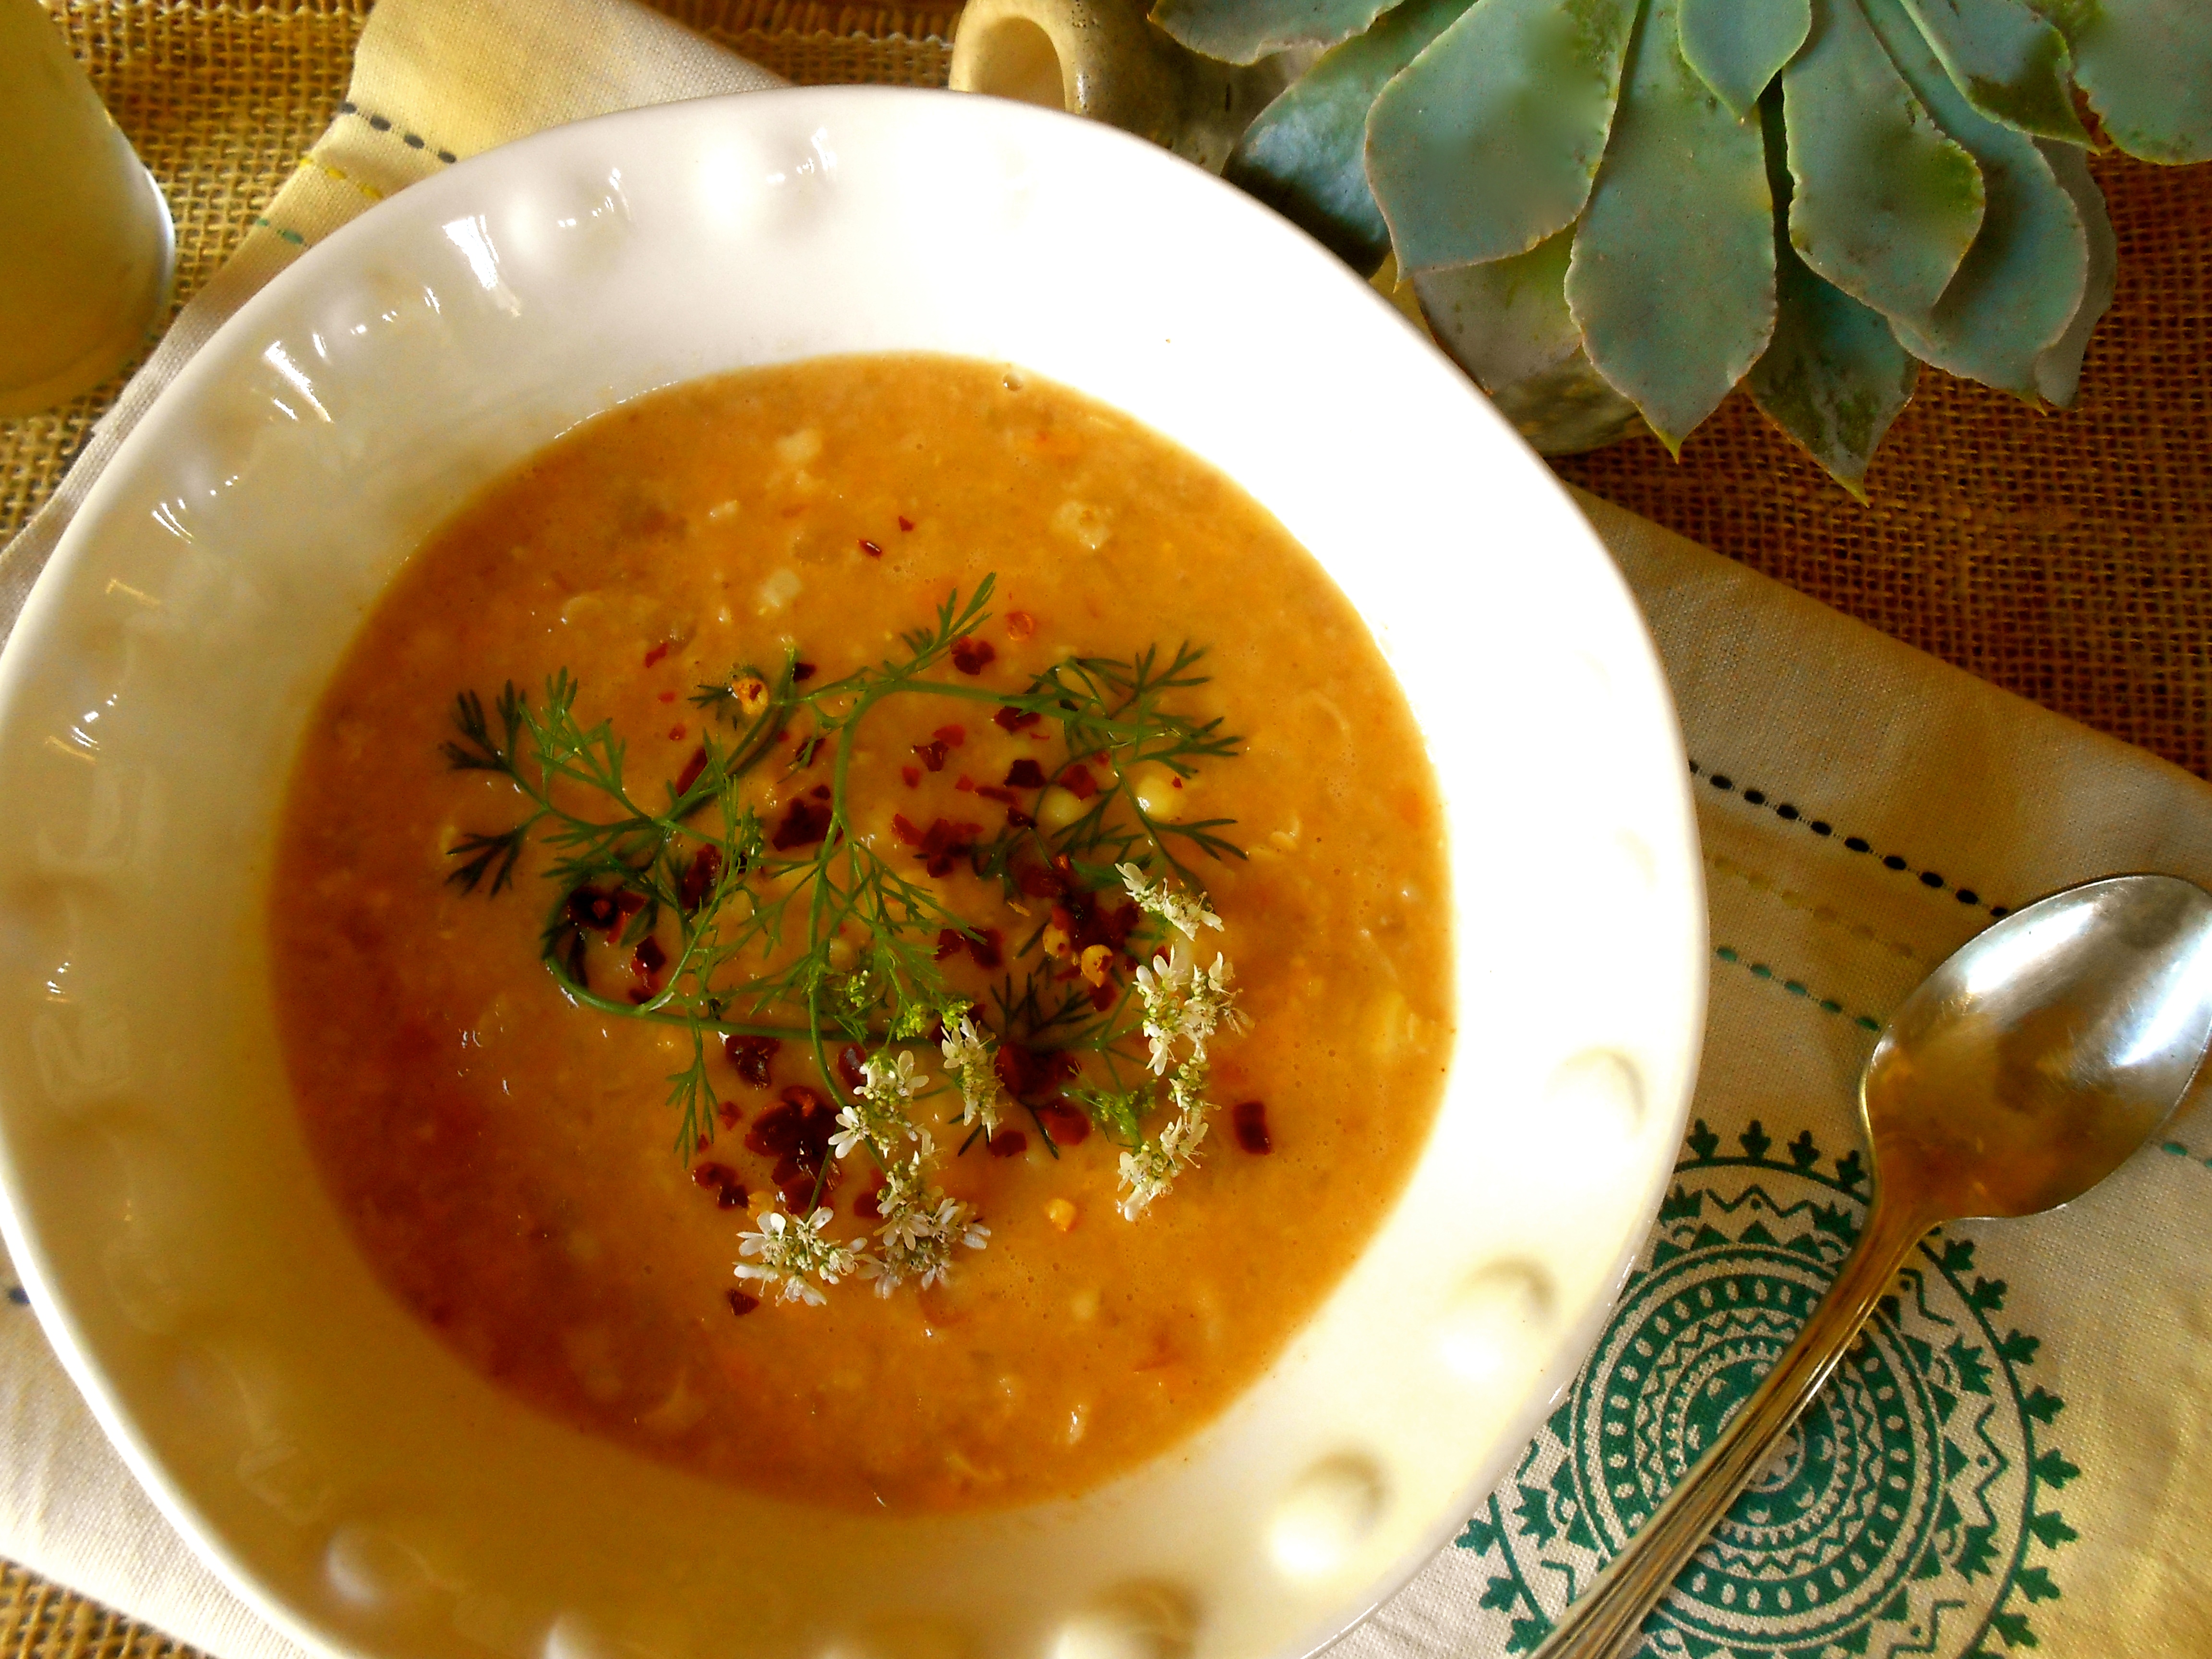
Save the corncobs! Simmering the corncobs in the soup intensifies the sweet corn flavor.

Serve topped with red chili flakes and cilantro flowers. And don’t forget the glass of vinho verde.
tomato pie
July 7, 2014 § 68 Comments
Savory pies are just about my favorite thing. With left over ingredients from our caprese salad I knew just what to make for breakfast Saturday morning. You could call this caprese pie.

the lovely papercut art by Nikki McClure, a wonderful artist from Olympia, Washington…
Whenever I head out to the market I always ask the guys if there is anything special they would like me to pick up. And my son always says “CAPRESE SALAD”! I am not kidding when I say always. He loves it, especially made with the fresh stretched mozzarella available at our market. I am always delighted when he doesn’t request something sugary or a highly processed snack food. And it is quite satisfying having your teenage son in the kitchen preparing a caprese salad for dinner.
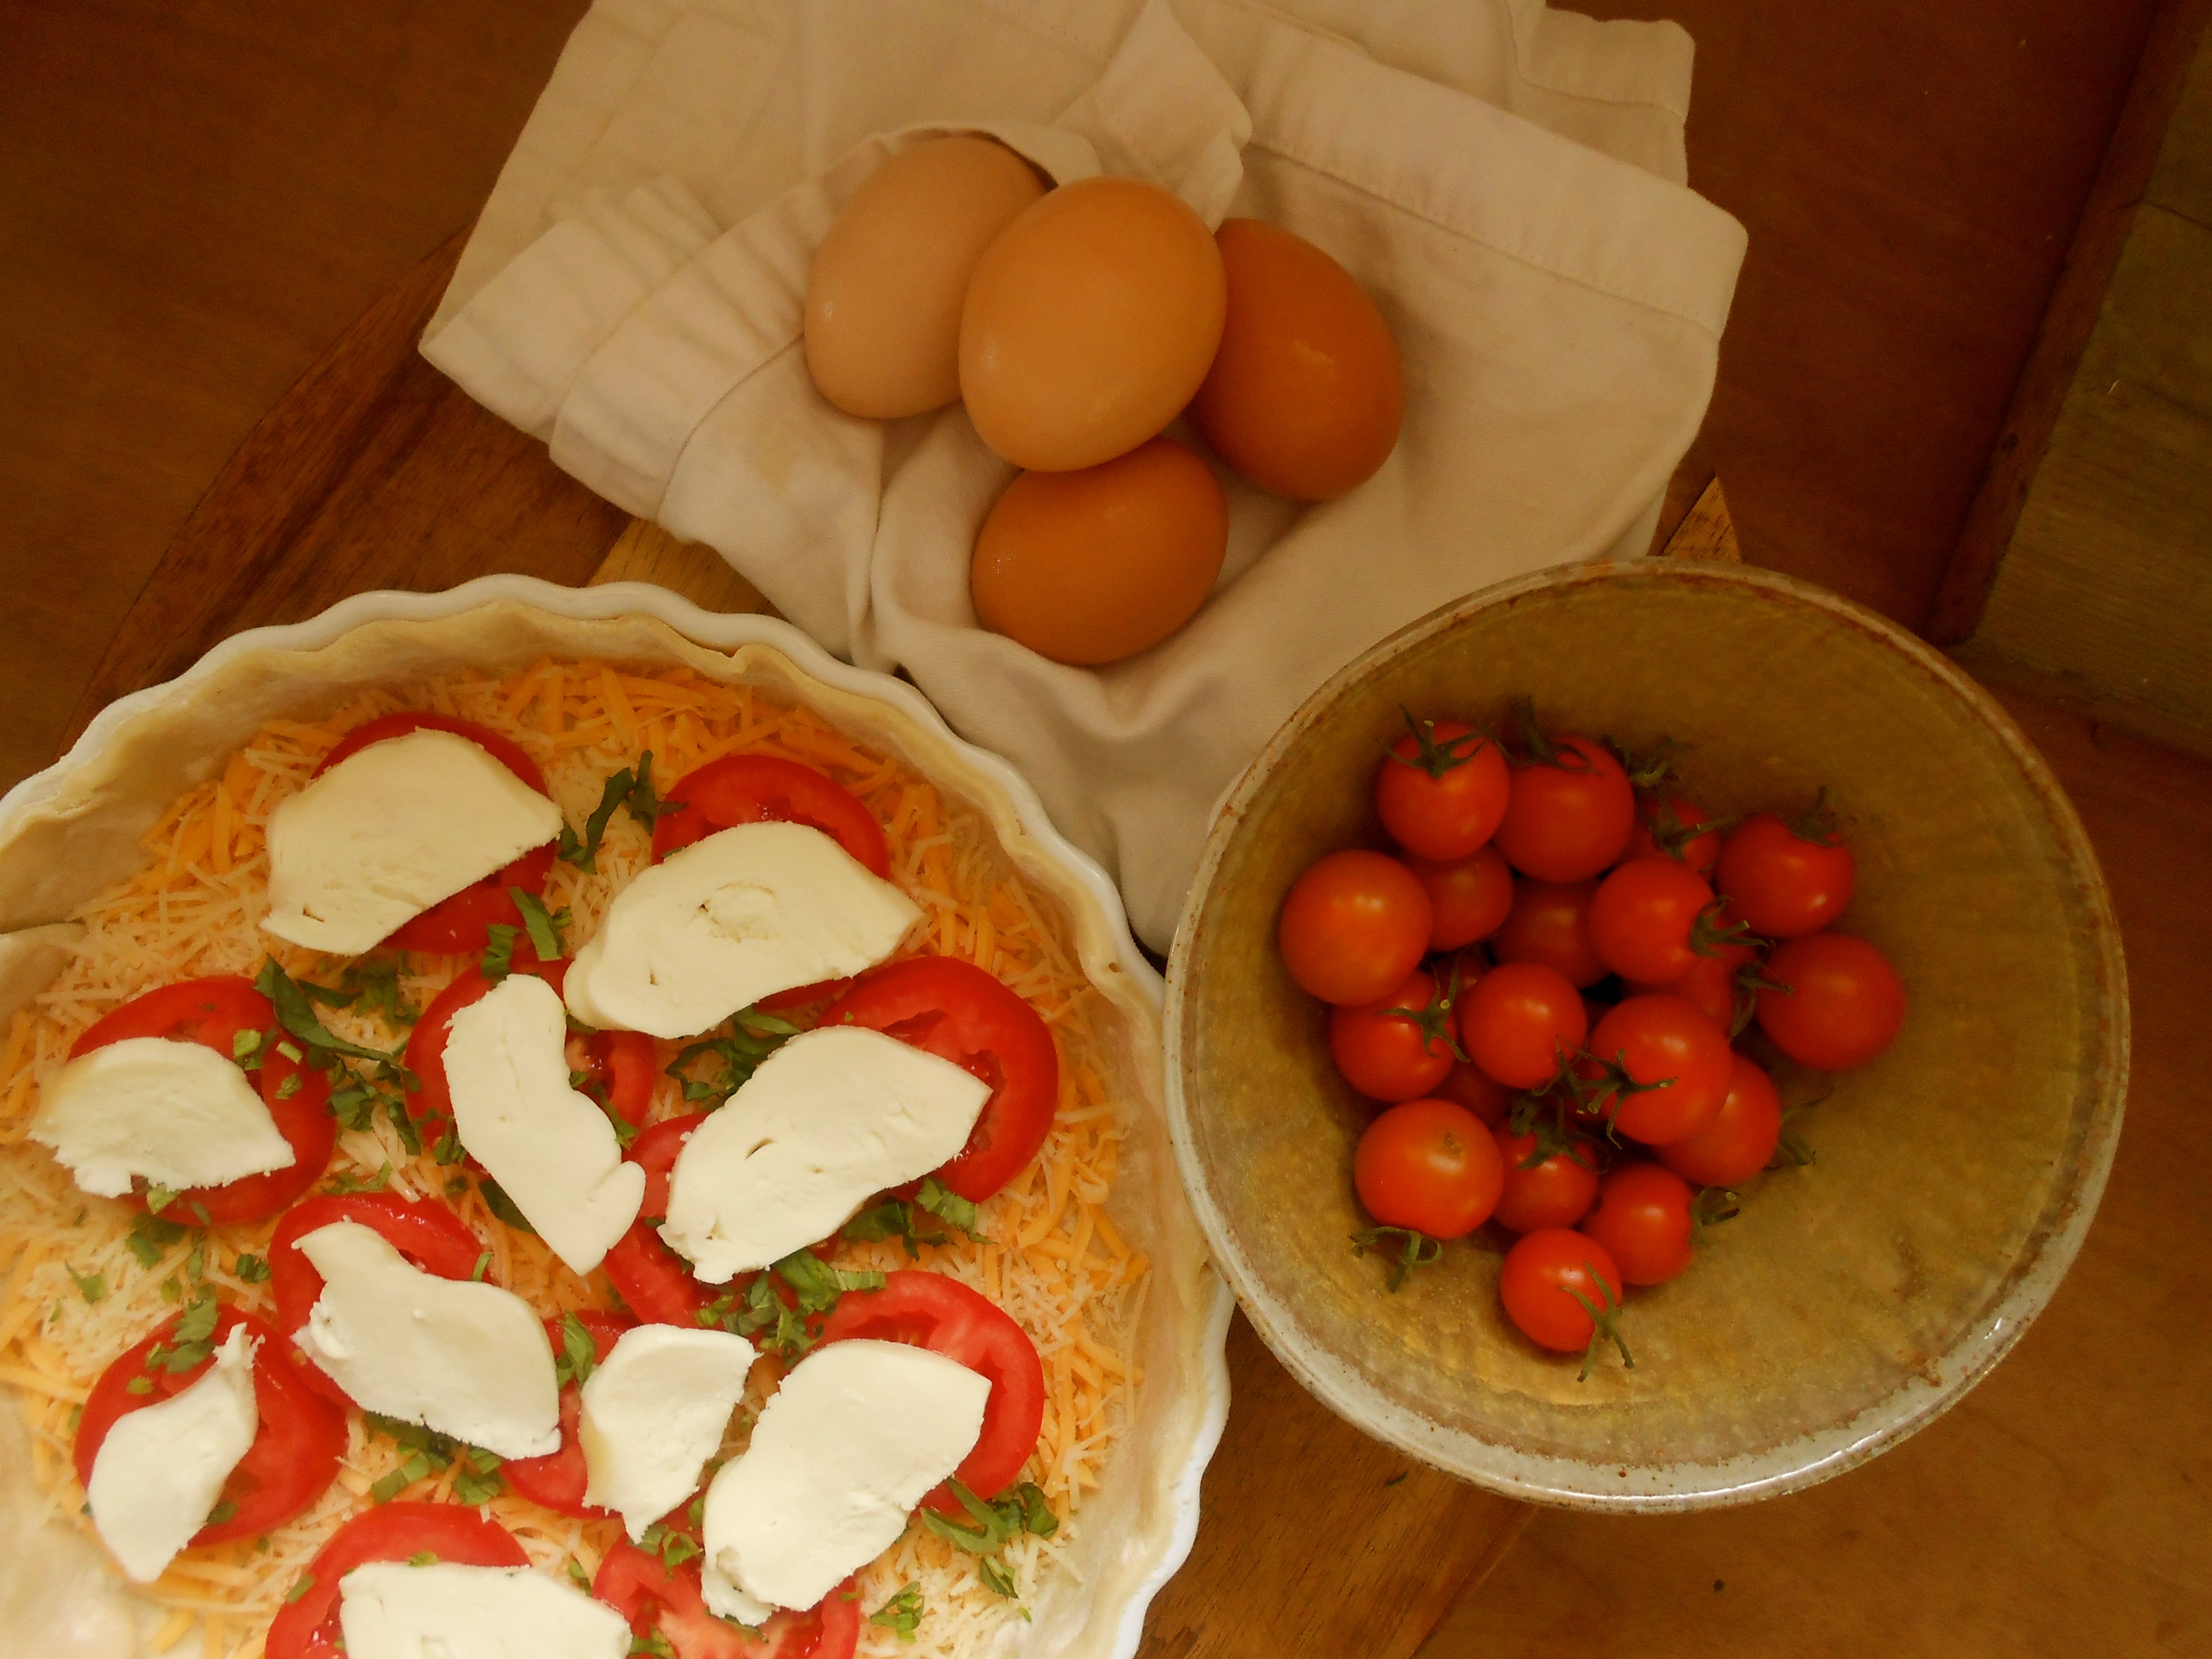
As for the pie, I always follow Molly Katzen’s quiche formula whenever I make a custard style pie. Her recipe has never failed me. Once you assemble the basic groundwork, choices for the filling are limitless. After your crust is in place the first layer to place upon the crust is grated cheese. The fat in the cheese melts and forms a moisture resistant barrier between the filling and the crust, thus helping to keep the crust from getting soggy. For the filling, vegetables such as asparagus, broccoli, mushrooms and onions need to be steamed or sautéed prior to layering onto the pie. Here I used uncooked tomatoes which was quite nice in keeping a fresh, raw flavor, much like caprese salad. After applying the filling over the cheese, add the custard, which is 4 eggs and 1-1/2 cups milk, top with cherry tomatoes and bake in a 375°F oven for 35 – 40 minutes. Simple, straightforward. casual or elegant.
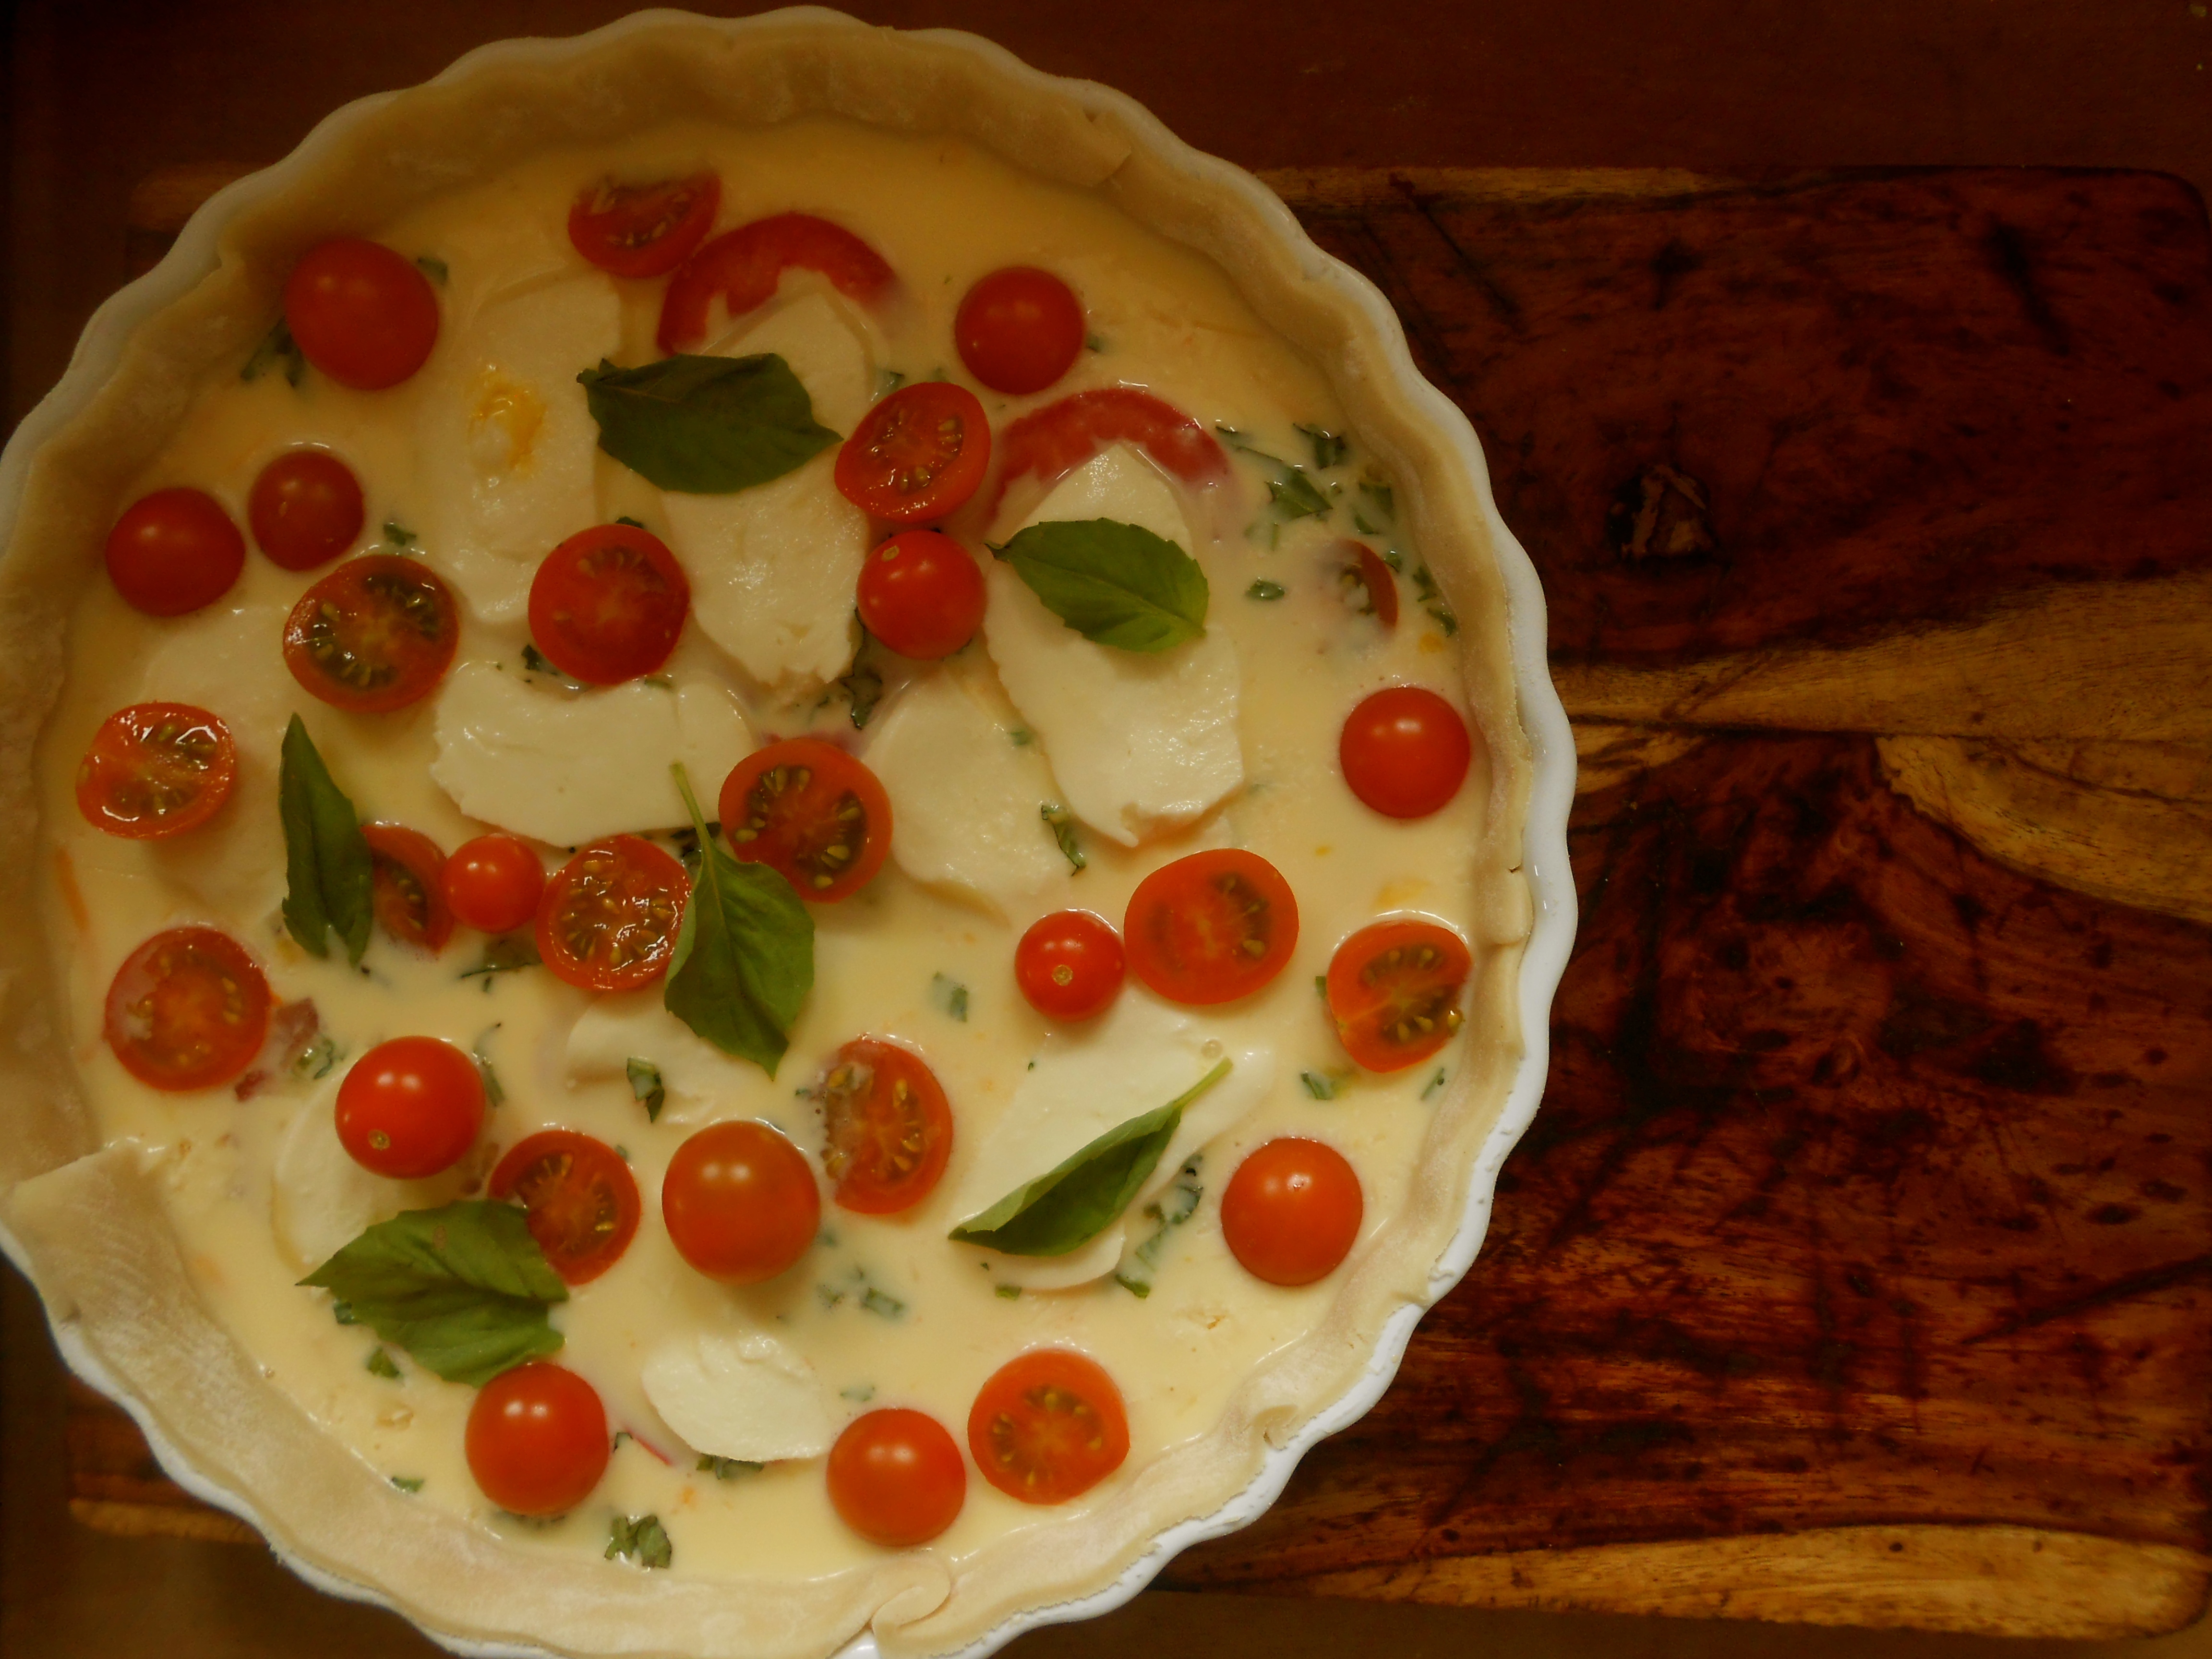
I n g r e d i e n t s
- basic pie crust
- 1 cup grated cheese, such as swiss, gruyére, sharp or medium cheddar
- 1/4 cup grated parmesan
- fresh mozzarella cheese, 1/8th inch slices (I used enough for 8 round slices)
- 3 roma tomatoes, sliced
- a few sprigs basil
- approximately 20 cherry tomatoes, sliced in 1/2
- 4 eggs
- 1-1/2 cup milk
Prepare your pie crust and place onto your pie pan. Deposit both the grated cheese and parmesan directly upon the crust. Add roma tomato slices, mozzarella slices and basil. Beat together 4 eggs and 1-1/2 cups milk and pour it over the top. Finish the top with cherry tomatoes. Bake 35-40 minutes at 375°F.

beets & eggs
June 23, 2014 § 86 Comments

We love beets and more often than not we have a couple of roasted beauties in our refrigerator wrapped in foil and ready to toss in a salad, pack in our lunchbox during the work week, or a few on hand to cook this lovely breakfast on a Saturday morning. You could add a cut up baked russet potato and 1/2 a diced onion into the skillet and call it red flannel hash. Today’s beets & eggs are kept clean and starch free.

We have been keeping it fairly simple in the kitchen lately, nothing too elaborate. I haven’t followed a recipe in a couple of weeks. I am just sticking to dishes we know and love. I enjoy cooking meals that just sort of come together naturally from instinct. Beets and eggs fall into this category. This breakfast comes together quickly if you have roasted beets on hand. Simply pierce beets several times with a fork, wrap in foil and bake in a 450°F oven for one hour. After cooling off you may refrigerate them for 3 or 4 days. They peel very easily once they are roasted.
I n g r e d i e n t s
- 2 roasted beets, peeled and cut
- 3 tablespoons olive oil
- 4 organic eggs
- sea salt and pepper
- fresh dill
- feta cheese
Heat olive oil in a skillet over medium high heat. Add beets and toss around until well coated. Cook until warmed through and lower the heat to medium. Crack the eggs around the circumference of the skillet. Cover the pan and let the eggs poach until desired doneness. Season with sea salt and pepper and serve with fresh dill and feta.
stroganoff
June 16, 2014 § 87 Comments
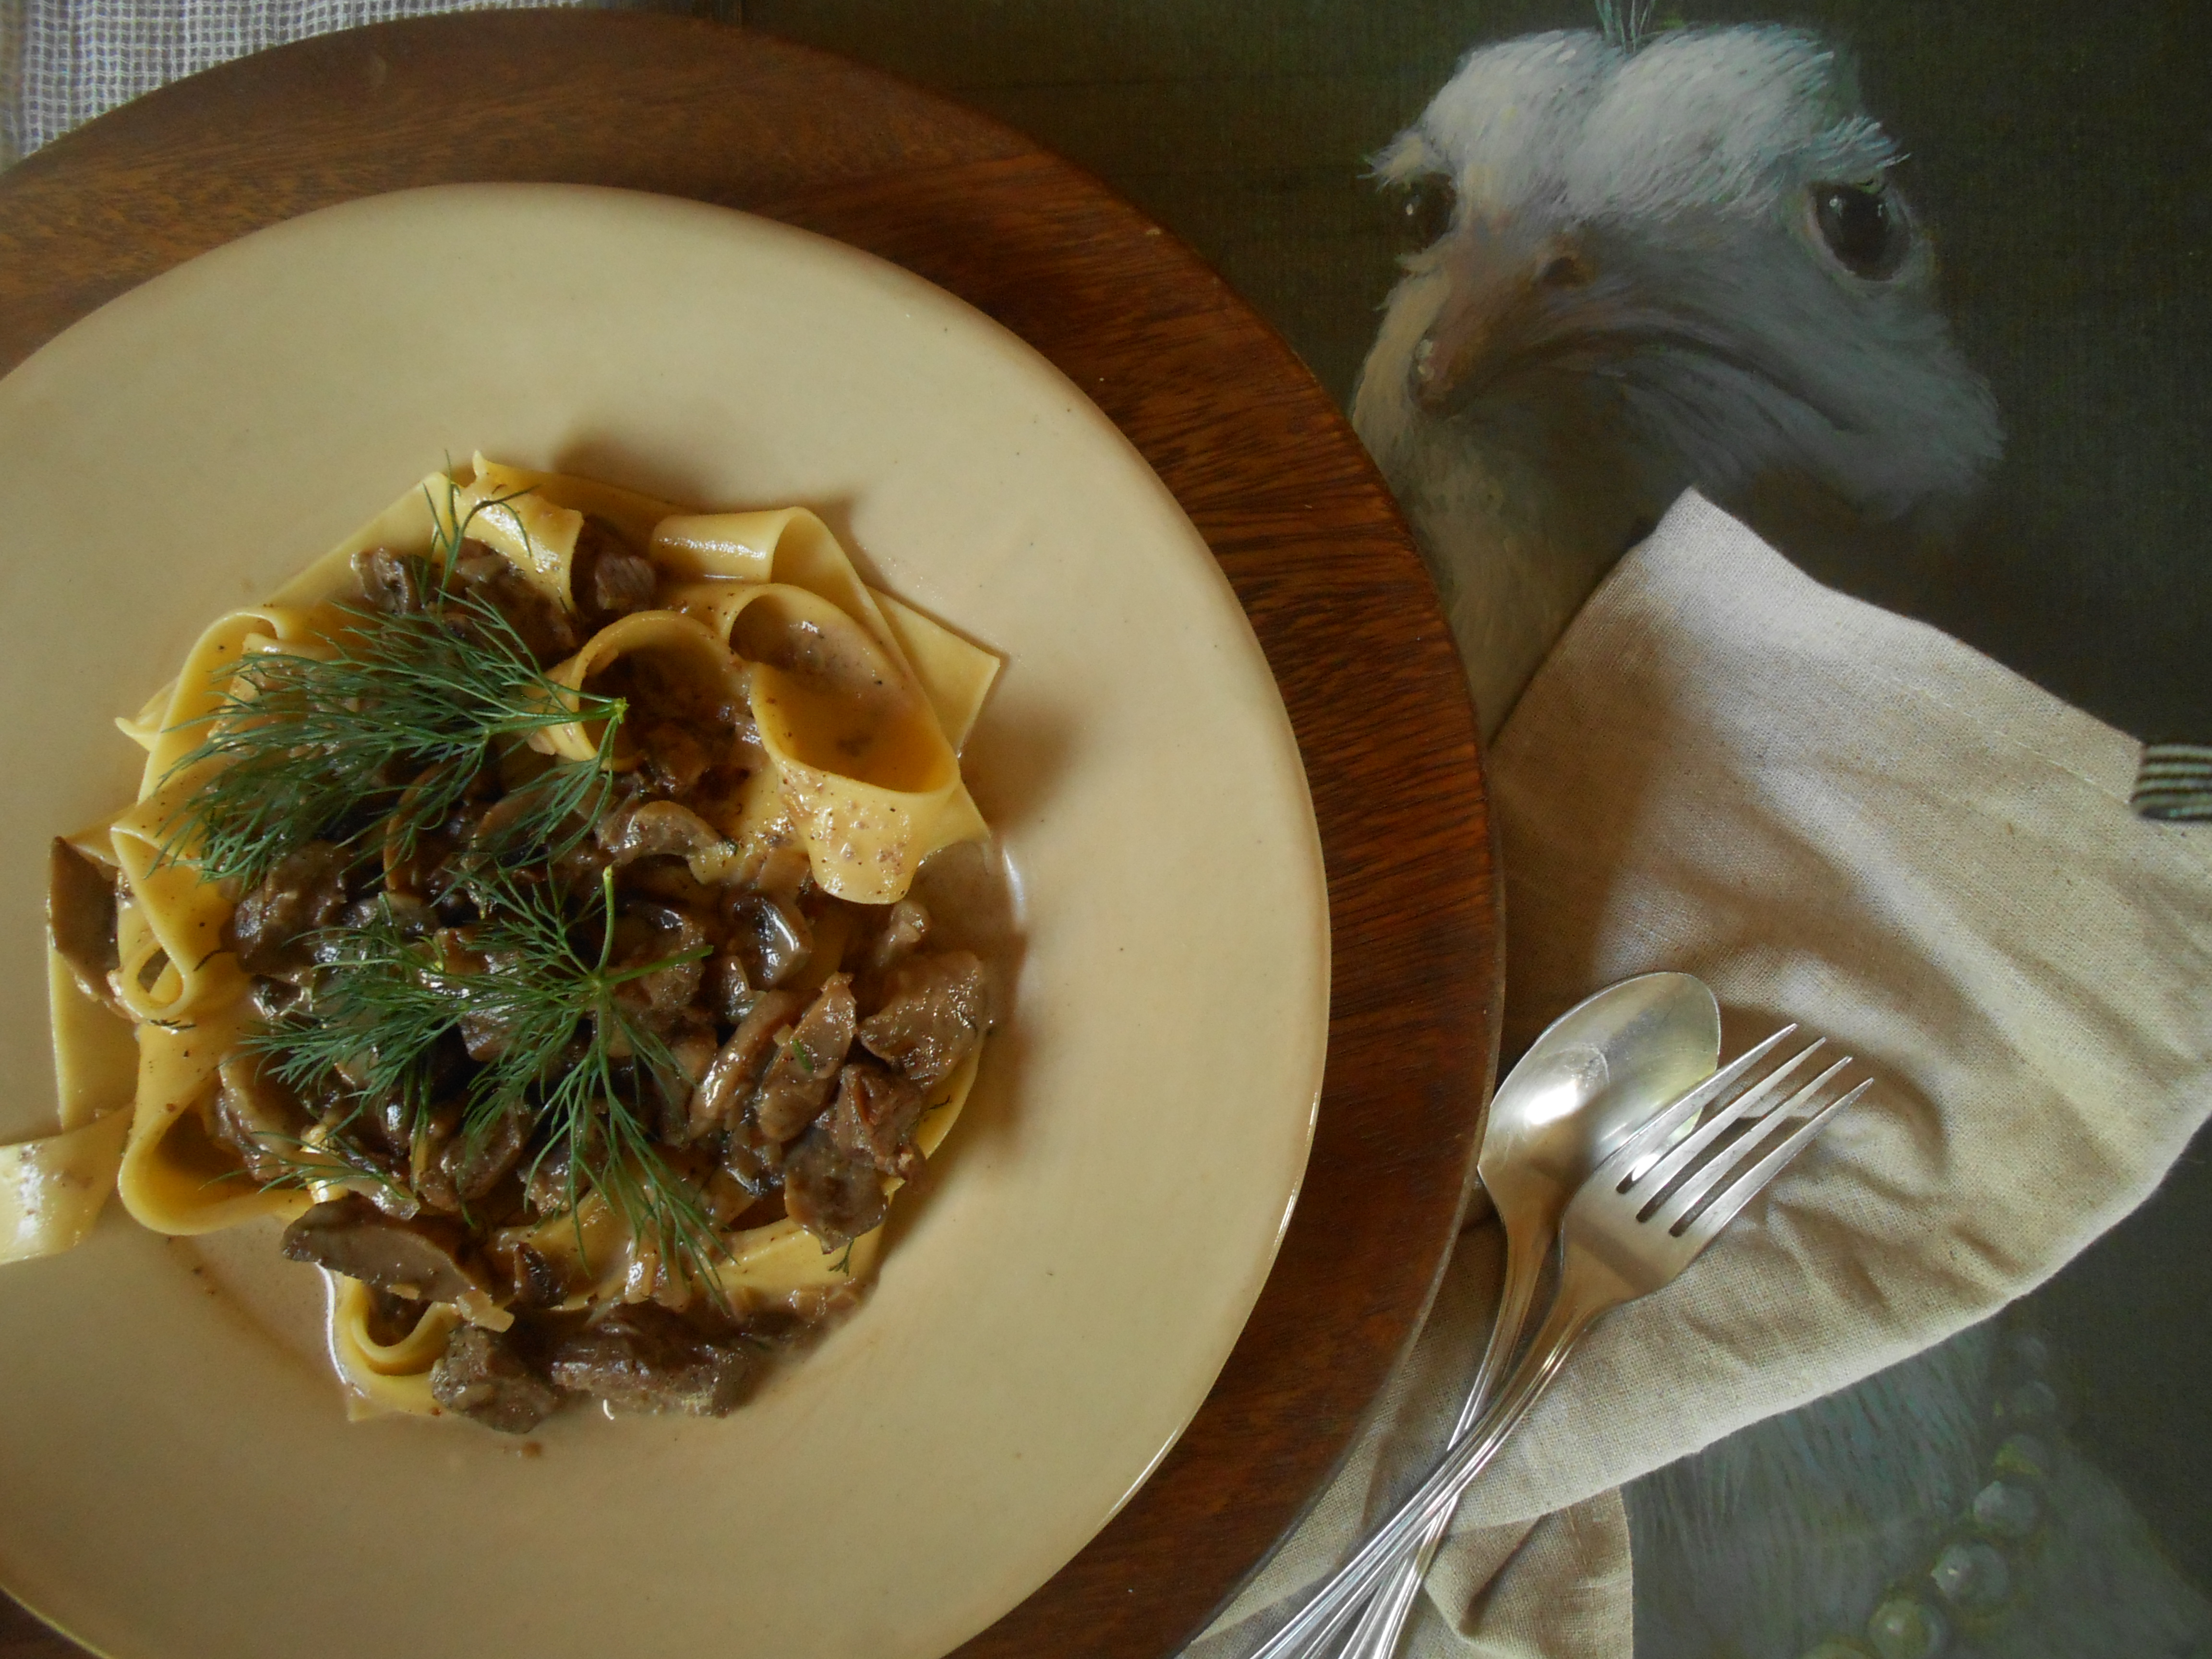
A ribbony Pappardelle pasta dish, lovely and creamy with a modest hint of mustard and dill.
Yes I realize it is grilling season and that is exactly why I picked up beef tenderloin at the market the other day. However, living in the Pacific Northwest leaves you with many options when it comes to seasonal cooking. Because of our mild weather we have the opportunity to grill in the winter (on Christmas day!) cook soups on the hottest days of summer (our average high last summer was 73°F), and make beef stroganoff on a cloudy and cool June afternoon.
Apparently this Russian dish became all the rage in the United States during the 50’s and was considered a gourmet dinner party favorite. In the spirit of vintage, perhaps this delicious rendering will inspire your next small gathering menu. After all, entertaining should be comfortable, simple, slow and meaningful.

I n g r e d i e n t s
- 1 and a 1/2 pounds beef tenderloin, well trimmed and cut into 1 x 1 squares
- 2 tablespoons olive oil
- 6 tablespoons (3/4 stick) butter
- 1/4 cup finely chopped shallots
- 1 pound small crimini mushrooms, thickly sliced
- 1 cup beef stock
- 1/4 cup red wine
- 3/4 cup crème fraîche
- 1 tablespoon Dijon mustard
- small handful chopped fresh dill
- 16 ounces pappardelle pasta
- 1 tablespoon paprika
Pat meat dry with paper towels. Sprinkle with salt and pepper. Heat oil in heavy large skillet over high heat until very hot. Working in batches, add meat in single layer and cook just until brown on outside, about 1 minute per side. Transfer to rimmed baking sheet.
Melt 2 tablespoons butter in same skillet over medium-high heat. Add chopped shallots and sauté until tender, scraping up browned bits, about 2 minutes. Add mushrooms. Sprinkle with pepper and sauté until liquid evaporates, about 12 minutes. Add wine and allow to evaporate a bit, then add beef stock. Simmer until liquid thickens and just coats mushrooms, about 15 minutes. Stir in crème fraîche and Dijon mustard. Add meat and any accumulated juices from baking sheet. Simmer over medium-low heat until meat is heated through but still medium-rare, about 2 minutes. Stir in chopped dill. Season to taste with salt and pepper.
Meanwhile, cook noodles in large pot of boiling salted water until tender, about 8 minutes. Drain. Transfer to bowl. Add remaining 4 tablespoons butter and toss to coat. Season with salt and pepper. Divide noodles among plates. Top with beef and sauce. Sprinkle generously with paprika.
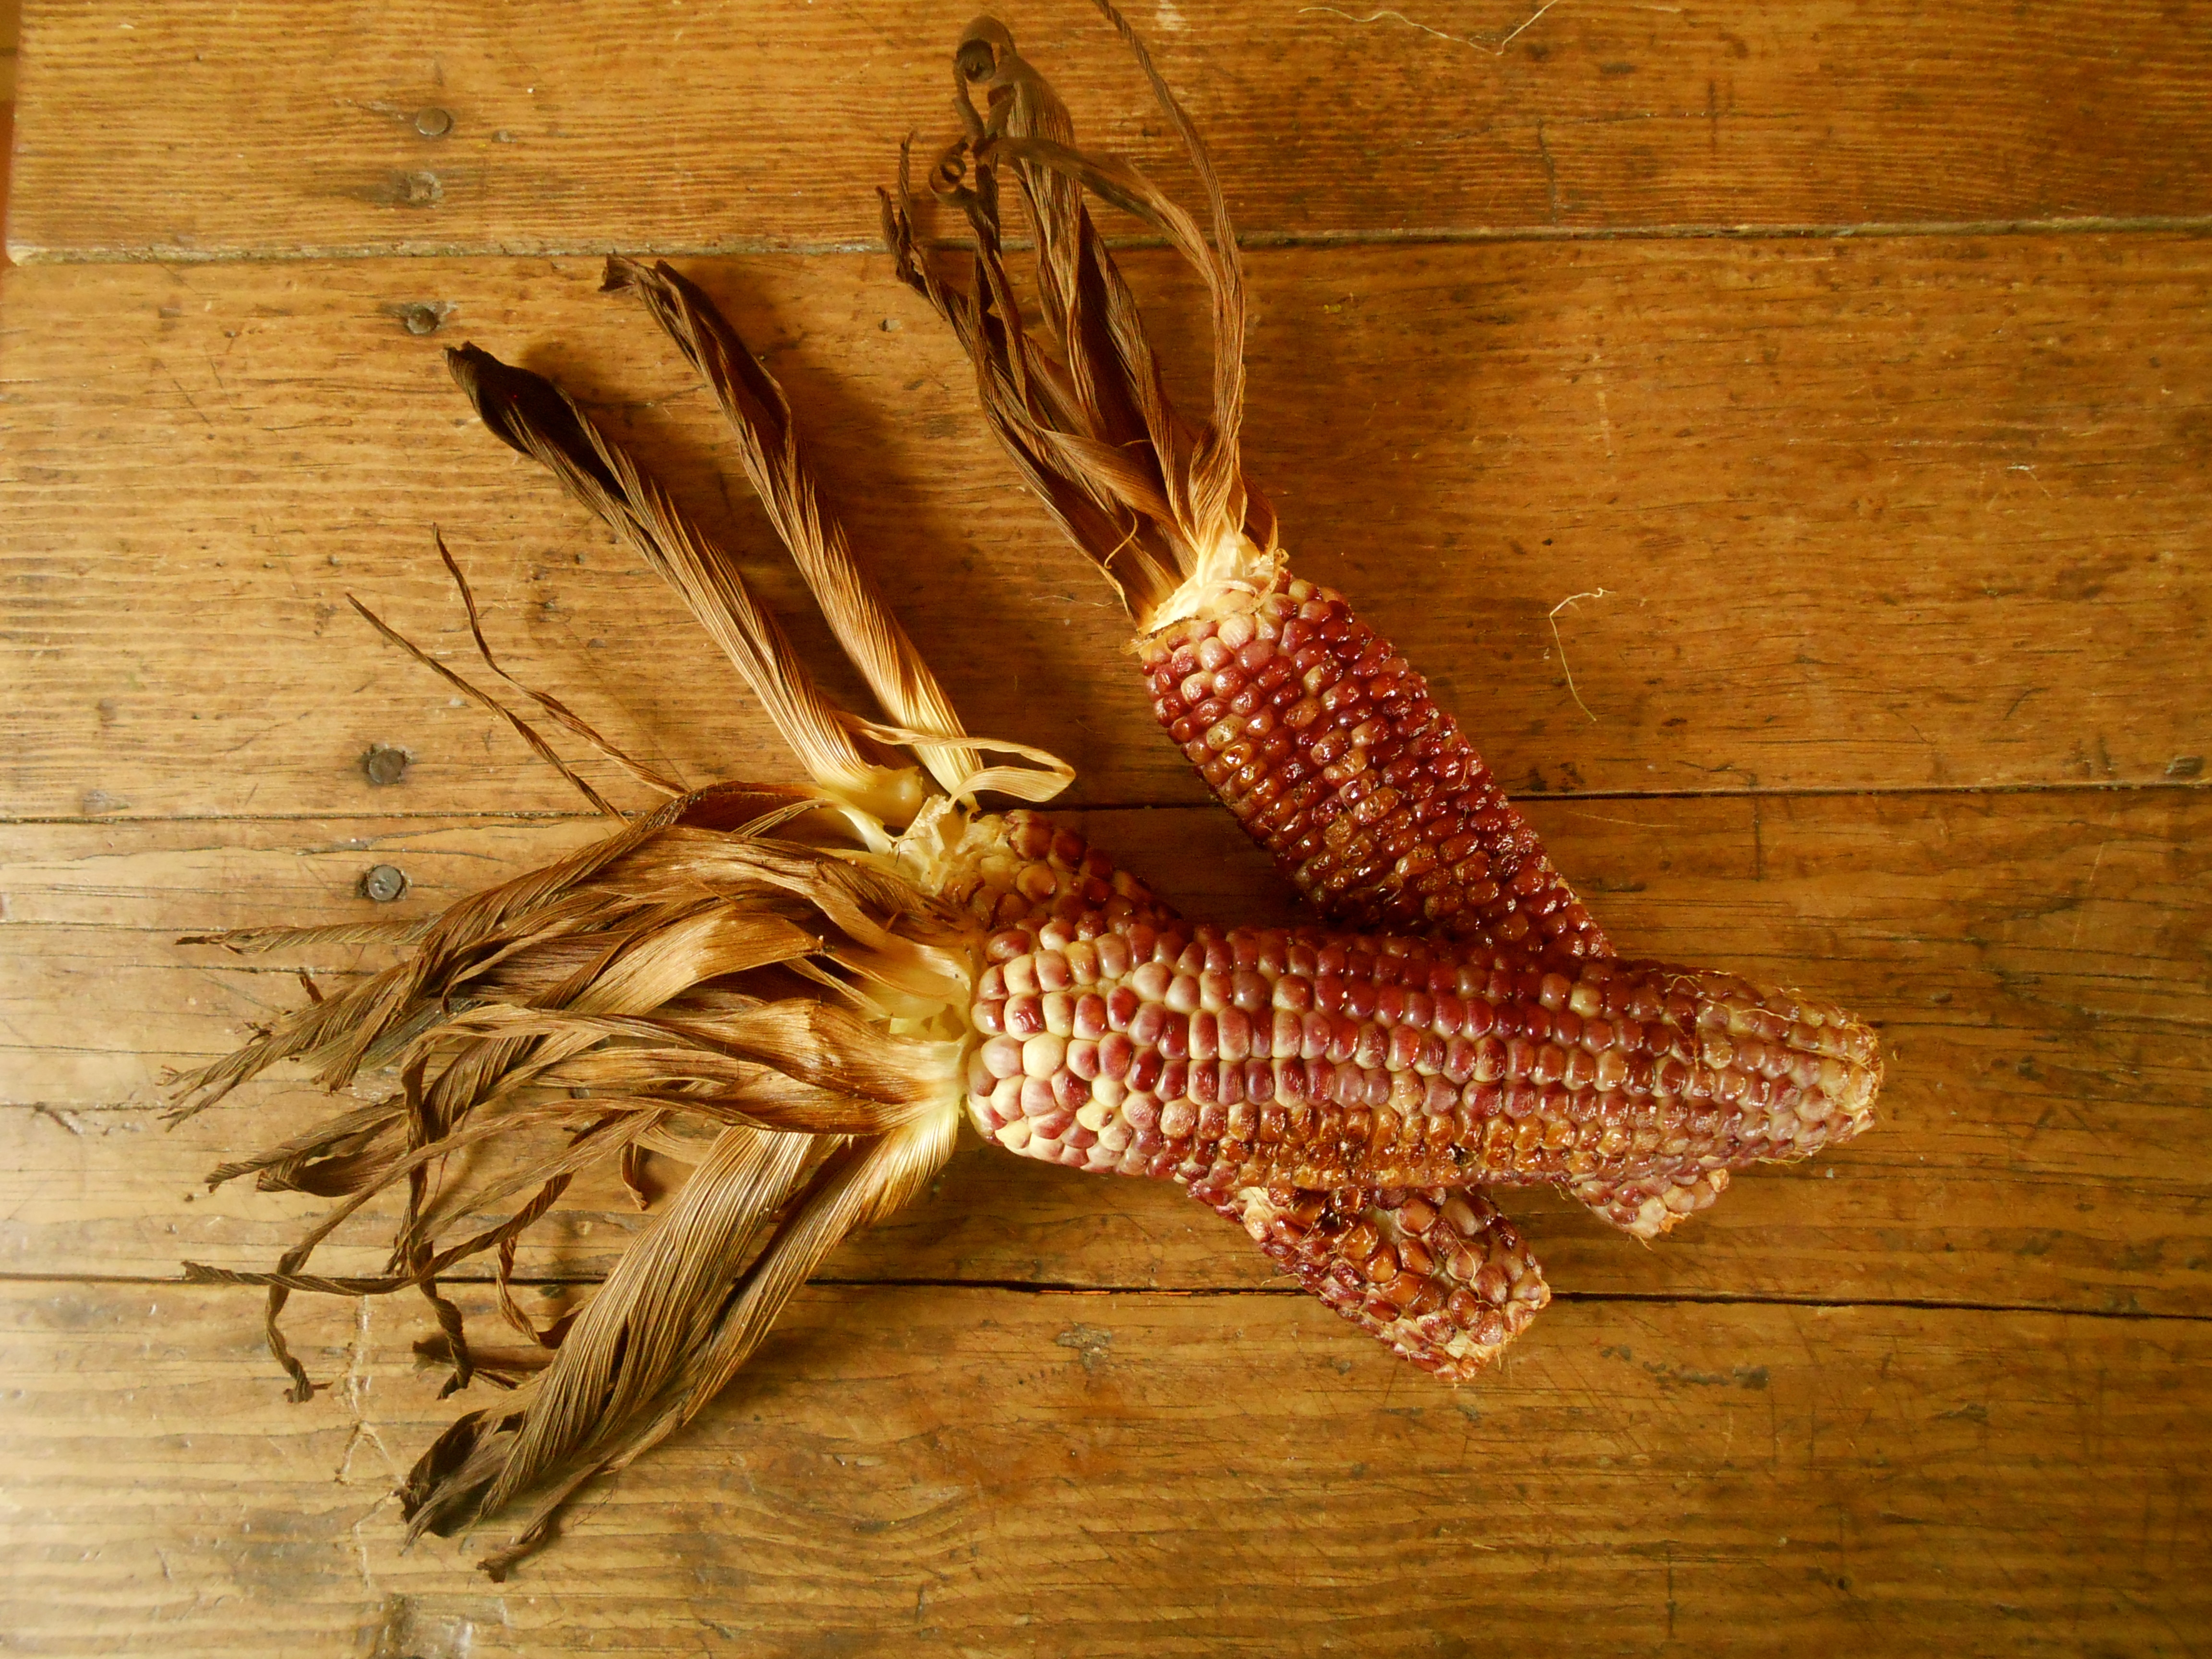
roasted red corn with warm cumin butter
June 10, 2014 § 90 Comments

Amusingly the market’s sign on this corn read “Red White Corn”. Hmm. That was enough for me to place three in the basket and roast them for dinner. I like trying different varietals of vegetables, for no other reason than “variety”. The other day we picked up pinky sized zucchini and although I do enjoy bitter flavor they were a bit too much for my palate. Other interesting vegetable varietals I have seen are purple green beans, purple carrots, yellow watermelon and of course lovely red blood oranges.

Recipe adapted from Epicurious. Serves 3.
I n g r e d i e n t s
- 3 ears of red white corn
- 1 teaspoon olive oil
- sea salt and pepper
- 4 tablespoons butter
- 2 scallions, finely chopped
- 1 teaspoon cumin seeds
- 1 teaspoon fresh lemon juice
M e t h o d
If you are roasting your corn in the oven, preheat oven to 450°F.
In a dry small heavy skillet toast seeds over moderate heat, shaking skillet, until fragrant, about 1 minute, and cool. In an electric coffee/spice grinder finely grind seeds with a sprinkling of salt. In a saucepan melt butter with cumin salt and stir in scallion greens and lemon juice. Cool butter.
While butter is cooling, peel back husks from corn, leaving them attached at base of ears, and discard silk. Brush kernels with olive oil and place on a baking sheet. Roast in oven for 30 minutes until corn turns a golden brown. Remove the corn from the oven and allow to cool. If you are leaving your kernels on the cob, serve with warm cumin butter. Otherwise, slice the corn kernels off of the cob and toss with warm cumin butter.
grilled chicken with za’atar
June 4, 2014 § 81 Comments
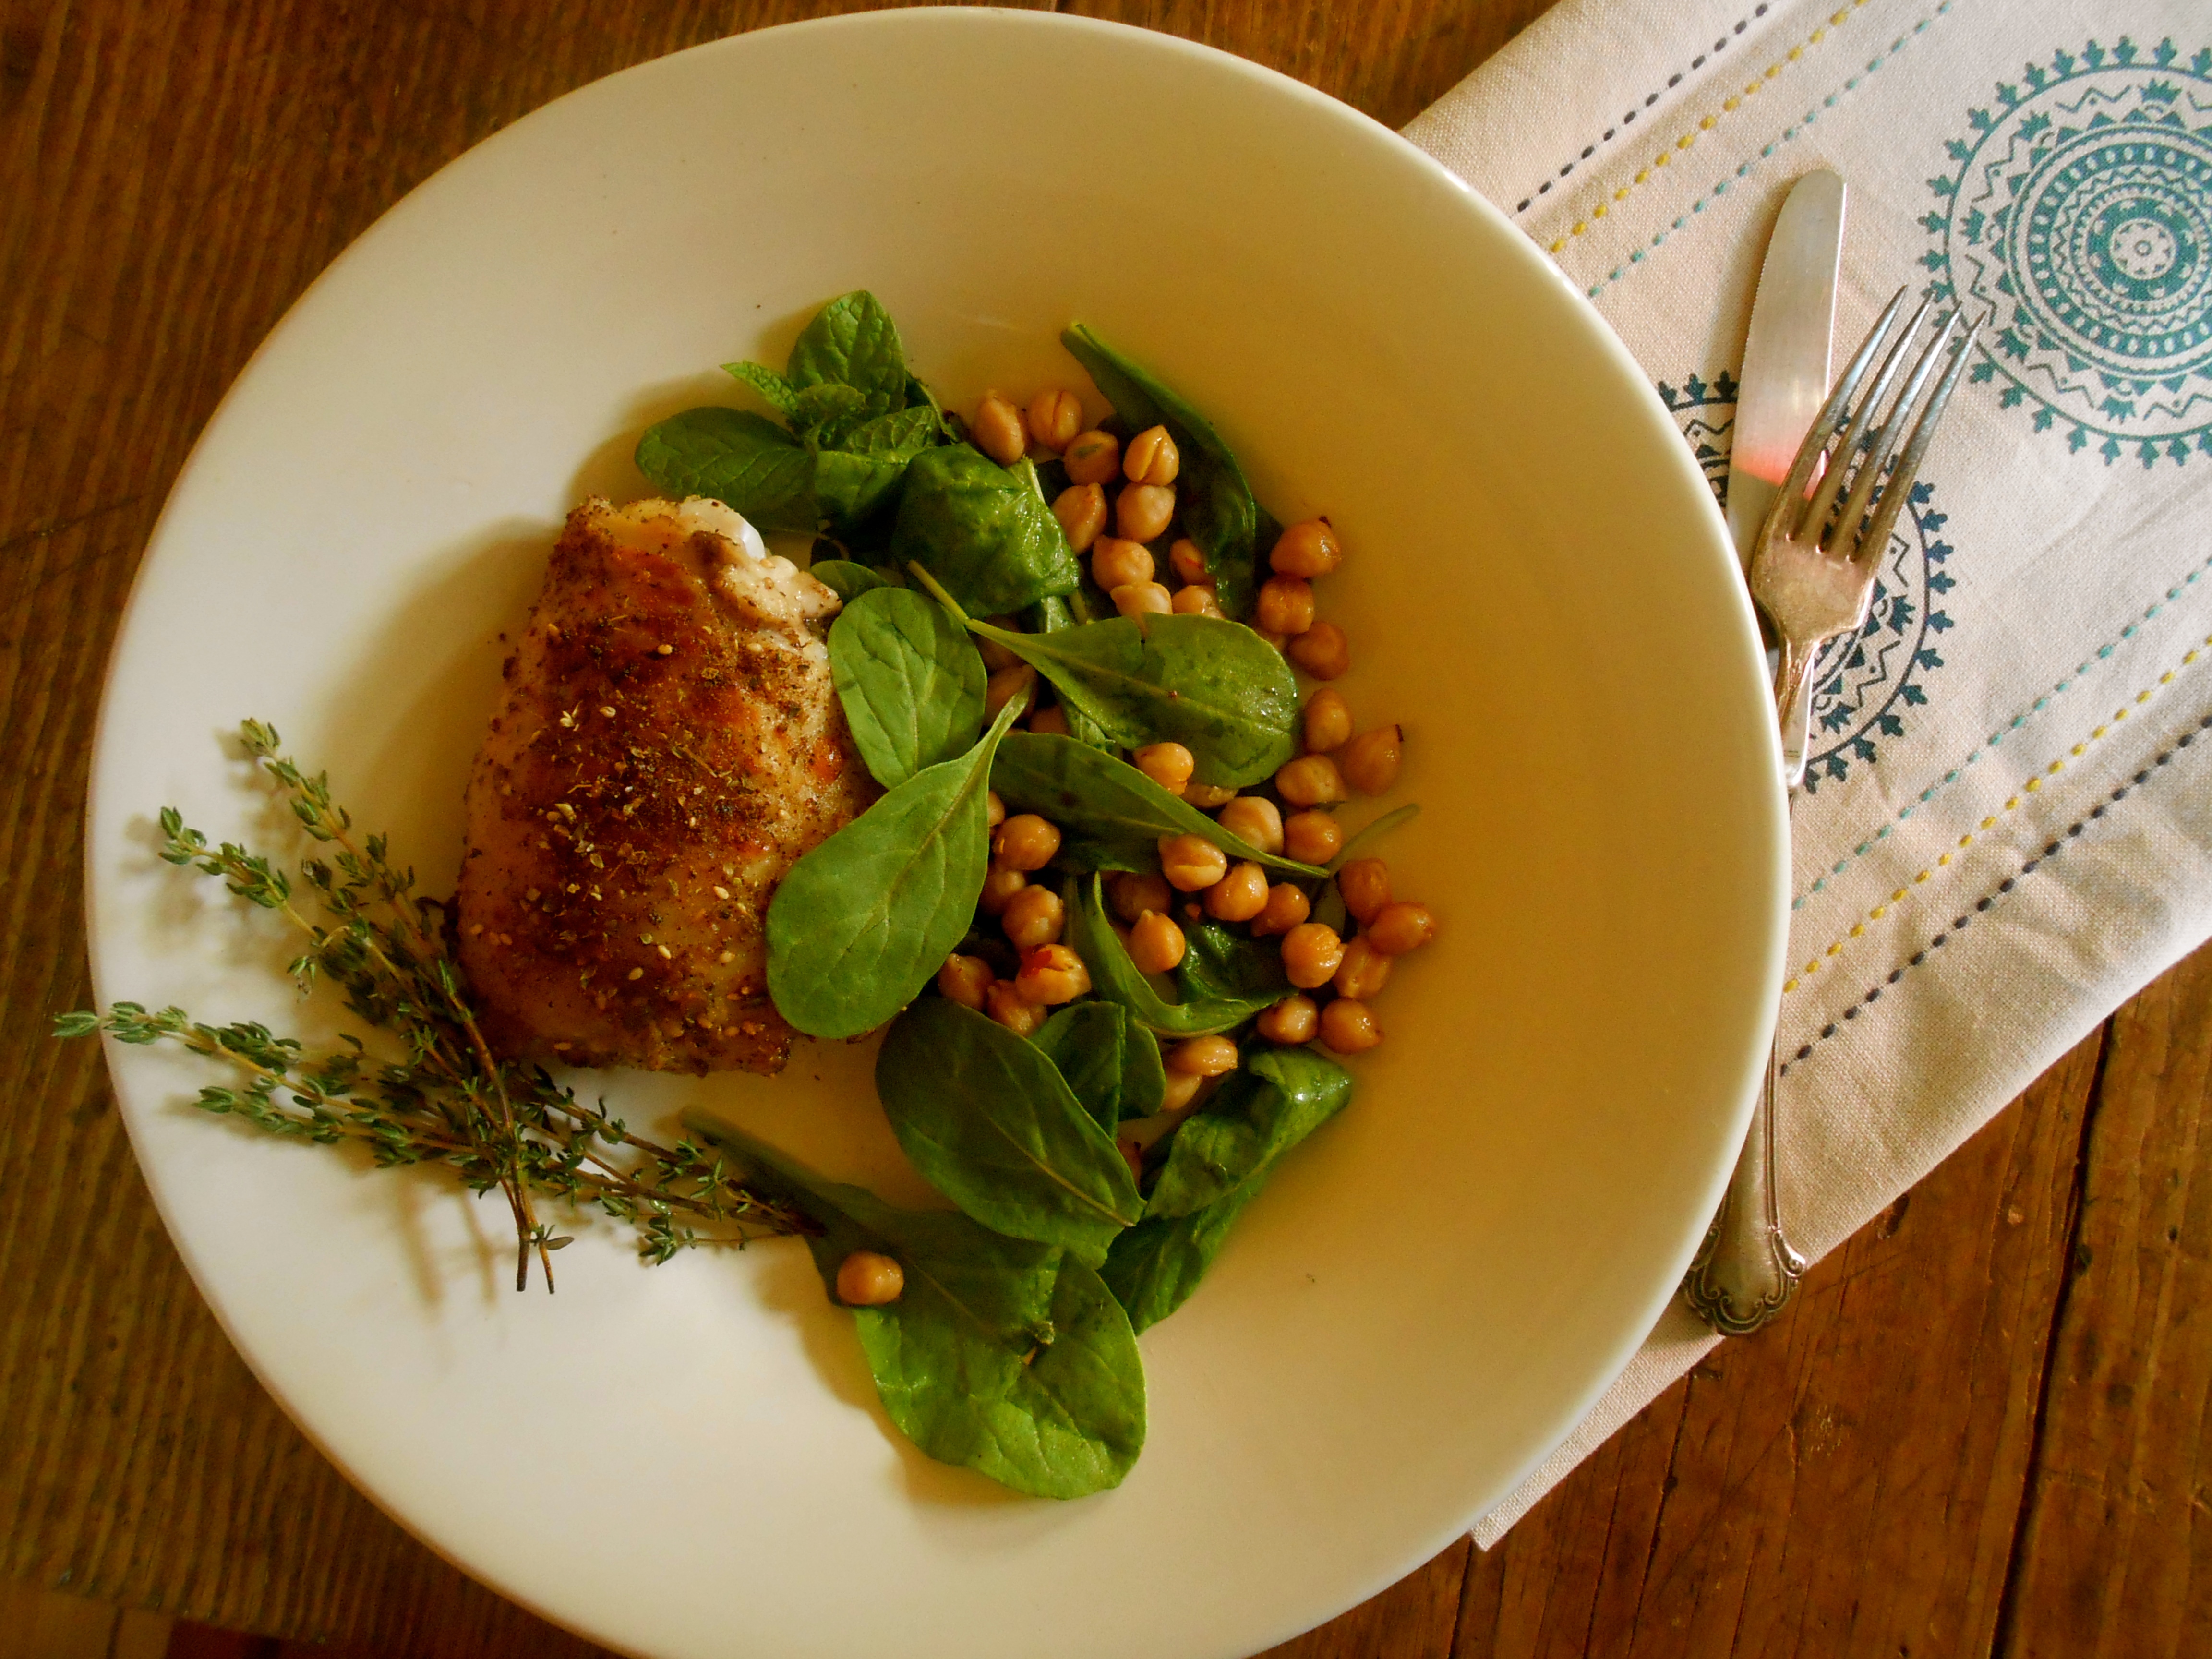
Finally we can brush off the grill and get started on summertime grilling. Here is a magnificent grilled chicken recipe using roasted garlic, tangy lemon and intoxicatingly aromatic za’atar. We are a bit old fashioned in our grilling method. We use a charcoal style barbecue and I always buy mesquite lump charcoal. The mesquite really enhances the flavor of your grilled vegetables and meat. Although a bit more time consuming with ash clean up and building a fire; it is certainly worth it when you taste a hint of mesquite in your grilled food. Deliciously served with a baby arugula and warm chickpea salad.

There are two ways to go with this. Admittedly I don’t have much forethought when it comes to cooking. I think about food and cooking all the time, but I don’t plan ahead and take the step of something so simple as marinading the meat for 24 hours. The original recipe suggests marinading, but I wanted to cook it now, not tomorrow. I went ahead and prepared the marinade and allowed it to steep for approximately 45 minutes while the chicken was warming to room temperature. The flavors were fresh and vibrant and the heat from the serrano pepper was just enough to let you know it was present. The za’atar is every bit intoxicating in flavor as it is in fragrance.
Recipe heavily adapted from Bon Appétit
I n g r e d i e n t s
- 2 heads of garlic, top third cut off
- 6 tablespoons olive oil, divided
- 4 chicken thighs-bone in, organically raised
- 1/4 cup Za’atar – recipe to follow
- 1 1/2 teaspoons lemon zest and 3 tablespoons fresh lemon juice
- 1 tablespoon chopped fresh rosemary
- 1 serrano chile, seeded, minced
- Kosher salt and freshly ground black pepper
M e t h o d
Preheat oven to 400°F. Put garlic on a large sheet of foil. Drizzle with 1 tablespoon oil and wrap tightly with foil. Roast until tender and golden brown, 45-50 minutes. Let cool.
Place chicken in a glass baking dish large enough to hold chicken. Sprinkle 2 1/2 tablespoons za’atar over chicken. Squeeze roasted garlic cloves out of skins and into a small bowl; mash into a paste with the back of a fork. Add 4 tablespoons oil, lemon zest and juice, rosemary and serrano; whisk to blend. Pour over chicken; turn to coat. Cover; chill overnight – or not…allow to steep for one hour while chicken is warming to room temperature.
Meanwhile, build a fire in a charcoal grill, or heat a gas grill to medium-high. Brush grill rack with remaining 1 tablespoon oil. Grill chicken, turning occasionally, until skin is crisp and browned and an instant-read thermometer inserted into the deepest part of thigh without touching bone reads 160°, about 35 minutes. Transfer chicken to a cutting board, sprinkle with remaining 1 1/2 tablespoon za’atar, and let rest 10 minutes.
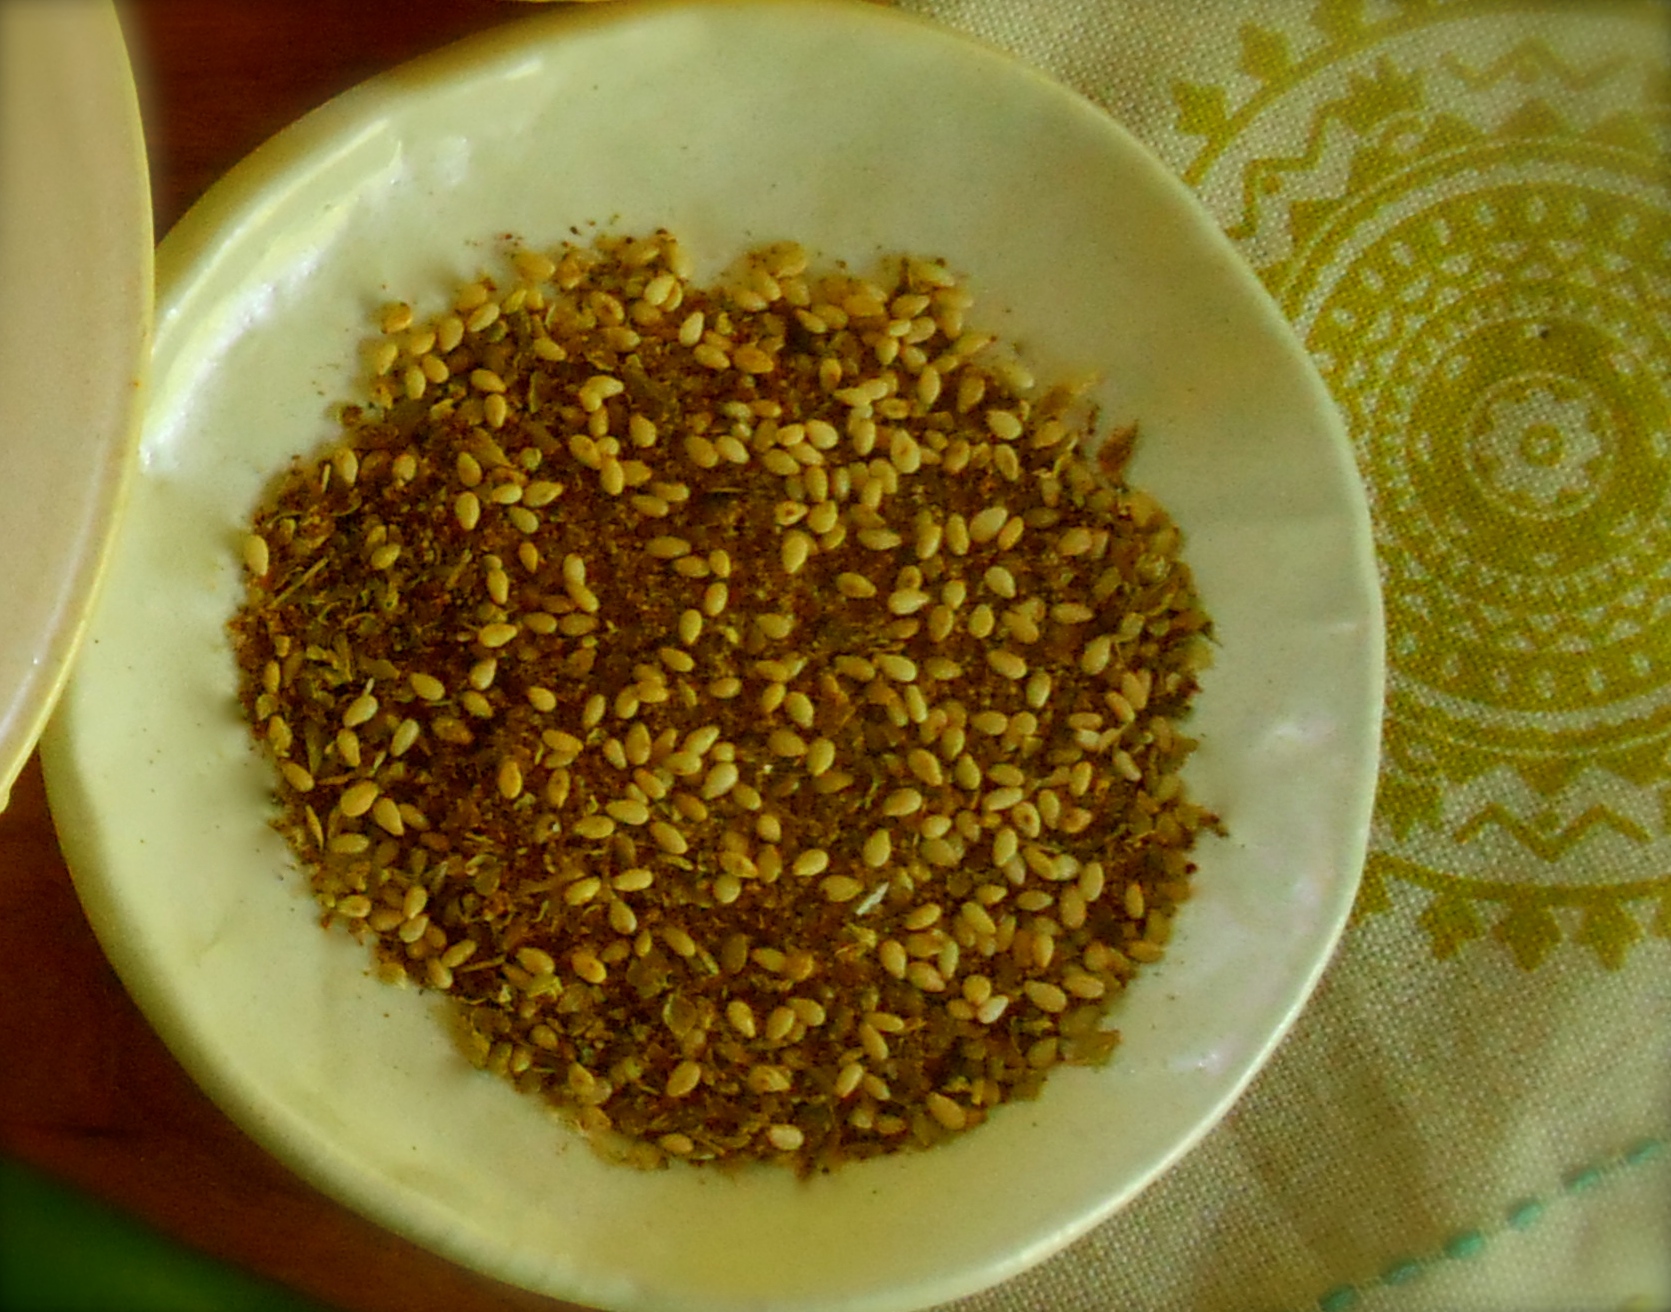
z a ‘ t a a r
- 1 tablespoon oregano
- 1 tablespoon sumac
- 1 tablespoon ground cumin
- 1 tablespoon sesame seeds
- 1 teaspoon kosher salt
- 1 teaspoon freshly ground black pepper
Combine all ingredients! Enjoy.
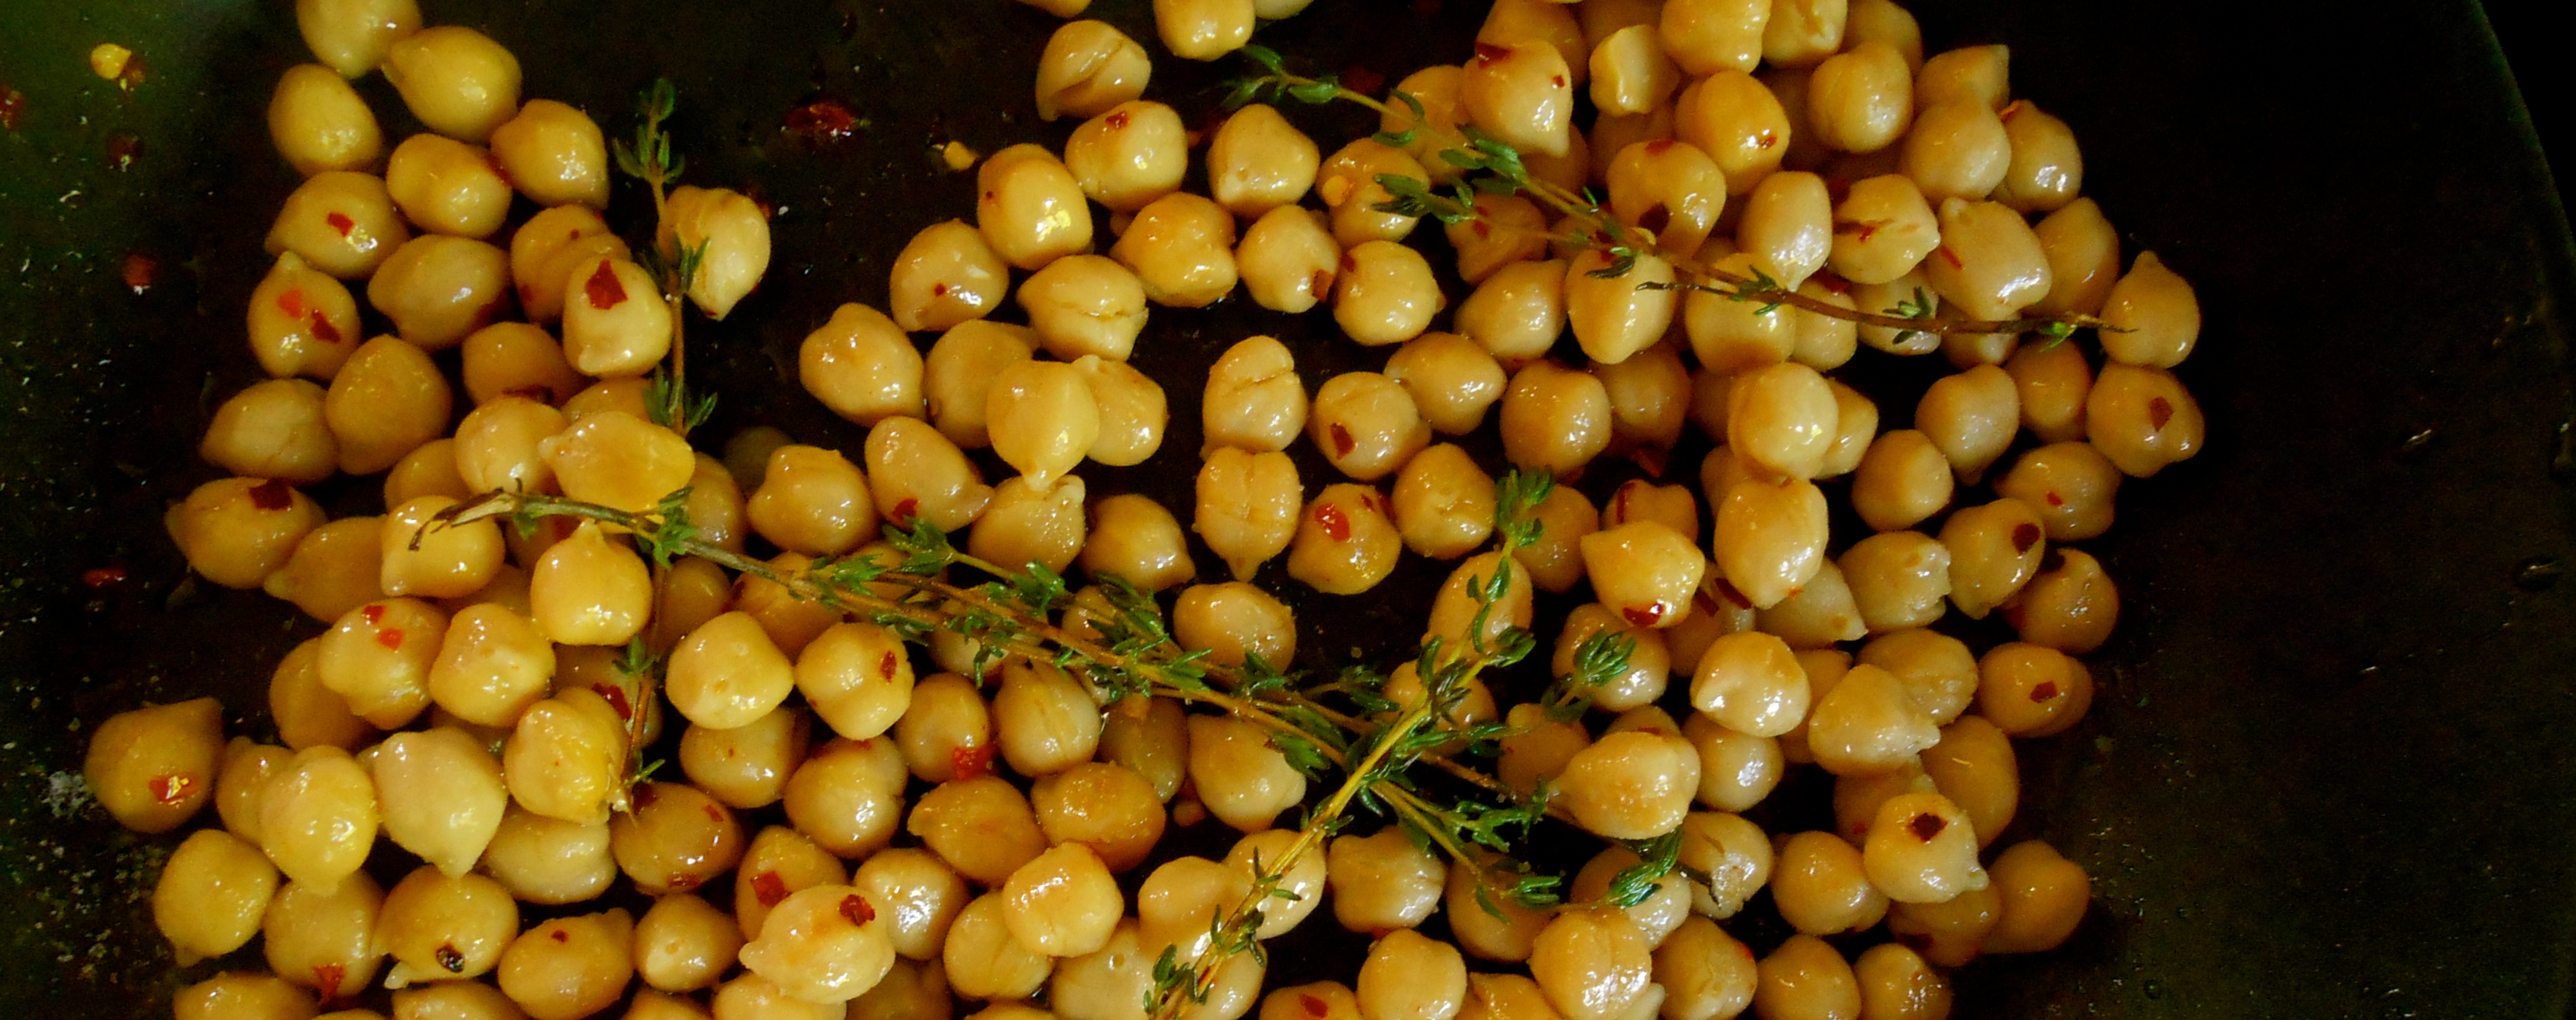
b a b y a r u g u l a a n d w a r m c h i c k p e a s a l a d
- 6 tablespoons olive oil, divided, plus more for drizzling
- 1 15-oz. can chickpeas, rinsed
- 4 sprigs thyme
- crushed red pepper flakes, to taste
- 3 cups arugula with tender stems
- 1 tablespoon finely grated lemon zest
- 2 tablespoons fresh lemon juice
- Flaky sea salt
Heat 2 Tbsp. oil in a medium skillet over medium-high heat; cook chickpeas, thyme, and red pepper flakes, stirring occasionally, just until warmed through, about 5 minutes. Transfer to a large bowl. Toss arugula, lemon zest, and lemon juice into chickpeas. Serve drizzled with more oil and sprinkled with sea salt.
farmer’s breakfast tart
May 27, 2014 § 83 Comments

A farmer’s breakfast is considered to be hash potatoes, bacon or sausage and eggs. Applying this idea to a tart using chicken breakfast sausage and a lovely goat cheese with baked eggs certainly was a delicious alternative.
The goat cheese we used was Murcia Al Vino. It is a firmer, smooth and buttery cheese made from goats indigenous to the Murcia region of Spain. This region has a rich variety of grasses, shrubs, and wild herbs on which the goat’s graze to give the cheese a distinctive taste and aroma. The unique feature is that it is washed in red wine during ripening. We have been buying various wine tinted goat cheeses known as winey goat, drunken goat and syrah goat. The wine deeply tints the cheese, giving the rind its characteristic burgundy color and imparting a strong floral bouquet. It not only has a bold, delicious flavor, it has the intoxicating aroma of a good bottle of wine.
I n g r e d i e n t s
- 1 puff pastry sheet
- 1/3 cup greek yogurt
- 1/4 finely shredded cheese
- 1 cup shredded peeled russet potato
- salt and ground black pepper
- 4 sausage links, cooked and cutting in 1/2 in pieces
- 4 eggs
- 1 spring onion, thinly sliced
M e t h o d
Heat oven to 400°F. Unfold the pastry sheet onto a baking sheet. Using a sharp knife, score a 1-1.2 inch border around the edge of the pastry. Prick the center of the pastry sheet thoroughly with a fork.
Stir the yogurt, cheese and potato in a medium bowl. Spread the potato mixture in a thin layer on the pastry sheet to the border. Season with salt and black pepper. Bake for 15 minutes. Arrange the sausage on the pastry. Carefully crack 1 egg into each corner of the potato mixture. Bake for 10 minutes or until the eggs are softly set and cooked to your liking. Sprinkle with green onions and additional cheese if desired.
amanda’s sweet & sour meatballs
May 22, 2014 § 43 Comments

This beautiful recipe comes from Amanda. I will never forget her post around Easter time when she talked about family, traditions, childhood memories, the importance of gatherings as a child and inventing new traditions within our own beliefs and lives. This post was such a beautiful narrative of nostalgia; a longing to go back, if only for a moment to revisit the memorable gatherings of our past and relive the sensations we felt.
In the past year I have made several of Amanda’s recipes. Notably, her Andalucian cold almond soup (Ajo Blanco), which is silky, cool and just the right dinner on a hot summer evening. I remember blanching and slipping the skins off of the almonds, a very peaceful and meditative task. This is a delicious cold refreshing white gazpacho. We plan on making this soup again soon and this time using home made almond milk.
Back to the meatballs. These meatballs are her adaptation of her Grandma’s sweet and tangy meatballs and The Shiksa in the Kitchen, and quite frankly, they are soul food.
This recipe is not adapted in any way from What’s Cooking – Fine dining my way. Thank you Amanda. We loved your sweet and sour meatballs.
I n g r e d i e n t s
- 1 pineapple cut up
- 1 cup tomato sauce
- 1/2 cup cider vinegar (or another Passover-approved vinegar)
- 1/4 cup brown sugar
- 2 tbsp tomato paste
- 1 small onion, chopped
- 3/4 tsp salt, divided
- 1 garlic clove chopped
- 1 lb chopped turkey meat
- 1 egg, beaten
- 3-4 tbsp matzo meal
- 1 tsp paprika
- 1/4 tsp black pepper
- 1 tablespoon coriander seeds
- 1 handful cilantro leaves
- Pinch of cayenne

M e t h o d
If you are able to preserve any of the juice from your pineapples save it in a separate cup. In a large pot or dutch oven, mix together tomato sauce, cider vinegar, brown sugar, tomato paste, 1/2 tsp salt and the juice from the pineapples. Stir together and turn heat to low to let the sauce slowly warm.
Meanwhile, in a mixing bowl use a fork to mix together the ground turkey, egg, matzo meal, paprika, 1/4 tsp salt, garlic, onion, black pepper, coriander seeds, cilantro and cayenne. I like a little heat in the meatballs, so I add a 1/2 tsp of cayenne or sometimes I just use Spanish smoked paprika, which also brings heat, but here it could overwhelm. If you don’t want them spicy, you can omit it completely– or just add a pinch of cayenne for depth of flavor.
Form the meat mixture into small 1-inch meatballs. If the mixture seems to moist or stick, add another tablespoon of matzo meal to the mixture. Place the meatballs into the warming sauce. When all the meatballs are formed, bring the mixture to a boil and stir to cover the meatballs with sauce. Lower the heat to a low, even simmer and cover the pot.
Let the meatballs cook for 40 minutes, stirring frequently, until the sauce thickens and meatballs cook all the way through. After 40 minutes, add the pineapple chunks to the sauce and stir to coat. Let the chunks warm in the sauce for 5 minutes. Serve hot with cilantro to garnish.
hominy hash
May 19, 2014 § 68 Comments
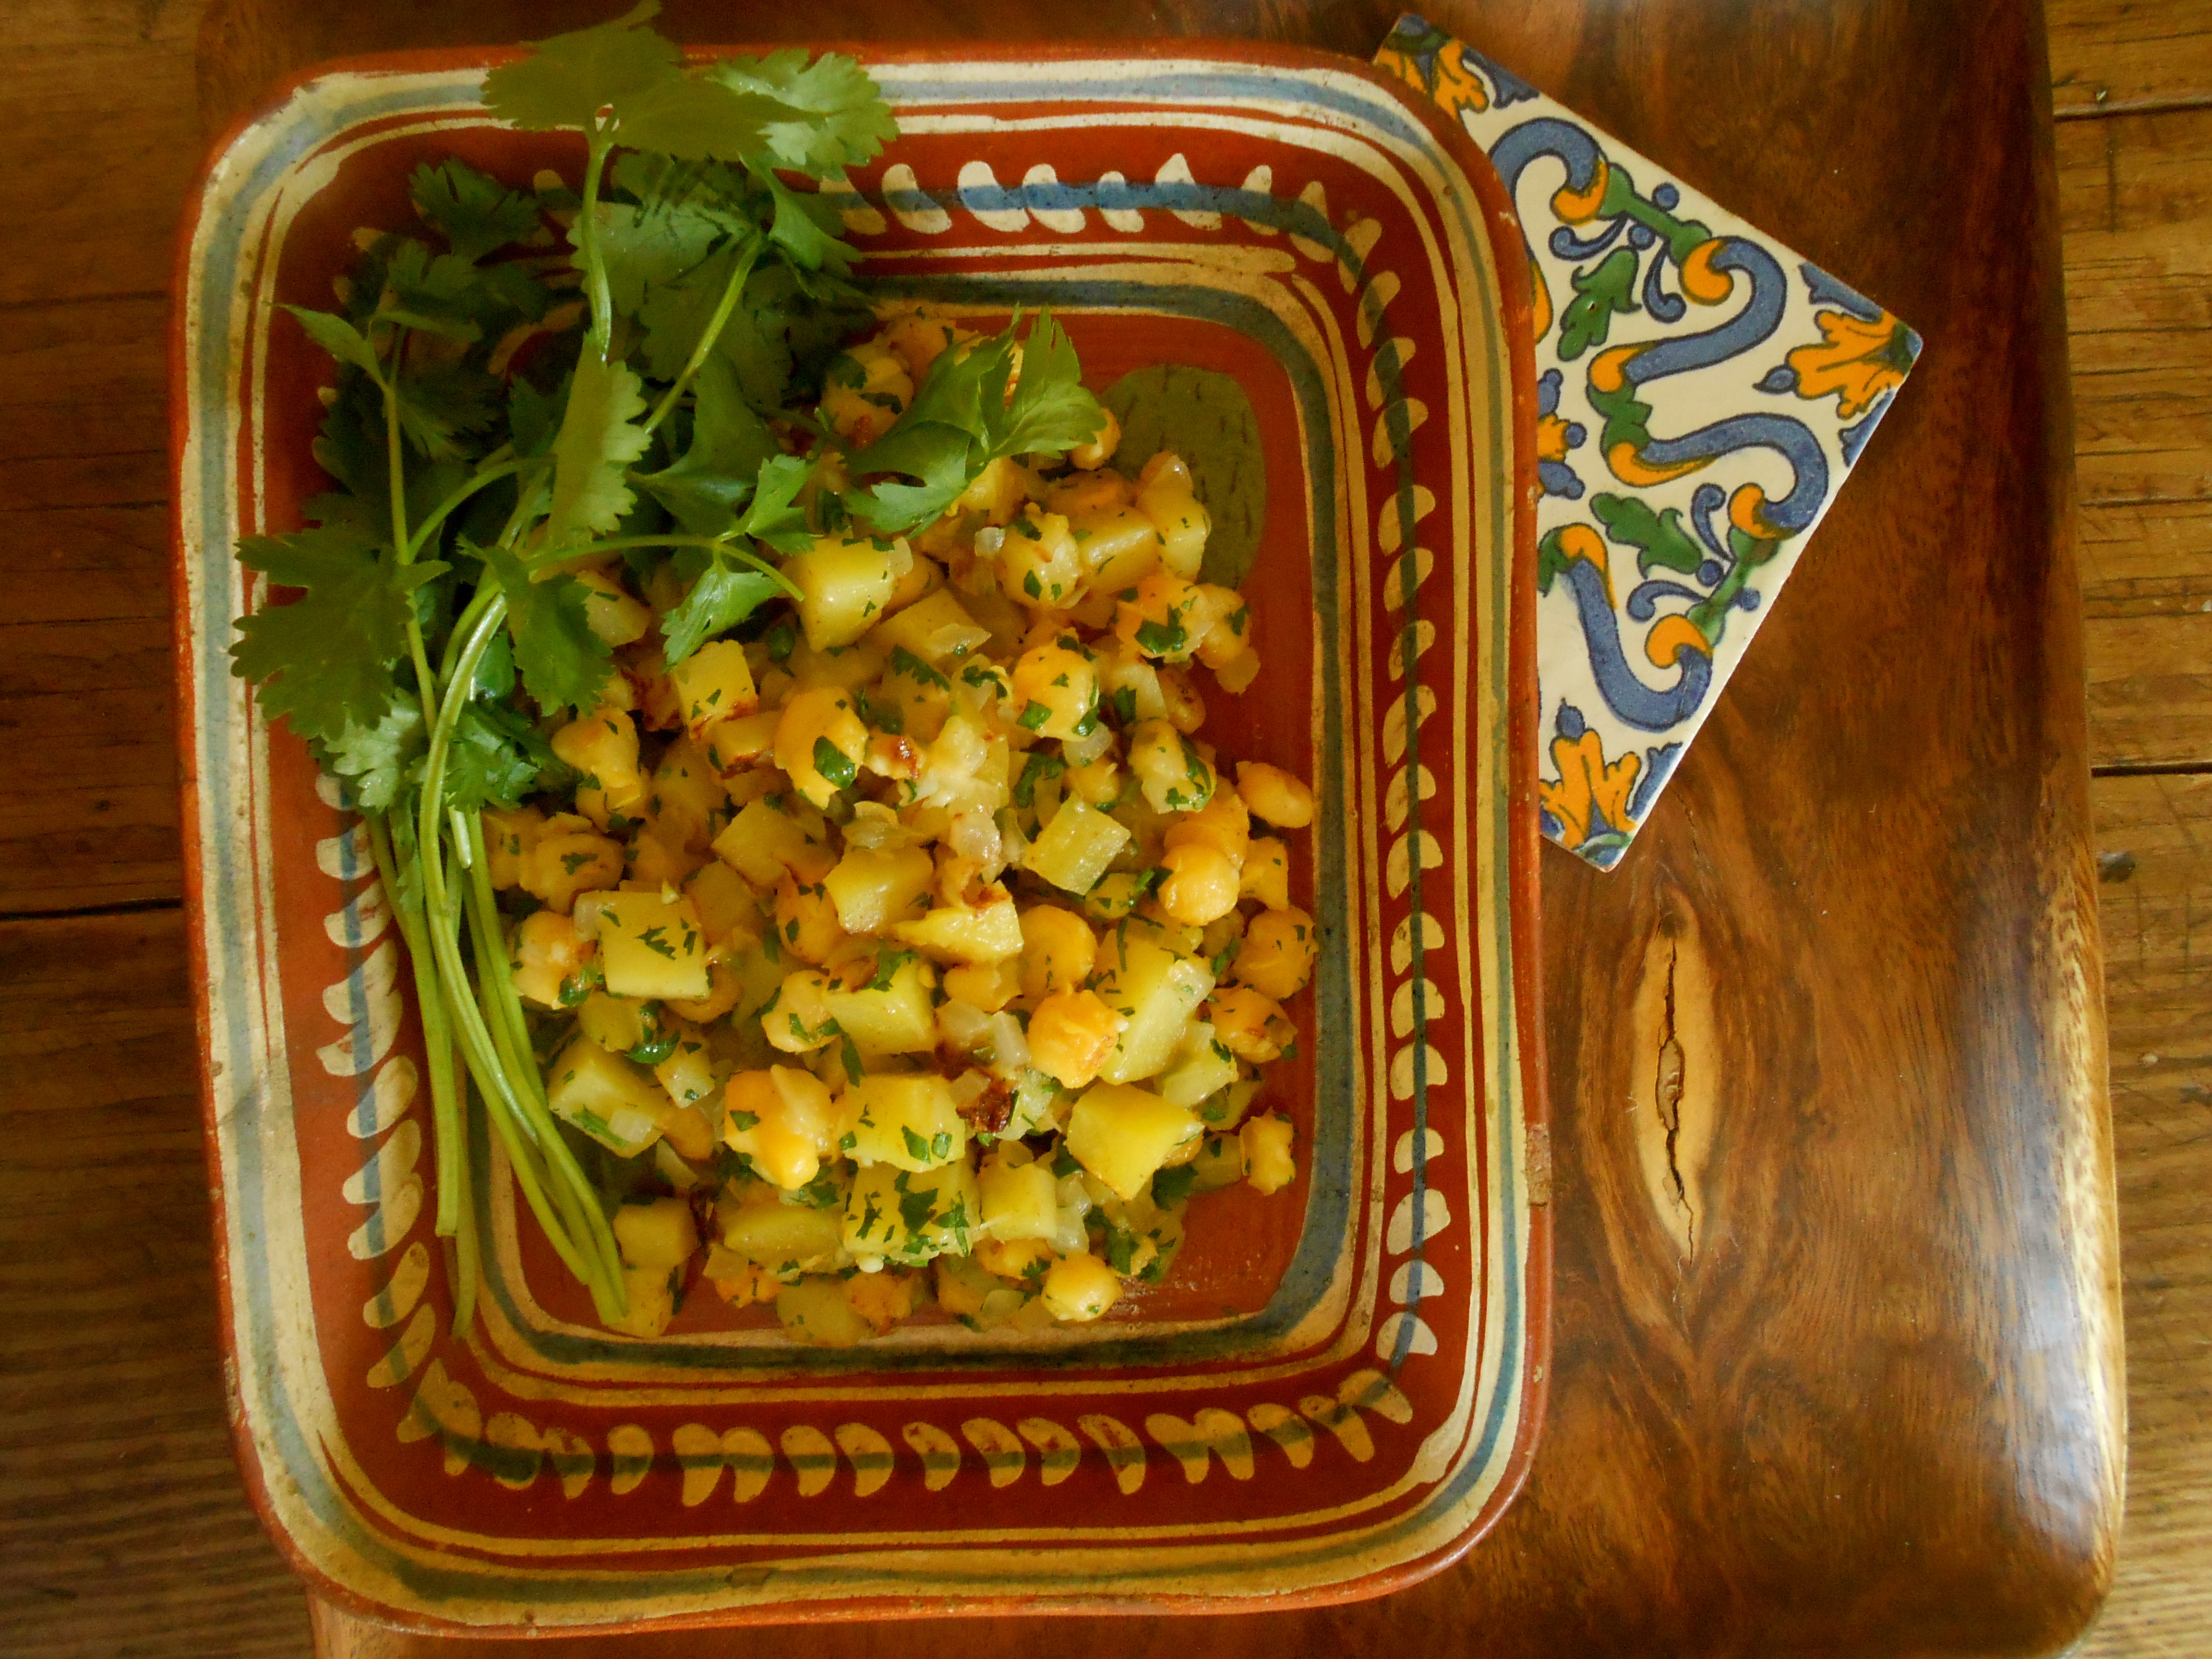
I am going to toot my horn and say, I created a perfect hominy hash! It all started a few days ago when a very kind family brought lunch to the school for us from a local Mexican walk-up. They gave us menu’s a few days in advanced and asked what we would like to order. The menu had a few unique items and I chose a salad with hominy hash. Although it was fantastic it left me unsatisfied because if I were to measure the amount of hominy hash my salad had on it I think it would leave some room in a 1/4 cup measure. Perhaps dissatisfaction is a good thing because I set out to re-create hominy hash, and it was delicious.
Serves 4.
I n g r e d i e n t s
- 2 yellow potatoes, peeled and diced in small squares
- 1 sweet onion, finely diced
- 1 jalapeño pepper, finely diced
- 2 garlic cloves, minced or pressed
- 2 tablespoons olive oil
- 1 tablespoons cumin
- 1 – 29 ounce can of hominy
- salt to taste
- handful cilantro, coarsely chopped
- lime
M e t h o d
Heat olive oil in a large skillet over medium high heat. Add garlic and cook a one minute until aromatic. Add onions, jalapeño pepper and potatoes and toss around with a spatula until well combined. Season with salt and cook for 20 minutes or until potatoes are tender. Add hominy and cook for 10 minutes. Add fresh cilantro, a squeeze of lime and serve.

somen noodles with wild garlic & pea shoot pesto
May 15, 2014 § 79 Comments

I had the day off yesterday, well actually it was a day on considering all the work I accomplished around the house. Isn’t it satisfying when you are “on” and everything seems to fall into place? Six loads of laundry washed and put away, tomatoes planted, front garden edged and weeded, a much needed nap and a fantastic somen noodle dinner.

It wasn’t until 5:30pm when I realized the day got away from me and I didn’t have a dinner plan. The last grocery trip I made was a bit unorganized. I shopped without a list or the week’s menu plan, which I love to do occasionally, but isn’t helpful at all when it’s time to put dinner together. I was lost in sensory overload as I walked through the market picking fresh peas, ramps, pea shoots, enoki mushrooms (because they are cute), garlic, somen noodles and Thai eggplants, which I will use later.

I decided on somen noodles with ramps and mushrooms with a pea shoot pesto.
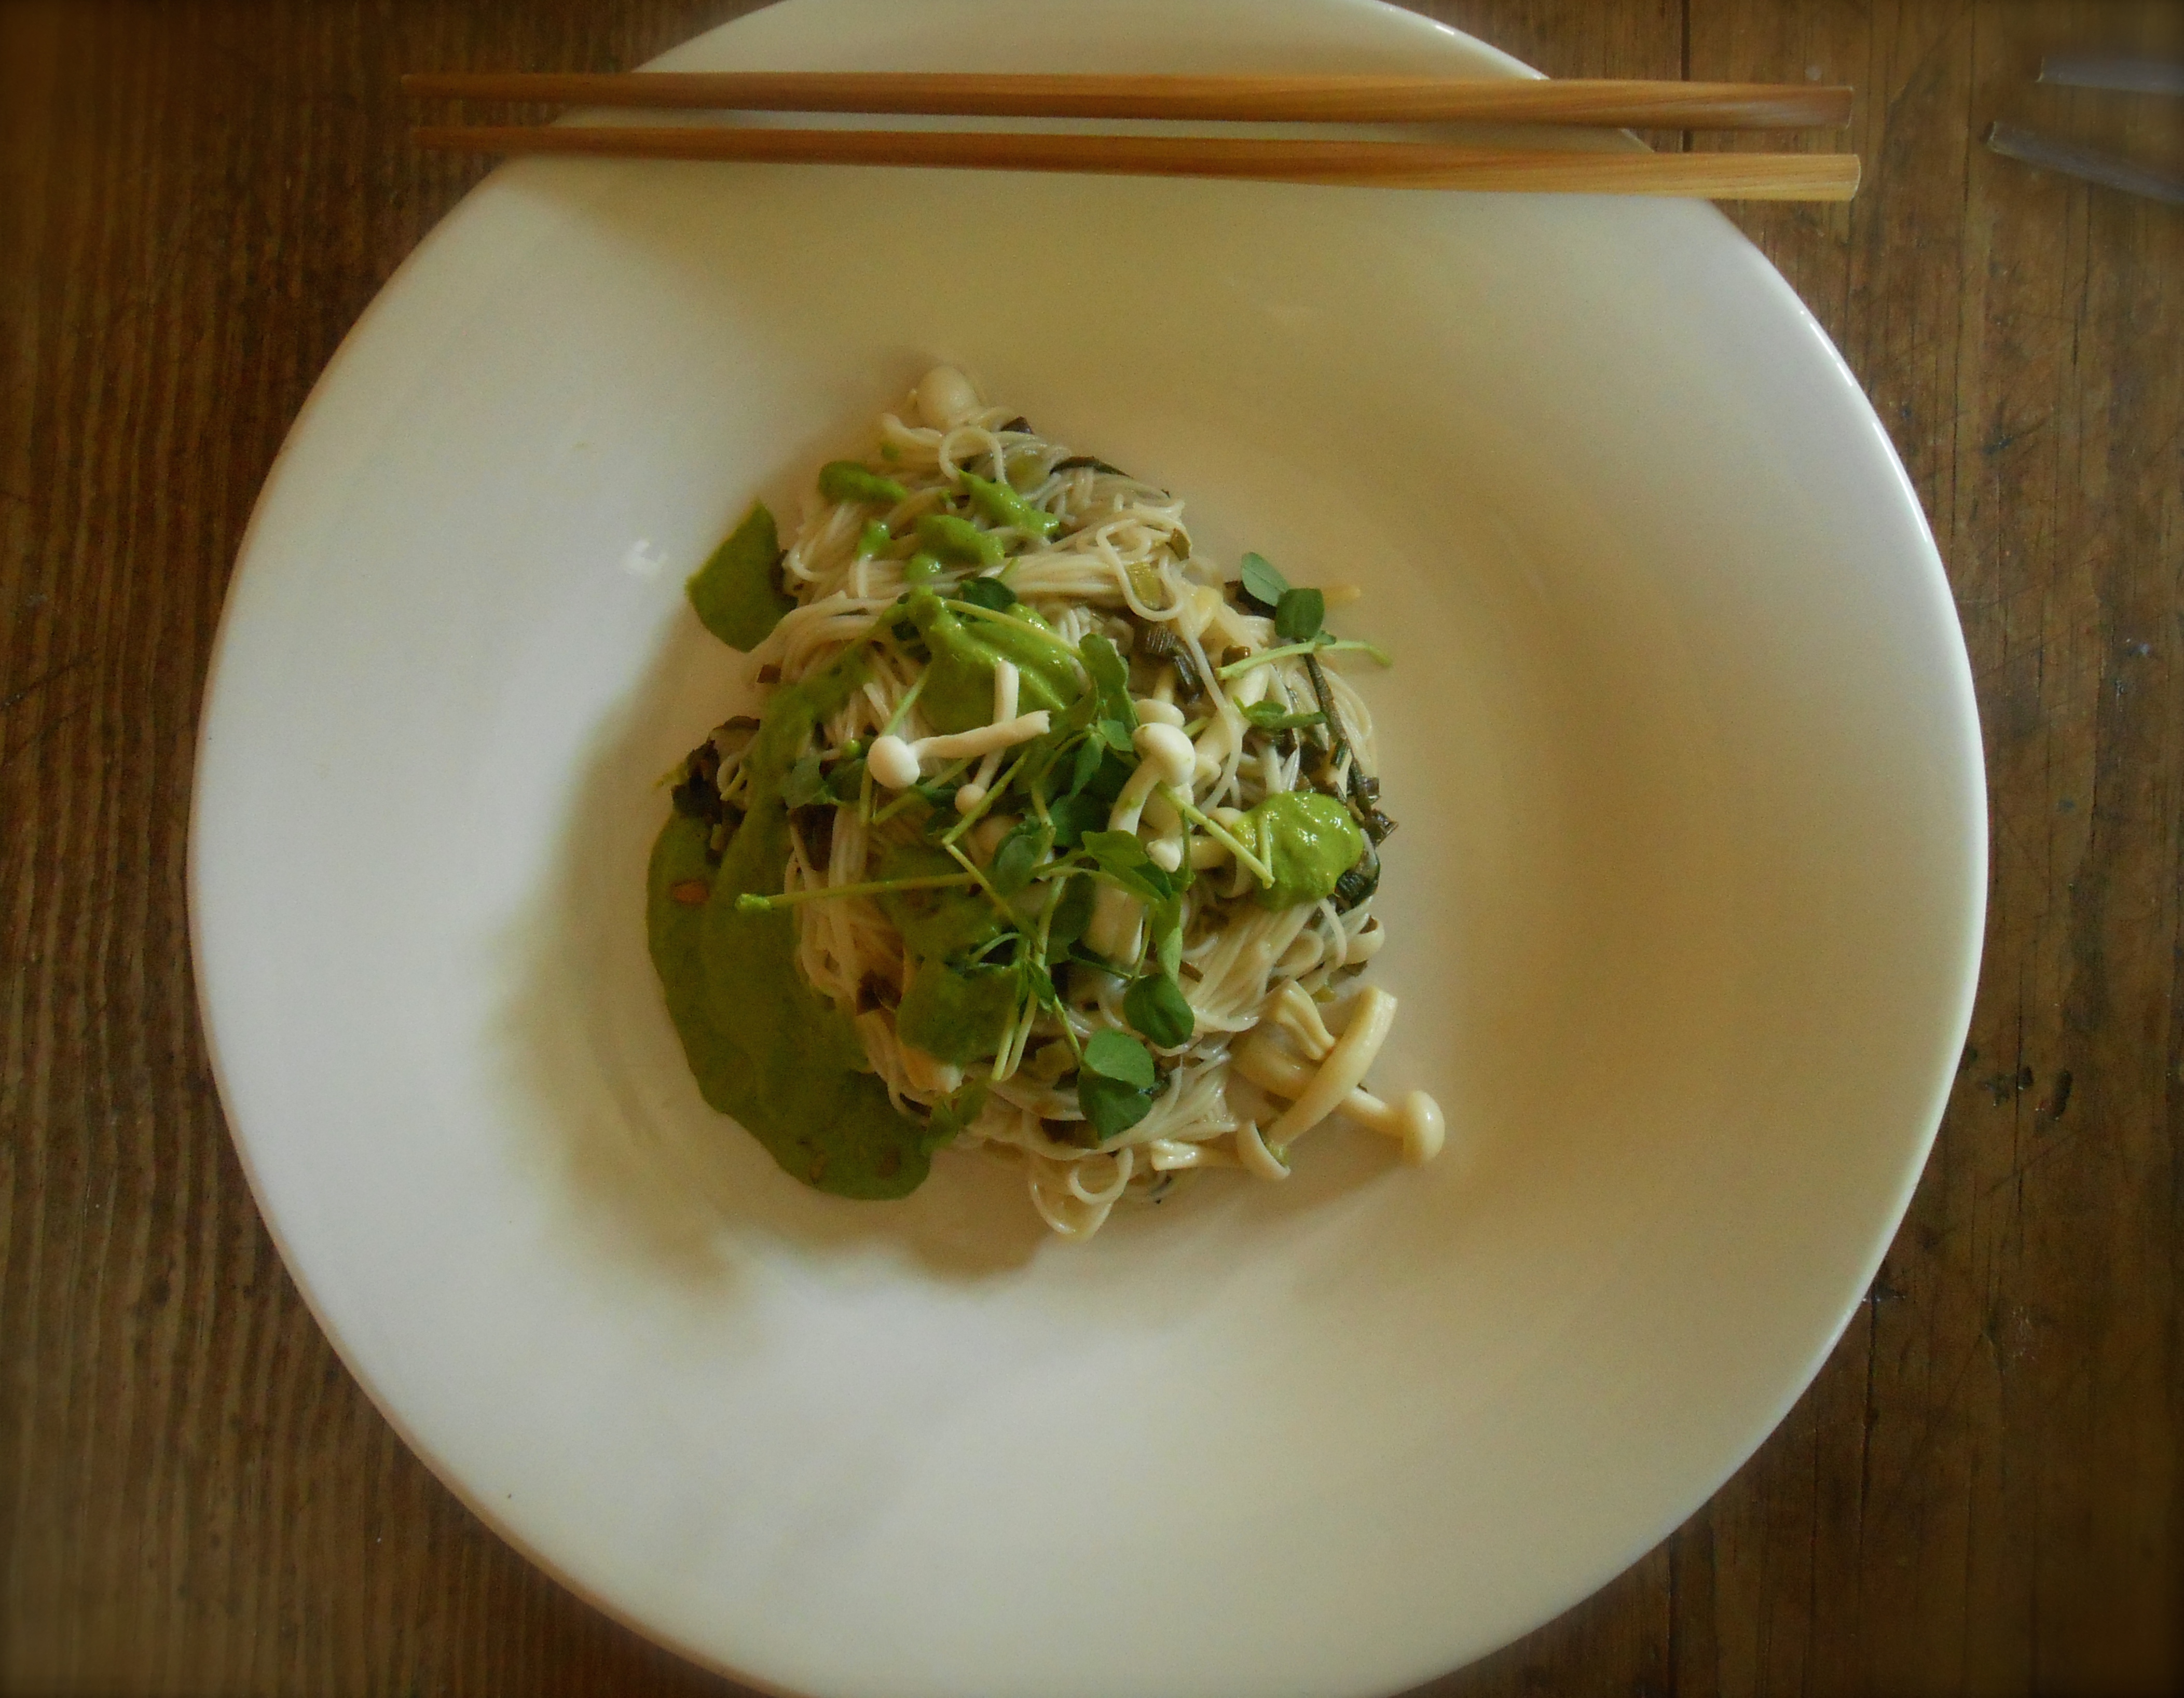
I n g r e d i e n t s
- 1-2 bunches ramps, or 1 regular leek, halved through the root and tough greens removed
- 2 tablespoons extra virgin olive oil
- 2 small sprigs fresh thyme, leaves stripped and chopped
- 1 bunch of enoki mushrooms
- Juice of 1 small lemon
- 2 bunches of somen noodles, 1 cup of cooking water reserved
- 2 tablespoons freshly grated Parmesan cheese
- Sea salt and freshly ground black pepper, to taste
M e t h o d
Cut the roots off the ramps and clean any dirt or old skin off the white parts of the stems. Rinse well and pat dry. Thinly slice the whites and stalks of the ramps. Shred the green leaves in a chiffonade (a style of slicing meaning to cut into long, thin ribbons). Set aside.
Put the olive oil into a wide skillet over medium-high heat. When the oil is rippling, add the white parts of the ramps. Sauté until they start to soften, then add the thyme. Cook for a minute. Add the mushrooms and a pinch of sea salt. Sauté until the mushrooms have colored slightly. Add the shredded ramp leaves. Mix well and continue cooking until the ramp greens have wilted, about 1 minute. Add the lemon juice, stir to mix and remove pan from heat and cover. Leave it to stand while you cook the soba noodles.
Uncover the mushroom mixture and heat through over a medium-high flame. Add half the reserved soba water, ground black pepper and grated cheese. Bring to a simmer and cook just long enough to melt the cheese, which will thicken the sauce. Add the drained soba noodles. Cook, stirring, until the noodles are heated through and well coated with sauce and vegetables, for about 1 minute. Add a little more soba water if the pan looks dry or the noodles start to stick. Serve immediately with a grind of black pepper and freshly grated Parmesan cheese and a spoonful of pea shoot pesto.

p e a s h o o t p e s t o
- 1/2 cup pumpkin seeds, pan roasted
- 3 cups pea shoots, roughly chopped
- 1/2 cup grated Parmesan Reggiano
- 2 cloves garlic, chopped
- Sea salt to taste
- 1/3 to 1/2 cup extra-virgin olive oil
M e t h o d
Place a small skillet on medium high heat and add the pumpkin seeds. Roast until browned occasionally giving the skills a good shake.
In a food processor or blender, combine pumpkin seeds, pea shoots, parmesan and garlic. Pulse until roughly chopped. Add salt to taste. With motor running, slowly drizzle in olive oil and a little water. Blend until well-combined and you reach your desired thickness.
