coconut curry ramen
October 29, 2015 § 79 Comments
 We visited our Asian supermarket the other day to pick up the makings for sushi and while there I gathered up a few ingredients I thought would make a nice pot of curry noodles; red curry paste, coconut milk, ramen noodles, fresh ginger, jalapeño and kaffir lime leaves, to name a few. What I came up with is this utterly delectable bowl of silky goodness.
We kept the recipe relatively minimal by going easy on the vegetables, light on the spiciness and adding a little tang with a squeeze or two of lime. If you would like to make it vegetarian you could leave out the chicken sausage and the fish sauce and add crispy baked tofu and perhaps a few clusters of bok choy.
I n g r e d i e n t s
- 2 – 15 ounce cans coconut milk
- 2 tablespoons butter
- 3 tablespoons red curry paste
- 1 jalapeno pepper, minced
- 1 pound Italian chicken sausage, removed from casings
- ½ teaspoon sea salt
- ½ teaspoon black pepper
- 3 cups chicken broth
- 2 carrots, peeled and shredded
- 2 tablespoons fresh grated ginger
- 5 fresh kaffir lime leaves*
- 1 tablespoon fish sauce
- 2 tablespoons soy sauce, plus a little more as needed
- 4 tablespoons lime juice
- 1 tablespoon brown sugar
- 3 single wrapped servings of ramen noodles, 9 ounces
- ½ cup fresh cilantro, chopped, plus extra for garnish
In a large dutch oven heat 6 ounces of coconut milk over medium heat. Add the butter and curry paste and stir to combine. Cook for 2-3 minutes, then add the finely chopped jalapeño. Cook until tender, approximately 4-5 minutes. Add the sausage, toss to coat and cook for 8-10 minutes or until the sausage has cooked through.
Once the sausage is cooked, add the rest of the coconut milk and chicken broth. Bring to a boil and lower the heat to simmer. Add the carrots, kaffir lime leaves, fish sauce, soy sauce, lime juice, brown sugar and ginger. While this is simmering boil the ramen noodles in a separate pot until done. Rinse with cool water. Add the ramen noodles and cilantro to the pot and serve, garnished with cilantro.
*A word about kaffir lime leaves: The glossy, dark green leaves of the kaffir lime tree are quite peculiar. Kaffir lime leaves look like two attached leaves and are most often used as a crucial ingredient for flavoring many Asian dishes such as soups and curries. The flavor profile is best described as a bright floral aromatic. Similar to bay leaves, whole fresh Kaffir leaves are generally removed from the dish prior to serving.
creamy polenta with slow cooked bolognese
October 22, 2015 § 53 Comments
I had a mid-week day off last week and it was raining cats and dogs, which was all I needed to set off a craving for something simmering on the stove. What’s better than a pot of full-flavored bolognese slowly bubbling and creating a homey feel about the place? In my opinion, slow cooked meals conjure up a sense of contentment, ease, happiness and anticipation. This recipe comes together casually over the course of several hours. Add a little here and simmer, then a little there and simmer…you get the idea.
Imagine creamy polenta with shredded asiago stirred in, and plenty of butter, then ladle a generous amount of bolognese sauce over it and top it off with a spoonful of parsley pesto and a scattering of parmesan-reggiano. Delightful in every way.
Six Hour Bolognese Sauce – This six hour bolognese sauce came about after after reading several online recipes.
I n g r e d i e n t s – B o l o g n e s e
- 1 pound grass fed ground beef
- 1 teaspoon sea salt + more to taste
- 2 tablespoons olive oil
- 1/3 cup butter, softened
- 3/4 cup yellow onion, chopped finely
- Freshly ground pepper to taste
- 1 cup chopped carrots, chopped finely
- 1 cup chopped celery, chopped finely
- 1 -1/2 cups whole milk
- 1/2 teaspoon nutmeg
- 1 -1/2 cups dry white wine
- 2 – 28 ounce cans of diced san marzano tomatoes with juice
- Freshly grated Parmesan cheese, to serve
Rub the salt into the ground beef and allow it to sit to room temperature.
In a large saucepan or Dutch oven over medium-low heat, add the oil and butter. When the butter melts, add the onion and a good pinch of salt and pepper. Saute until onion 8-10 minutes. Add carrots, celery, another pinch of salt, and cook another 8-10 minutes.
Add beef and cook until all the pink is gone. Make sure you break up any big clusters of beef.
Add milk. Reduce heat to low and stir frequently to prevent scalding. Simmer until all liquid has evaporated, about 1-1 1/2 hours, stirring every 10 minutes. Add nutmeg.
Add wine and simmer as you did the milk and simmer for another 1-1 1/2 hours, stirring about every 10 minutes.
Carefully add tomatoes, stirring them into the sauce. Reduce heat as low as it will go, and cook for 3 hours. Stir occasionally to make sure nothing sticks to the pot.
Adjust seasoning with salt and pepper, if needed. Serve over pasta or creamy polenta and top with Parmesan cheese and pesto.
Creamy Polenta:
- 4 cups vegetable stock
- sea salt
- 1 cup coarse cornmeal
- 1/2 cup (or a little more for extra creaminess) finely shredded asiago cheese
- 6 tablespoons unsalted butter, cubed
Combine the vegetable stock and salt to taste in a heavy pot over medium-high heat. Bring just to a boil, reduce the heat to medium-low, and slowly, whisking constantly, add the cornmeal in a thin stream. Cook, stirring constantly, until the polenta pulls away from the sides of the pot and most of the liquid has been absorbed, about 20 minutes. If you polenta is too thick add little boiling water until desired consistency is met. Remove the pan from the heat, and stir in the cheese and butter.
Pesto:
- large handful parsley
- 1/4 cup olive oil
- 1/4 cup parmesan
- 1 large or 2 small garlic cloves
- salt (to taste)
Whizz all ingredients in a food processor until well combined. Taste and adjust adding more salt or parmesan if needed.
albóndigas soup
October 9, 2015 § 62 Comments
Isn’t it wonderful to have a pot of soup simmering on the stove on an overcast day? We’ve had our share of overcast days here in Seattle lately and what’s better than a tasty bowl of albóndigas soup!
What I love most about albondigas soup is the texture of the moist and tender meatballs. The meatballs are packed with spices, mint, rice and zucchini. The rice grains cook inside the meatballs and puff up as they simmer, which creates a lovely tender, moist texture. This is a pleasantly mild soup, so if you are in the mood for spicy, you may add a few sliced jalapeños to the simmering sauce.
I n g r e d i e n t s
- 1/2 cup long white rice
- boiling water – enough to cover 1/2 cup rice
- 1 -1/2 pounds of lean ground beef
- 2 small zucchini squash, finely chopped
- 2 eggs
- 1 teaspoon fresh oregano
- 3 sprigs of fresh mint or 1 teaspoon dried mint
- 8 peppercorns
- 1 teaspoon salt
- 1 teaspoon ground cumin
- 1/3 onion, chopped
- 3 medium tomatoes (about 3/4 pound)
- 1 clove of garlic finely chopped
- Boiling water to cover tomatoes
- 2 Tablespoons olive oil
- 1 medium onion, thinly sliced
- 4 cups of chicken broth
- Avocado, fresh cilantro, lime wedges (for garnish)
empanadas
October 2, 2015 § 30 Comments
Not only are these little tasty meaty pillows fun to eat, but they are quite simple to put together. Well, truth be told, although a smooth process of assembly, they are a bit time consuming. One hour and a half start to table, but, I’m here to tell you they are worth it. If you have a little extra time and would like to spend it in the kitchen, I recommend making empanadas.
I love a good cooking project and this one in particular is very relaxing and unhurried. The pliable dough was a joy to work with, especially with the folding and crimping of the edges. Oh, and the delightful aroma of the beefy filling will spread through your home and create considerably above normal anticipation for dinnertime. No doubt you’ll enjoy spooning a bit of chimichurri sauce onto each bite.
I n g r e d i e n t s
For the dough:
- 3 cups flour
- 1 egg yolk
- 1/2 cup chilled butter
- 1 cup warm milk (maybe a little less)
- 1/2 teaspoon salt
For the filling:
- 1 pound free range, grass fed ground beef
- 1 red onion, chopped
- 1/2 cup butter
- 2 tablespoons smoked paprika
- 2 tablespoons chili powder
- 1 tablespoon finely chopped fresh oregano
- 1 tablespoon cumin
- 1 bunch scallions, chopped
- salt & pepper to taste
- 1 egg white, whisked
First, make the dough and refrigerate while preparing the filling. Mix the flour & salt in a food processor, add the butter and blend well. Add the egg yolk and milk, in small amounts, pulsing until small dough clump forms. Make two flattened disks, wrap in plastic wrap and refrigerate until filling is ready, at least 30 minutes.
Melt the butter in a large sauté pan. Add onions and salt, cook until soft, about 10 minutes. Add the beef and break apart with a wooden spoon, cook until browned. Add spices and combine well. Remove from heat and allow to cool. Once cooled add scallions and fresh oregano.
On a lightly floured surface thinly roll out the dough and cut out disc shapes. If you don’t own a disc cutter (like me) you may use a small plate or bowl. To assemble the empanadas, add a large spoonful of beef in the center of each disc. Brush the edges of the disc with egg whites. Fold empanada disc and seal the edges gently with your fingers. Use a fork to seal the edges. Lightly brush the top of the empanadas with egg whites and refrigerate for 30 minutes, while pre-heating the oven to 400°F. Bake for approximately 25 minutes.
Serve warm with chimichurri sauce.
Chimichurri Sauce
- 1 1/2 cups fresh parsley leaves
- 1/2 cup basil leaves (or you may use cilantro)
- 3 oregano sprigs, leaves removed
- 2 garlic cloves
- 3 tablespoons vinegar (we used apple cider vinegar)
- 6 tablespoons olive oil
- 1 – 2 tablespoons chili powder (add according to your taste, we go a little heavy)
- Salt and pepper to taste
Combine all ingredients in a blender or food processor until smooth. Taste and adjust by adding more vinegar or chili powder, according to your preference.
Enjoy!
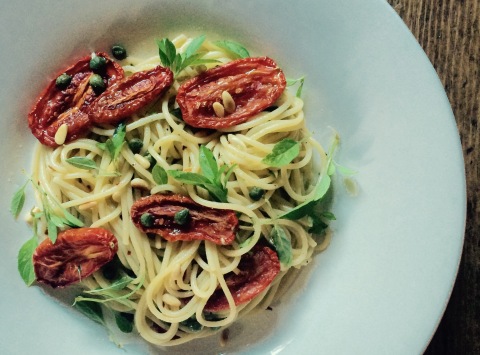
spaghetti with slow roasted tomatoes
September 24, 2015 § 50 Comments
San Marzano tomatoes are the most famous plum tomato to come out of Italy. If you compare these heirloom varietal tomatoes with other plum tomatoes you will find they are slim, thicker fleshed, contain fewer seeds, and the taste is sweeter, less acidic and not overly juicy which which is key for making a nice luxuriant sauce.
We planted this heirloom varietal in our garden this year. We didn’t know what to expect considering the imported canned tomatoes we adore are grown in the rich volcanic soil at the base and in the shadow of Mount Vesuvius. Our climate here in Seattle is mild, and the summer weather this year was particularly tomato friendly. Happily, we are harvesting these wonderfully sweet, sturdy plum tomatoes with little water content; making them perfect for slow roasting, then tossed into a bowl with your favorite pasta. If you would like to forego the pasta these are lovely as is, straight from the oven to table.
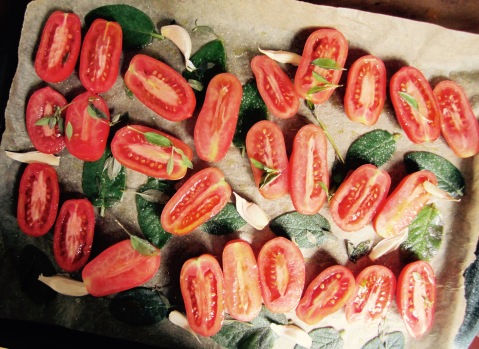
With the changing of the season, now is a perfect time of year to turn on your oven, set at 225°F (107°C), place a dozen or so fresh halved Roma tomatoes on a baking sheet, drizzle with olive oil and a little salt and roast for a good 2 -4 hours. If you would like to add several unpeeled cloves of garlic and fresh herbs, as pictured above with sage leaves, you will be pleased when your kitchen is filled with a delightful aroma. These are unbelievably delicious. Last week I finished a whole sheet of them in one sitting, by myself!
- 10 -12 Roma tomatoes
- drizzle of olive oil
- salt & pepper
- fresh herbs (optional)
- 4 or 5 cloves of garlic, unpeeled (optional)
F o r t h e p a s t a:
- 1 pound pasta, any shape
- 4 cloves garlic, chopped
- 1/4 cup olive oil
- juice from 1/2 lemon
- a few tablespoons of capers
- 2 tablespoons toasted pine nuts
- handful of fresh basil
- pinches of red pepper flakes, according to taste
- salt & pepper, to taste
- parmesan cheese (optional)
M e t h o d
Slice tomatoes in half, drizzle with olive oil and salt. Roast the tomatoes, centers facing up, in a 225°F oven. Roasting time will vary depending on the size of your tomatoes. I roasted mine for 3 hours.
Cook your pasta in salty water until a little under al dente, reserving some of the pasta water.
In a large skillet over medium high heat enough olive oil so it coats the bottom of the pan. When the oil is just simmering and add the garlic. Heat until fragrant, about 30 seconds, do not brown the garlic. Add the pasta and toss, adding some pasta water as needed. Add a few pinches of salt & pepper and continue to cook the pasta in the skillet until the pasta is perfectly al dente, about 2 minutes.
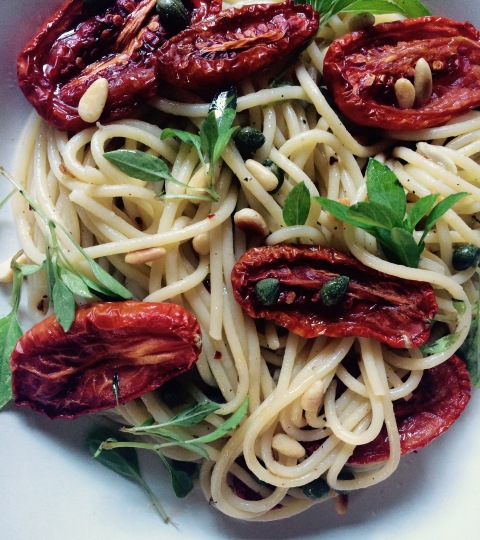
Remove from heat, add a few squeezes of lemon and stir in capers, pine nuts, red pepper flakes, fresh basil, and the tomatoes. Taste and adjust seasonings.
Add more olive oil, salt, pepper, and grated parmesan cheese, to taste.
apricot clafoutis
August 13, 2015 § 68 Comments
There are three very temperamental wild apricot trees down the street and during the six years we have lived here in the Cottage Grove neighborhood of West Seattle they have only produced two seasons of soft juicy fragrant apricots. Nobody takes care of these trees and it is difficult to tell whose property they are on. For all one knows maybe this is the reason for their oversensitive nature. Perhaps it is up to me to give them a little affection and show my appreciation for the fruit they unselfishly bear for no one other than a passer-by who happens to notice.
If you happen to come across six juicy ripe apricots here is a wonderfully easy dessert you can put together for your family or guests. You may dust the clafoutis with powdered sugar if you like. We prefer ours without. And it is delightful served warm with a ball of vanilla bean ice cream on the side.
Recipe adapted from William-Sonoma recipe catalog.
I n g r e d i e n t s
- 2 tablespoons unsalted butter
- 6 apricots, pitted and halved
- 2 eggs
- 3/4 cup, plus 2 tablespoons whole milk
- 6 tablespoons sugar
- 1 teaspoon finely grated lemon zest
- 1 teaspoon vanilla extract
- Pinch of fine sea salt
- 1/3 cup all-purpose flour
M e t h o d
Preheat oven to 375°F. Add 2 tablespoons of butter to your baking dish and place in the oven for a couple of minutes, until the butter is hot and bubbly. Arrange the apricots in an even layer in the bottom of the dish. In a blender, process the eggs, milk, sugar, lemon zest, vanilla, salt and flour until smooth. Pour the batter over the apricots. Bake until the clafoutis is puffed and golden brown, about 45 minutes. Let cool slightly on a wire rack.
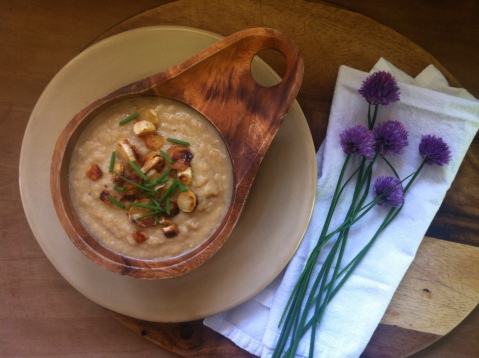
cauliflower soup with roasted parsnips & chives
June 26, 2015 § 66 Comments
We sat down to an autumn dinner in the spring! I love a delicious soup any time of the year and having a head of cauliflower and three large parsnips in the refrigerator for the past two weeks was all the influence needed to put this soup together. And of course for my friends living in the Southern Hemisphere, timing for this soup may be just right.
While the parsnips were roasting in a hot oven with melted butter and a little brown sugar, the cauliflower was simmering on the stove in vegetable stock. Rather than roast the cauliflower I prefer to simmer the cauli-florets in broth with finely diced shallots. The pungent cruciferous flavor mellows in the broth and the shallots add lovely flavor.
After the cauliflower is tender, roughly blend into a delicious soup and top with caramelized parsnips and chives.
I n g r e d i e n t s
- 1 cauliflower, broken into florets
- 2 large shallots, finely diced
- 2 tablespoons olive oil
- 6 cups vegetable stock
- sea salt & pepper
- 2 large parsnips, peeled and cut into rounds
- 4 tablespoons butter, melted
- 1 heaping tablespoon brown sugar
- fresh chives for garnish
Preheat the oven to 350°F. In a large dutch oven heat the olive oil on medium heat. Add the shallots and cook until aromatic. Add the cauliflower and push it around the pot to coat with oil/shallots. Add the stock and turn up the heat to high. Bring to a boil and reduce heat to medium. Continue a slow boil until cauliflower is tender.
In the meantime, melt the butter and stir in the brown sugar. Add the parsnips and butter/sugar mix into a bowl and toss to coat well. Place onto a roasting pan, cover with foil and roast in the oven for 2o minutes. Remove foil, stir and place back in the oven for 20 minutes until brown and caramelized.
When cauliflower is tender and ready, whizz with a hand blender until desired consistency is met. Season with salt and pepper and serve with caramelized parsnips and snippets of fresh chives on top.
beet, goat’s cheese & walnut pie
June 12, 2015 § 72 Comments
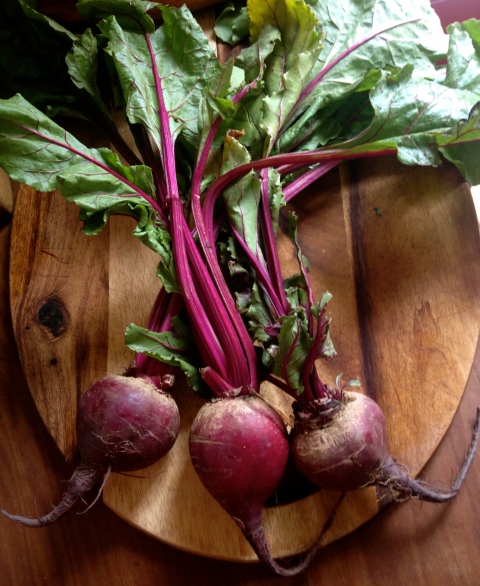
We’ve been in a constant state of remodel here at the tiny white cottage. So much so that I have been without a kitchen table for the past five months. Since then all of my photo’s for this humble little blog have been taken on a cutting board on my counter top. I could have lost steam and inspiration for lack of space (and light for that matter) but for some reason I have been chugging along like the ‘little engine that could’. I certainly haven’t lost enthusiasm for cooking dinner for the guys and some of my best meals have transpired in this construction zone. Like for instance, this beet, goat’s cheese & walnut tart.
It doesn’t take a kitchen table to bring us together for a nice meal in the evening. We are happy to sit down on stools or chairs or even hop up on the kitchen counter with a plate and fork in hand. It’s such a valuable time of day, and to be able to take three lovely organic beets with the greens attached and create a delicious tart such as this calls for a moment to sit and sigh in relief that all is well and wonderful.
I stumbled upon this recipe a couple of weeks ago on Epicurious and couldn’t get to the market quick enough to pick up beets and goat’s cheese. If you love beet, goat cheese & walnut salad you’ll love this pie. Sometimes beets with the greens attached are not available at the market. If this is true at your market you may use another tender green such as spinach or chard.
Recipe adapted from Epicurious.
I n g r e d i e n t s
- single pie crust of your choice
- 2 to 3 small beets
- 1 tablespoon olive oil (I used coconut oil)
- 1 medium onion, thinly sliced
- 2 or 3 garlic cloves, finely chopped
- 1 teaspoon thyme, finely chopped
- greens from the beets (or spinach can be used)
- 2 tablespoons apple cider vinegar
- sea salt & pepper
- 3 large eggs
- 1/2 cup milk (I used whole)
- 4 ounces fresh goat cheese
- 1 cup chopped walnuts (about 4 ounces)
- small handful of mint leaves
- 1/2 cup walnut, crushed
M e t h o d
Preheat oven to 350°F. Peel and grate the beets using a box grater or food processor. Place a large skillet on medium heat. Add olive oil or coconut oil and spread onion slices evenly in the pan. Fry for five minutes each side. Add garlic and thyme and cook until fragrant. Toss in 1/2 of the beet greens (or spinach) with apple cider vinegar, salt and pepper. When the greens are wilted stir in the other half and remove the skillet off the heat. Beat the eggs together with the milk and then crumble in the goat’s cheese. Add the eggs and cheese to the greens and onion mixture and combine well. Stir in the mint leaves and set aside.
After rolling out your pie dough transfer it to your pie pan. Prick the bottom a few time and blind bake for 10 minutes. Arrange the grated beets at the bottom of the pie and keep a little for the top. Pour the egg and greens mixture onto the crust, making sure that the cheese is evenly distributed. Spread the walnut pieces here and there on the top and sprinkle the remaining shredded beets. Bake for 30-35 minutes or until golden and set.
chilaquiles verdes
June 4, 2015 § 77 Comments
 I encountered some lovely organic tomatillo’s at the market a few weeks ago and brought home more than enough to make this delightful chilaquiles verdes recipe. Turns out I ended up making two batches because it is so good! The first time around I followed a recipe I had tucked away from Food52, which involved oven roasting tomatillo’s, red onion, jalapeño and garlic until golden brown, then whizzing in a blender. The chicken was simmered in chicken stock just long enough to cook through and then shredded into tender moist bite size pieces. All of this was placed back into the dutch oven to simmer with the chicken stock and a generous amount of lime. It was perfectly flavored with queso fresco, cotija, cilantro and finished with a fried egg on top.
 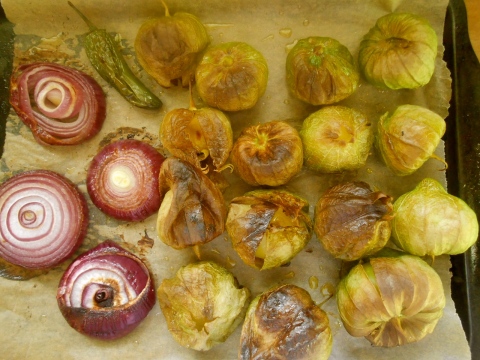 The second time preparing chilaquiles verdes our temperatures soared to 82°F (24°C) and I couldn’t imagine the oven adding heat to the already hot kitchen. At this point, I decided to grill the vegetables and chicken and after whizzing the vegetables in the blender add it the pot of chicken stock along with the shredded grilled chicken and generous amount of lime.
  Turned out to be an interesting comparison of oven roasted vs. grilled vegetables. The fire roasted flavor from the grilled vegetables was quite nice, however, when I prepare this again rather than grill the chicken I will simmer it in the chicken stock to achieve the tender moist texture that makes chilaquiles so wonderful.
 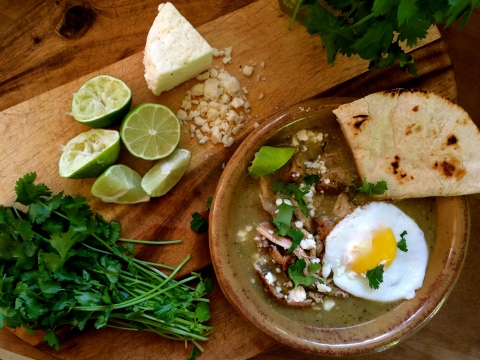 The recipe below is the oven roasted vegetable version. If you are interested in the fire roasted version, grill your olive oiled vegetables for 15 minutes turning often and make sure to follow the same recipe below for the chicken. Recipe adapted from Food52 by lisina.
- 3 pounds tomatillos in the husk
- 1 large red onion cut in 1/2-inch slices
- 2 jalapeños (I used one)
- 8 cloves of garlic, unpeeled (I used 4)
- 1 handful of cilantro leaves
- 1 lime
- 1 heaping spoonful of crema or sour cream (I used yogurt)
- 1 quart chicken stock (preferably homemade)
- 2 boneless, skinless chicken breasts
- 12 corn tortillas
- 1 cup (or more if you like) queso fresco in large crumbles (1/2- to 1-inch pieces), or shredded monterey jack
- 1/2 cup crumbled cotija cheese
- Cilantro leaves, for garnish
- Salt and olive oil, as needed
Lay tomatillos, onions, jalapeños, and garlic on a baking sheet lined with parchment paper. Drizzle with olive oil and sprinkle with salt. Place the baking sheet under the broiler, until the veggies are wilted and blistered, about 10 minutes (time will vary based on the heat of your broiler). Remove the veggies and let them cool until you are able to handle them. Remove the husks from the tomatillos, squeeze the garlic from the cloves, and remove the stem from the jalapeños. Throw the roasted veggies into a blender, along with any juices that accumulated on the baking tray. Add the cilantro leaves, the juice of the lime, and the crema. Purée until the mixture is very smooth. Taste and make any needed adjustments (more salt, acid, etc). While the veggies are still in the oven, bring the chicken broth to a gentle simmer in a dutch oven. Add the chicken breasts and allow them to simmer until tender, about 20 minutes. Move the chicken to a cutting board and use two forks to shred it. Return the chicken and any juices to the pot. Add the tomatillo purée to the chicken broth, taste for seasoning (note the sauce should be tangy, almost sour, so add another squeeze of lime if necessary), and bring to a simmer. Cover and let the mixture simmer for about 20 minutes. Cut the tortillas into quarters. If your tortillas are fresh, dry them out in the oven or toaster oven. If they’re stale and dried out, add them right to the pot. Stir the mixture and let simmer for another 10 minutes. The tortillas will cause the sauce to thicken. Uncover and stir in the queso fresco or sprinkle with the monterey jack. Cover the pot again, allowing the cheese to melt. Uncover, sprinkle with cotija and cilantro, and serve.
blueberry rye slab
May 28, 2015 § 59 Comments
A couple of weeks ago I decided it was time to get the hang of making a good pie crust. Both fruity & savory pies are at the top of of my favorites list and there is no excuse for bringing home store-bought pie crust. Crumbles, cobblers and pretty much any fruity baked dessert that doesn’t involve a combination of butter, flour, icy cold water and refrigeration for a period of time are put together with ease, but no, not pie crust. Not for me anyway.
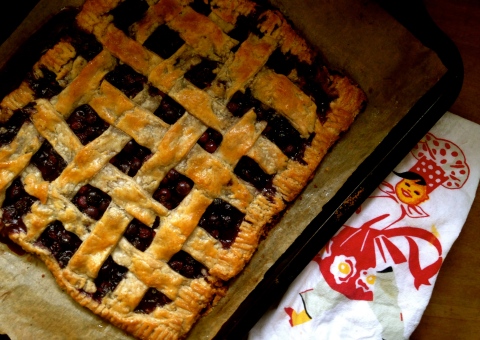
I mix my pie crust by hand and just for practice I made four pies in the past two weeks; two savory pies and two blueberry slabs. Yes, I made this slab twice in two weeks. It is that good.
The slabs turned out beautifully. The crust was perfect. Flaky, buttery, it easily rolled out to a perfect thickness and it held the juices in. Both the rye flour and the apple cider vinegar added a twinge of sourness which contrasted well with the sweet blueberries. I just love a rustic looking pie. And this held together well enough to eat without using a plate or fork. You can pick up the squares and eat them as you would a hand pie.
I still need a lot of practice but this blueberry slab was simple enough for a novice pie maker. If you have any tips on making pie crust you would like to share, please do, I can use all the help I can get.
I took this Food52 recipe and reworked the filling by leaving out a large amount of sugar, ginger, lemon zest, salt and flour.
Recipe adapted from Food52 by Yossy Arefi.
- 1- 1/8 cup (9 ounces) all-purpose flour
- 1 – 1/8 cup (9 ounces) rye flour
- 2 sticks (12 ounces) unsalted butter, cold and cut into cubes
- 1 teaspoon salt
- 8 to 12 tablespoons ice water
- 1 tablespoon apple cider vinegar
To make the crust, combine the flours and salt in a bowl. Use your fingers or a pastry cutter to cut half of the butter into the flour until it is the size of peas, then cut in the other half until it is the size lima beans. Some of the butter will be completely worked into the flour, but you should have lots of visible pieces of butter in the dough, too. Add the apple cider vinegar to the water and make a well in the center of the flour mixture. Use a gentle hand or wooden spoon to mix about 8 tablespoons of water into the flour until just combined. If the dough seems very dry, add more water a couple of teaspoons at a time. You have added enough water when you can pick up a handful of the dough and squeeze it together without it falling apart. Press the dough together, then split it in half, form into discs, and wrap each disc in plastic wrap. Chill the dough for at least one hour before using, or overnight.
- 5 cups blueberries, about 2 1/2 pints
- 1/8 cup sugar
- 1 vanilla bean, seeds scraped
- 1 egg for egg wash
- 3 tablespoons crunchy sugar to finish
Preheat oven to 400º F and line a baking sheet with parchment paper.
Gently toss the blueberries, sugar and vanilla bean seeds in a bowl until well combined.
On a lightly floured surface, roll out one piece of the dough into a roughly 8- by 12-inch rectangle, 1/4 to 1/8 inch thick. Gently move the dough to the prepared baking sheet and put the whole thing in the fridge. Roll out the other piece of dough to roughly the same size, erring larger rather than smaller, and set it aside for a moment.
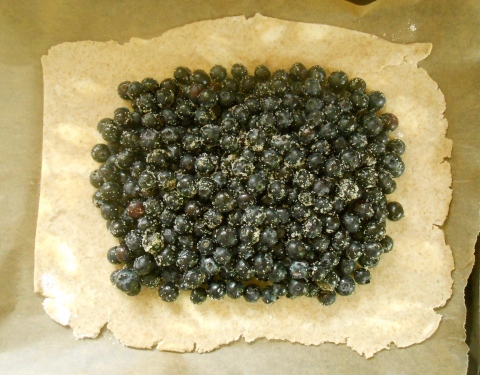
Remove the dough from the fridge and pour the blueberry mixture on top, leaving a generous border of at least 1 1/2 inches around the edges.
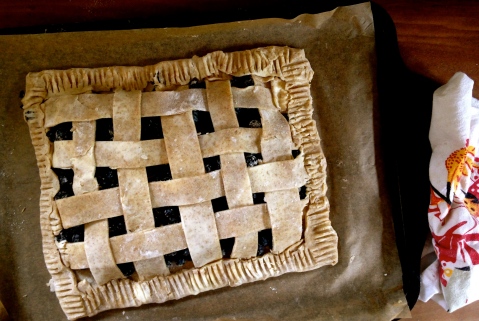
To make a lattice top, cut the remaining dough sheet into 1-inch strips and starting from the top left corner of the pie, lay one strip of dough horizontally and one strip vertically, so that the horizontal strip is on the bottom. Lay a second horizontal strip about 1/2 inch below the top strip so that it overlaps the vertical strip. Fold the top horizontal strip to the left and lay another vertical strip about 1/2 inch to the right of the first one. Next, fold the top horizontal strip back over it. This way, the second vertical strip will go underneath the top horizontal strip and over top of the second horizontal strip. Fold the first vertical strip up and lay down a third horizontal strip. Fold the vertical strip back down. Next, fold the second horizontal strip to the left and place a third vertical strip. Fold the horizontal strip back over the pie. Fold the middle vertical strip up and lay down the fourth horizontal strip. Fold the top and third horizontal strip to the left and place a fourth vertical strip. Continue until all strips are used and the top of the pie is covered. You may have to piece some scraps together to make the last few strips of dough. Fold the bottom crust up and over the top of the pie and press firmly with a fork to seal.
Put the baking sheet into the refrigerator or freezer until the crust is very firm. When you are ready to bake, brush the top of the pie with a beaten egg and generously sprinkle it with sugar. Bake the pie until the crust is deep golden brown and the juices are bubbling, 35 to 45 minutes. Cool slightly before cutting.
Note: Be prepared; a lattice-topped pie will probably leak, so do not forget to line your pan with parchment paper.


