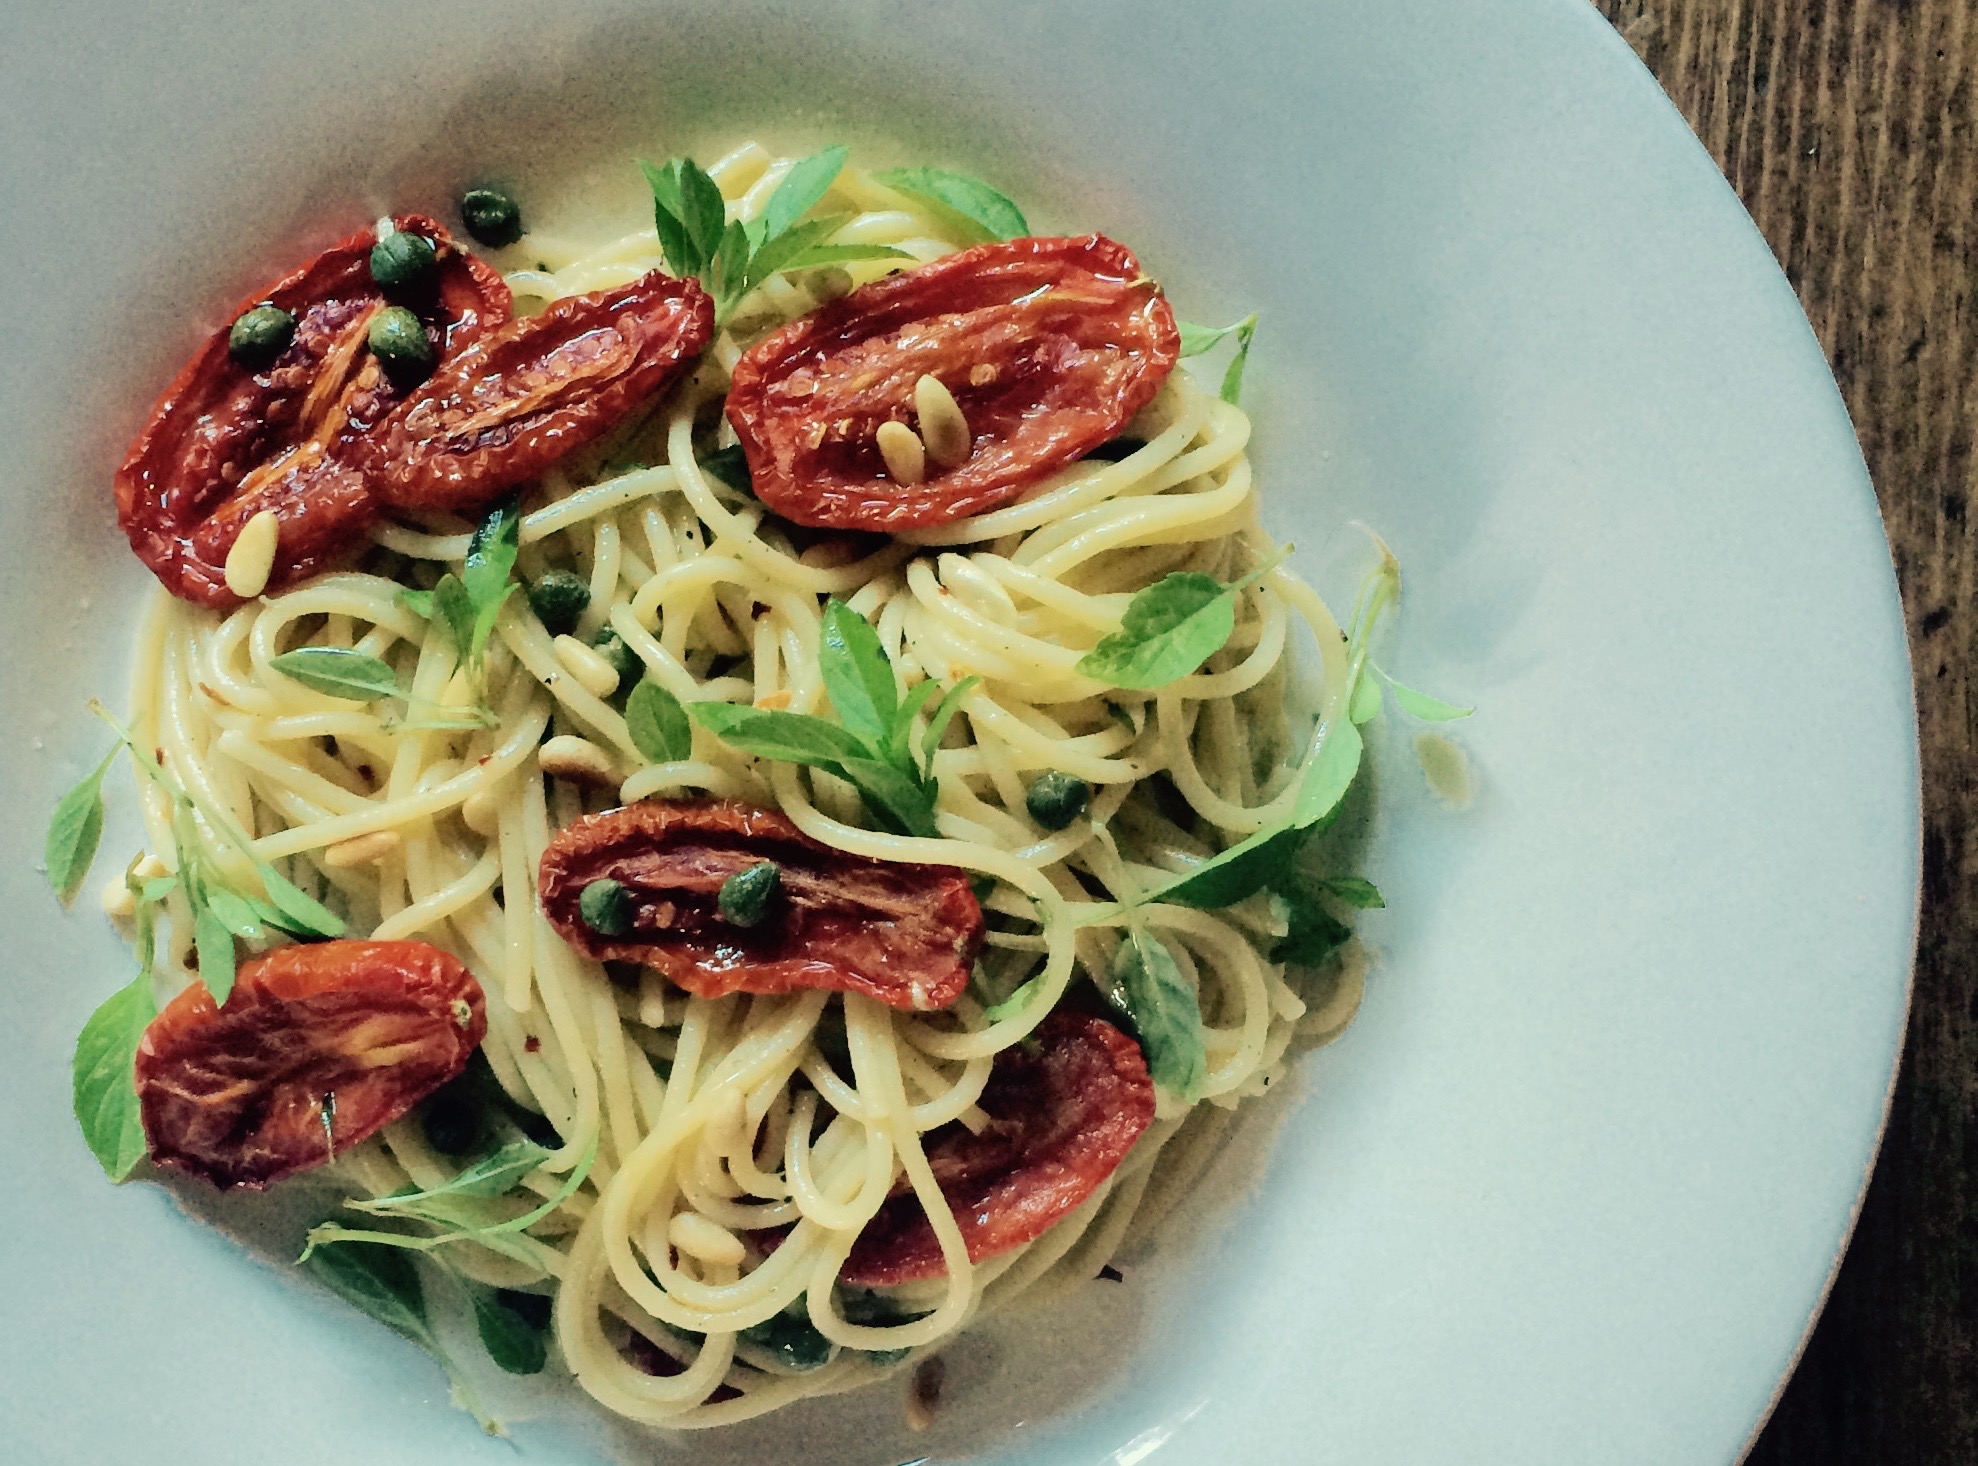
spaghetti with slow roasted tomatoes
September 24, 2015 § 50 Comments
San Marzano tomatoes are the most famous plum tomato to come out of Italy. If you compare these heirloom varietal tomatoes with other plum tomatoes you will find they are slim, thicker fleshed, contain fewer seeds, and the taste is sweeter, less acidic and not overly juicy which which is key for making a nice luxuriant sauce.
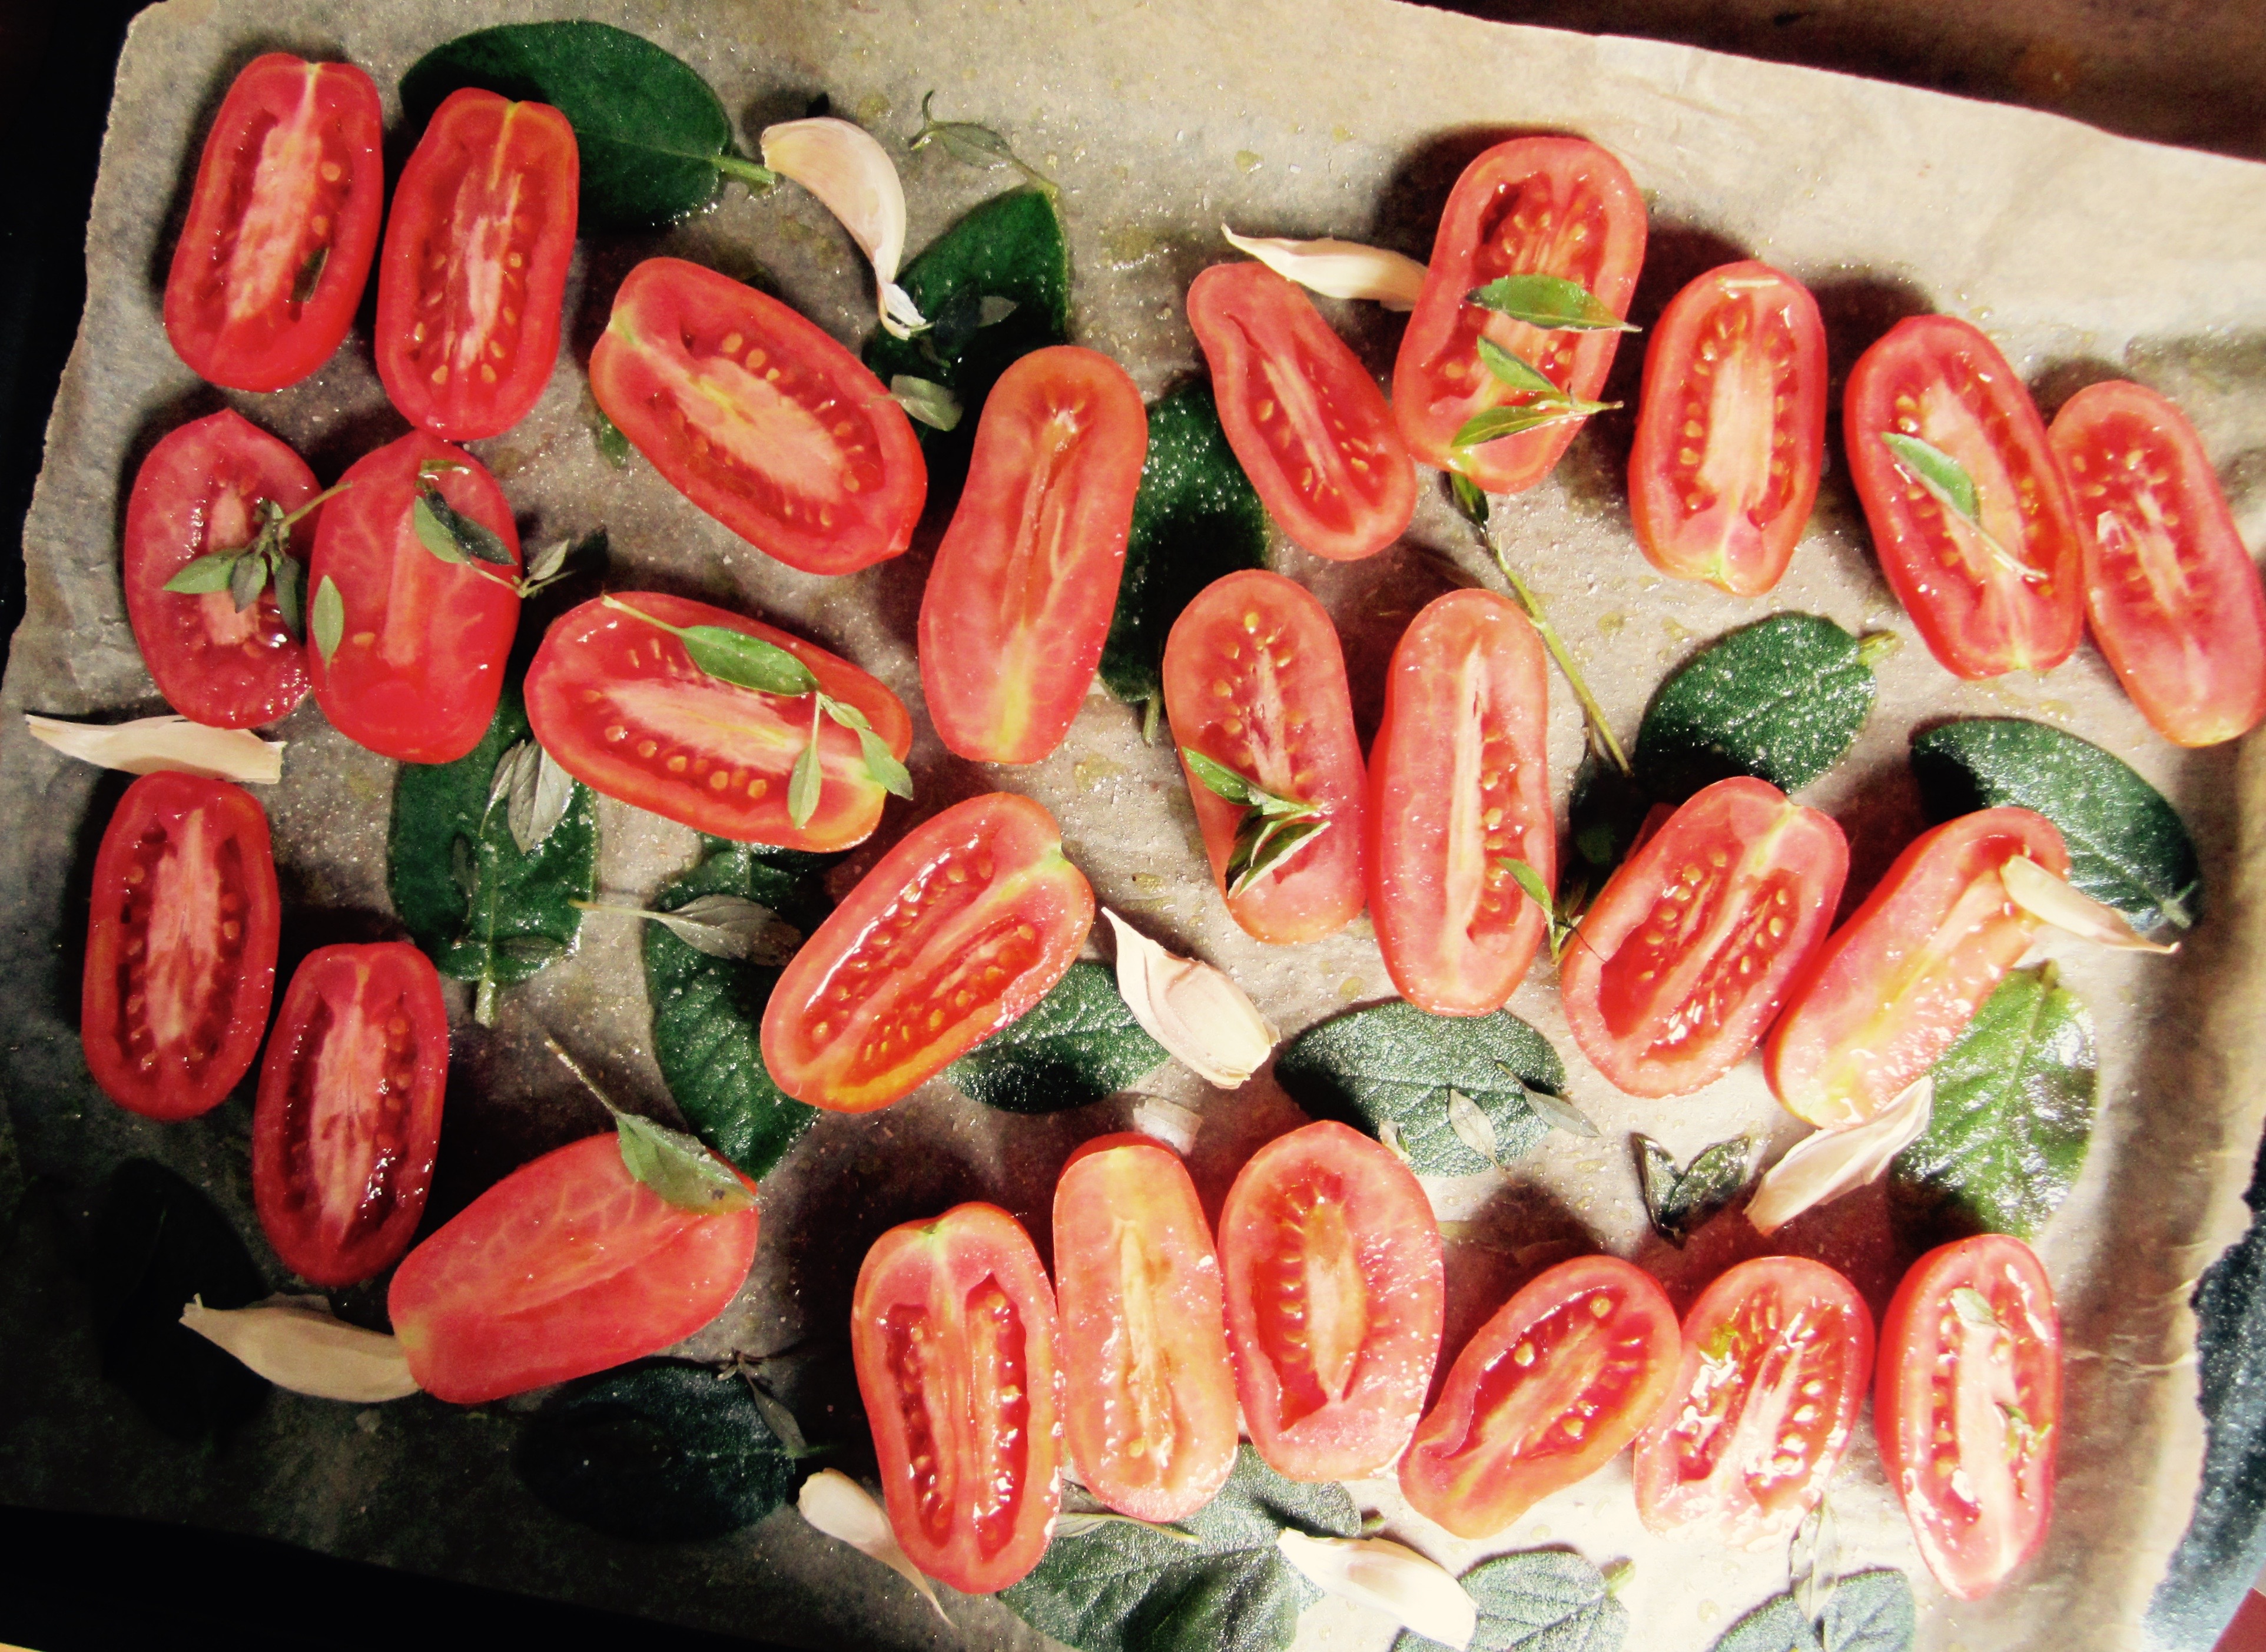
We planted this heirloom varietal in our garden this year. We didn’t know what to expect considering the imported canned tomatoes we adore are grown in the rich volcanic soil at the base and in the shadow of Mount Vesuvius. Our climate here in Seattle is mild, and the summer weather this year was particularly tomato friendly. Happily, we are harvesting these wonderfully sweet, sturdy plum tomatoes with little water content; making them perfect for slow roasting, then tossed into a bowl with your favorite pasta. If you would like to forego the pasta these are lovely as is, straight from the oven to table.

With the changing of the season, now is a perfect time of year to turn on your oven, set at 225°F (107°C), place a dozen or so fresh halved Roma tomatoes on a baking sheet, drizzle with olive oil and a little salt and roast for a good 2 -4 hours. If you would like to add several unpeeled cloves of garlic and fresh herbs, as pictured above with sage leaves, you will be pleased when your kitchen is filled with a delightful aroma. These are unbelievably delicious. Last week I finished a whole sheet of them in one sitting, by myself!
- 10 -12 Roma tomatoes
- drizzle of olive oil
- salt & pepper
- fresh herbs (optional)
- 4 or 5 cloves of garlic, unpeeled (optional)
F o r t h e p a s t a:
- 1 pound pasta, any shape
- 4 cloves garlic, chopped
- 1/4 cup olive oil
- juice from 1/2 lemon
- a few tablespoons of capers
- 2 tablespoons toasted pine nuts
- handful of fresh basil
- pinches of red pepper flakes, according to taste
- salt & pepper, to taste
- parmesan cheese (optional)
M e t h o d
Slice tomatoes in half, drizzle with olive oil and salt. Roast the tomatoes, centers facing up, in a 225°F oven. Roasting time will vary depending on the size of your tomatoes. I roasted mine for 3 hours.
Cook your pasta in salty water until a little under al dente, reserving some of the pasta water.
In a large skillet over medium high heat enough olive oil so it coats the bottom of the pan. When the oil is just simmering and add the garlic. Heat until fragrant, about 30 seconds, do not brown the garlic. Add the pasta and toss, adding some pasta water as needed. Add a few pinches of salt & pepper and continue to cook the pasta in the skillet until the pasta is perfectly al dente, about 2 minutes.
Remove from heat, add a few squeezes of lemon and stir in capers, pine nuts, red pepper flakes, fresh basil, and the tomatoes. Taste and adjust seasonings.
Add more olive oil, salt, pepper, and grated parmesan cheese, to taste.

whole roasted spiced cauliflower
April 23, 2015 § 80 Comments
 I know some of you are thinking not another roasted cauliflower recipe. How many different recipes do we really need for the same vegetable? But please give me your attention for just a second because I am here to tell you the many wonders of this particular version. Not only is it in the oven lickety-split to free you up for your other high maintenance dishes you may be preparing, but you could just forego the other dishes and have this for dinner, period.
  Other than simplicity of putting this together there are a couple of things you’ll love about this. One is the crispy aromatic outer layer. We went a little heavy on the olive oil just to achieve this result. And with the lovely spices there is no denying the alluring aroma that will fill your kitchen – or in our case, the entire house. Spicy crispy outer layer, soft nutty tender inside, this is why I posted another cauliflower recipe. The lovely cream sauce kept us dipping until the whole head of cauliflower was finished.
This recipe comes from the beautiful blog An Edible Mosaic.
What you will need:
c a u l i f l o w e r
- 1 head cauliflower
- 3 tablespoons olive oil or more to coat the entire head of cauliflower
- 1 teaspoon garam masala
- 1/2 teaspoon coarse salt
- 1 teaspoon cumin powder
- 1/2 teaspoon ground yellow mustard powder
- 1/4 teaspoon ground turmeric
- 1/8 teaspoon ground cayenne pepper (more or less to taste)
- 1/8 teaspoon ground black pepper
- small handful of coarsely torn parsley – for garnish
- 1/4 cup pine nuts, dry roasted and coarsely chopped – for garnish
c r e a m y s a u c e
- 1/4 cup mayo
- 1/2 cup plain greek yogurt
- 1 teaspoon coarse mustard
- 1 teaspoon horseradish
- 1/2 teaspoon Worcestershire sauce
- 1/2 teaspoon ground sweet paprika
- 1/4 teaspoon garam masala
- 1/8 teaspoon black pepper
- 1/8 teaspoon ground cayenne pepper (more or less to taste)
Preheat oven to 425F. Line a large baking sheet with parchment paper. Remove the outer green leaves from the cauliflower and use a paring knife to cut out the core, leaving enough core intact so that the florets stay together. Place the cauliflower on the prepared baking sheet and rub generously with the olive oil. Combine all the spices for the cauliflower in a small bowl, and evenly rub the spices onto the oiled cauliflower. Cook until the cauliflower is tender inside and golden outside, about 1 hour 15 minutes, rotating the baking sheet once halfway through. While the cauliflower is roasting combine creamy sauce ingredients in a bowl and set aside. Cool for 5 minutes and transfer the cauliflower to a serving dish. For serving either slice the cauliflower into “steaks” or separate the florets. Serve with the creamy sauce for dipping.
Lacinato Kale and Mint Salad with Spicy Peanut Dressing
October 24, 2014 § 81 Comments
Admittedly, we don’t eat much kale in our house, and really for no other reason than I just don’t notice it when I’m at the market (as if it doesn’t exist). Humph! It’s the season for kale right now and I have been noticing towering stalks growing in gardens while walking around the neighborhood, and needless to say, sparking my eagerness to pick some up next trip to the market.

I found this recipe on Food 52 and only made one minor change by switching out the walnuts for pecans. It’s out of this world delicious. Now I have a reason to plant lacinato kale in my garden next season. Perfect hearty salad for this time of year.
I n g r e d i e n t s
- 1 bunch of lacinato kale, chopped very small, almost minced
- 1 cup fresh mint, minced
- 1 cup pecans, chopped
spicy peanut dressing
- 3 tablespoons smooth natural peanut butter
- 3-6 tablespoons warm water (to achieve desired consistency)
- 3 tablespoons rice wine vinegar
- 1 tablespoon pomegranate molasses
- 1 tablespoon soy sauce
- 1 teaspoon fresh garlic, minced
- 2 teaspoons fresh ginger, peeled and minced
- 1 teaspoon sesame oil
- 1 teaspoon dried red chili flakes

luscious cauliflower soup
October 17, 2014 § 73 Comments
 Someone asked me the other day if I usually know in advance what I am making for dinner. I had to pause and think about the answer for a moment because I am always aware of what’s in my refrigerator and have a general idea of what I will be cooking for dinner. However, a majority of the time I don’t actually make what I originally had in mind when I bought the ingredients. This cauliflower soup is a perfect example. We have been enjoying this wonderful warm cauliflower cous cous with chili and lime and this was part of my plan for dinner last Wednesday, and the reason I purchased cauliflower.
  Fall weather is definitely here and it happened to be a cool wet day. I spent some time outside and admittedly a bit unprepared for the cool misty day in my canvas Converse sneakers, which left me chilled and damp footed for the rest of the day. As I was driving home from work, with the heater blasting my feet, I thought about the warm cauliflower salad and I couldn’t wait for dinner. Nevertheless with the chill in the air (and cold feet) I couldn’t get my mind off of a pot of soup simmering on the stove. By the time I reached home I decided to make cauliflower soup instead. This soup is very creamy and irresistible. And to think I actually had creme fraiche in the refrigerator, unheard of!
I n g r e d i e n t s
- 1 head of cauliflower, cut up
- 3 medium size potatoes, peeled and diced
- 1 medium red onion
- 3 tablespoons olive oil
- 7 cups stock, chicken or vegetable
- 1/2 cup half and half
- 7 ounces creme fraiche
- 1/2 cup good cheddar cheese
- several chives for snipping on top
Heat 3 tablespoons of olive oil in a large pot over medium high heat. Add the onions and cook until soft, 5 minutes. Add potatoes and coat well. Continue to cook for 5 minutes and add the cauliflower. After cauliflower is well coated add the stock and bring to a boil. Reduce heat to medium low continue to slow boil until potatoes are tender. Using an immersion blender, blend the soup until desired consistency. We like our soup to have a small amount of texture, so leaving some cauliflower and potato whole is preferred. Add cheese, half & half and creme fraiche. Stir in chive snippets and serve. 
chili lime cucumber noodles
October 10, 2014 § 88 Comments
 Hello. It’s hard to imagine it’s October and I haven’t posted a single recipe since August 27th. Well, it isn’t because I haven’t been in the kitchen because I have been making dinner everyday and breakfast on the weekends. Actually, the kitchen is my favorite place to be during these very busy times. While some folks can not imagine entering the kitchen and cooking a meal after working all day; I happen to thrive on it. I guess it can be considered my happy place! Well, I’m back. And I am here to share some of my recent favorites. I simply cannot get enough of these sensational pots of goodness. First, if you share my sentiment for chana dal, try this recipe. Wonderfully spicy, comforting and It happens to be my teenage son’s favorite dinner now and the leftovers are great for breakfast. Another dish on high rotation in our kitchen is this french green lentil recipe I posted back in March; a truly delicious early spring dinner and even better in autumn. Lastly, today’s recipe, chili lime cucumber noodles. Thank goodness my family enjoys cucumbers, and spicy chipotle, and arugula because this salad has been in the middle of our dinner table on a number of occasions for the past two months. And it all started with this.
  This is my new julienne peeler made by OXO. A dear friend gave this to me a few months ago and I have been using it like I have never used a kitchen tool before. Not only is it fun to use but it produces a satisfying texture to cucumbers, carrots, zucchini and even potatoes for hash browns. It is a game changer. Spring for it, you will be glad you did. :)
  This salad is very attractive and texturally crunchy. It’s a little sweet from the honey, spicy from chipotle powder and plenty of salt, pepper and lime juice. There’s just a bit of olive oil and a big handful of arugula, mint and basil. It’s delicious. And you could use zucchini instead of cucumber, it is equally delightful.
I n g r e d i e n t s
- juice of one lime
- chipotle chili powder, to taste
- generous pinch of sea salt
- 1 english cucumber, peeled into noodles with a julienne peeler
- 1 tablespoon extra virgin olive oil
- little squeeze of raw honey
- 2-3 handfuls of arugula
- 2 sprigs of mint, leaves chopped
- 3 sprigs of basil, leaves chopped
- ground black pepper
Combine the lime juice, salt, chipotle powder, olive oil, and honey in a small bowl. Taste and add more chipotle heat or honey to your liking. Toss with the cucumber noodles and arugula until evenly mixed. Add mint and basil and pepper to taste and give a few tosses to combine. Eat right away. 
radish leaf pesto
August 15, 2014 § 86 Comments

Did you know you can make a delicious pesto sauce with radish leaves? Up until now I always tossed the leaves into the compost bin without much thought. I brought home two fresh bunches of radishes from the market the other day and the greens were wonderfully alive, crisp and vibrantly green; I just had to use them instead of throwing them away.
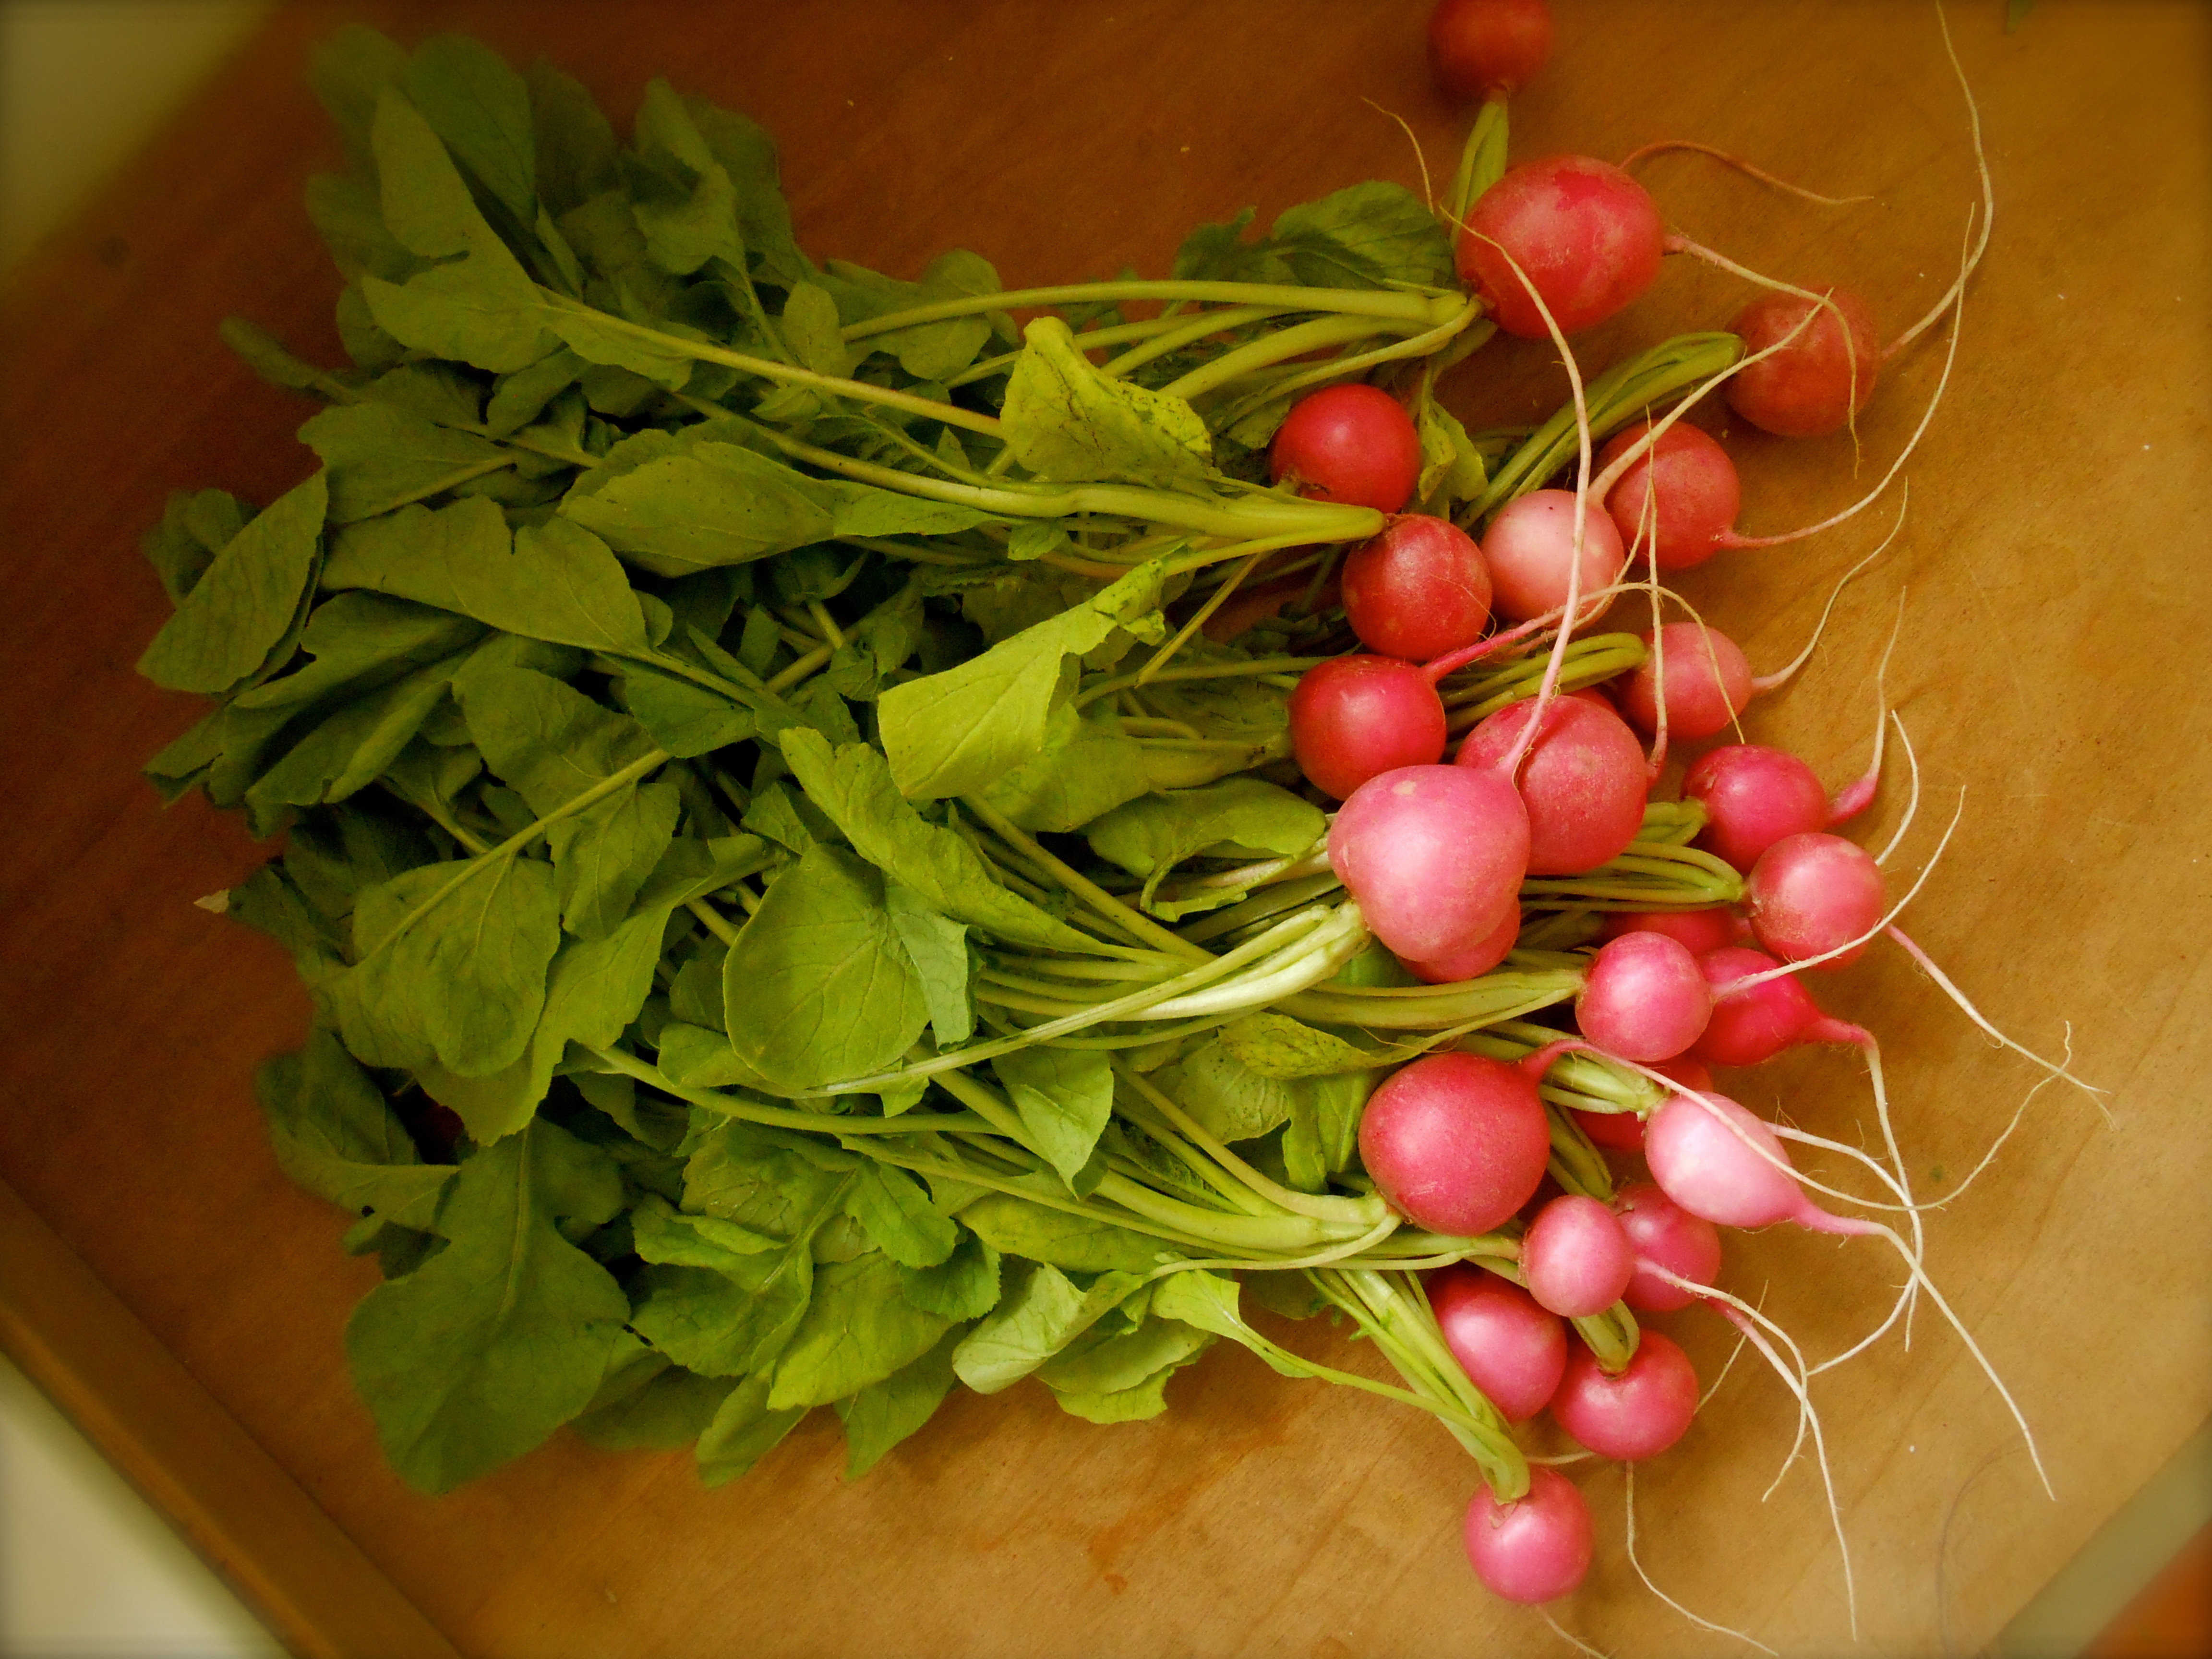
Radish leaves don’t stay fresh for very long, and it’s best to separate them from the roots soon after harvesting or bringing them home from the market. Wash, dry and store the leaves like other salad greens and eat them within a day or two.

Garlic, fresh oregano, lemon juice, almonds, red pepper flakes and parmesan are all you need to add to your radish leaves for this wonderful pesto. So, instead of throwing out the greens when you buy a bunch of radishes, turn them into a delicious pesto.
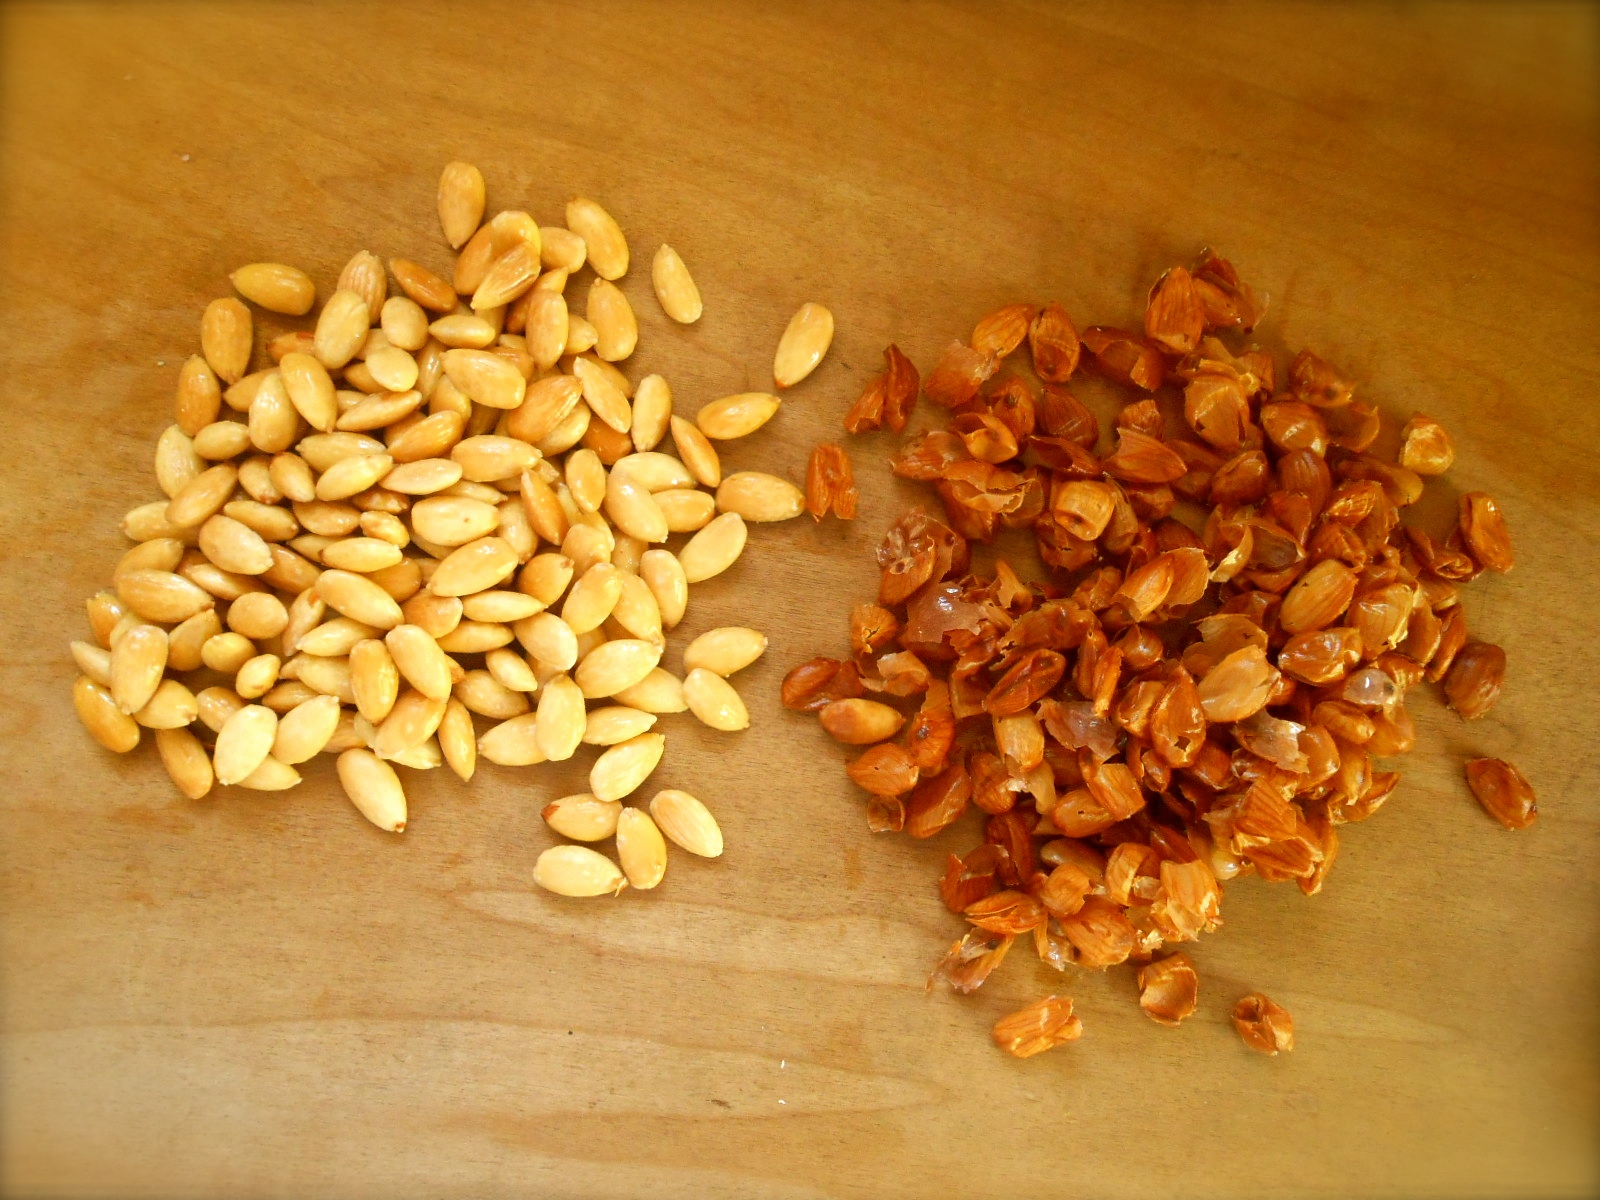
To blanch almonds simply drop raw almonds into boiling water for one minute. Drain and rinse with cold water and the skins slip off effortlessly when pinched.

I n g r e d i e n t s
- 2 cups lightly packed radish leaves
- 2 cloves garlic
- 3-1/2 tablespoons fresh oregano, chopped
- 3 to 4 tablespoons fresh lemon juice
- 1 cup blanched whole almonds
- 1/2 teaspoon sea salt
- 1/2 teaspoon freshly ground black pepper
- pinch of crushed red pepper flakes
- 3/4 cup extra virgin olive oil
- 1/2 cup parmesan cheese
- 1 pound linguine
Put the radish leaves, garlic, oregano, lemon juice, blanched almonds, salt, pepper and red pepper flakes in a food processor and pulse to form a coarse purée. With the motor running, pour in the olive oil and process until smooth. Add half the cheese and pulse a few more times. Taste and add more salt or pepper if you like. Set aside until ready to dress the pasta.
Bring a large pot of generously salted water to a boil, add the pasta, and cook until al dente. Scoop out 3 cups of the cooking liquid and reserve, drain the pasta.
After draining the pasta return to the cooking pot, add the pesto, and gently fold together. Add reserved pasta water as needed to keep the consistency creamy rather than sticky. Serve in shallow pasta bowls right away, with the remaining cheese on the side.
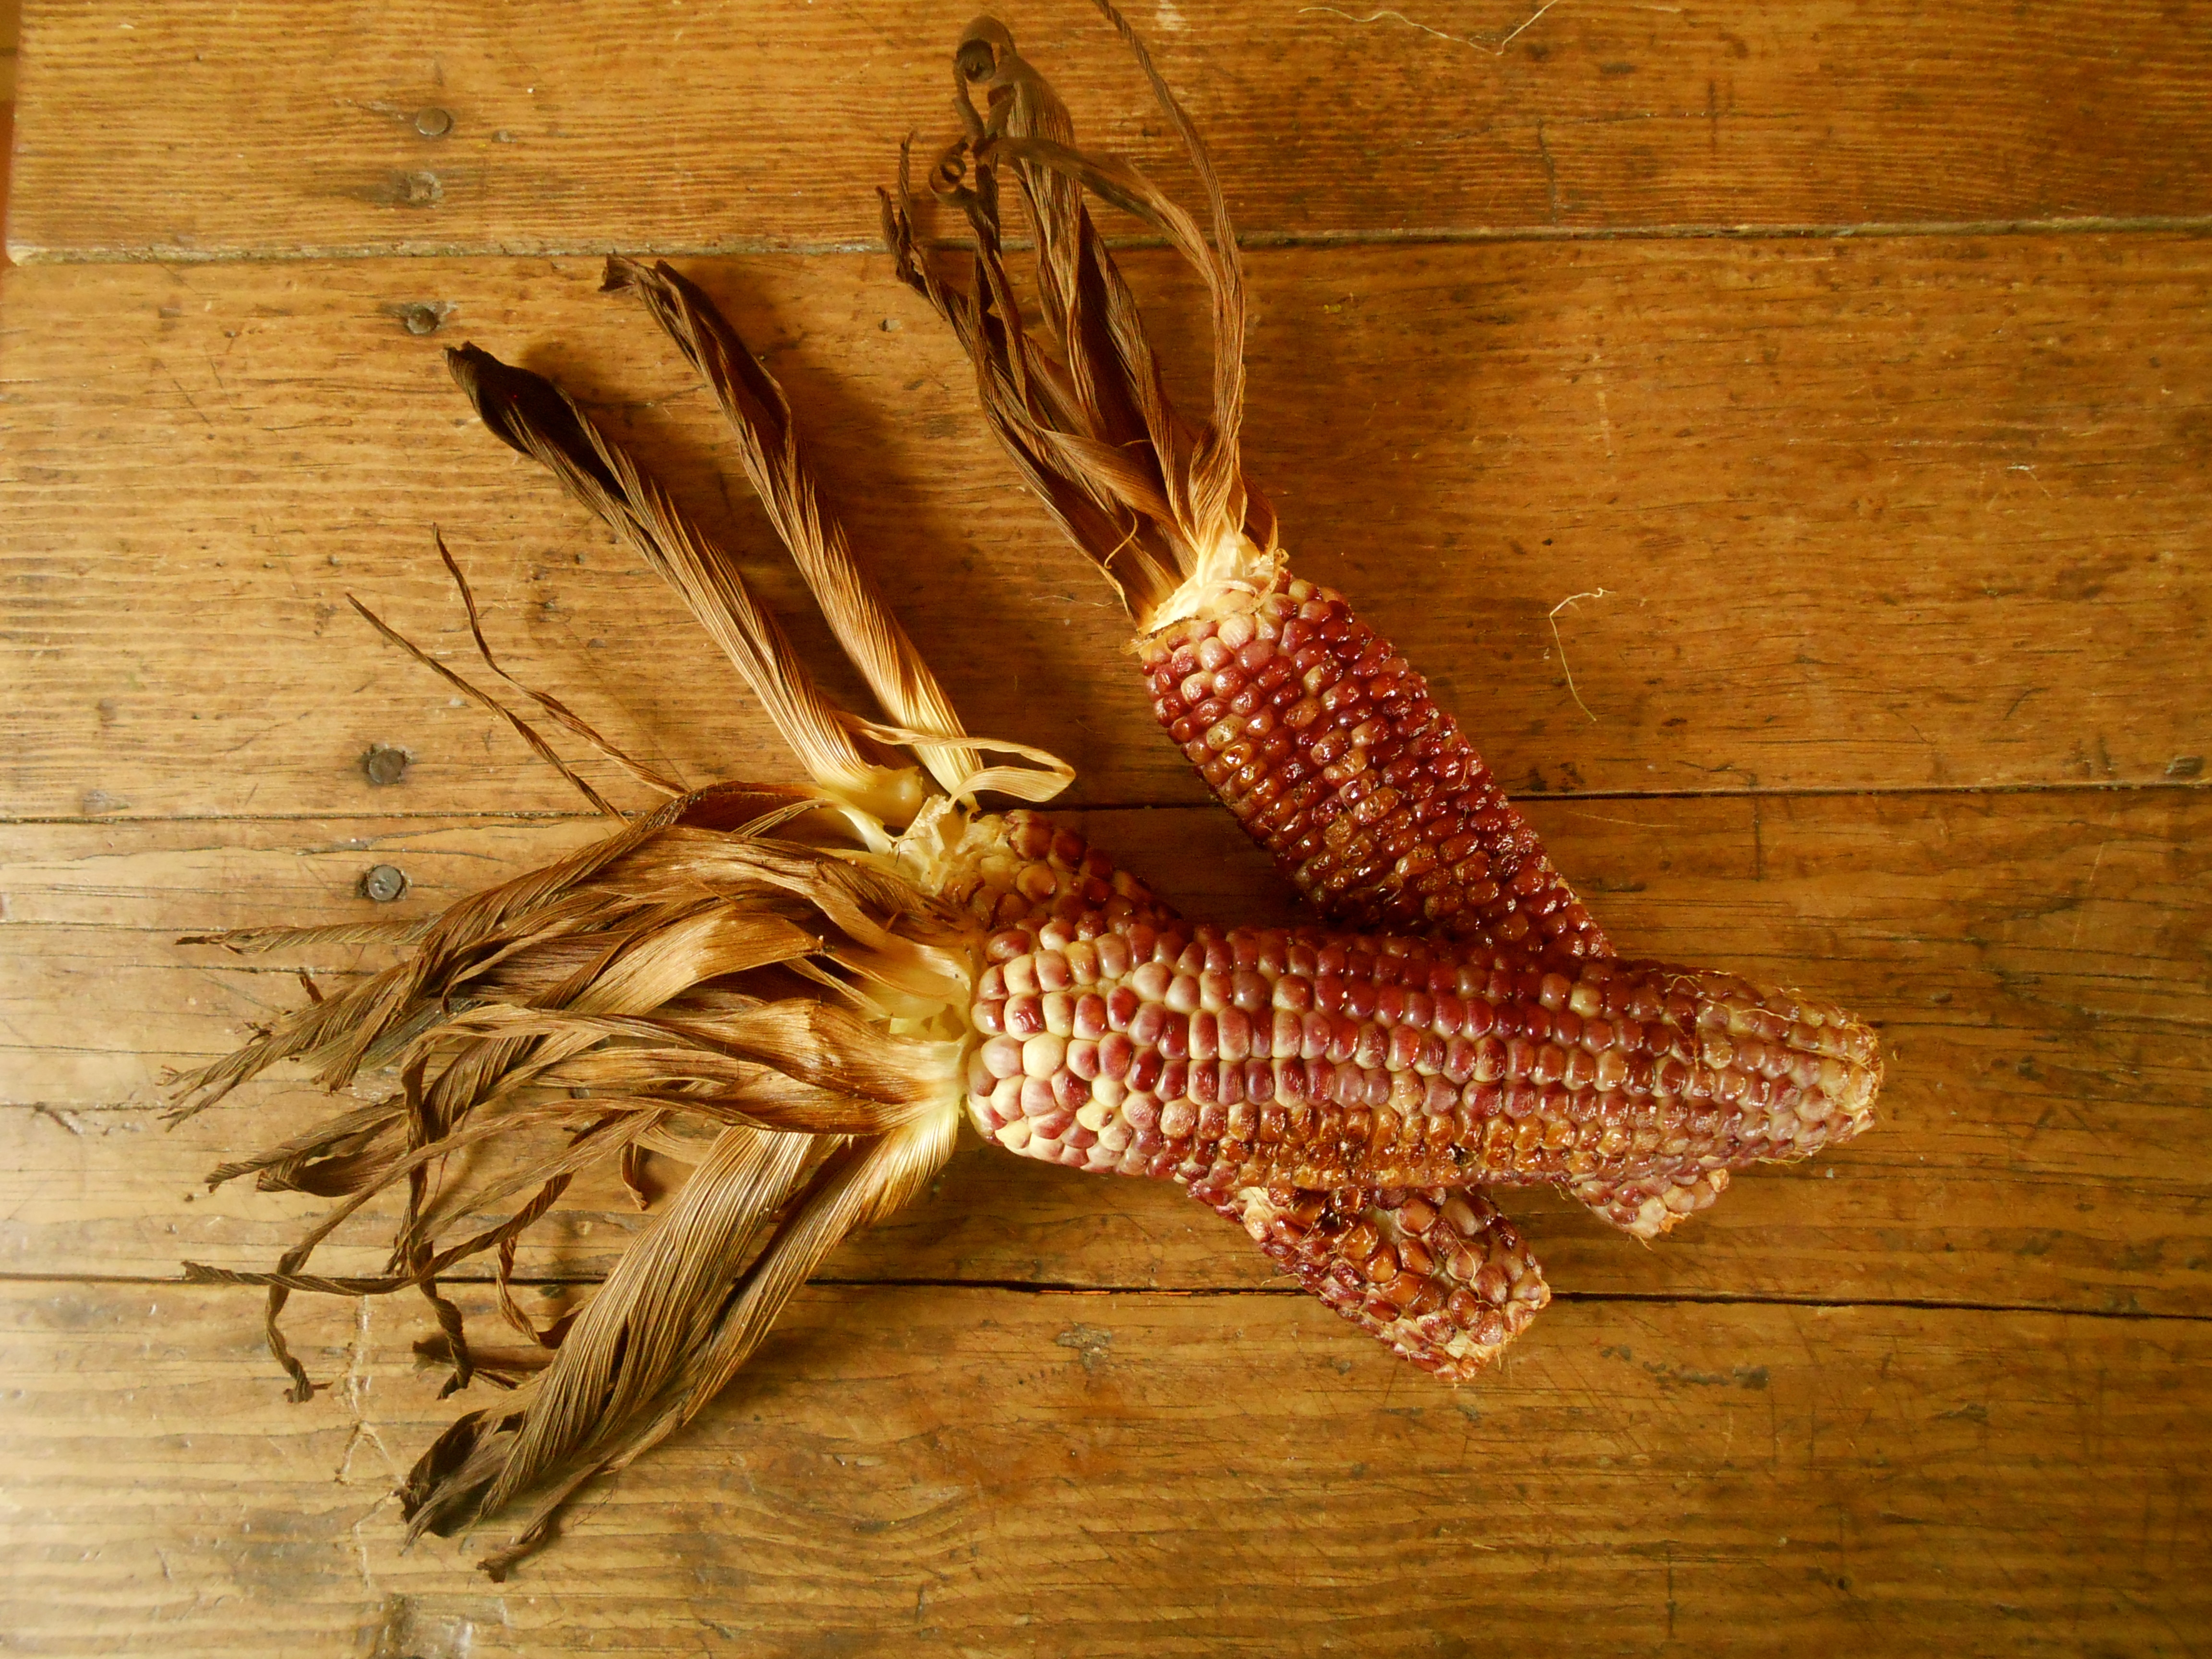
roasted red corn with warm cumin butter
June 10, 2014 § 90 Comments

Amusingly the market’s sign on this corn read “Red White Corn”. Hmm. That was enough for me to place three in the basket and roast them for dinner. I like trying different varietals of vegetables, for no other reason than “variety”. The other day we picked up pinky sized zucchini and although I do enjoy bitter flavor they were a bit too much for my palate. Other interesting vegetable varietals I have seen are purple green beans, purple carrots, yellow watermelon and of course lovely red blood oranges.

Recipe adapted from Epicurious. Serves 3.
I n g r e d i e n t s
- 3 ears of red white corn
- 1 teaspoon olive oil
- sea salt and pepper
- 4 tablespoons butter
- 2 scallions, finely chopped
- 1 teaspoon cumin seeds
- 1 teaspoon fresh lemon juice
M e t h o d
If you are roasting your corn in the oven, preheat oven to 450°F.
In a dry small heavy skillet toast seeds over moderate heat, shaking skillet, until fragrant, about 1 minute, and cool. In an electric coffee/spice grinder finely grind seeds with a sprinkling of salt. In a saucepan melt butter with cumin salt and stir in scallion greens and lemon juice. Cool butter.
While butter is cooling, peel back husks from corn, leaving them attached at base of ears, and discard silk. Brush kernels with olive oil and place on a baking sheet. Roast in oven for 30 minutes until corn turns a golden brown. Remove the corn from the oven and allow to cool. If you are leaving your kernels on the cob, serve with warm cumin butter. Otherwise, slice the corn kernels off of the cob and toss with warm cumin butter.
chickpea & leek soup
May 12, 2014 § 68 Comments

It was cool and cloudy last Saturday and although I don’t need an excuse to make soup, the gloom outside was calling for the soup pot. Creamy chickpeas and silky sweet leeks give this soup a lovely smooth comforting feel, yet keeping a bit of texture. It tastes fantastic. The soup went wonderfully with a nice bottle of Cabernet from Washington State and a freshly baked crusty baguette from my favorite bakery.
Slightly adapted recipe from Jamie Oliver’s The Naked Chef.
I n g r e d i e n t s
- 3 medium leeks
- 2 tablespoons olive oil
- 1 tablespoon butter
- 2 cloves of garlic, finely sliced
- 1 medium potato, peeled
- 1 – 15 ounce can of chickpeas, drained and rinsed
- salt and freshly ground black pepper
- 4 cups vegetable stock (or chicken)
- 1 or 2 bay leaves
- parmesan cheese
- extra virgin olive oil
M e t h o d
Heat a heavy bottomed pan over medium high, add the oil and the butter. Add the leeks and garlic to the pan, and cook gently with a good pinch of salt until tender and sweet. Add the chickpeas, potato and bay leaves; cook for one minute. Add stock and simmer for 15 minutes.
Ladle out 1/2 of the soup into a large bowl and using a hand blender whizz until smooth, or ladle into a blender and whirl if you are using one. (make sure to keep a breathing space on your blender lid so you do not have hot soup exploding in your kitchen!) Return the smooth portion to the pot, stir well and check for seasoning, add parmesan to taste to round off the flavors. Serve soup with a drizzle of good extra virgin olive oil, shaved parmesan and a twist or two of freshly ground black pepper.

yogurt & fava bean soup
May 2, 2014 § 116 Comments

I began my seasonal hunt for fava beans when I came across this hot yogurt and fava bean soup recipe from Yotam Ottolenghi. The first sighting of fava beans is always a sign warmer weather is upon us. And indeed it is. We have had 80°F temperatures for the past two days. Seattle does not have extreme weather. We don’t have sweltering heat in the summer or freezing temperatures in the winter. I have heard our fine city referred to as a best kept secret because of the mild temperatures and tolerable seasons. And with that, and a little rain (ok, a lot) comes an abundance of farm fresh foods.
I have this personal tradition of preparing a spring soup every year at the start of spring. This is my way to welcome in the season and all its glory. This year I decided on a heavily ladened herb soup. The fava beans in this soup are pureed with the yogurt and long-grain rice until smooth and creamy, which really is a wonderful base. However, a base sometimes needs something on top and after adding fresh herbs, hazelnuts, spring garlic and asparagus tips the soup becomes unforgettable.
I hope I’m not too late for Fiesta Friday #14. I could really use a party today. And with Saucy and Johnny hosting, no way was I going to miss this one. It’s still gin o’clock right? Ok, where is the blackberry gin fizz?
I n g r e d i e n t s
- 2 cups of shelled fava beans (from about 1 1/2 to 2 pounds of unshelled fava beans)
- 1/4 cup long-grain rice
- 1- 3/4 cup greek yogurt
- 2 garlic cloves, crushed into paste
- 1 large egg
- 4 cups of vegetable stock
- fresh herbs for garnish, such as, tarragon, dill, chives, chive flowers, mint, cilantro, roughly chopped
- grated zest and juice of 1 lemon
- toasted and chopped nuts for garnish, I used hazelnuts
- extra virgin olive oil, for drizzling over finished soup
- sea salt and freshly ground black pepper to taste
M e t h o d
For the fava beans:
Prepare an ice water bath. Bring a large pot of water to a boil. Drop in the shelled fava beans and cook for a minute or two. Drain. Immediately transfer the beans to the ice water bath. Remove the skins by gently pushing your fingers against the sides of the bean (the favas should easily slide out). Place into a bowl. Set aside.
Heat the vegetable stock in a large soup pot. Add the rice, bring to a boil, then lower the heat, cover and simmer for 20 minutes or until the rice is tender. Add half of the fava beans. Season with salt and pepper, and using a hand blender, blend until completely smooth.
In a separate heat-proof bowl, whisk together the yogurt, crushed garlic, and egg. Add a ladleful of the hot soup and whisk together. Continue adding the hot soup slowly, until you’ve mixed about half of the soup into the egg mixture, do this slowly so the yogurt doesn’t split due to differences in temperature. Pour the tempered yogurt back into the pot with the remaining soup.
Place the soup on medium heat until warmed through. Make sure it doesn’t boil. Season with salt and pepper to taste.
Ladle the soup into four shallow bowls. Evenly scatter the remaining fava beans on top. Garnish with fresh herbs, lemon zest, sprinkling of chopped nuts, a drizzle of extra virgin olive oil, and a squeeze of lemon.
birdie in the basket
April 28, 2014 § 107 Comments

We all have rituals in our lives we love and by nature make them happen. Without a thought or plan these moments naturally fall into place. It is a recurring event permanently marked on our minds daily calendar. My dearest ritual is dinnertime. Every evening we gather around our table to sit down, share a meal together and nourish ourselves. This tradition has become such a valued part of our lives. The conversation flows naturally and we are able to slow down and breathe. And gathering around the table on the weekends for breakfast, unhurried and fresh, is a different sort of gathering altogether. A perfect start to a day of chores, leisure and a nice bike ride.

Here is a lovely way to turn an ordinary hash brown and egg breakfast into impressive single serving entrée. The hash browns are first cooked in a skillet until browned and crisp then divided between the muffin cups. After a sprinkling of cheese an egg is cracked on top and finished off with a a sliced cherry tomato, a dollop of pesto and baked for 20 – 30 minutes.

Recipe from Better Homes and Garden.
I n g r e d i e n t s
- 2 russet potatoes, washed peeled and coarsely grated
- 1/4 cup + 1 tablespoon olive oil
- 1 tablespoon butter
- 6 eggs
- 1/4 cup of your favorite cheese to pair with baked eggs – I used a balsamic Bellavitano cheese
- handful of basil or cilantro
- 1/4 cup freshly grated parmesan cheese
- 2 tablespoons of walnuts
- 6 cherry tomatoes
- sea salt and fresh ground pepper
M e t h o d
Hash Brown Potatoes
Peel and coarsely shred potatoes. Place potatoes in a large bowl; add enough water to cover potatoes. Stir well. Drain in a colander set over the sink. Repeat rinsing and draining two or three times until water runs clear. Drain again, pressing out as much water as you can with a rubber spatula. Line a salad spinner with paper towels; add potatoes and spin. Repeat, if necessary, until potatoes are dry. If you do not own a salad spinner you may use a kitchen towel and wring out your potatoes. You want your potatoes to be as dry as possible. The hash browns will steam rather than brown if too much water is on them. Transfer potatoes to a large bowl. Sprinkle with salt and pepper; toss to combine.
Heat 1 tablespoon of the oil and the butter in a large skillet over medium-high heat until butter foams. Add potatoes to the skillet, spreading into an even layer. Gently press with the back of a spatula to form a cake. Reduce heat to medium. Cook, without stirring, about 12 minutes or until the bottom is golden brown and crisp.
Invert a plate over the top of the skillet. Carefully turn the skillet over to transfer the potatoes onto the plate. If needed, add the remaining 1 tablespoon oil to the skillet. Using the plate, slide the potatoes back into the skillet, uncooked side down. Cook about 8 minutes more or until the bottom is golden brown. Let hash browns stand about 10 minutes or until cool enough to handle.
While the hash browns are cooking prepare your pesto.
Since it is morning time I chose not to use garlic in our pesto. If you would like the flavor of garlic add one small clove to this mix.
Place a large handful of your choice of herbs (cilantro or pesto) into your food processor or blender with 1/4 cup olive oil, walnuts and parmesan cheese and whizz until well blended. Set aside.
Assembling the birdie baskets
Once you are able to handle the hash brown…
Divide hash browns between muffin cups, pressing hash browns into the bottoms and up the sides of the cups. Add a sprinkling cheese among hash-brown-lined cups. Crack an egg into each cup. Top each cup with 1 teaspoon of the pesto and two of the tomato halves. Bake for 20 minutes or until whites are set and yolks are thickened. Let stand for 3 to 5 minutes before serving. Carefully remove from the muffin cups.
