spice crusted carrots with harissa yogurt
March 10, 2014 § 85 Comments
Our weather is warming up and for the past three or four days I have shifted from preparing chickpea stews, Mexican casseroles and pasta to fixing lighter vegetable dishes, salads and grains. For dinner last night we had a wonderful braised tofu and spice crusted carrots with harissa yogurt.
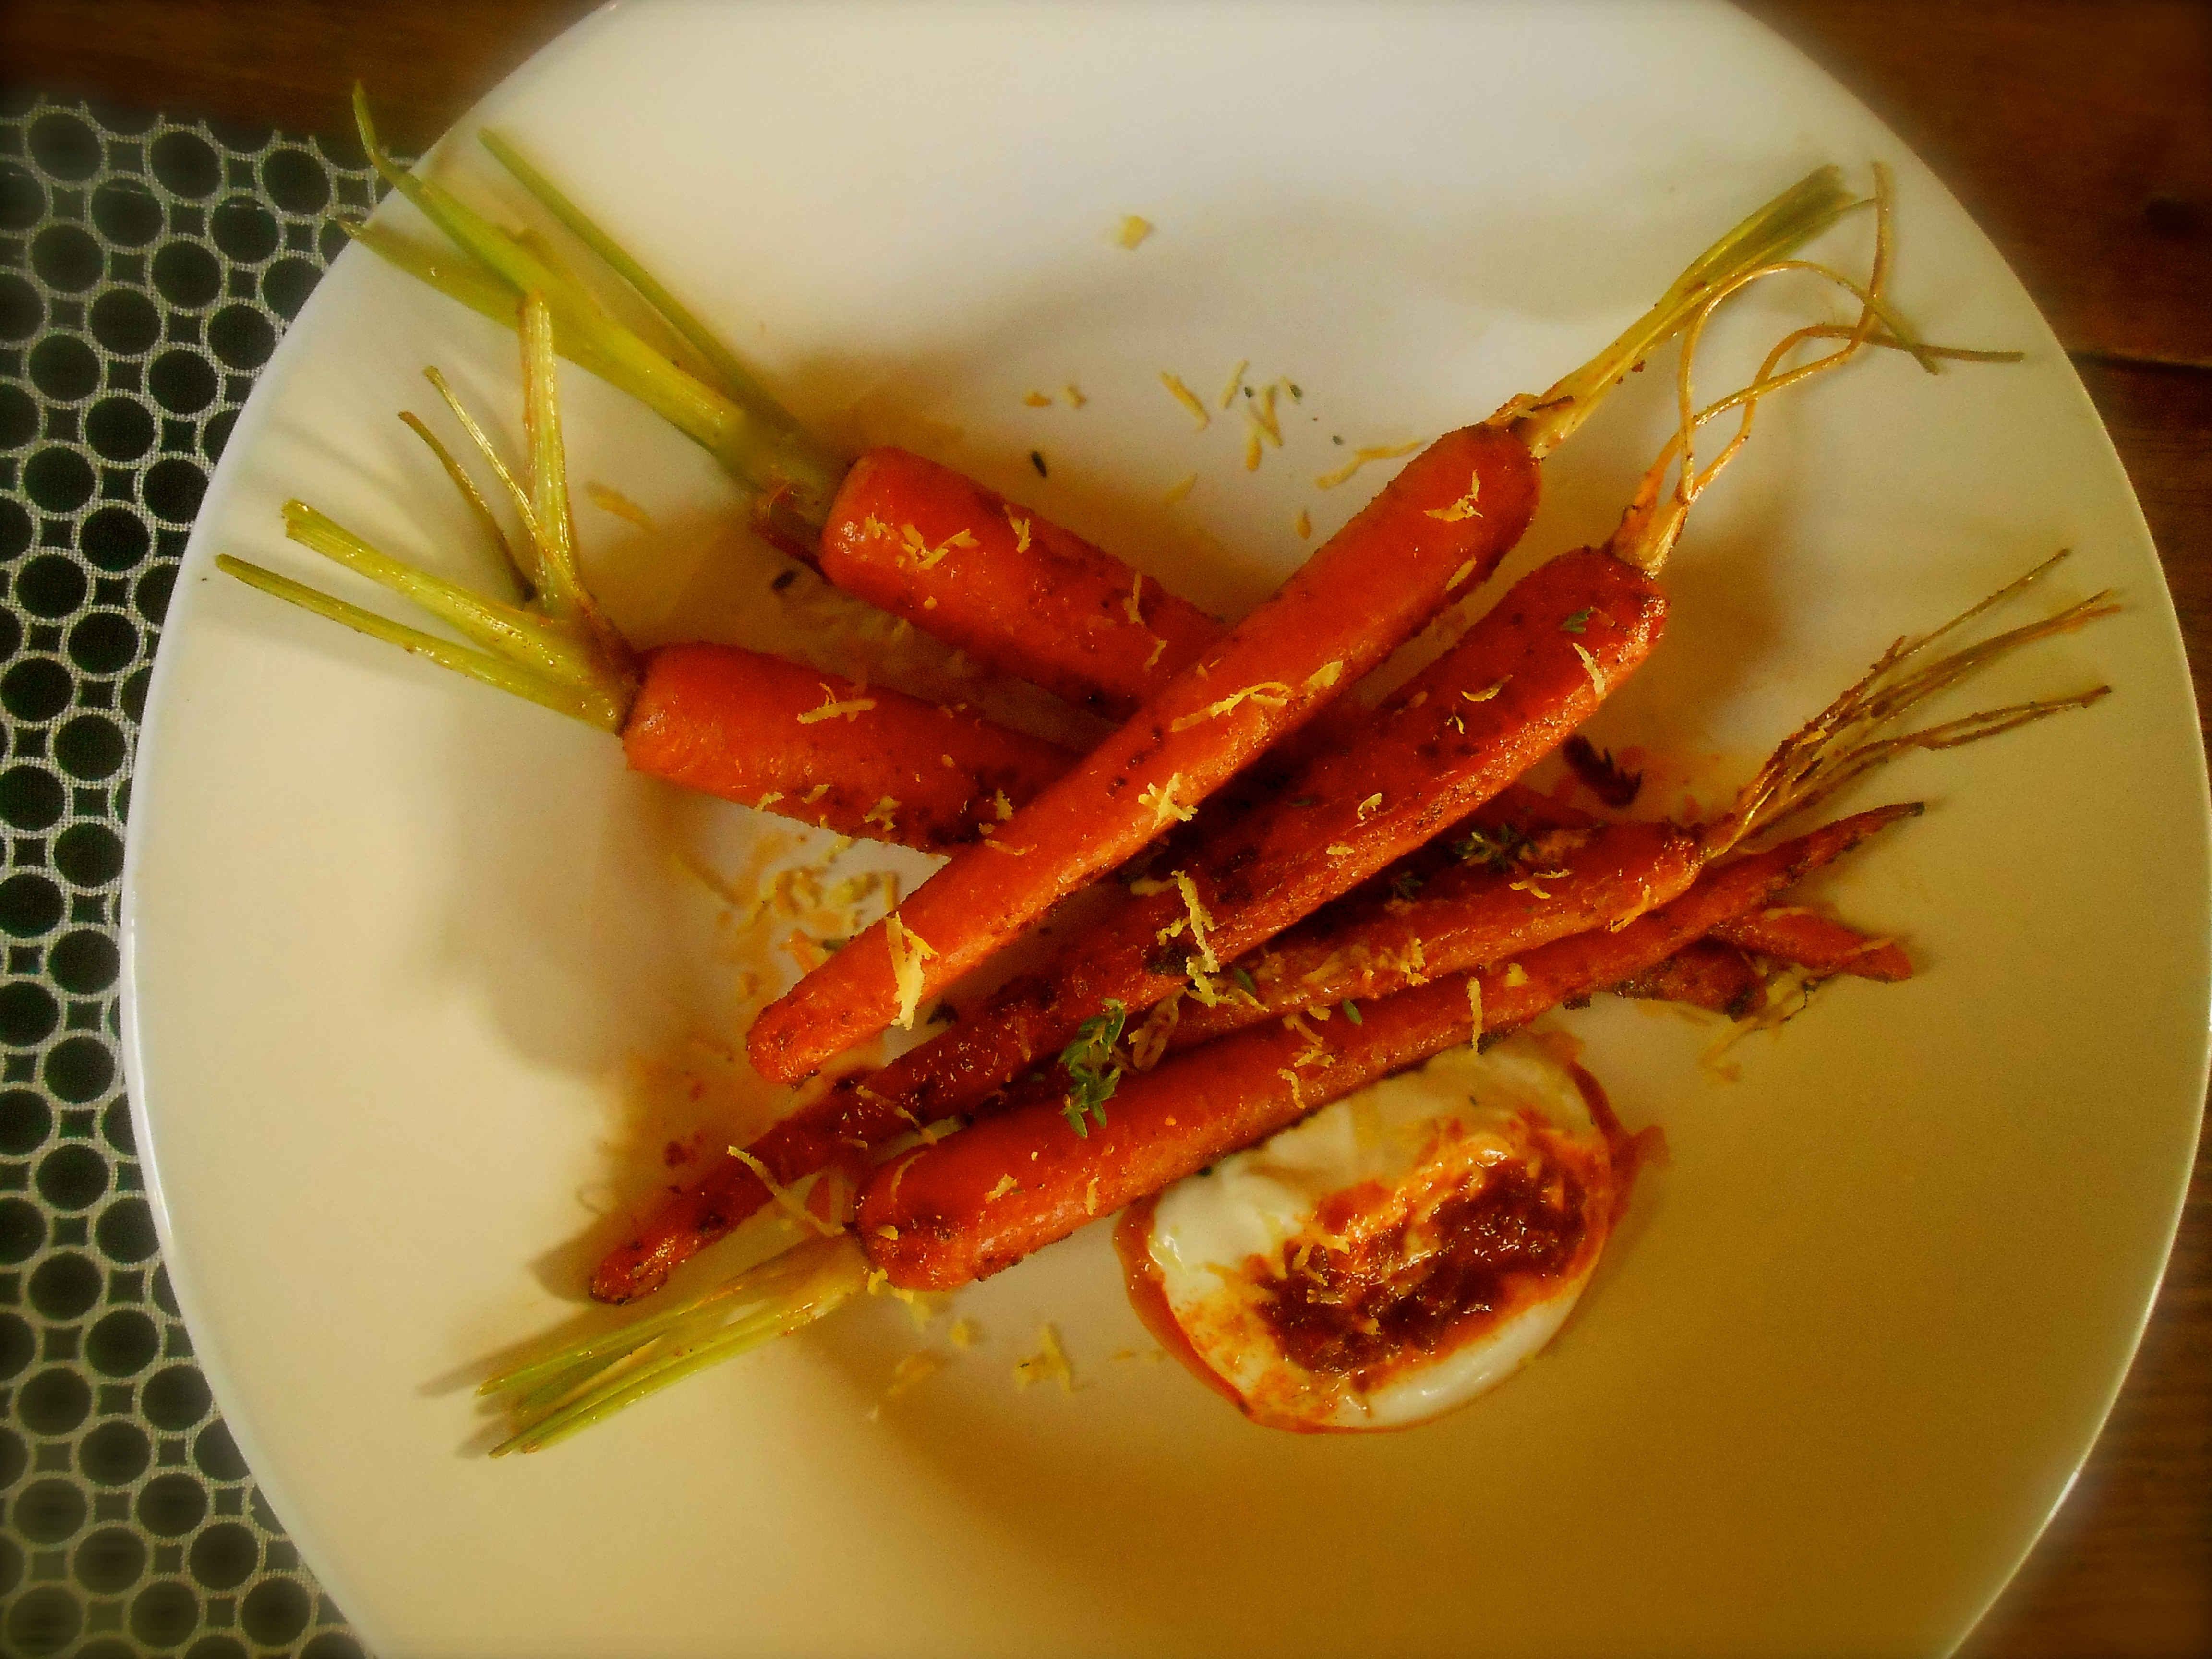
What was so impressive about this Bon Appétit recipe was the crusted texture of the carrots, the flavor of smoked paprika, sweetness from a trace of sugar and a lots of lemon zest. Complex flavor; simple in preparation.
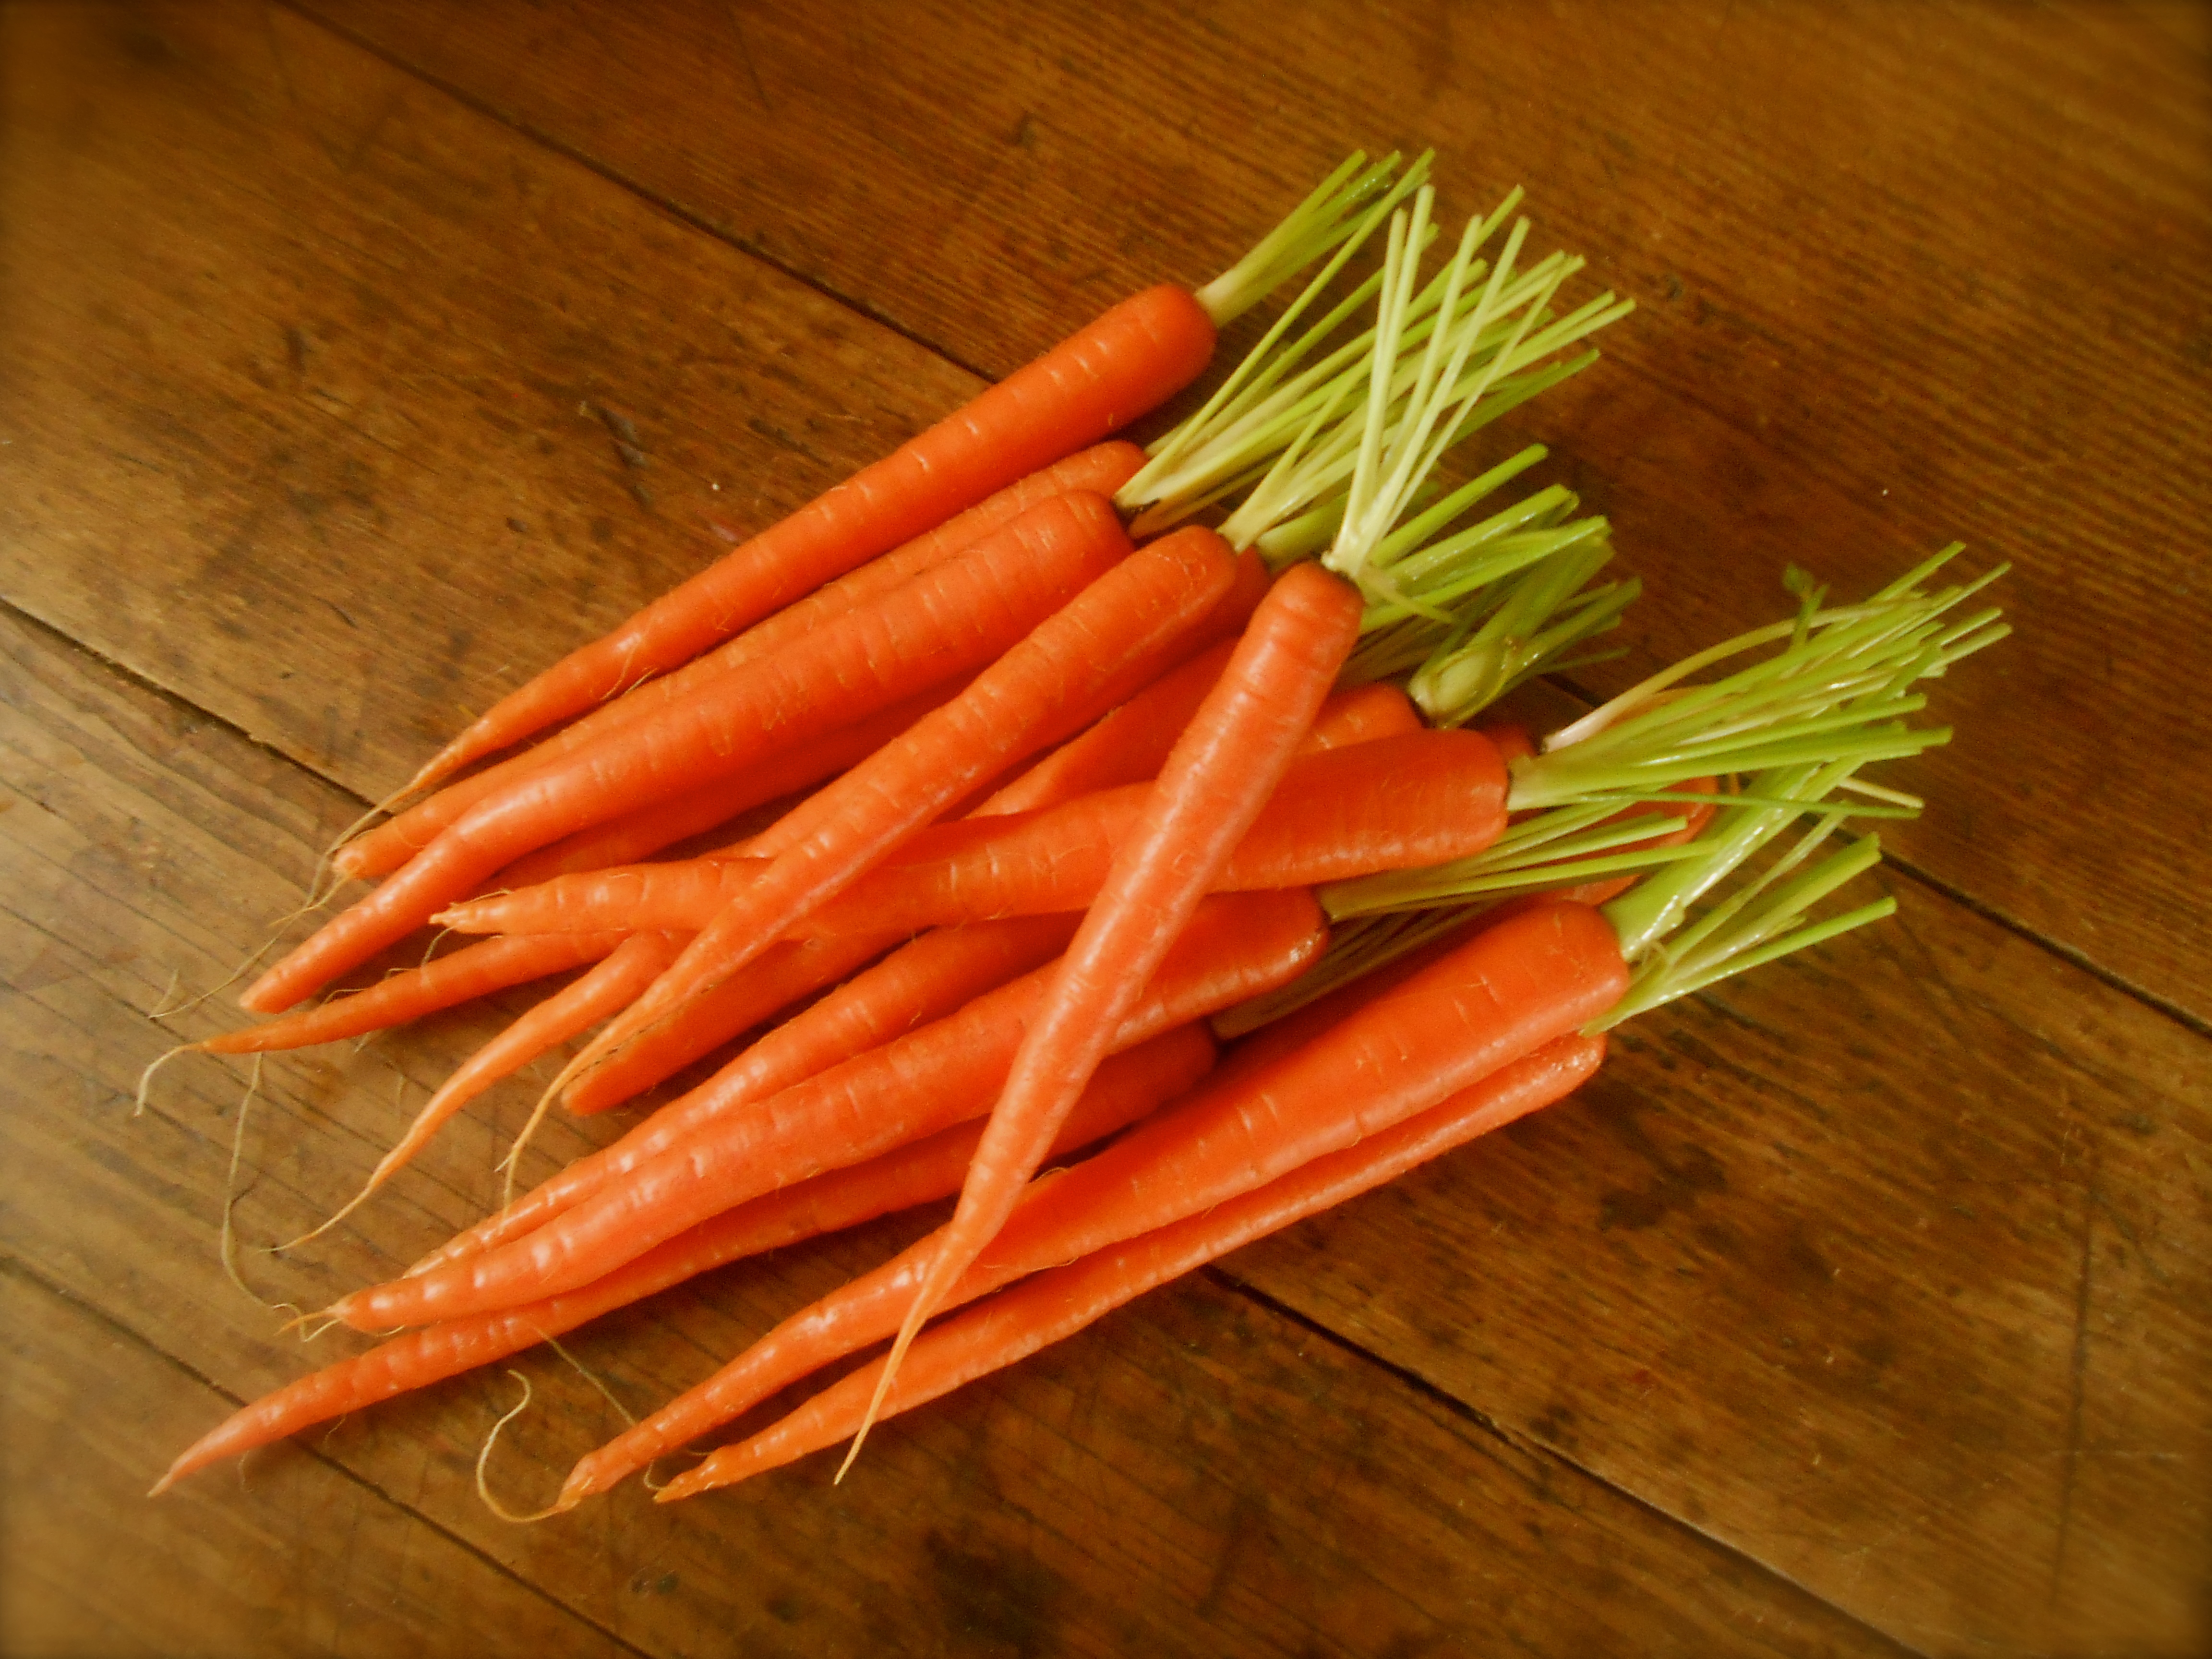
My preparation is slightly modified from the original Bon Appétit recipe. I cut back on the sugar and did not rub the skins off of the carrots.
I n g r e d i e n t s
- 1 teaspoon sugar
- 1 teaspoon mustard powder
- 1 teaspoon hot smoked Spanish paprika
- 1 teaspoon ground cumin
- ½ teaspoon ground coriander
- 4 tablespoons olive oil
- ½ cup plain Greek yogurt
- 1 tablespoon harissa paste
- 2 teaspoons chopped fresh thyme
- zest from 1/2 lemon
M e t h o d
Cook carrots in a large pot of boiling salted water until tender. Drain. Transfer to a bowl of ice water to stop cooking. Using paper towels, gently pat dry. The Bon Appétit recipe recommends using a paper towel to gently rub the skins off of the carrots. We used organic carrots and left the skins on.
Mix sugar, mustard powder, paprika, cumin, and coriander in a small bowl. Toss carrots with 1 tablespoon olive oil in a medium bowl. Add spice mixture and season with salt and pepper. Toss to coat.
Heat remaining 3 tablespoons olive oil in a large skillet. Working in batches, cook carrots, turning occasionally, until deep brown all over, 6–8 minutes. Season with salt and pepper.
Meanwhile, place yogurt in a small bowl. Season with salt and pepper. Add harissa paste, 2 teaspoons thyme, lemon zest and gently swirl ingredients, stopping before yogurt turns pink.
Spoon harissa yogurt onto plates and top with carrots, more thyme, and more lemon zest. Serve with lemon wedges.
roasted cabbage with bacon
December 9, 2013 § 61 Comments
While trimming brussels sprouts for roasting last week I had a thought. These little gems are mini cabbages and I wondered if roasting a giant cabbage would be just as delicious. I have eaten cabbage steamed, stewed, sautéed, braised, pickled in brine, and even raw in slaws, but never roasted. And without a doubt adding a few bacon lardons would be delicious. Indeed.

The texture of the cabbage was soft and the bacon crunchy. The combination of the roasted bacon and the sweetness of the cabbage was truly one of the best things I tasted in quite some time. I could not quit eating the crispy charred bits of cabbage before bringing it to the table. Served with parmesan chicken cutlets. Recipe coming…next post.

I n g r e d i e n t s
- 1/2 head of cabbage, sliced 1/4 inch
- 3 slices of good quality thick cut bacon, sliced 1/4 inch
- drizzling of olive oil
- sea salt & pepper
Preheat oven 450°F. Put all ingredients in a large bowl and toss until well coated. Spread evenly onto a large parchment lined baking tray. Roast for 30 – 40 minutes turning regularly using a spatula, until well roasted and bacon is crisp, yet still meaty.
Serves 4
roasted brussels sprouts
November 15, 2013 § 43 Comments
Roasting is my new favorite way of cooking vegetables. We roasted brussels sprouts the other day and they were a showstopper. I think this is an excellent idea as a T h a n k s g i v i n g side dish. It takes 30 minutes of (almost) hands free cooking. No need to have a spatula in your hand while trying to mash the potatoes.

We all know timing in the last 30 minutes is crucial when cooking Thanksgiving dinner. The turkey comes out of the oven and suddenly a state of pandemonium ensues. The buns go into the oven, potatoes are mashed, the gravy requires your undivided attention, and don’t forget the vegetables! This can be very challenging.

Simply slice the brussels sprouts in half, toss in salted olive oil, spread them out on a parchment lined cooking sheet and set aside until the turkey is removed from the oven. Place in a 400°F oven for 30 minutes. Give them a good toss every 10 minutes.

Roasting them alone is wonderful or add diced bacon, whole garlic cloves and chopped walnuts before placing in the oven. This is sure to be a crowd pleaser.
roasted sweet potatoes with pancetta and chimichurri
October 7, 2013 § 41 Comments
You just can’t help to think of root vegetables once Autumn is in the air. I keep buying loads of beets, carrots, sweet potatoes and parsnips. Recently I found this sweet potato recipe in the September issue of Bon Appétit. The idea of these flavors was so unique I had to prepare it . The Bon Appétit recipe calls for Speck which is an Italian cured meat much like Proscuitto. I used pancetta, however, any smoked type cured meat is possible, even turkey bacon. I found two different types of sweet potatoes at the market.

Chimichurri is a piquant sauce or marinade traditionally used on grilled meat, typically containing parsley, garlic, vinegar, olive oil, and flakes of chili pepper. It is “often billed as ‘Argentine barbecue sauce,’ and we enjoy it with many other dishes far beyond the grill. The chimichurri was wonderful with the roasted sweet potatoes and the pancetta adds a nice smoky flavor. 
I n g r e d i e n t s
- 4 small sweet potatoes or yams, unpeeled, cut lengthwise into wedges
- 2 tablespoons plus 1/4 cup olive oil
- salt and pepper
- 1/2 cup fresh cilantro
- 1/2 cup fresh flat-leaf parsley leaves
- 1/4 cup fresh oregano leaves
- 1 tablespoon fresh thyme leaves
- 2 garlic cloves
- 2 tablespoons red wine vinegar
M e t h o d
Heat oven to 425°F. Toss sweet potatoes and 2 tablespoons oil on a large rimmed baking sheet. Season with salt and pepper. Roast, turning once, until tender, 25-30 minutes.
Meanwhile, pulse cilantro, parsley, oregano, thyme, and garlic in a food processor until finely chopped. With motor running, slowly add vinegar and remaining 1/4 cup oil and process until combined. Season with salt and pepper.
Spoon chimichurri onto a serving platter and top with sweet potatoes and pancetta.
Serves 4.
roasted tomatoes and herbs
October 2, 2013 § 54 Comments
We are finally enjoying red, ripe and juicy roma tomatoes from the garden. I am still so puzzled as to why my tomatoes have taken so long when friends of mine living in the same city are at least 30 days on the other side of their harvest. All I can say is I am happy to have them!

And still more to come!
I have been wanting to slow roast tomatoes for weeks and after bringing in a dozen or so roma’s I knew exactly what I was going to do. No doubt these were going to be good, however, after the first bite I was completely smitten. I had to stop myself because I was going to finish off the whole lot and never mention a word to my family I had roasted them. The aroma in the house was a dead give away and coming to my senses I knew I had to share.

Crispy sage is such a lovely delicacy. I added several large sage leaves to the roasting pan, along with thyme, greek basil and thinly sliced garlic. We enjoyed the tomatoes alone as a side, however, I can imagine how perfect they would be tossed in spaghetti. Of course I thought that, how many pasta recipes can one blog have? I’m up to 18 and I have only had this blog for 7 months!
I n g r e d i e n t s
- 6 or 7 tomatoes, sliced in half
- 1/4 cup olive oil
- several whole sage leaves
- 4 or 5 sprigs of fresh thyme
- large sprig of basil, chopped
- 3 or 4 garlic cloves, thinly sliced
- sea salt
M e t h o d
Preheat oven 325°F. Drizzle olive oil onto parchment lined baking sheet. Sprinkle the herbs about and toss around with a spatula. Add the sliced tomatoes and garlic and continue to toss around until well coated. Evenly space the tomatoes about the pan, cut side down, sprinkle with salt and roast for one hour.

wilted kale
September 18, 2013 § 45 Comments
We eat fairly light in this house. I find myself serving sides as mains more often than not. Most of our meals are “one pot” or maybe a few sides. We are not vegetarians, but come awfully close. With an athletic young man in the house I do have to consider his nutritional needs and most often plan my meals with his palate in mind. Thank goodness he has a grown up palate!

Here is an exceptional side (or main) involving lacinato kale, also known as Tuscan, dinosaur or black kale. I especially enjoy lacinato kale due to it heartiness, deep dark green color and it’s ability to hold onto it’s crunchiness even after simmering for several minutes. This is a lovely combination of textures and flavors.
I found this recipe in a Cooking Light magazine (thanks sis!). This is a slight adaptation and we found the recipe really only serves two. Next time I make this I will double the recipe.
I n g r e d i e n t s
- 3 slices of center cup bacon
- 3/4 cup vertically sliced onion (sweet yellow or red)
- 8 cups lacinato kale, stemmed and chopped
- 2/3 cup chicken stock
- 1 tablespoon red wine vinegar
- 1 teaspoon pure maple syrup
M e t h o d
Cook bacon in a Dutch oven over medium-low heat until crisp. Remove from pan, crumple and set aside. Increase heat to medium. Add onions to bacon drippings in pan and sauté 3-4 minutes. Add kale and cook until kale begins to wilt, stirring occasionally. Add stock, cover and cook 4 minutes until tender, stirring occasionally. Stir in vinegar and syrup. Sprinkle with crumbled bacon.
Serves 2.
whole roasted cauliflower with whipped goat cheese
August 26, 2013 § 69 Comments
Several months ago while skimming through an issue of Bon Appétit I came across this impressive whole roasted cauliflower recipe. I knew I had to cook it and two days later while visiting our family in Idaho, we had a whole cauliflower roasting in the oven as well as goat cheese, cream cheese and feta whirling in the food processor. I have made this wonderful roasted cauliflower twice since then and my family loves it. It is so tender and somewhat “nutty” in flavor.

Precooking the cauliflower in seasoned broth infuses it with flavor and roasting it creates a nice crispy edge. This roasted cauliflower is so fork-tender and the whipped goat cheese was astounding. Astoundingly so that I have prepared it as a dip (adding caramelized onions) for our chips, vegetables or anything else you can find to scoop it up!
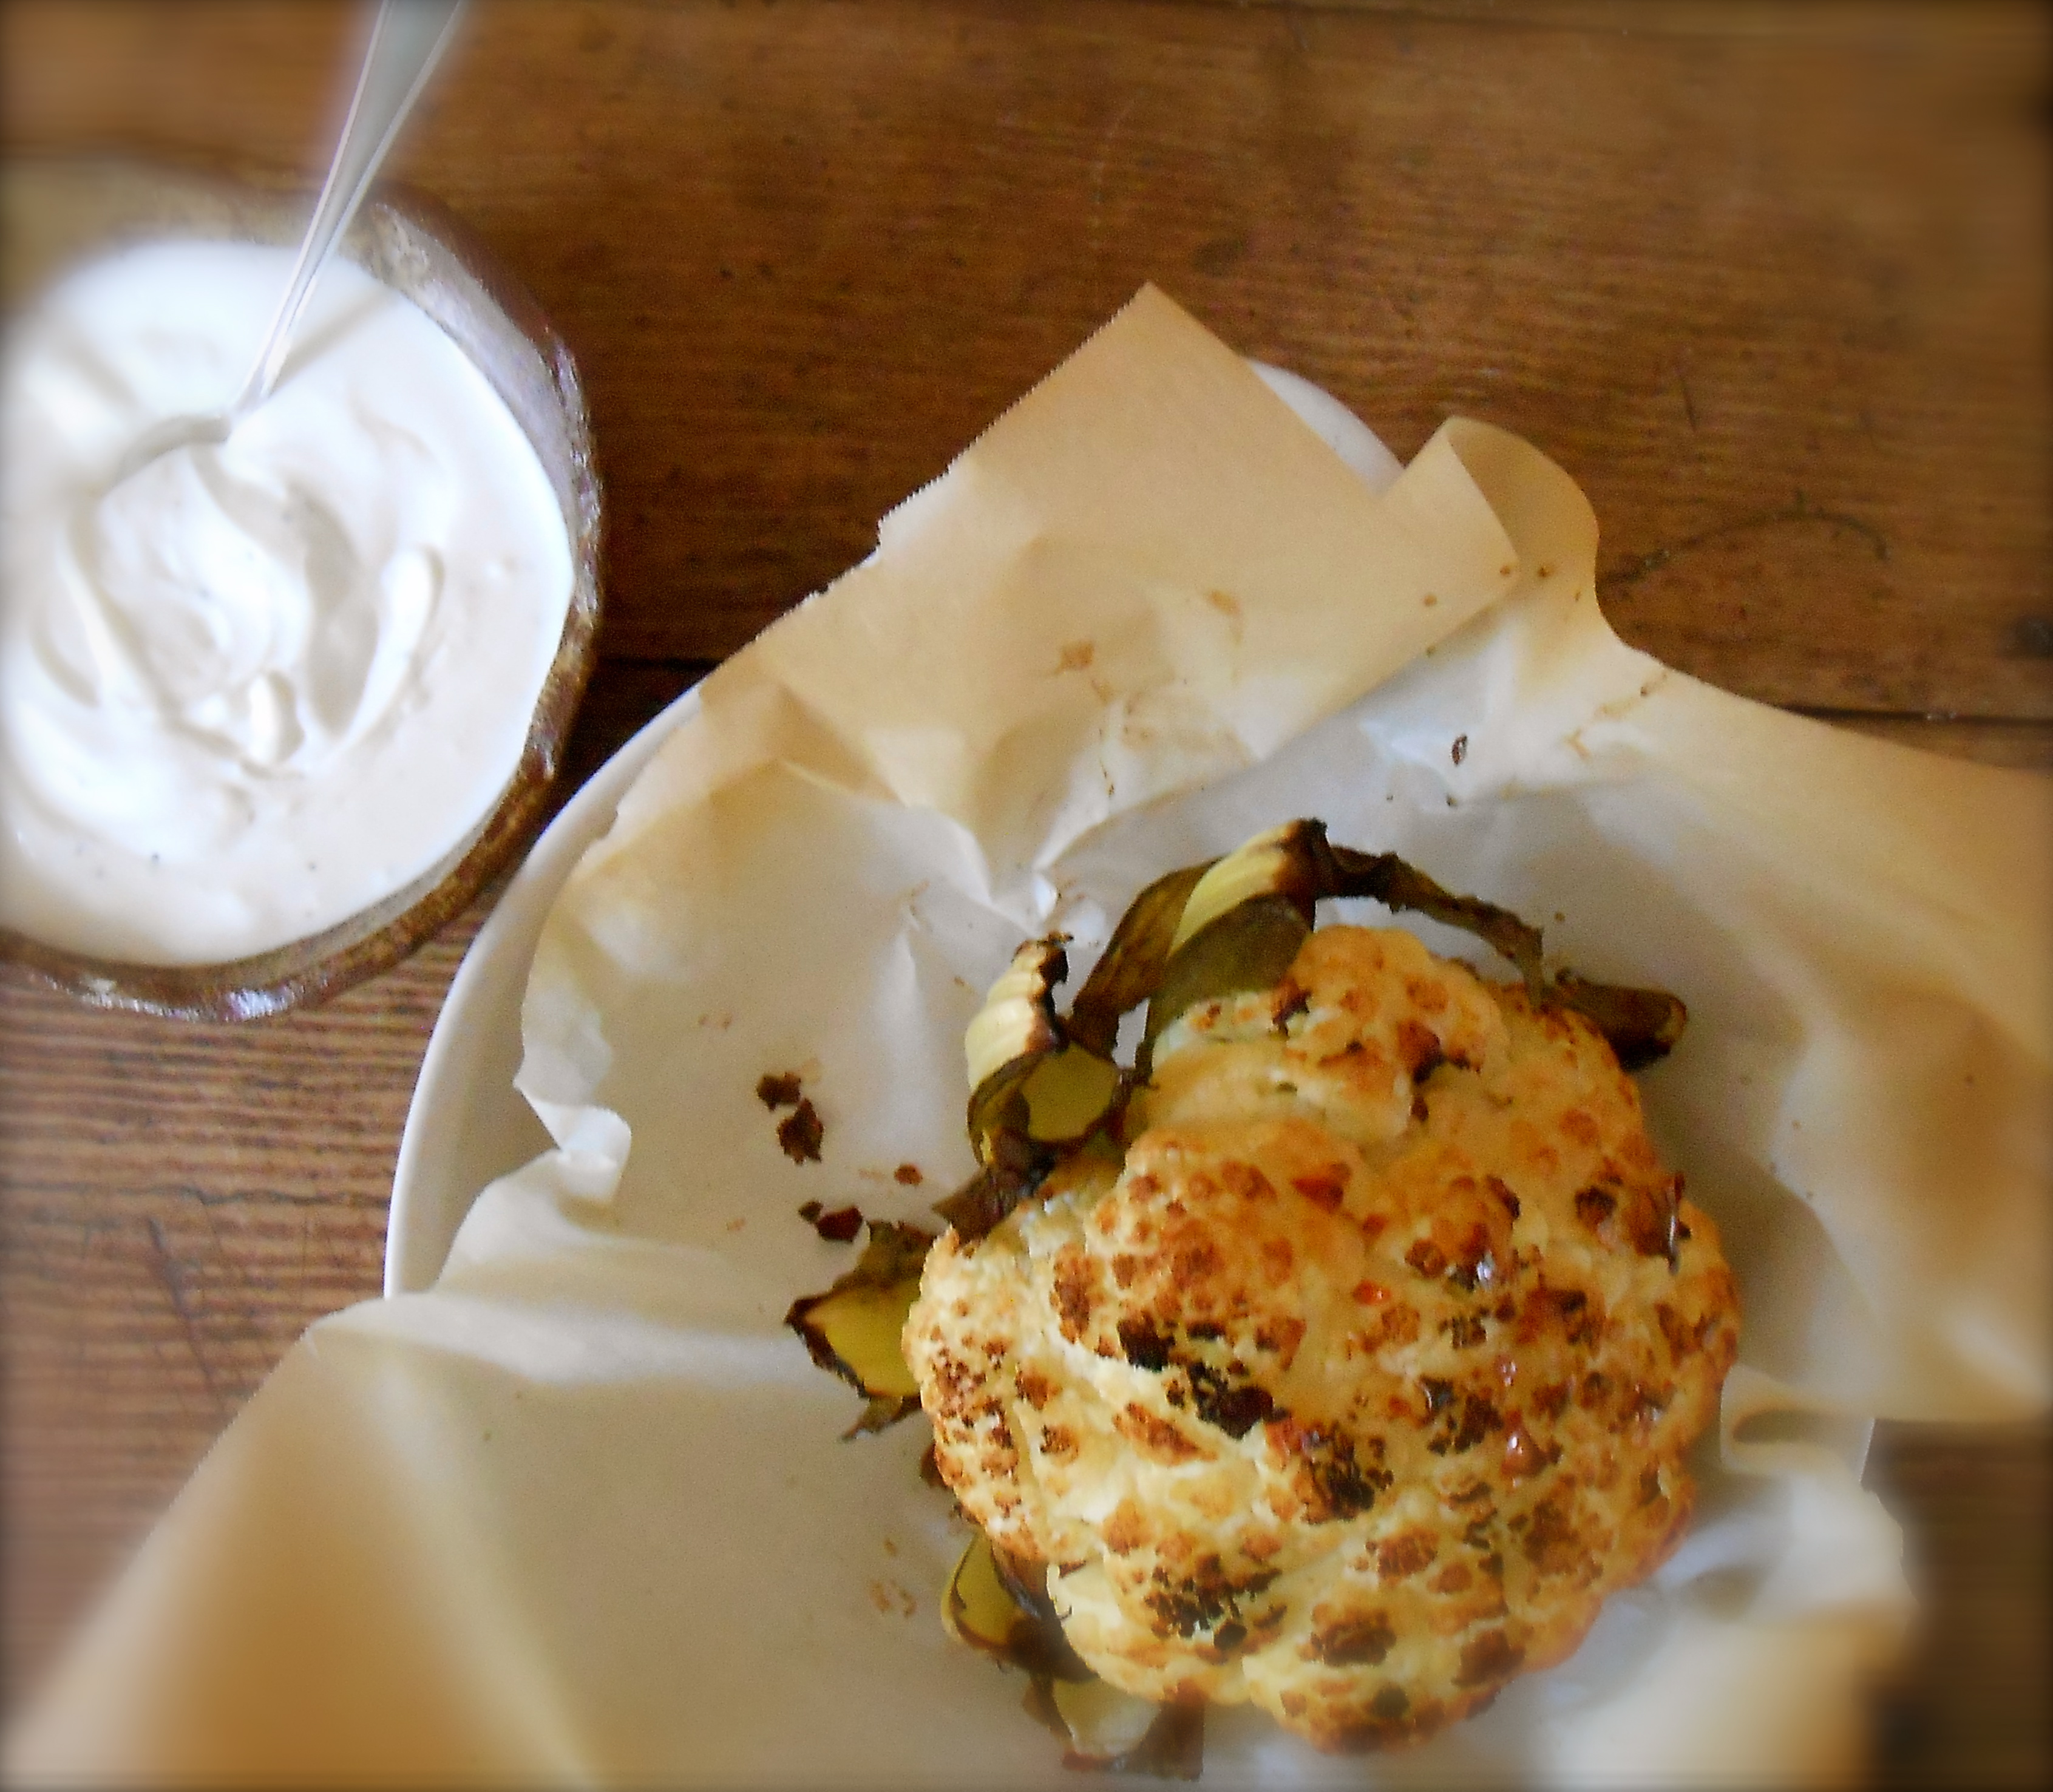
You may want to trim your cauliflower of it’s bottom leaves in order for it to sit flat in your roasting pan. I keep them on because we enjoy eating them as well. The recipe may seem a bit elaborate for roasting a vegetable, but it is well worth the effort and time.
EDIT: (After doing a search on the web for this recipe I have found every site “featuring” this recipe, as well as Bon Appétit Magazine, calling for 1/4 cup salt in the cooking liquid. You may want to adjust the salt to your discretion, however, we did not find the cauliflower to be too salty using the recipe as it is listed below) I found the cooking liquid is quite pungent and cabbage like after the cauliflower has cooked therefore, in my opinion, it may not be suitable to save as a broth for future cooking.
Recipe exactly how it appears in Bon Appétit Magazine…
I n g r e d i e n t s
- 2 1/2 cups dry white wine
- 1/3 cup olive oil
- 1/4 cup salt
- 3 tablespoons fresh lemon juice
- 2 tablespoons unsalted butter
- 1 tablespoon crushed red pepper flakes
- 1 tablespoon sugar
- 1 bay leaf
- 1 head of cauliflower, leaves removed
Whipped goat cheese
- 4 ounces fresh goat cheese
- 3 ounces cream cheese
- 3 ounces feta
- 1/3 cup heavy cream (I used half and half)
- 2 tablespoons olive oil plus more for serving
- Coarse sea salt (for serving)
M e t h o d
Preheat oven to 475 degrees. Bring wine, oil, kosher salt, juice, butter, red pepper flakes, sugar, bay leaf, and 8 cups water to a boil in a large pot. Add cauliflower, reduce heat, and simmer, turning occasionally, until a knife easily inserts into center, 15-20 minutes.
Using tongs transfer cauliflower to a rimmed baking sheet, draining well. Roast, rotating sheet halfway through, until brown all over, about 40 minutes. Check at 30 minutes and continue to check every 5 minutes until brown as you like.
While cauliflower is roasting, blend goat cheese, cream cheese, feta, cream and 2 tablespoons oil in a food processor until smooth, season with sea salt. Transfer whipped goat cheese to a serving bowl and drizzle with oil.
Transfer cauliflower to a plate. Drizzle with oil, sprinkle with sea salt. Serve with whipped goat cheese.
Whipped goat cheese can be made 1 day ahead and covered and chilled.
Recipe courtesy of Bon Appétit.
Serves 3 as a side dish.
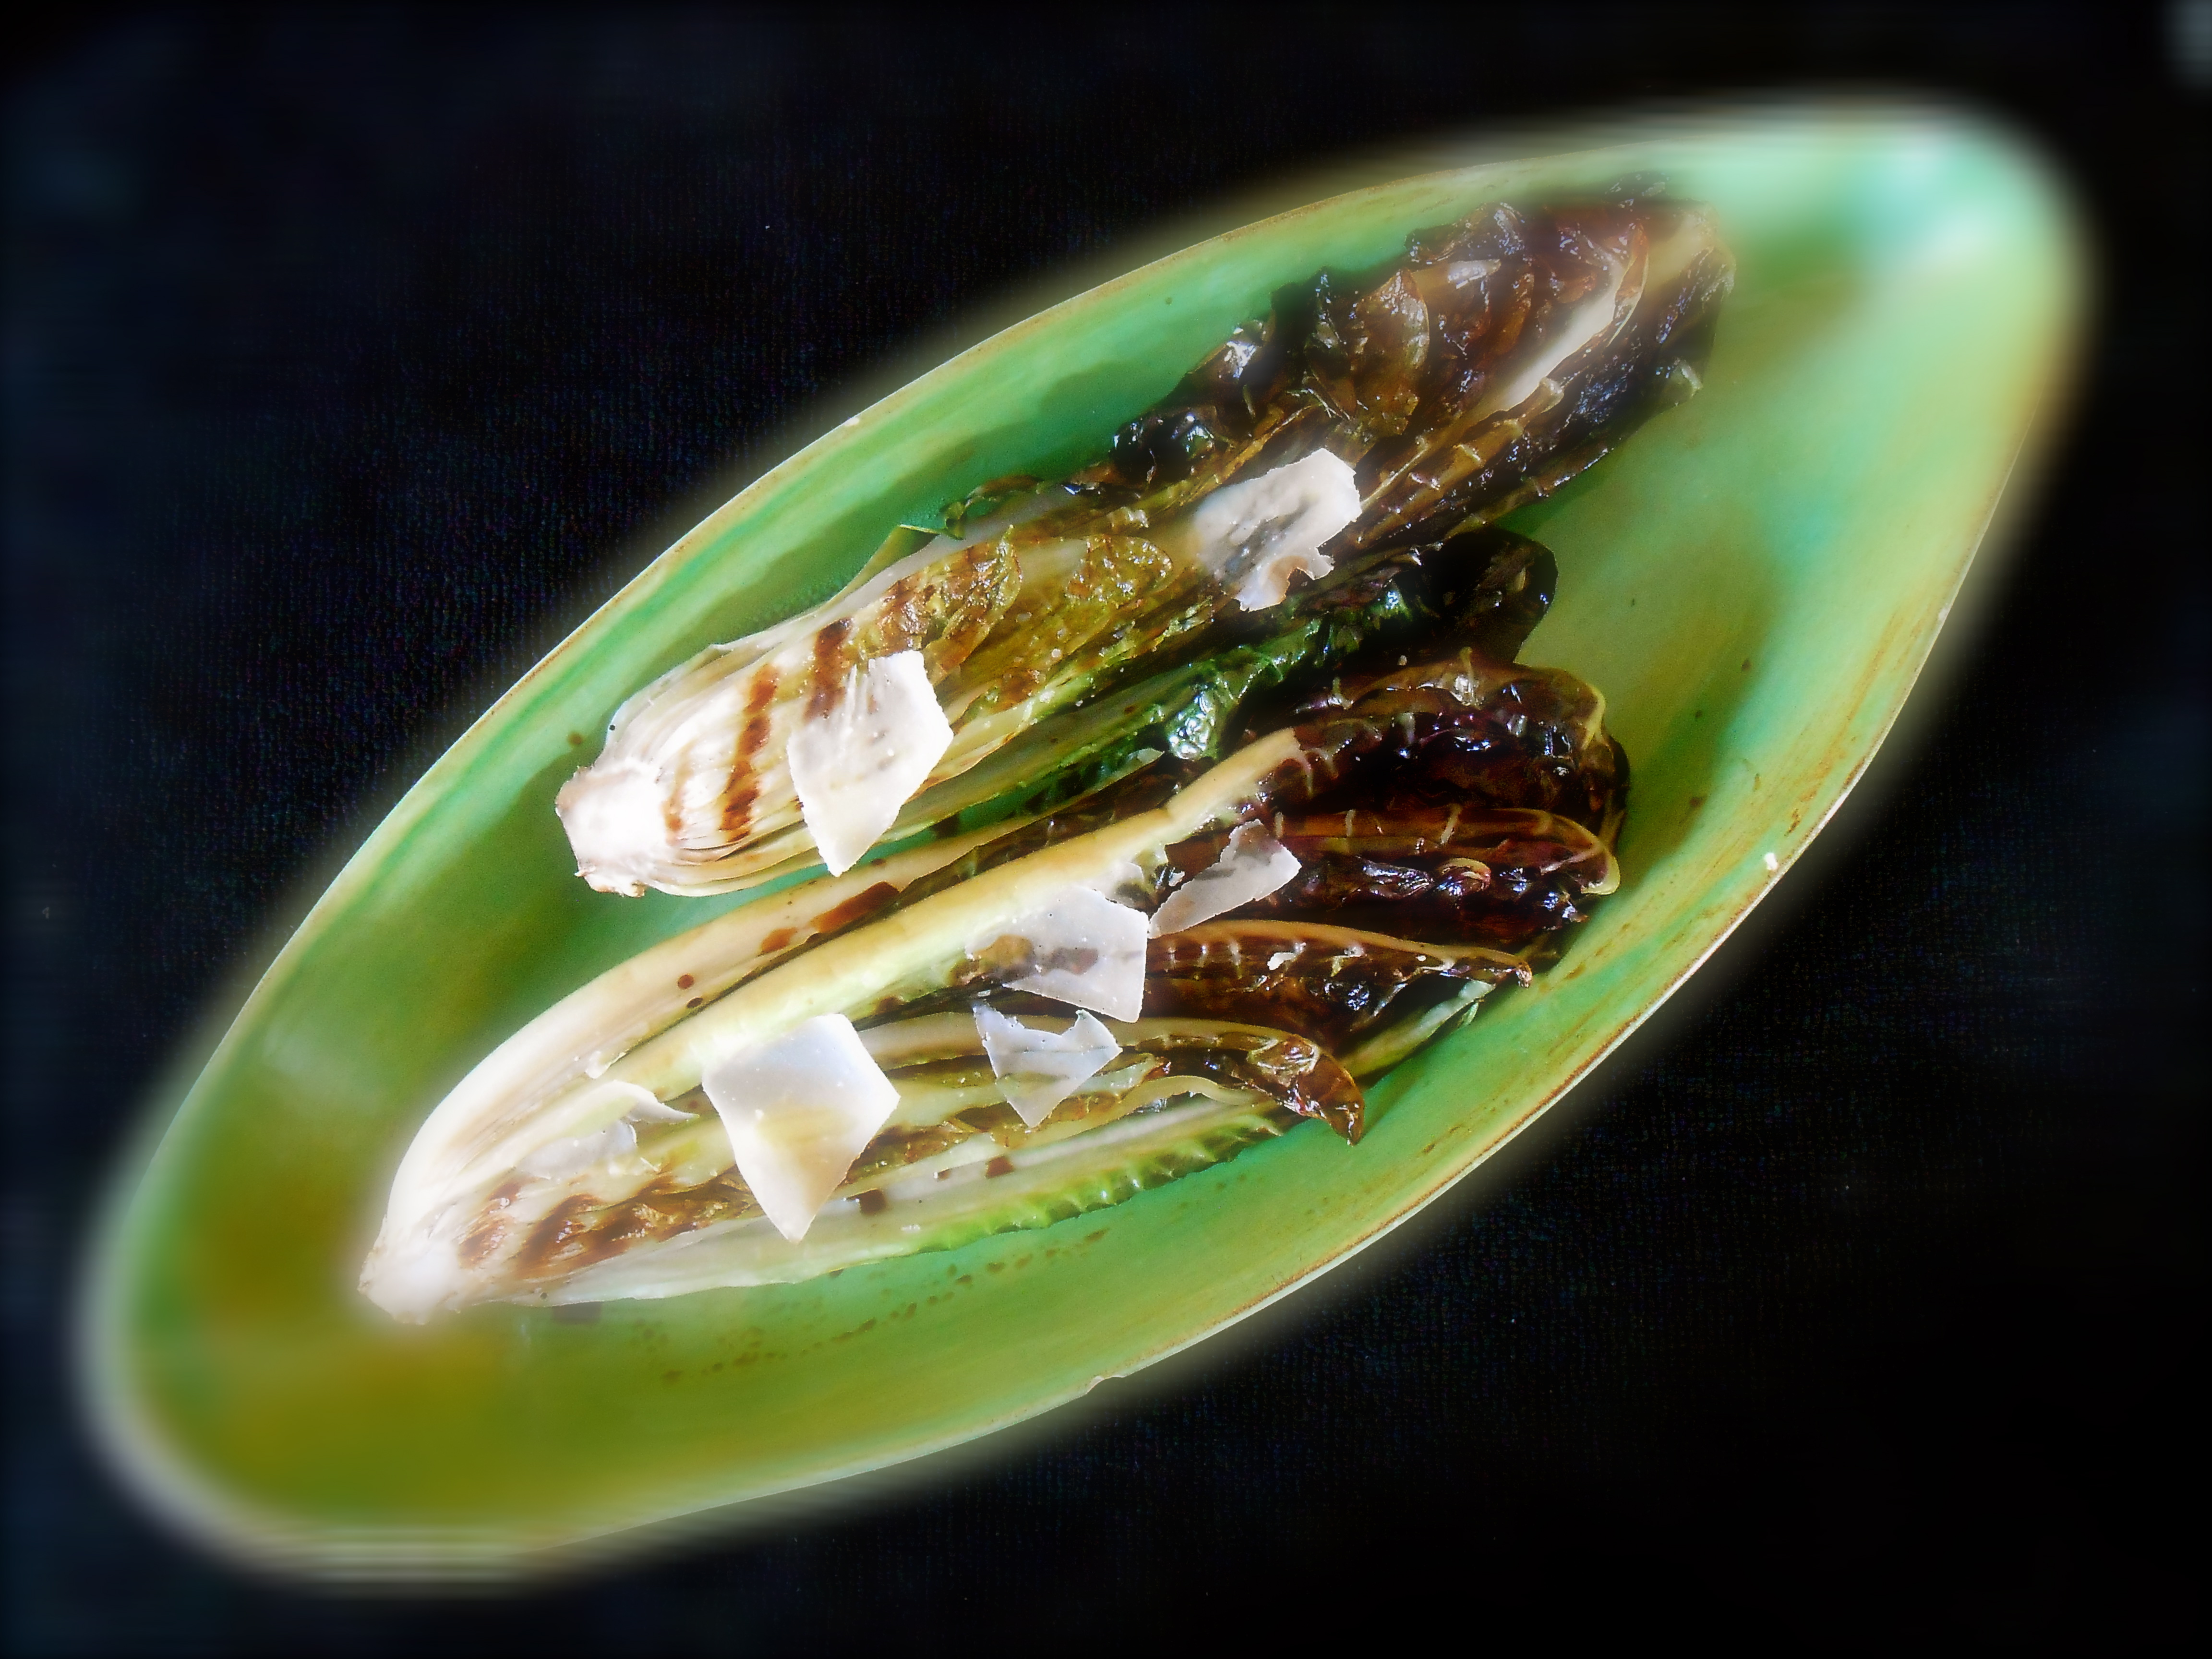
grilled radicchio treviso and zucchini ribbon salad
August 23, 2013 § 33 Comments
We are seeing signs of Fall here in Seattle and here are two wonderful “late” summer vegetable recipes for you to try. On my last visit to the farmer’s market I picked up a nice large head of Radicchio Treviso and an even larger sized Italian Striped Zucchini.

Radicchio Treviso is a leaf chicory. It is grown as a leaf vegetable and has long delicate green and magenta leaves, creamy white veins and a crinkled texture. The flavor is bitter which mellows a bit when grilled, braised or baked.
I n g r e d i e n t s
- 1 head of Radicchio Treviso
- 1 tablespoon olive oil
- Sea salt
- 2 tablespoons balsamic vinegar
- small wedge of grana padano or parmesan cheese, shredded
Preheat the grill or grill pan. Cut radicchio in half lengthwise and rub or brush both entire halves with oil. Set radicchio cut-side down on the grill. Cook until edges are well browned, about 4 minutes. Sprinkle with salt, turn and cook until radicchio is nicely browned and wilted, about 4 more minutes.
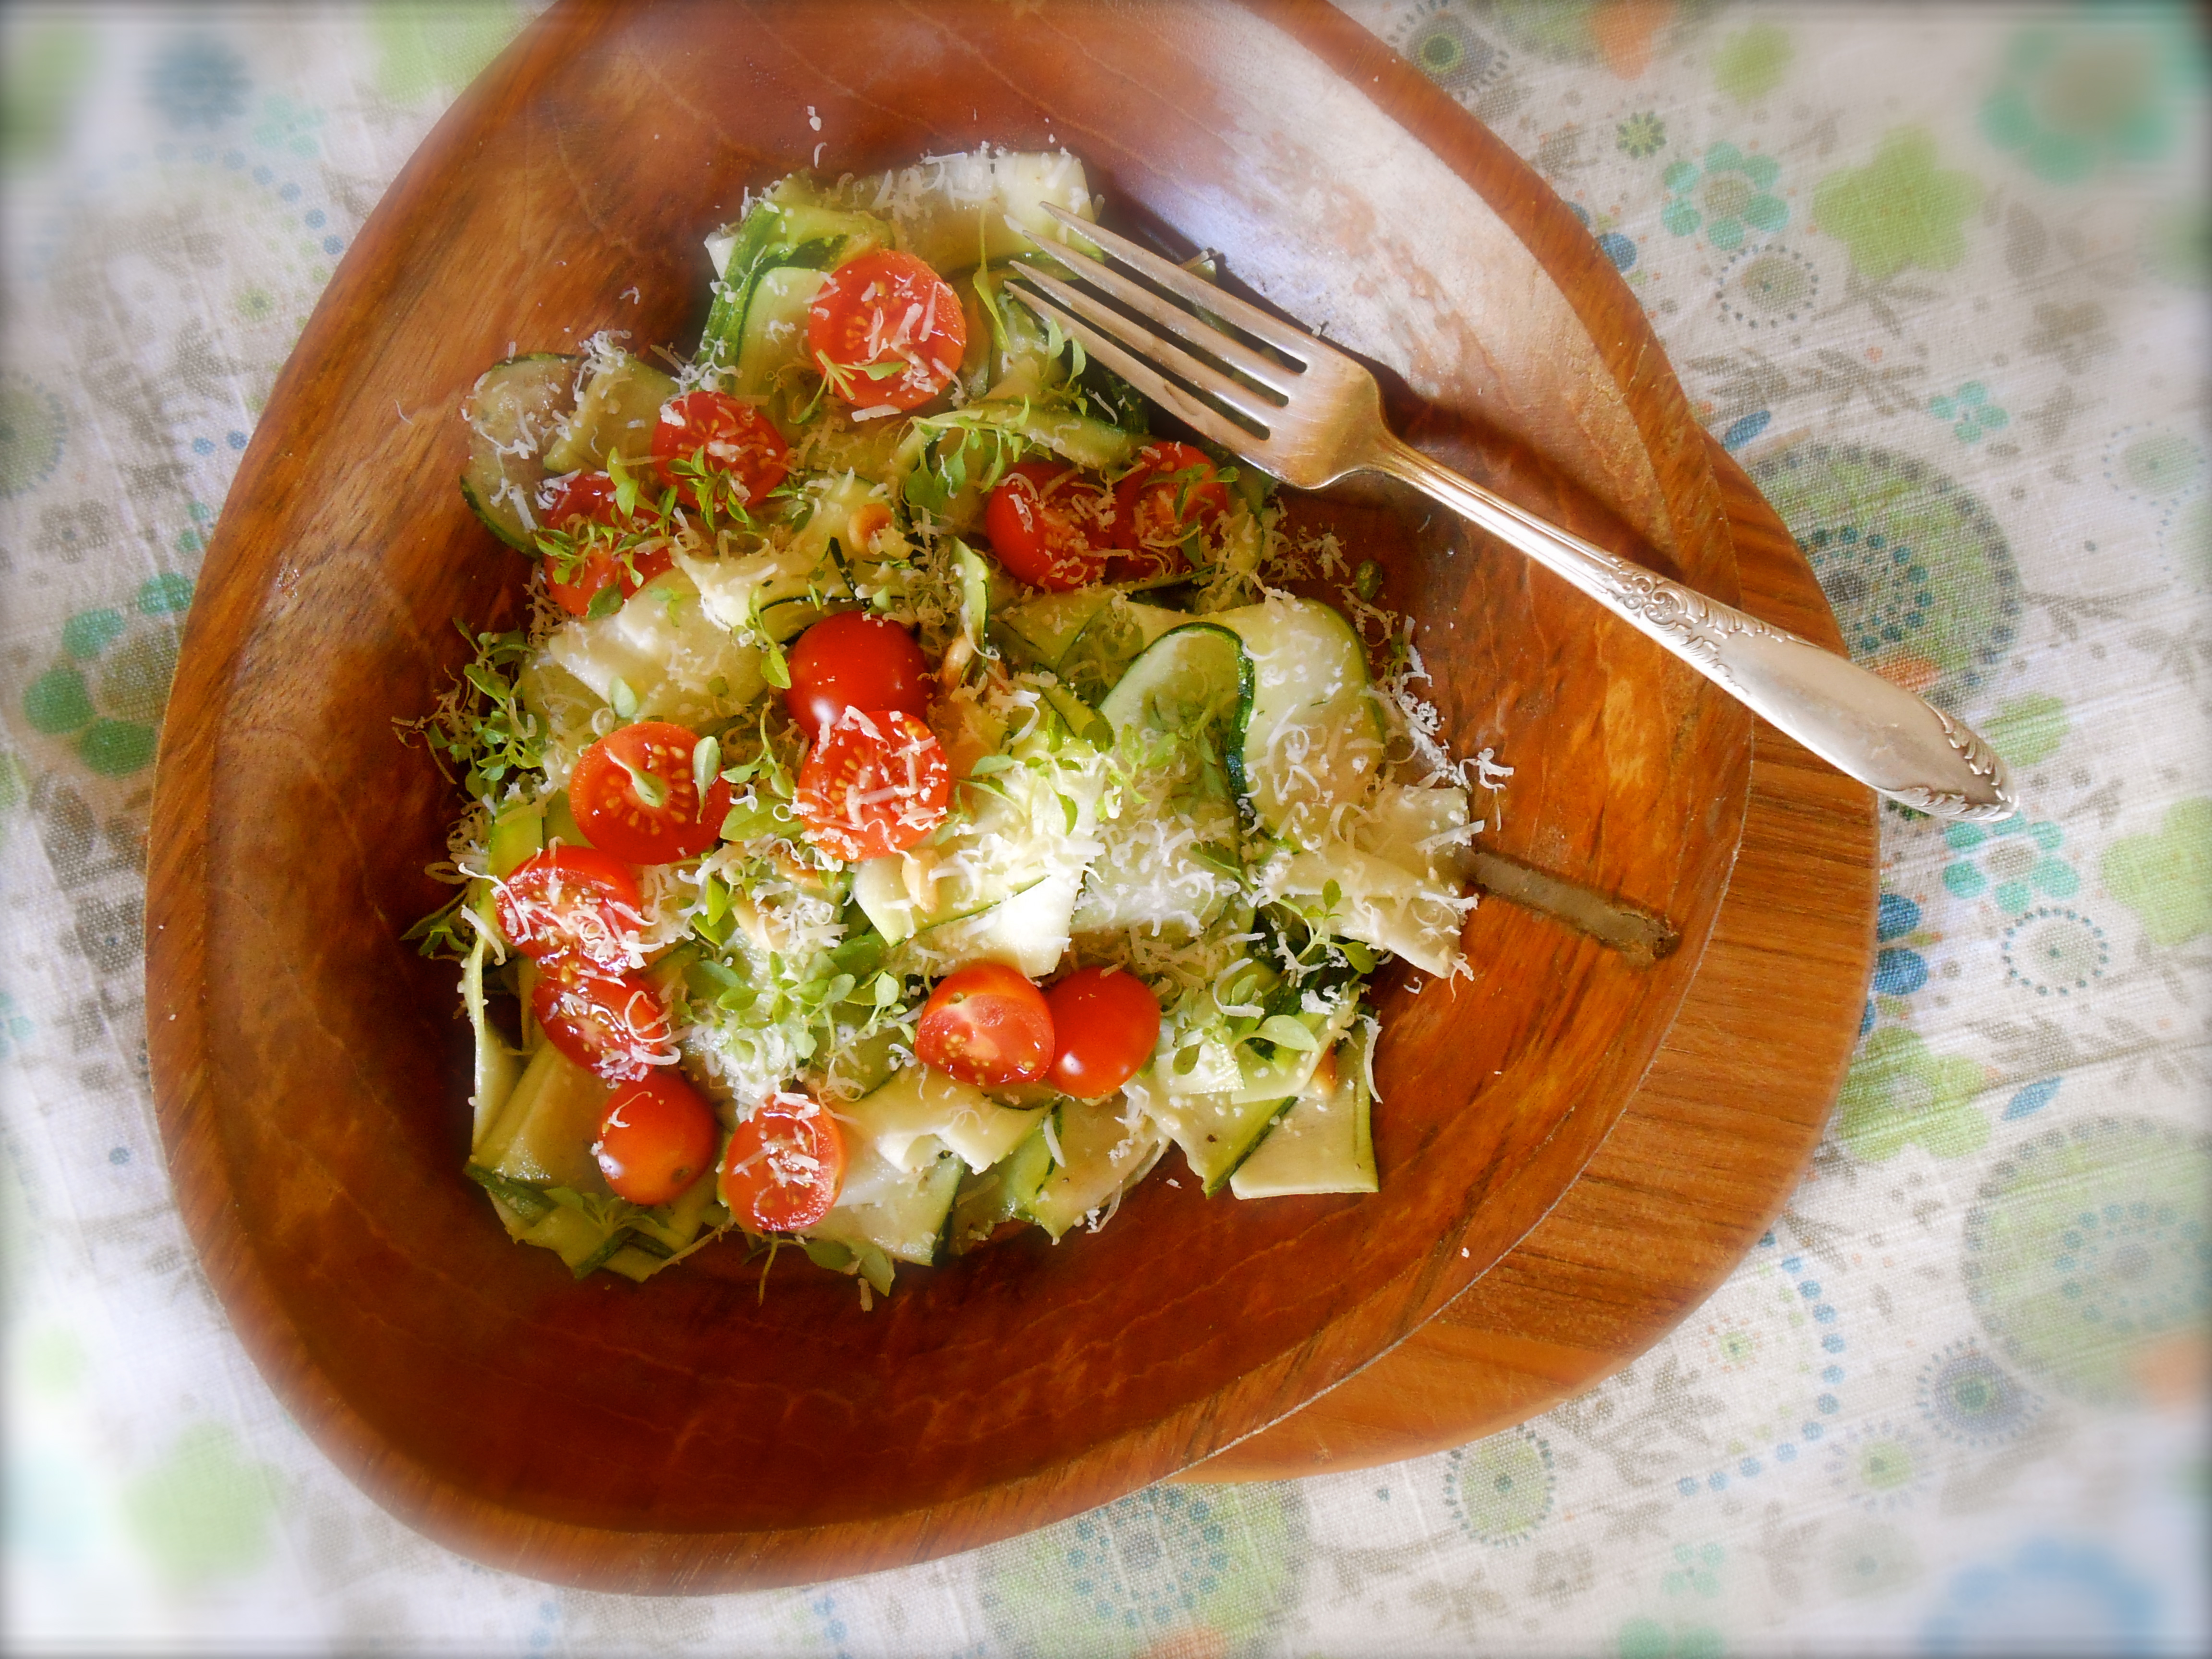
Alyssa and Carla’s Fresh Zucchini Pasta
Fresh Zucchini “Pasta”
serves one as a light lunch or two as a side dish
Dressing:
1 tablespoon really good extra virgin olive oil
1 tablespoon lemon juice
1 tablespoon freshly grated parmesan cheese
1 clove garlic, minced
Pinch of salt
a few cracks of freshly ground pepper
1 medium zucchini
8 cherry tomatoes, halved or quartered
2 tablespoons toasted pine nuts
1 tablespoon fresh basil, chopped
Combine all of the dressing ingredients into a jar, such as a mason jar, and shake to combine thoroughly. Adjust to taste.
Julienne the zucchini. I used this mandoline, which I adore (and use for many different dishes). You can try to do it by hand, but a mandoline creates perfect strands. I used the mandoline on each side of the zucchini until I got near the center, where the seeds made the strands too weak and they started to fall apart.
Toss the zucchini strands with the dressing. Plate the zucchini. Scatter the tomatoes, pine nuts and basil over the zucchini. Garnish with a sprinkle of parmesan.
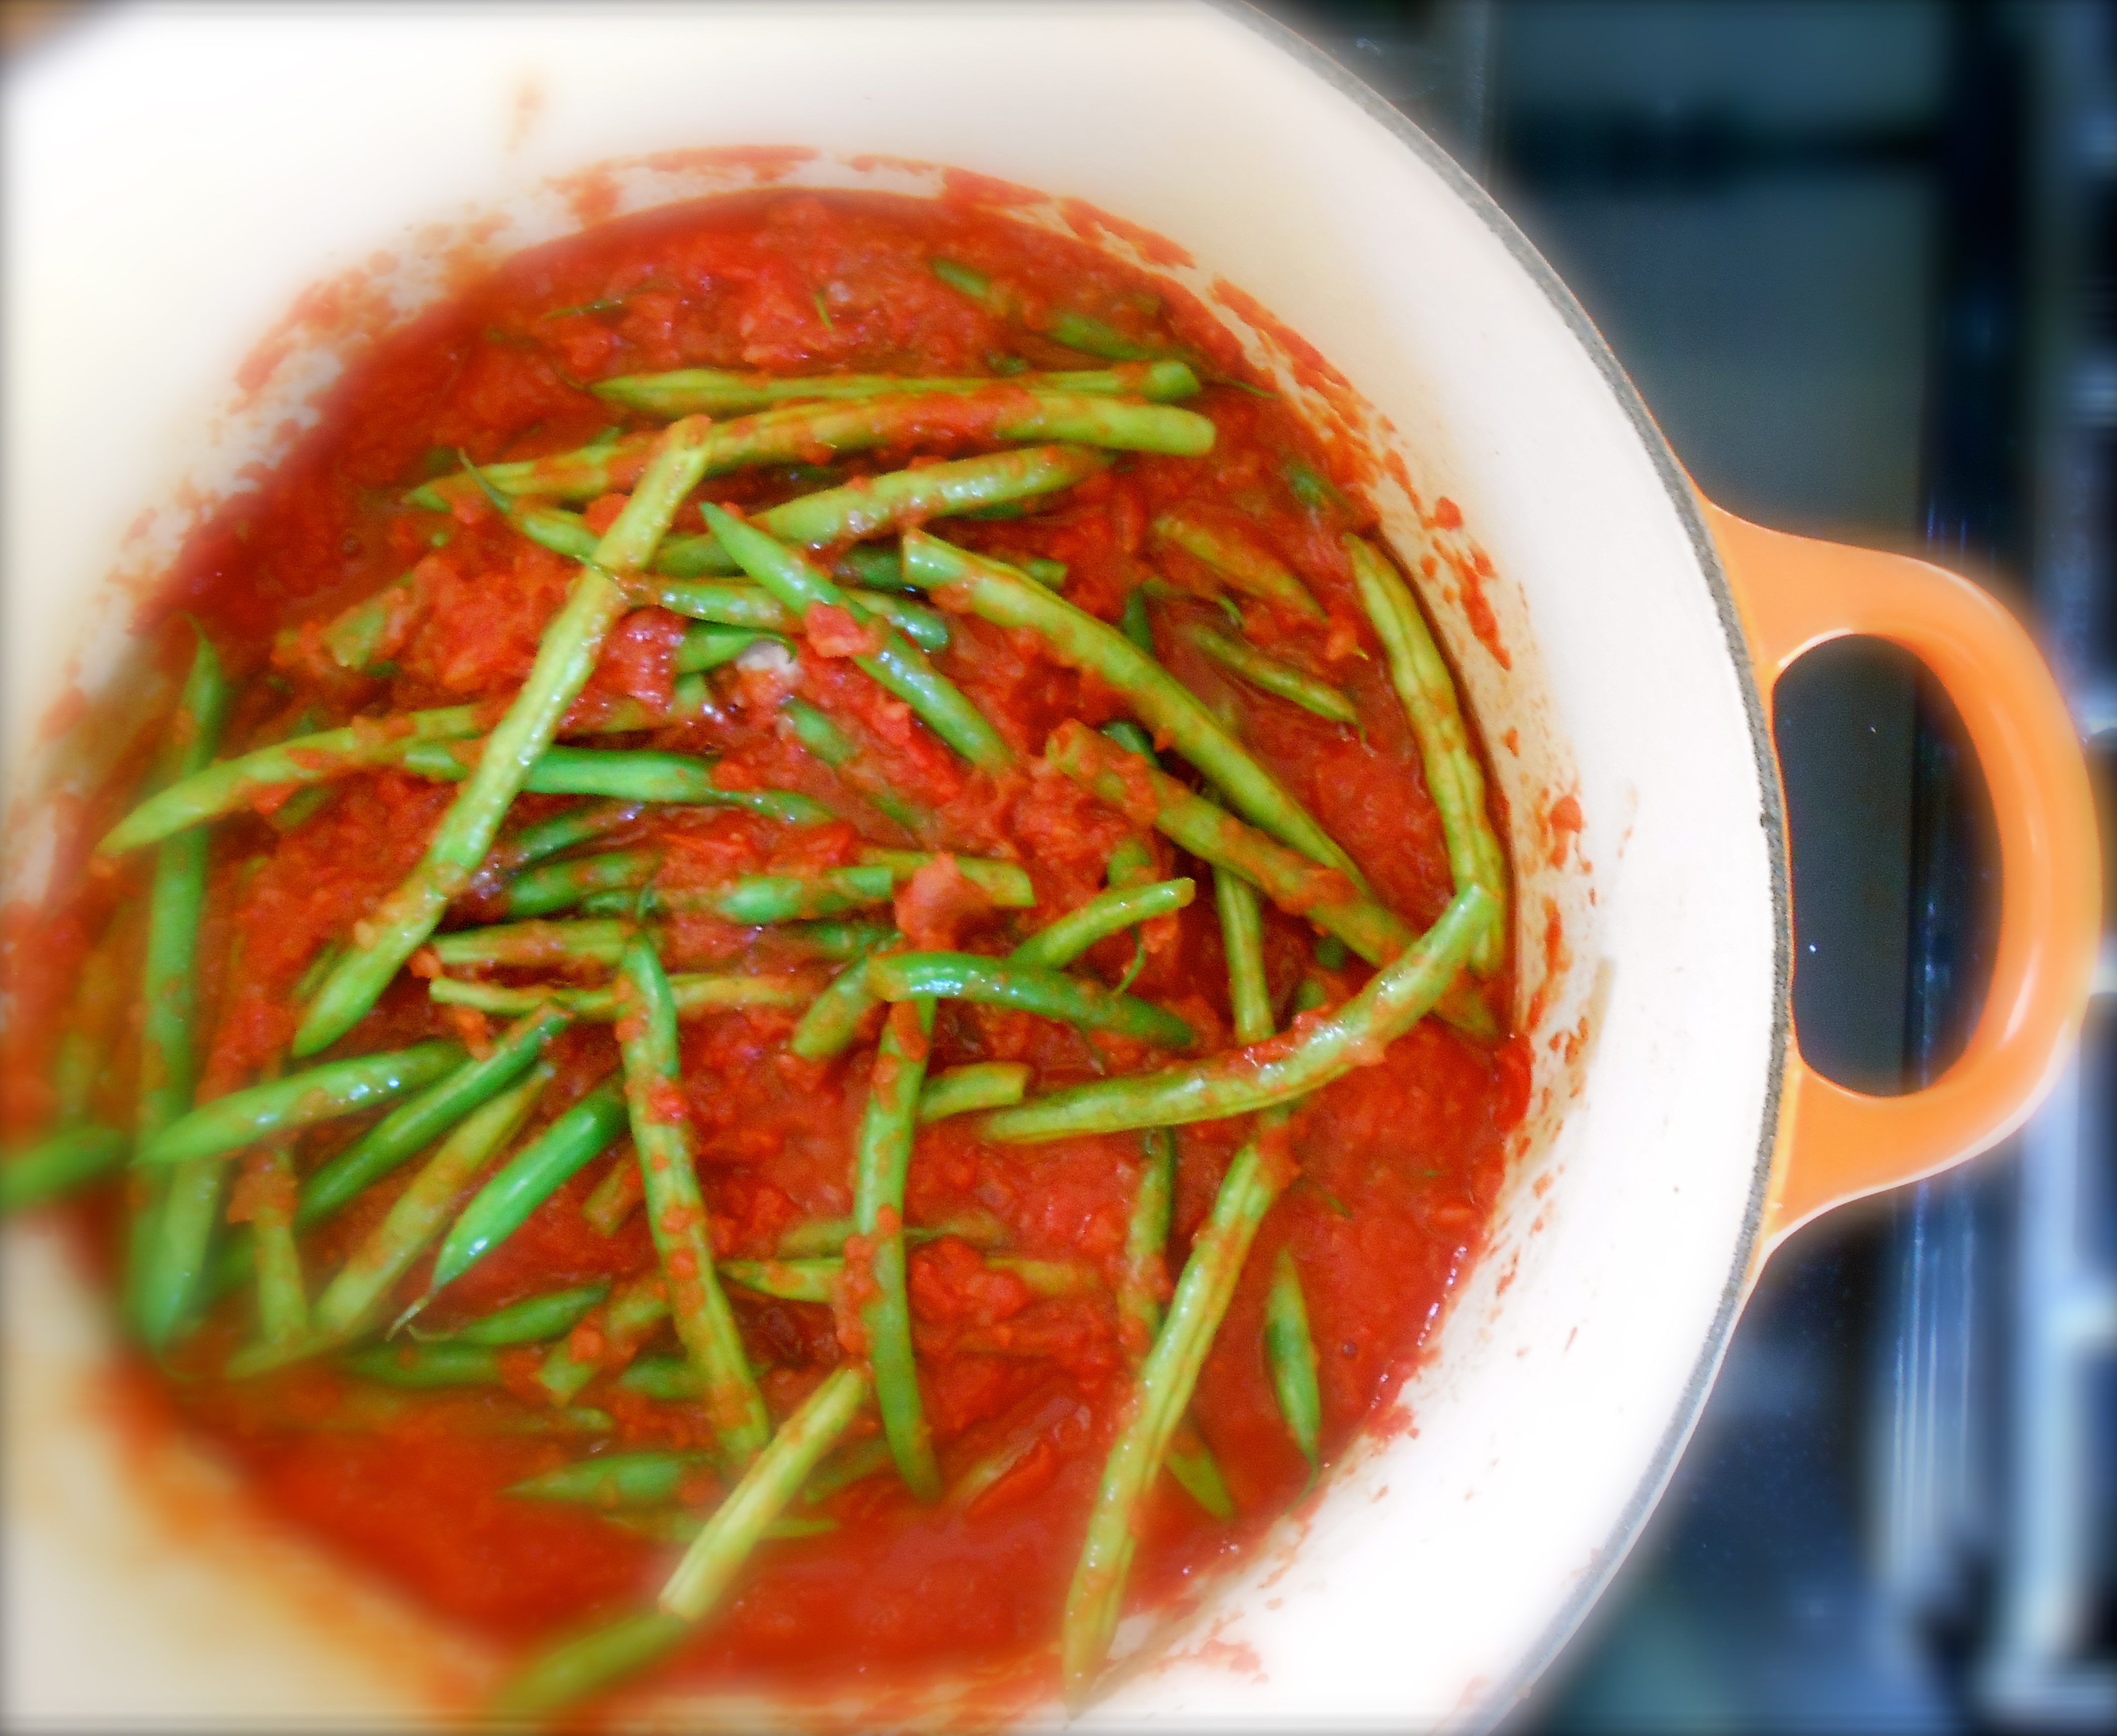
greek green bean stew (fasolákia fréska)
August 19, 2013 § 66 Comments
I’ll never forget this wonderful green bean and tomato stew I enjoyed on a number of occasions while visiting beautiful Greece. These green beans served at room temperature alongside a nice brick of creamy feta fast became my favorite Greek comfort food. After several attempts to recreate these succulent tender beans I have finally captured all the flavors, tender consistency and comfort I remember in this stew.
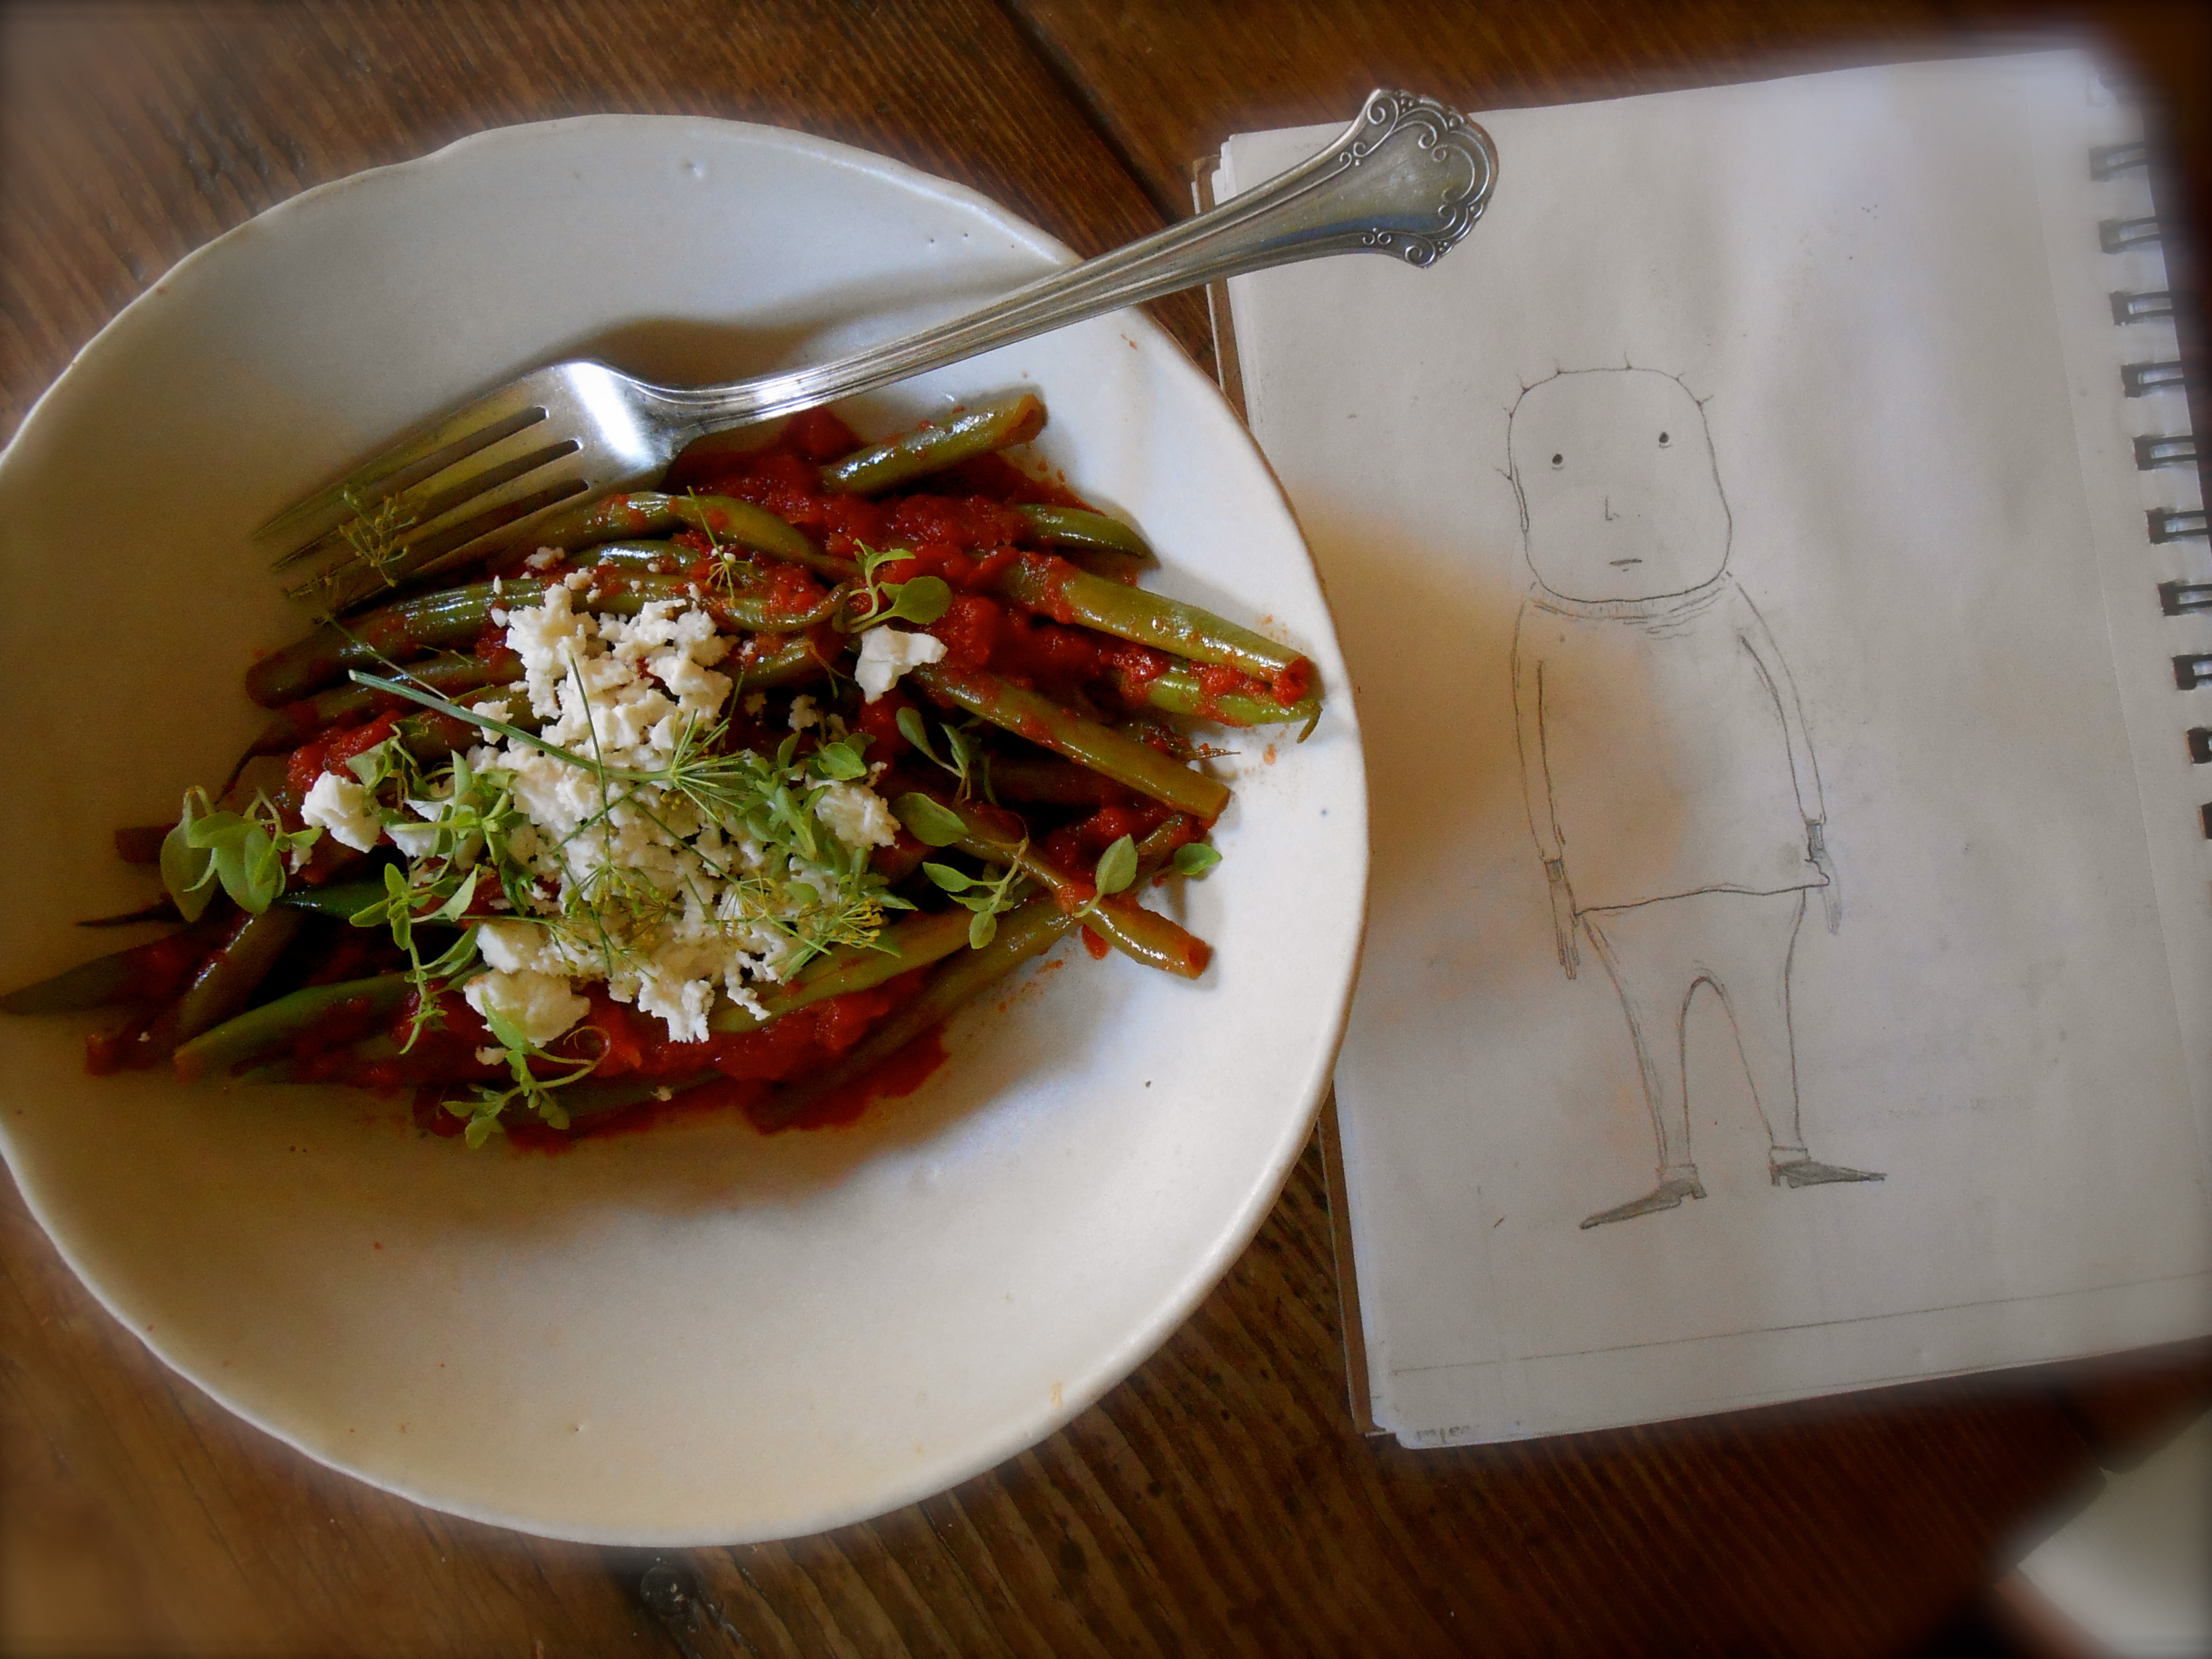
My esteemed possession from my visit to the island of Siphnos is a tiny paperback cookbook titled The Best Greek Dishes authored by Mdm. Margaret Phoca. I have referred to this little gem of a cookbook over and over again and have turned out a flawless (in my opinion) spanakópita, braised lamb and stewed potatoes, to name a few. Finally after many failed attempts to cook the perfect green bean stew at home I referred to this tiny cookbook and after making a few minor adjustments I have perfected a delicious bowl of fasolákia fréska.
A simple one pot meal.
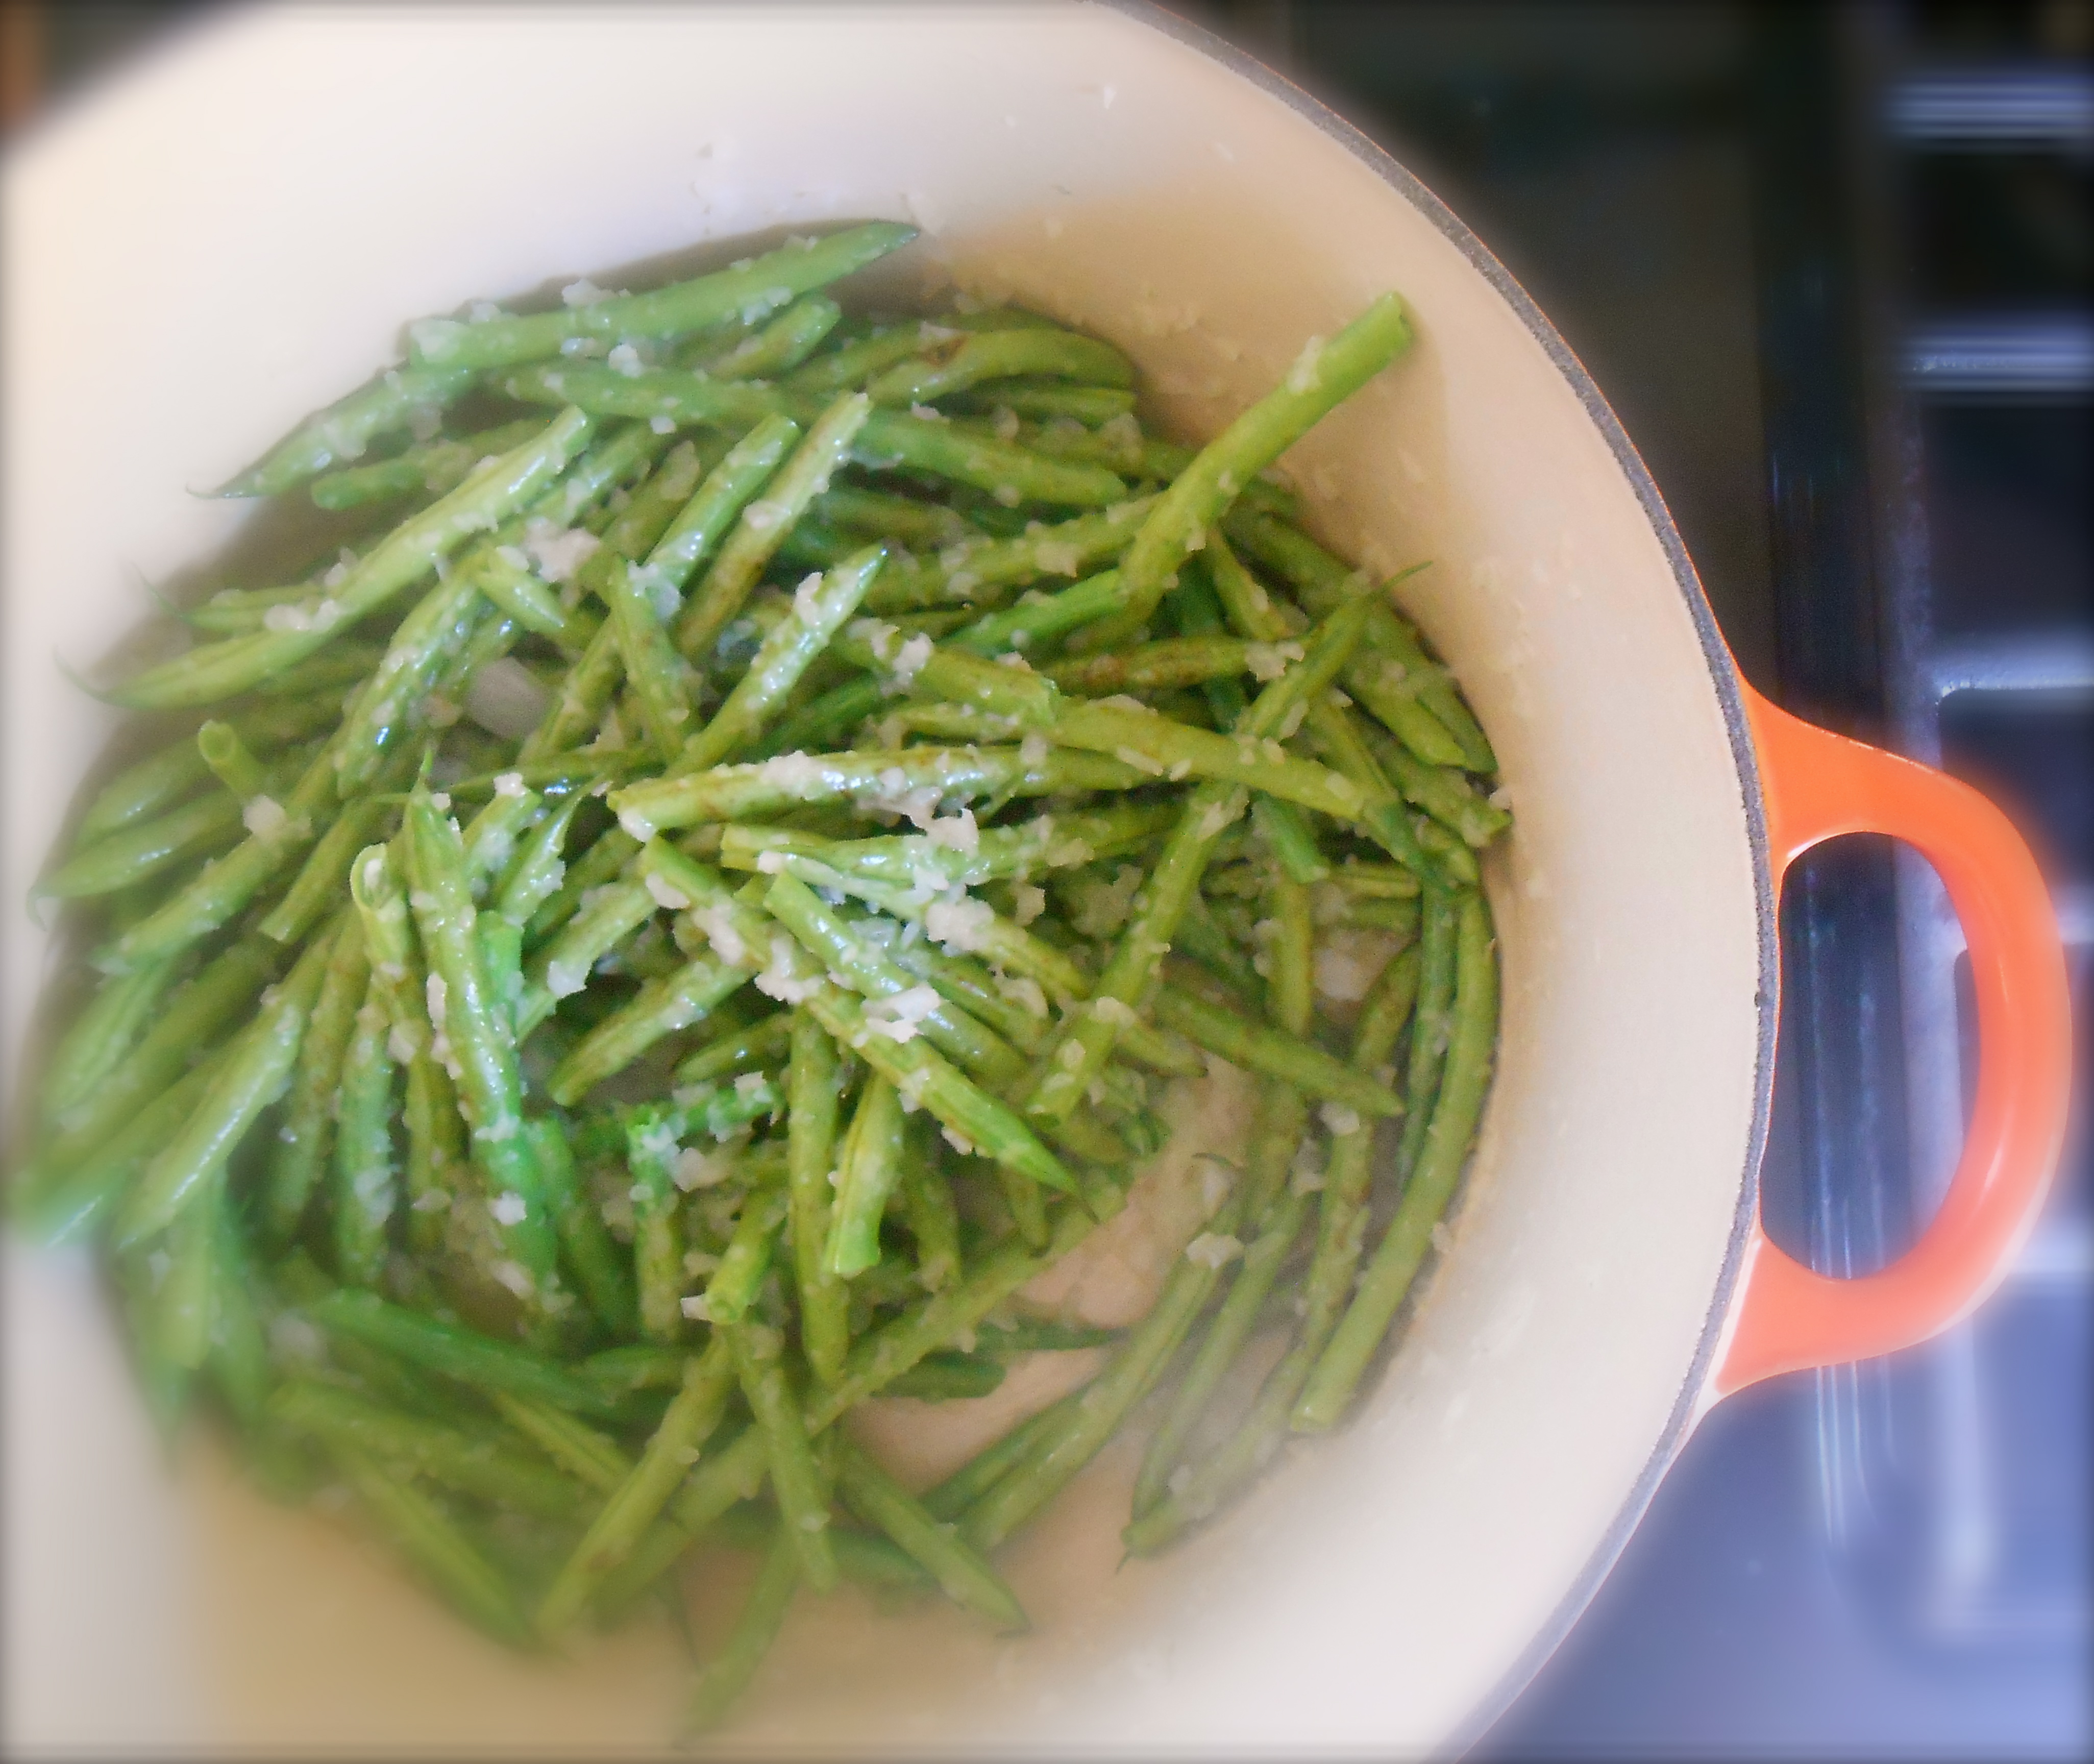
Normally we eat green beans steamed just enough for them to turn a stunning green and yet still a little crisp. After a quick steam bath we toss them in olive oil and salt and savor every single one of them. However, green beans are delightful after stewing in a flavorful tomato sauce for an hour or so. They become meltingly tender, sweet, silky and stew like. Although my tiny recipe book recommends serving these cold, these beans are best if left in the pot overnight in the refrigerator and brought to room temperature before serving.
I n g r e d i e n t s
- 1 pound green beans, washed and tails removed
- 1 large yellow onion, finely chopped
- 1/2 cup olive oil
- 1 pound ripe tomatoes, peeled and chopped, or one 28oz. can of crushed tomatoes
- salt
- 1/2 cup basil, torn
- 1/2 cup dill, torn
- 4 ounces of good quality feta, in brine, crumbled
M e t h o d
Heat the olive oil in a heavy bottomed pot and sauté the onion with a pinch of salt until it is soft and transparent. Add the beans to the pot and stir well until each bean is coated well with the onion and oil. Continue cooking and tossing for a few minutes.
Add the chopped tomatoes, stir well and cover for a few minutes to allow them to steam a little. After a couple of minutes uncover the pan and stir, the tomatoes should be thickening at this point. Cover and steam a few more minutes while the tomatoes reduce a little.
Once the tomatoes are nice and thick (stew consistency) uncover the pan and simmer, uncovered for one hour stirring occasionally. Taste for salt and season to your liking.
Allow to sit for a couple of hours and brought to room temperature before serving.
Top each serving with basil, dill and crumbled feta.
Serves 4.
chicken chilaquiles and jicama slaw
July 29, 2013 § 46 Comments
The other day I roasted a chicken and we didn’t even eat it for dinner! It was one of those days. We are remodeling this old cottage and the weekends are completed devoted to just that, sun up to sun down. I had purchased a whole chicken and didn’t want to freeze it so I roasted it knowing we were not going to be able to have a sit down dinner. I am glad I did because using the chicken the next day for chilaquiles was a delight. Served with jicama slaw.

I n g r e d i e n t s
- 1 small roasted chicken, shredded
- 2 tablespoons olive oil
- 4-5 cloves of garlic, chopped
- 1 can (28 ounces) whole peeled tomatoes in purée
- 3 chipotle chiles in adobo, finely chopped
- 1 tablespoon adobo sauce, from same can of chipotles
- handful of cilantro, 1/2 cup chopped
- tortilla chips, at least 4-6 cups
- 1/2 cup greek style yogurt
- 1/2 cup cotija or feta cheese
Combine the oil and garlic in a large heavy bottom pot. Cook over medium heat, stirring occasionally until the garlic is fragrant, 1 to 2 minutes. Add the tomatoes with their purée, chipotles and adobo sauce and 1 cup of water. Break up the tomatoes, season with salt and bring to a boil. Reduce the heat and simmer until lightly thickened, about 10 minutes. Add the chicken and continue to simmer for 10 minutes. Turn off the heat and add 1/2 cup chopped cilantro. Place a handful of chips in a serving bowl and top with chicken chilaquiles. Make sure to spoon a little extra sauce on each serving. Garnish with cilantro sprigs, greek yogurt and crumbled cotija cheese.

Jicama is such a curious root. “The root’s exterior is yellow and papery, while its inside is creamy white with a crisp texture that resembles raw potato or pear. The flavor is sweet and starchy, reminiscent of some apples or raw green beans, and it is usually eaten raw, sometimes with salt, lemon, or lime juice and chili powder. It is also cooked in soups and stir-fried dishes.” (wikipedia) I simply added lime, a little thinly sliced red onion, cilantro, salt and pepper. This was so cool and refreshing alongside the warm, spicy chilaquiles. This was a perfect matched dinner, texturally speaking. The soft spicy chilaquiles, creamy yogurt, crunchy tortilla chips and the crispy cool jicama all together sang in harmony with each bite.
I n g r e d i e n t s
- 1 medium jicama, peeled and juliennned
- 1/4 – 1/2 small red inion, thinly sliced
- 1/2 cup coarsely chopped fresh cilantro
- 3 tablespoons fresh lime juice
- coarse salt and pepper
I did not want the red onion to be dominant in this slaw. Use what your palate enjoys and play around with the lime juice as well.
In a medium bowl place all the ingredients and toss well. Serve right away, or allow to marinate in the refrigerator for up to 6 hours.
Serves 4.
