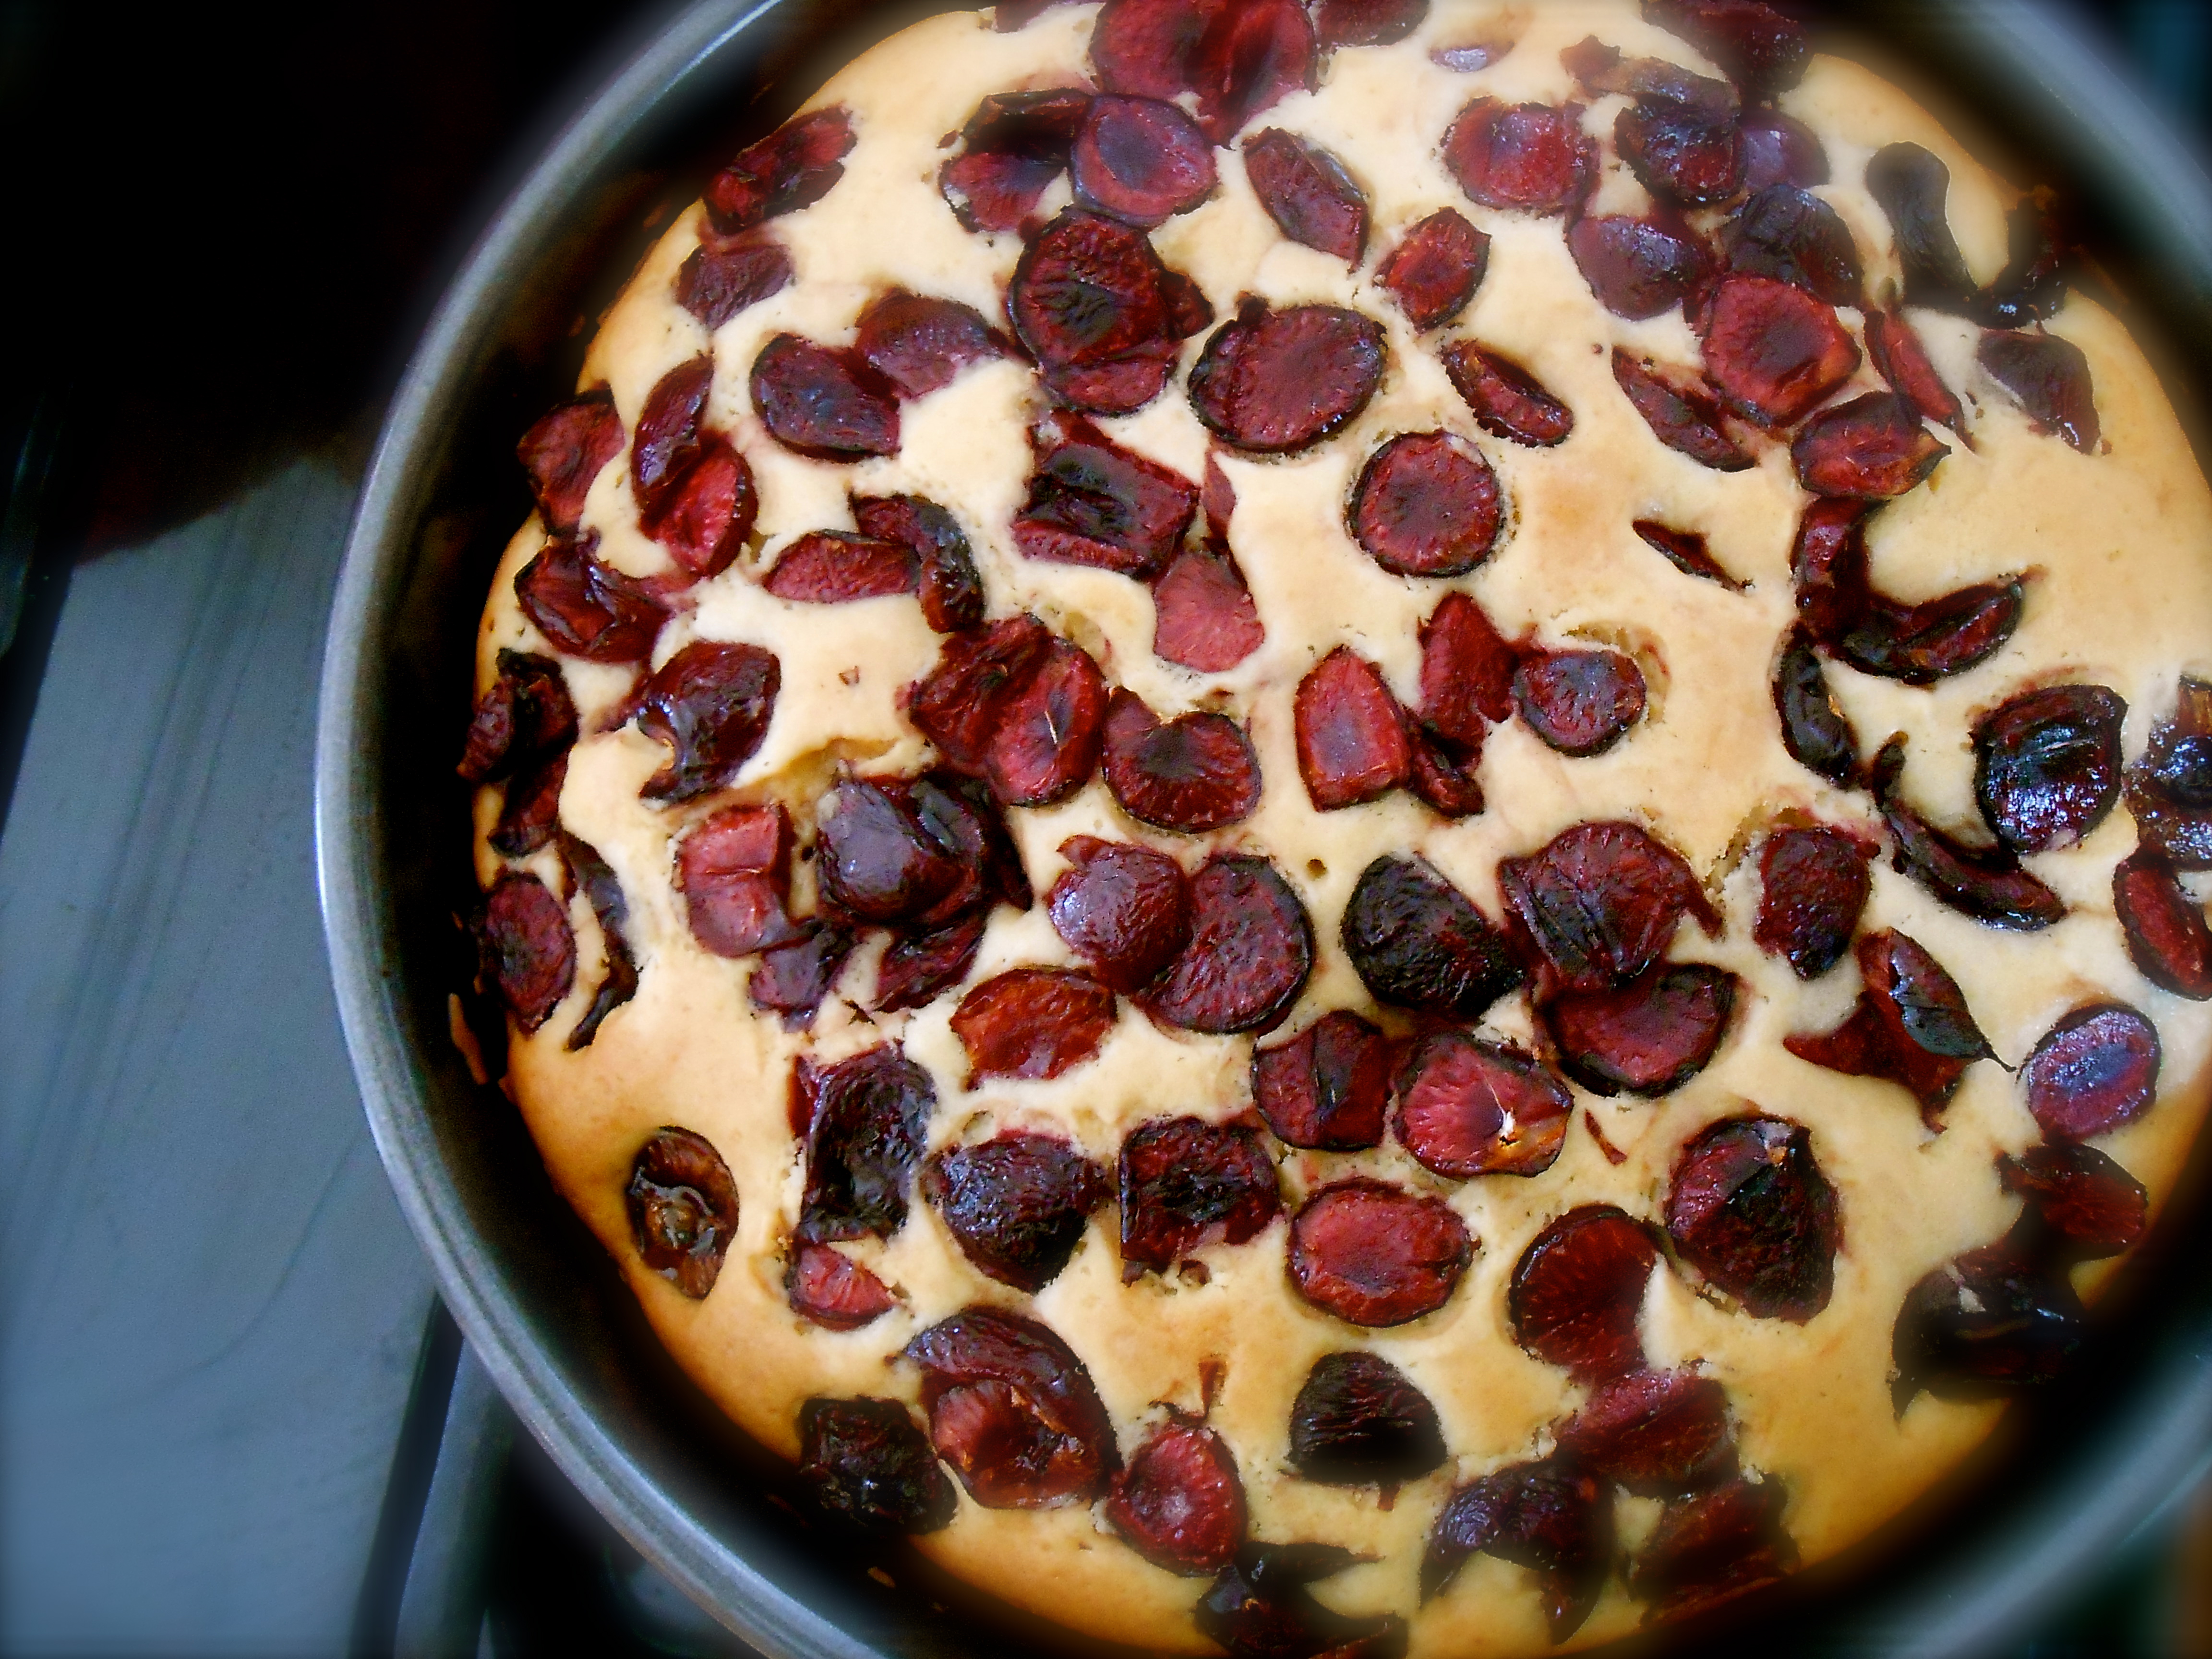
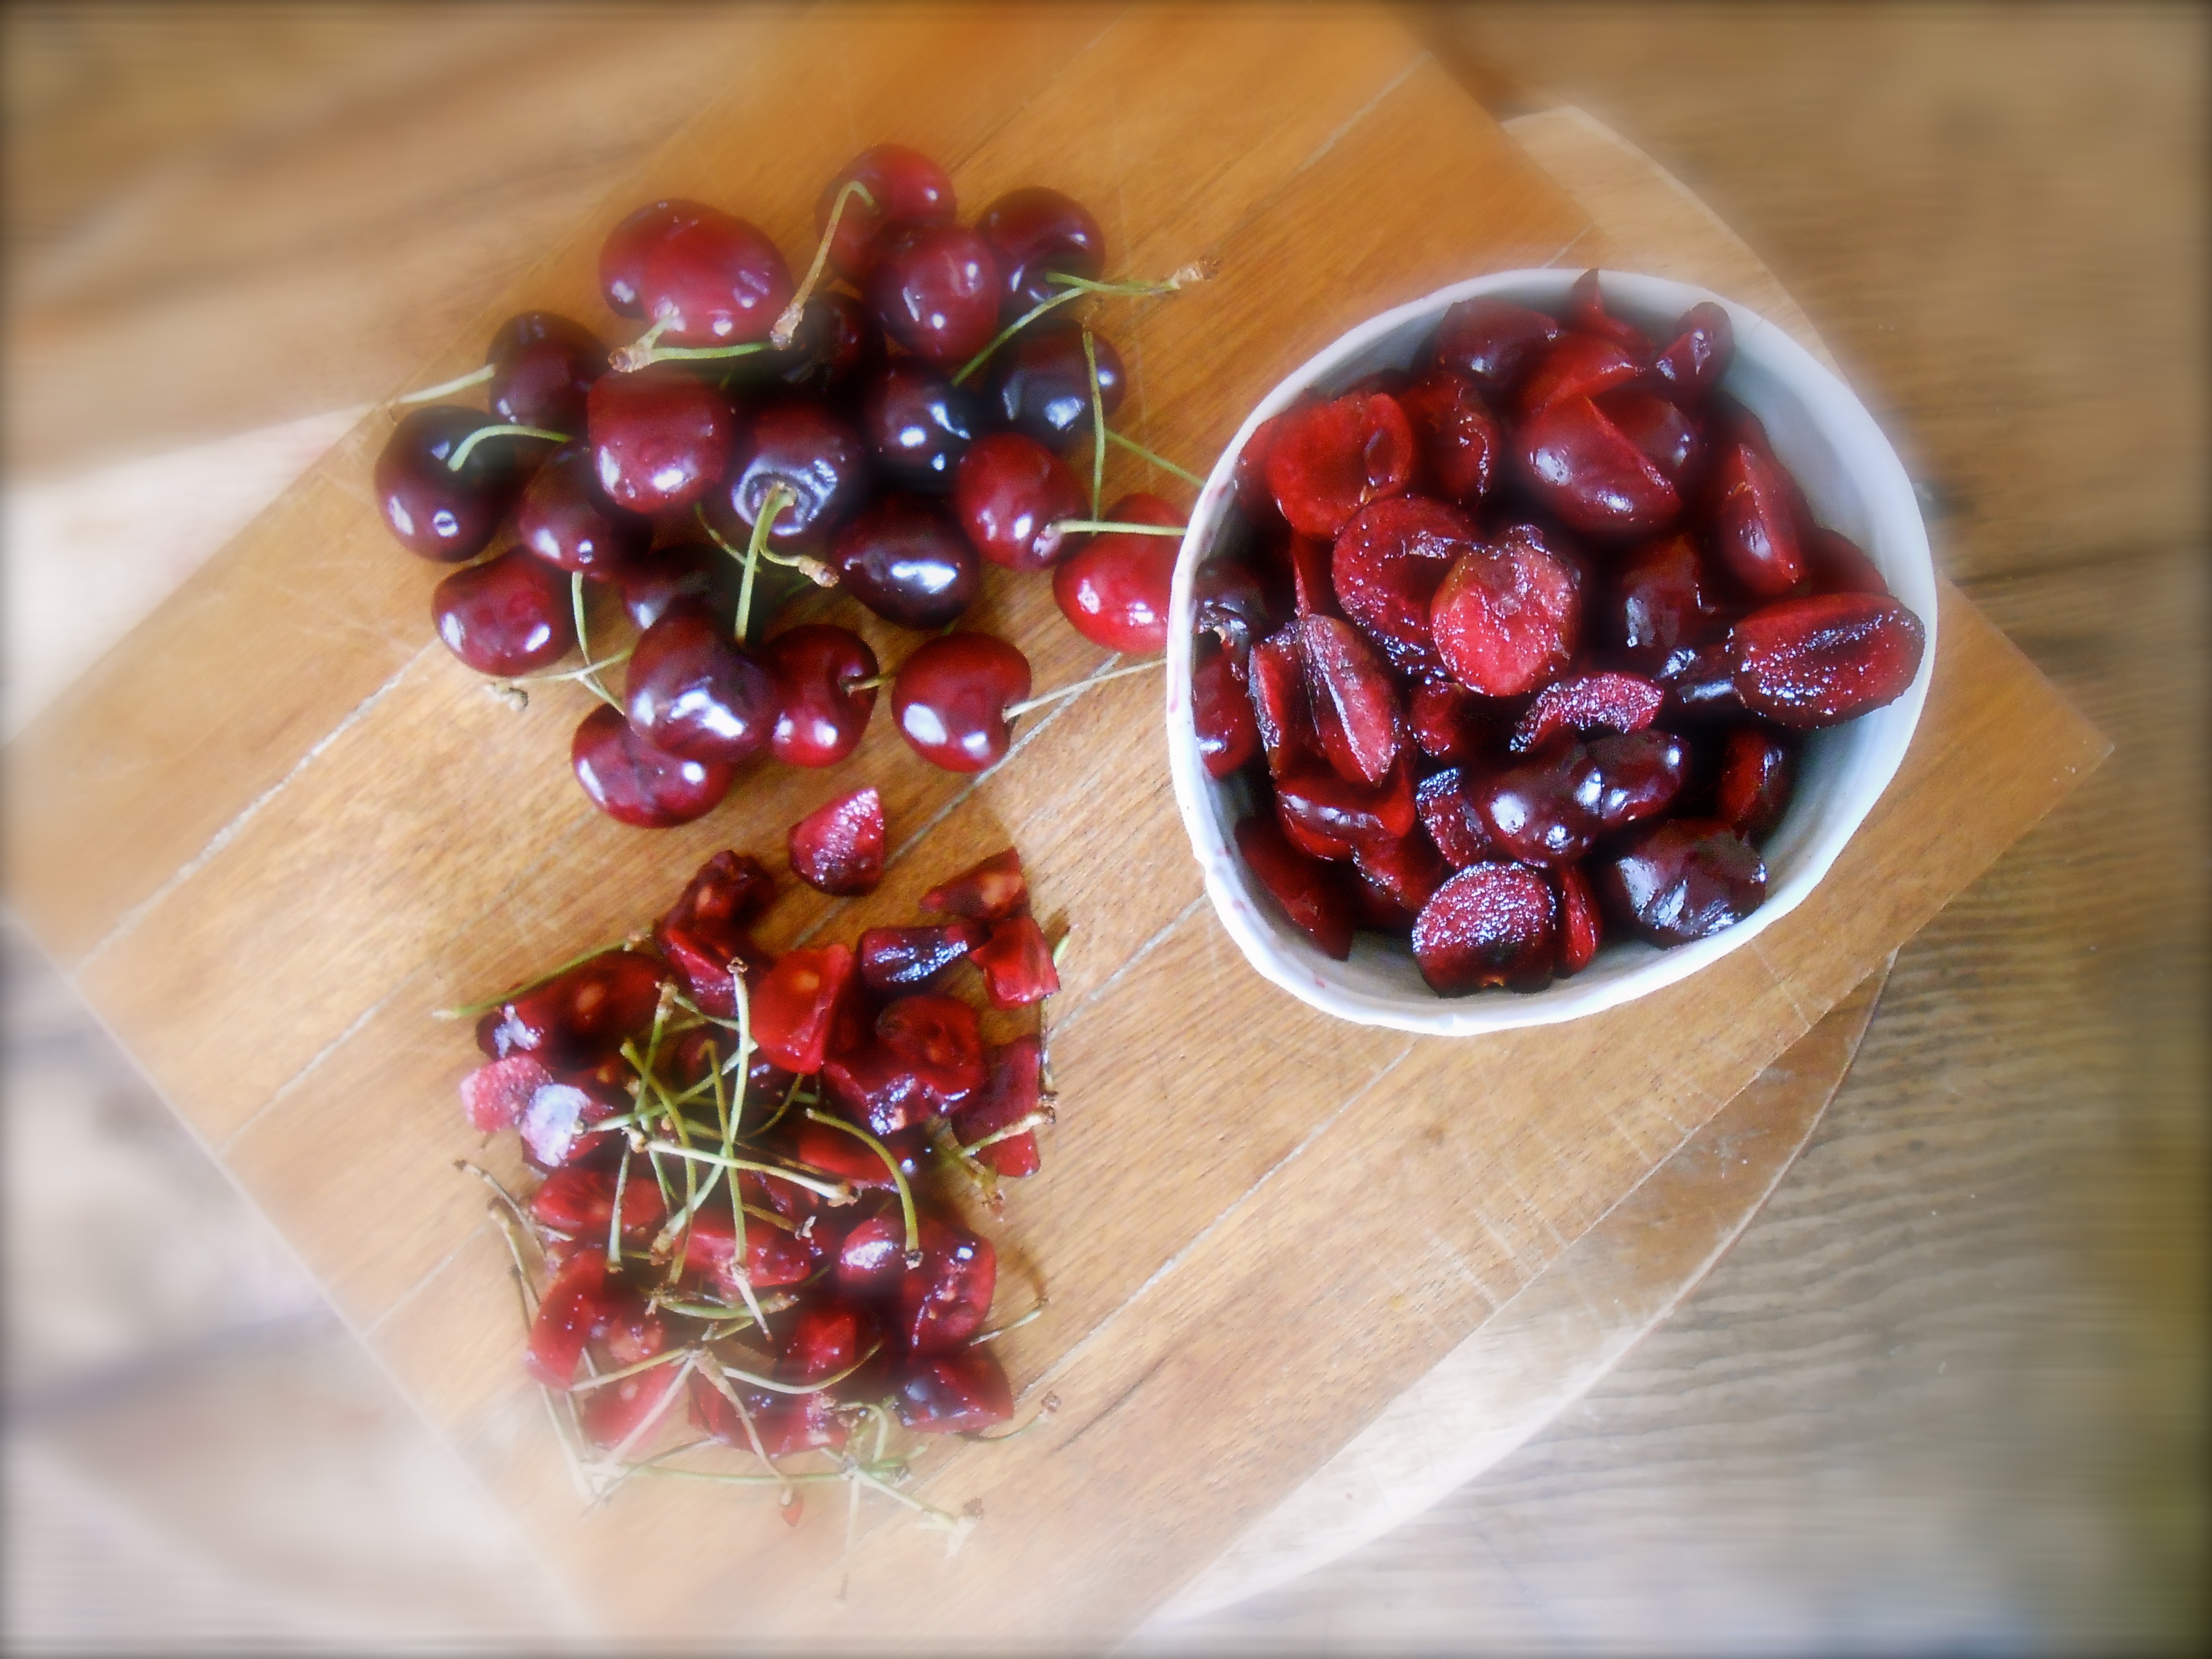
cherry yogurt cake
August 28, 2013 § 68 Comments
Here is a lovely breakfast cake which could be made with just about any fruit. I happen to have a nice bunch of cherries in the refrigerator and thought of making either a bread or cake for breakfast. When it comes to sweets I tend to keep it very simple. And in my usual “less ingredients is best” here’s what I came up with.
c h e r r y y o g u r t c a k e
I n g r e d i e n t s
- 1/2 cup butter, softened
- ¾ cup sugar
- 2 eggs
- 2 cups flour
- 2 tsp baking powder
- 3/4 cup vanilla yoghurt
- 1 cup fresh cherries, pitted and halved
M e t h o d
Preheat oven to 350°F Prepare a cake pan.
Beat butter and sugar together until light and fluffy. Add eggs, mix well. Mix in flour and yogurt. Spread mixture into your greased cake pan. Sprinkle cherries on the top and then pat them down gently with your hand. Bake for 50 minutes or until a toothpick comes out clean.
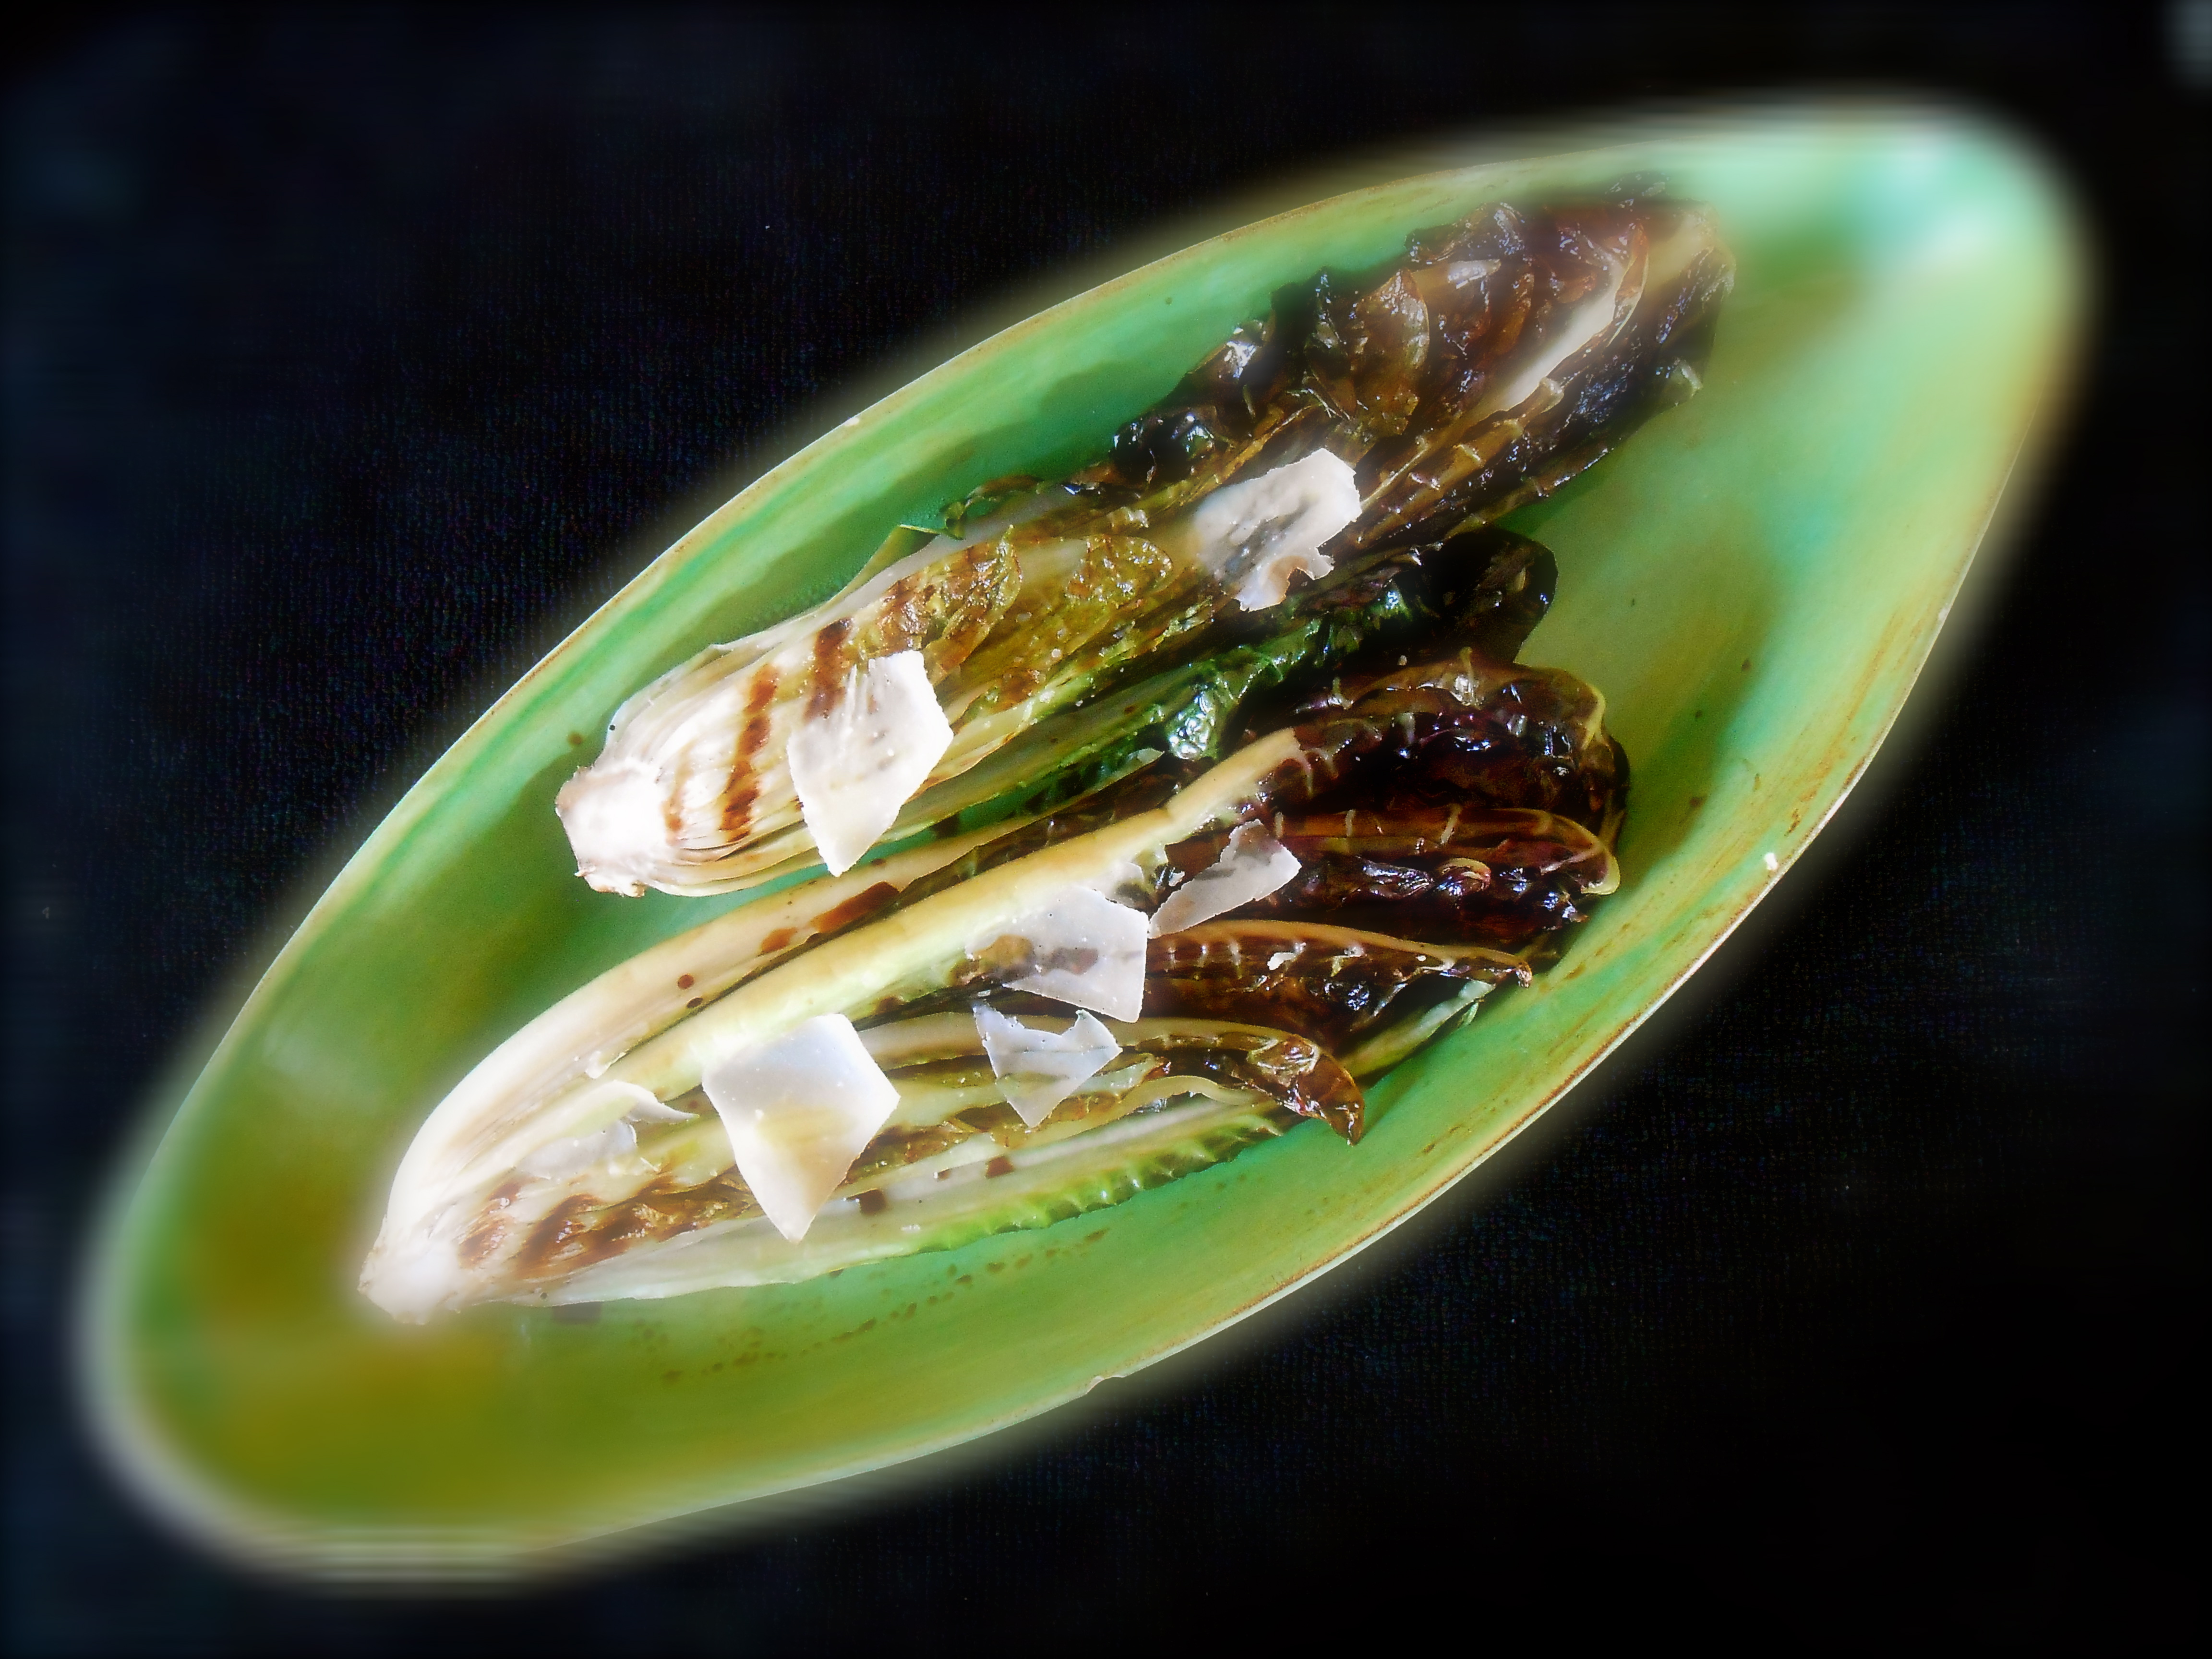
grilled radicchio treviso and zucchini ribbon salad
August 23, 2013 § 33 Comments
We are seeing signs of Fall here in Seattle and here are two wonderful “late” summer vegetable recipes for you to try. On my last visit to the farmer’s market I picked up a nice large head of Radicchio Treviso and an even larger sized Italian Striped Zucchini.

Radicchio Treviso is a leaf chicory. It is grown as a leaf vegetable and has long delicate green and magenta leaves, creamy white veins and a crinkled texture. The flavor is bitter which mellows a bit when grilled, braised or baked.
I n g r e d i e n t s
- 1 head of Radicchio Treviso
- 1 tablespoon olive oil
- Sea salt
- 2 tablespoons balsamic vinegar
- small wedge of grana padano or parmesan cheese, shredded
Preheat the grill or grill pan. Cut radicchio in half lengthwise and rub or brush both entire halves with oil. Set radicchio cut-side down on the grill. Cook until edges are well browned, about 4 minutes. Sprinkle with salt, turn and cook until radicchio is nicely browned and wilted, about 4 more minutes.
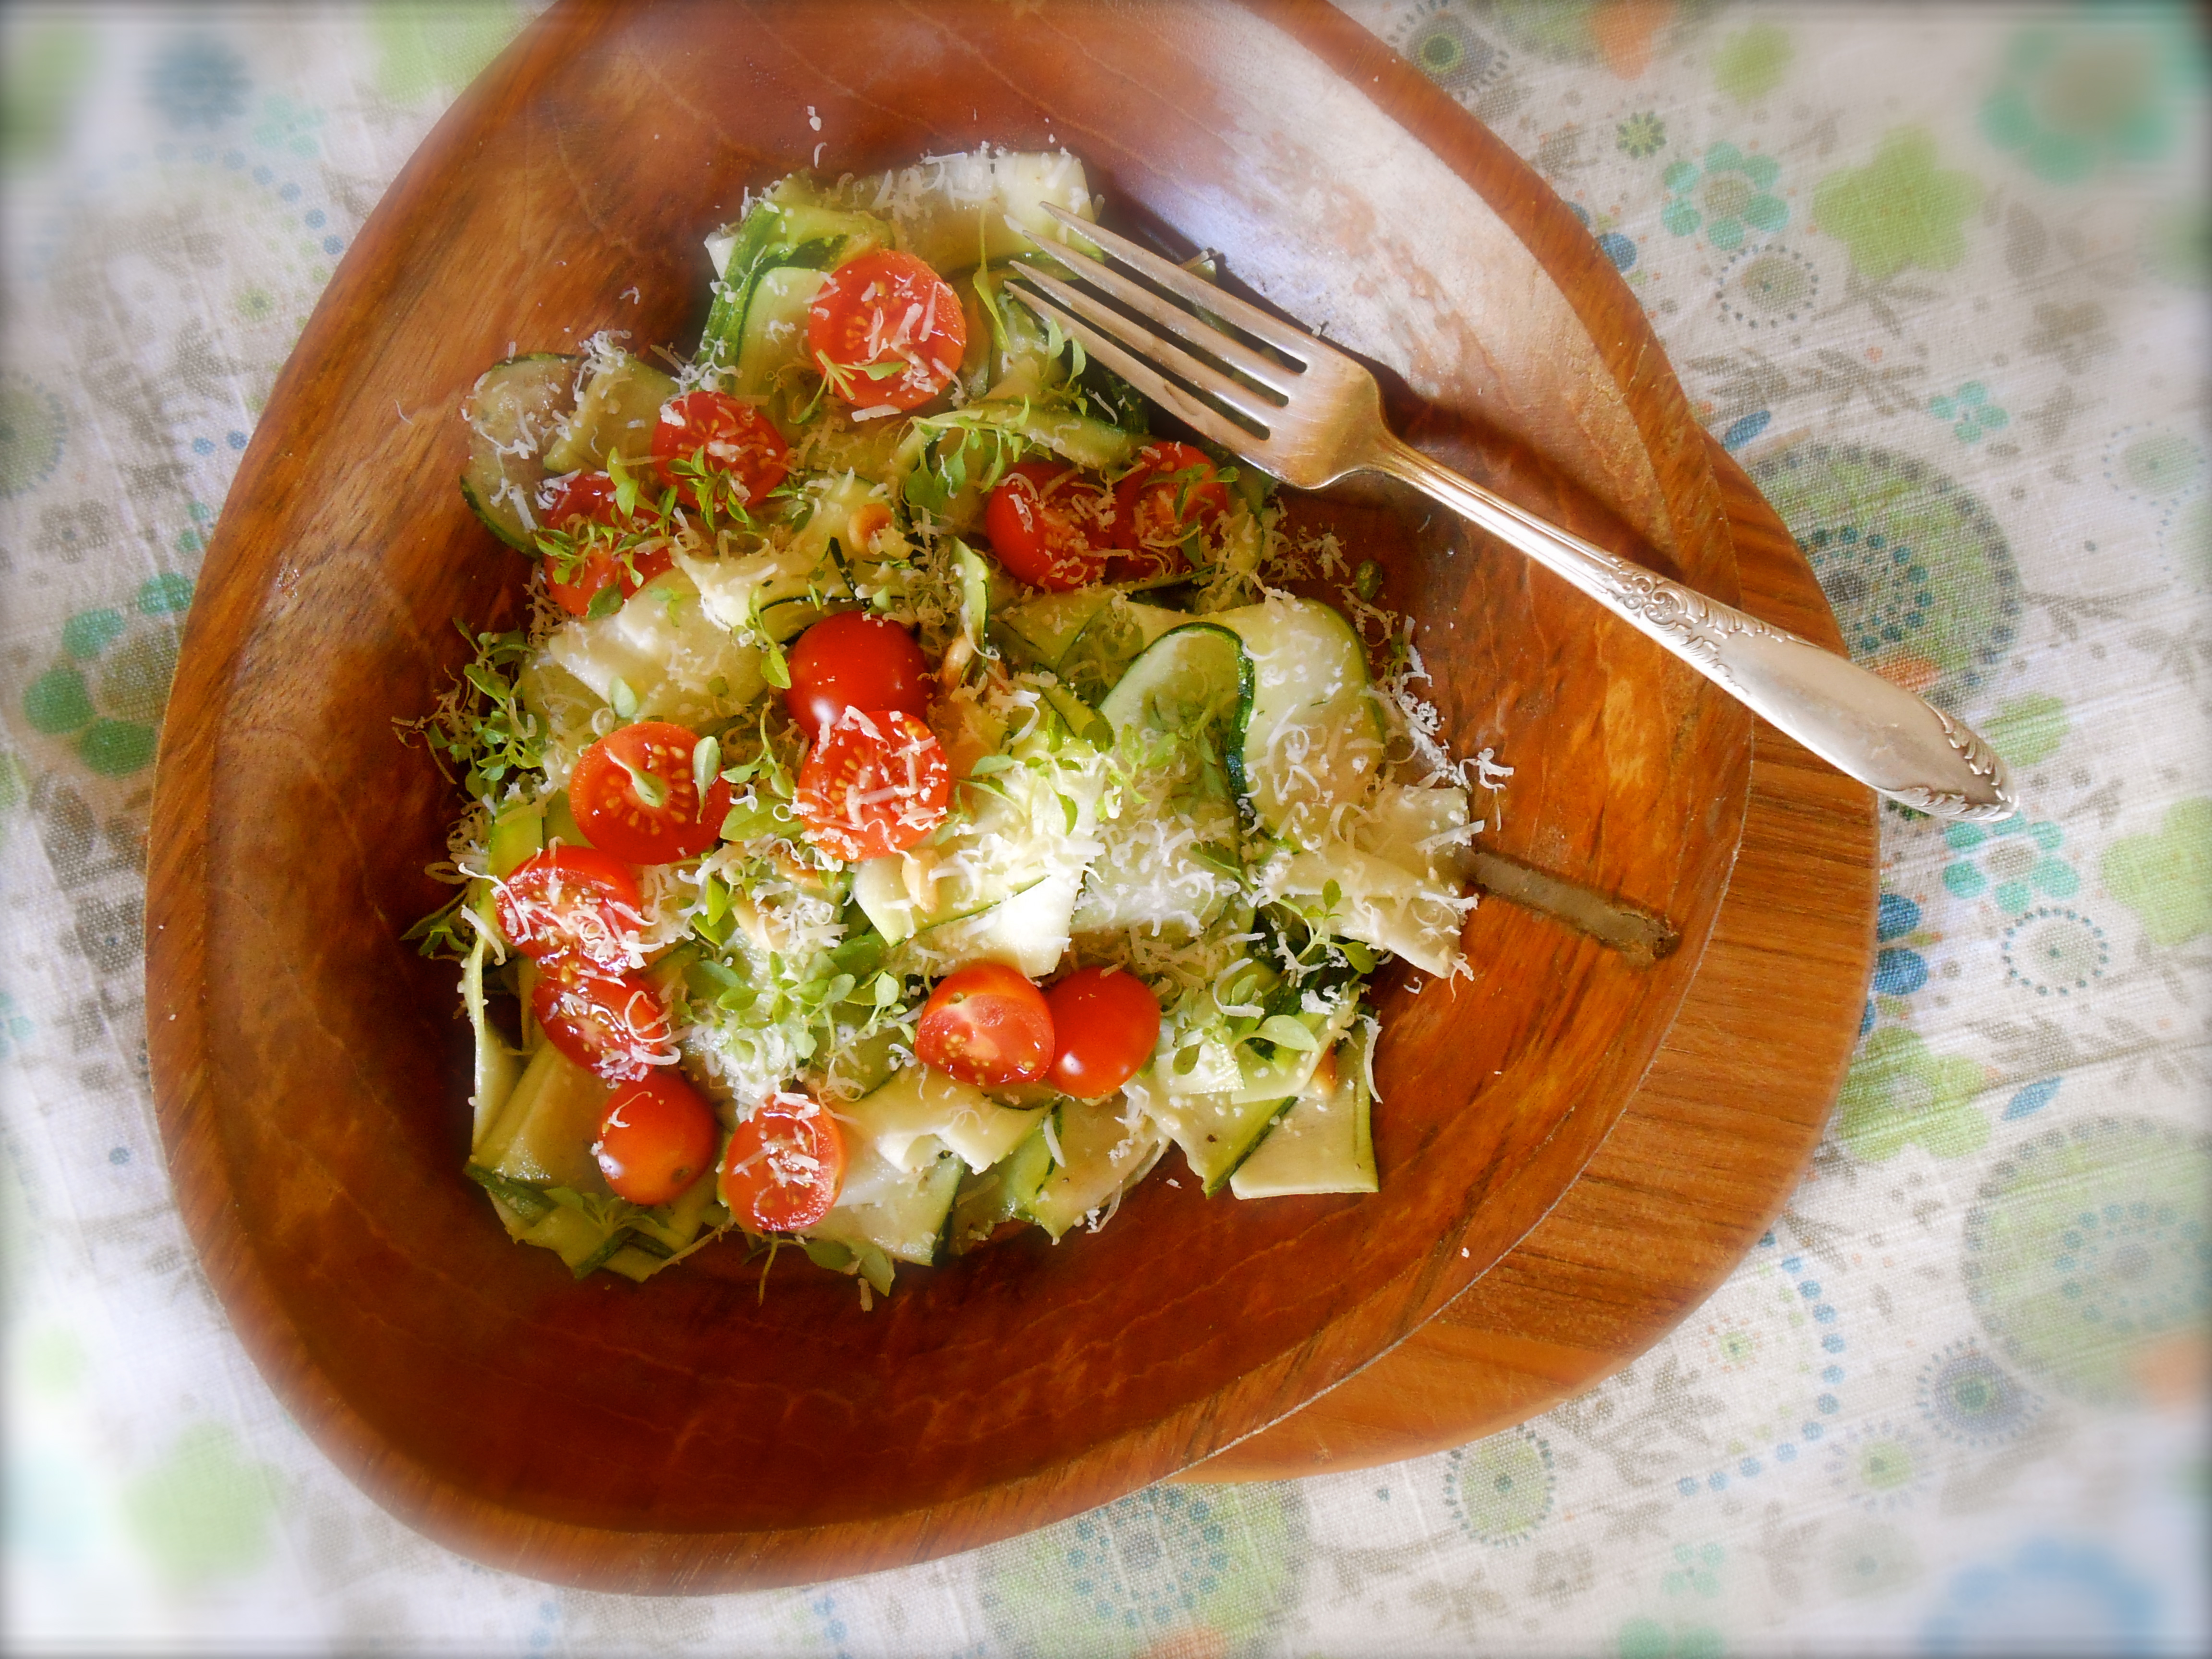
Alyssa and Carla’s Fresh Zucchini Pasta
Fresh Zucchini “Pasta”
serves one as a light lunch or two as a side dish
Dressing:
1 tablespoon really good extra virgin olive oil
1 tablespoon lemon juice
1 tablespoon freshly grated parmesan cheese
1 clove garlic, minced
Pinch of salt
a few cracks of freshly ground pepper
1 medium zucchini
8 cherry tomatoes, halved or quartered
2 tablespoons toasted pine nuts
1 tablespoon fresh basil, chopped
Combine all of the dressing ingredients into a jar, such as a mason jar, and shake to combine thoroughly. Adjust to taste.
Julienne the zucchini. I used this mandoline, which I adore (and use for many different dishes). You can try to do it by hand, but a mandoline creates perfect strands. I used the mandoline on each side of the zucchini until I got near the center, where the seeds made the strands too weak and they started to fall apart.
Toss the zucchini strands with the dressing. Plate the zucchini. Scatter the tomatoes, pine nuts and basil over the zucchini. Garnish with a sprinkle of parmesan.
dutch baby!
August 21, 2013 § 76 Comments
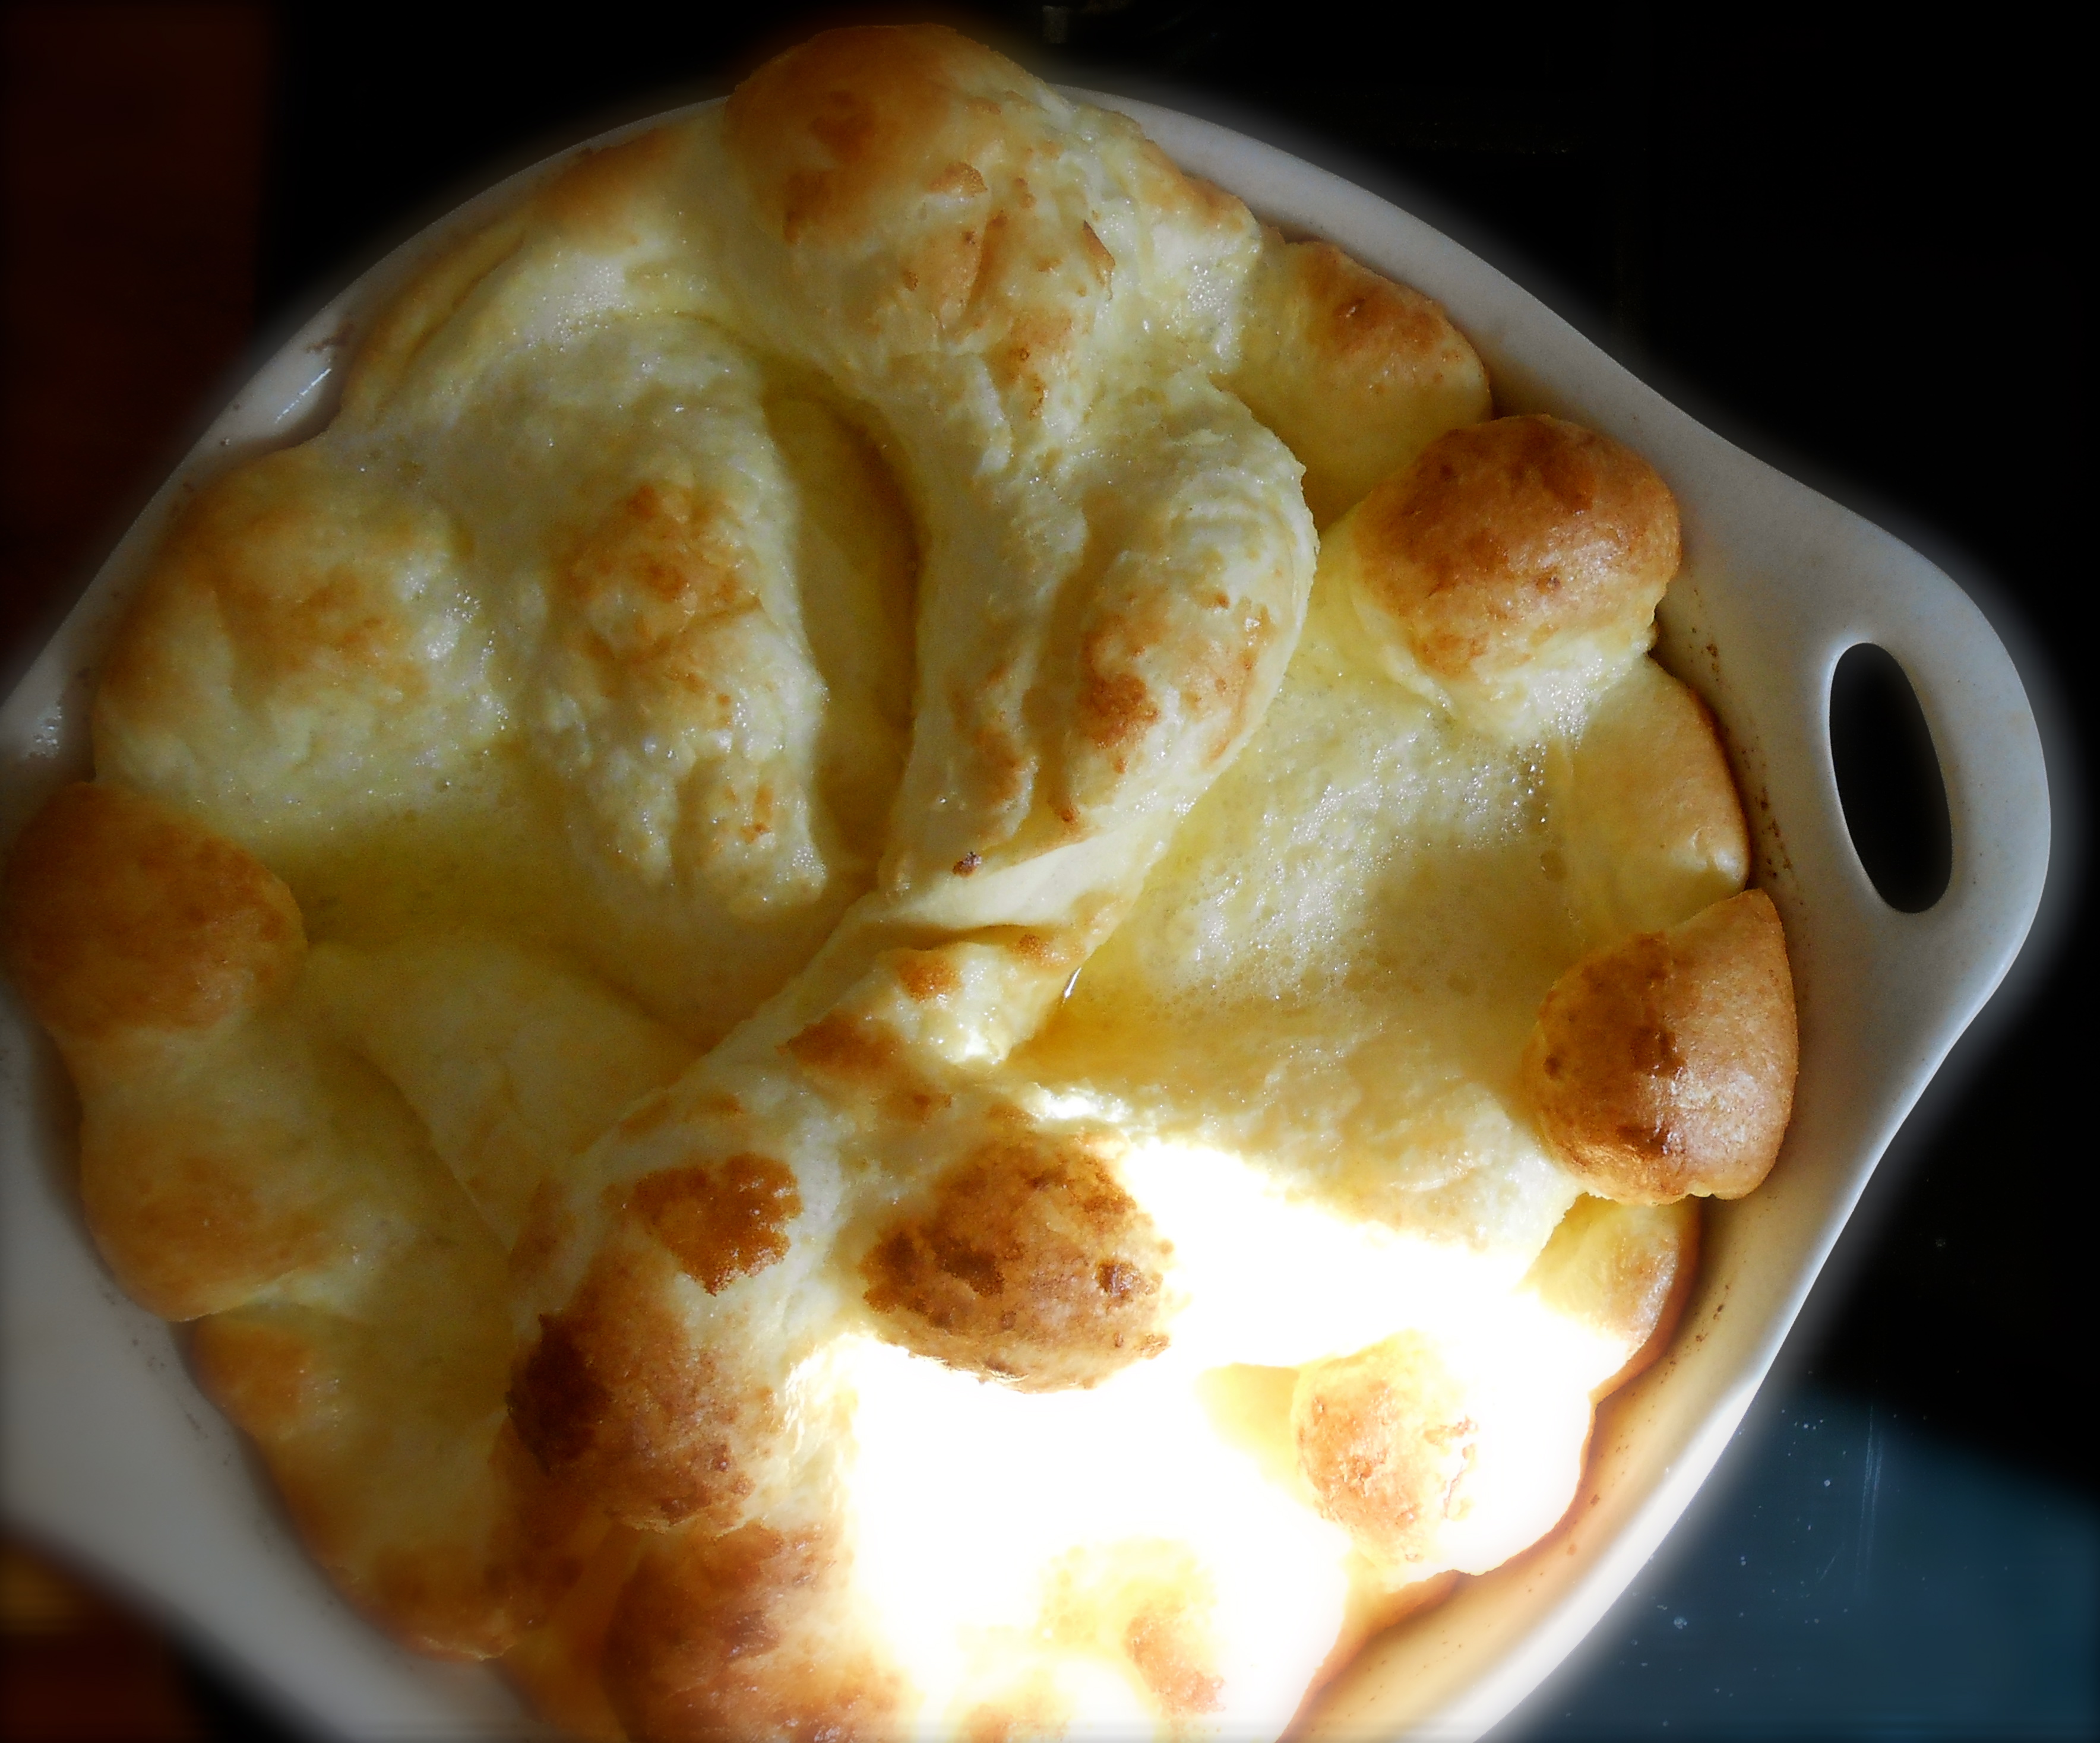
Several months ago a friend of mine introduced me to the idea of dutch babies and by her description I knew I had to seek out a recipe and make one. Dutch baby also known as a German pancake, a Bismarck, or a Dutch puff is a pillowy crispy edged baked custard delight. The first time I made one I gasped in sheer delight when I opened the oven and found a wonderfully brown puffy cake so beautiful and aromatic. After reading this post from Sarah’s blog holdsworthandwalter I was inspired to not only make her triple berry oven pancakes (using peaches) that morning, but to make my dutch baby the following morning.
In my wiki search I discovered “Dutch babies were introduced in the first half of the 1900s at Manca’s Cafe, a family-run restaurant that was located in Seattle, Washington and that was owned by Victor Manca. While these pancakes are derived from the German pancake dish, it is said that the name Dutch baby was coined by one of Victor Manca’s daughters. In 1942, Manca’s Cafe owned the trademark for Dutch babies, although the cafe later closed in the 1950s”. A nice bit of “local” Seattle food history.
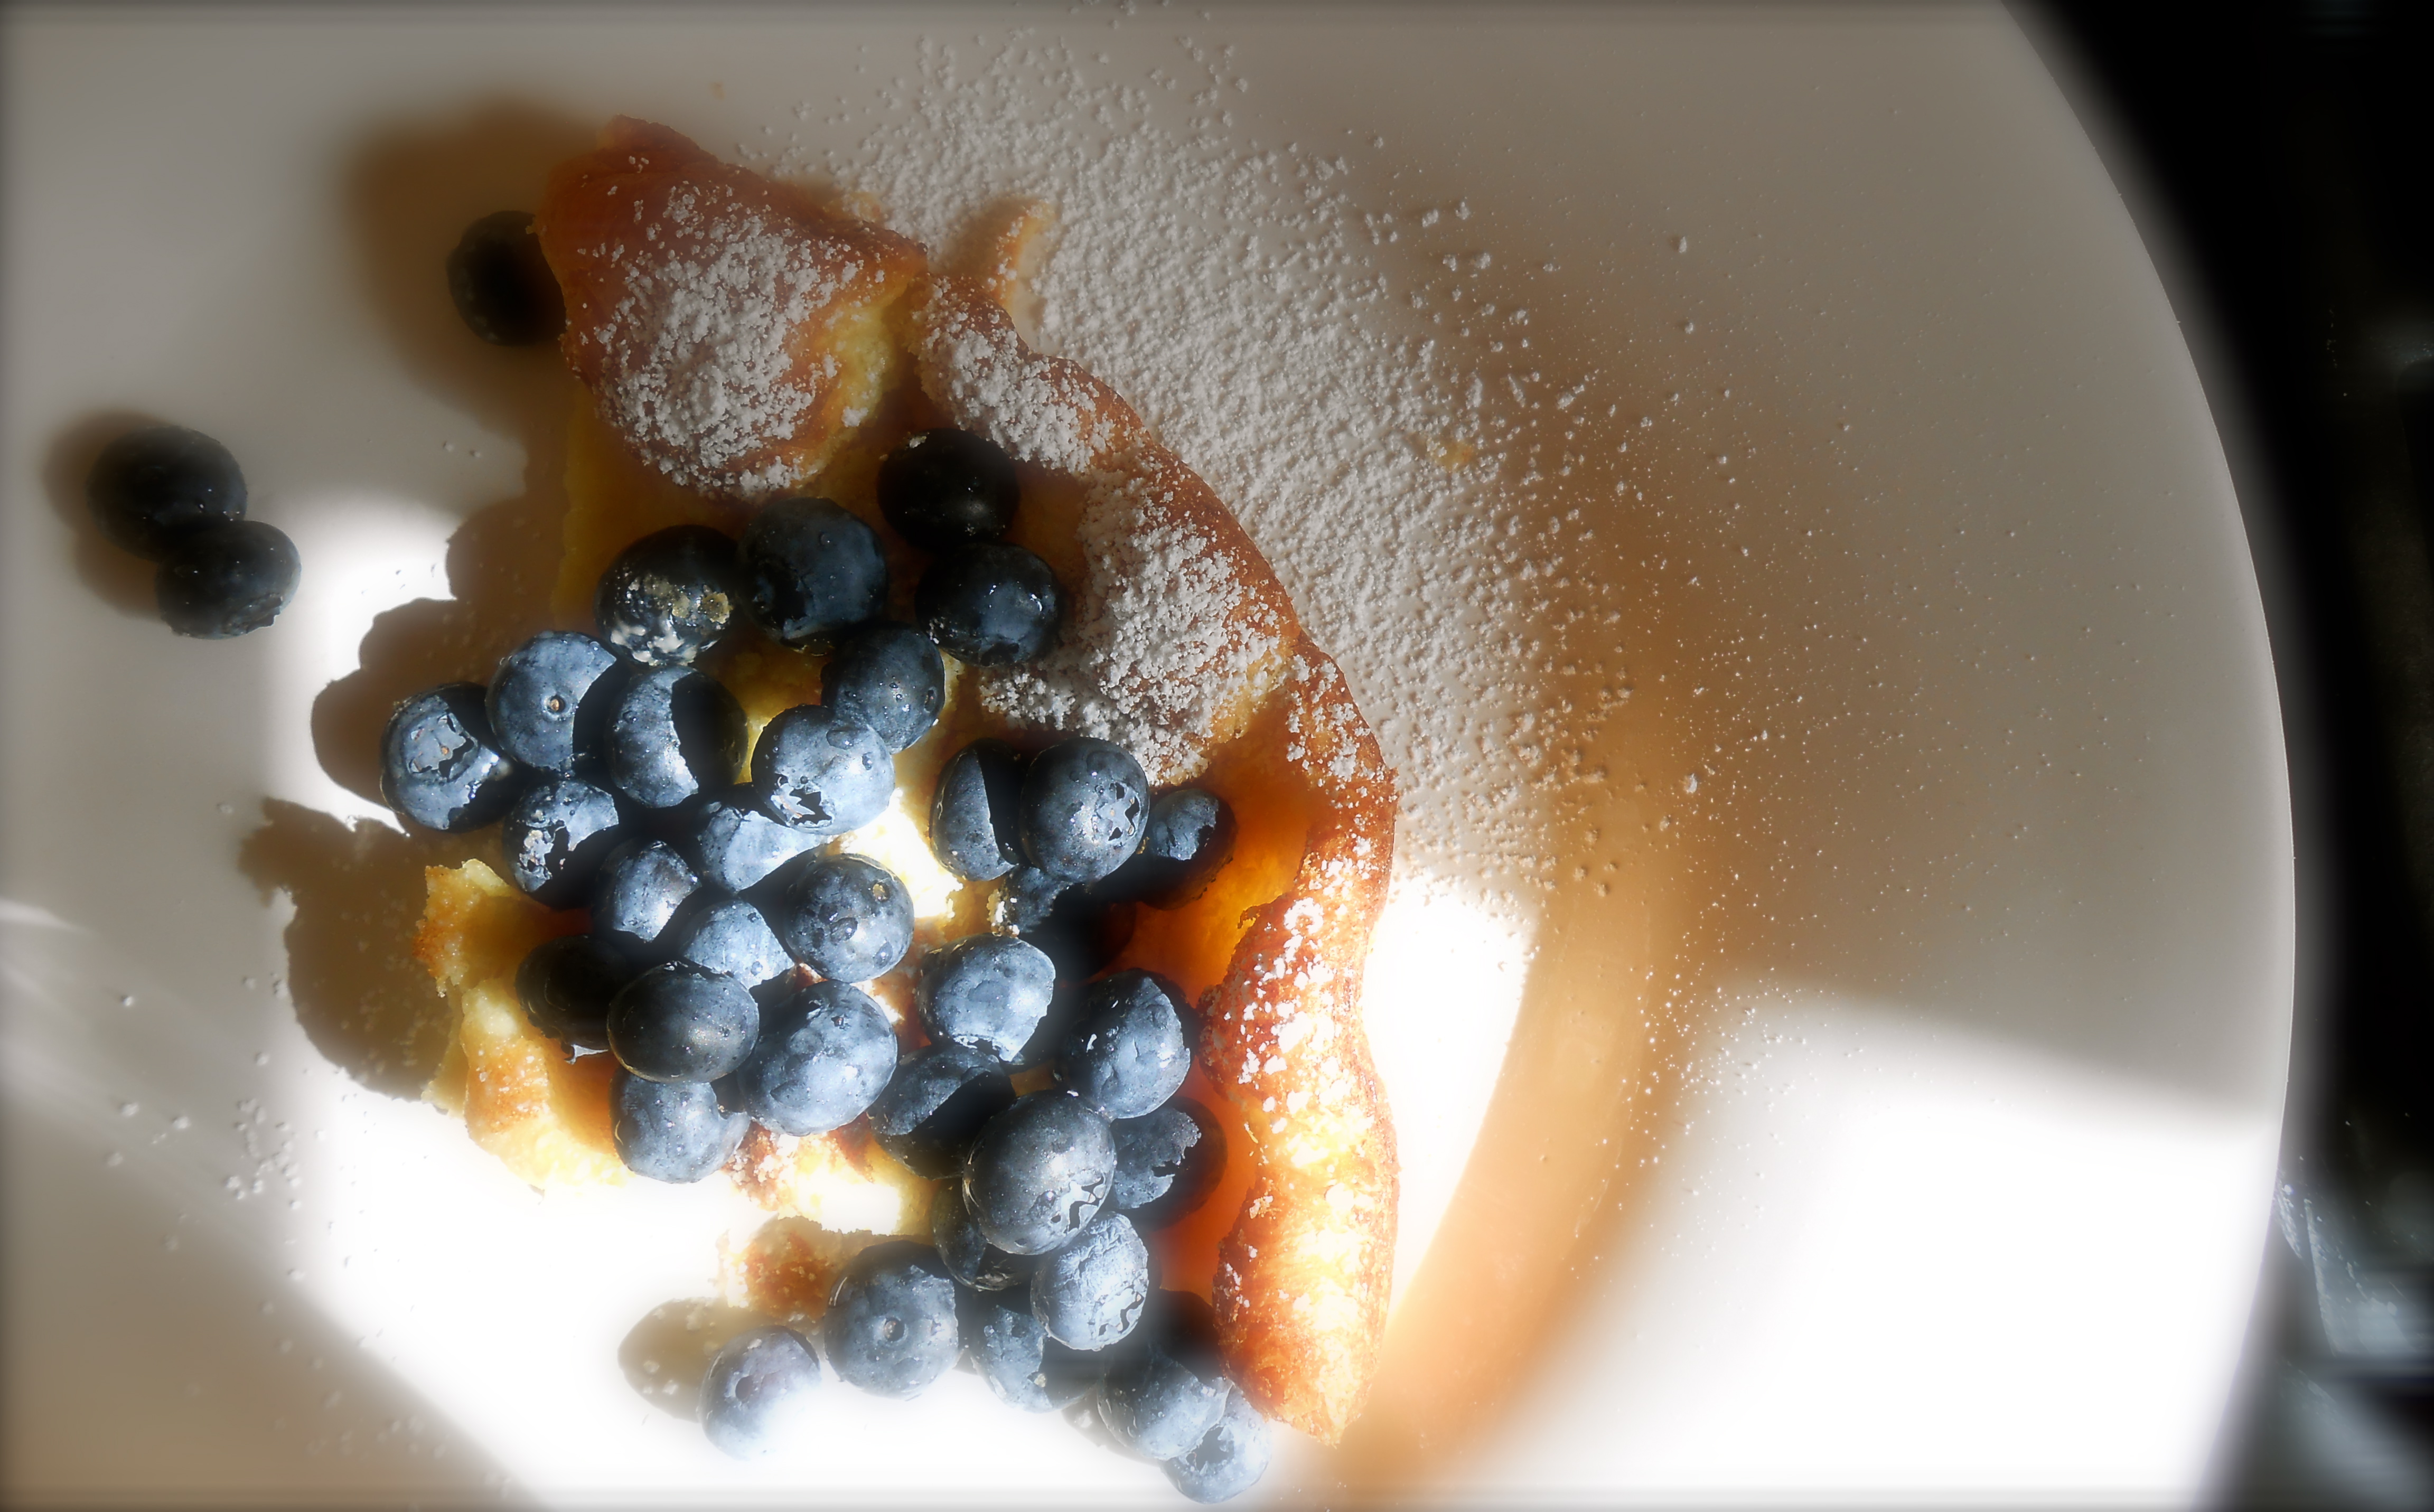
Served with fresh fruit and a dusting of confectioners sugar. Also delightful with warm maple syrup or a drizzle of fresh lemon juice and dusting of confectioners sugar.
I n g r e d i e n t s
- 3 tablespoons unsalted butter (1 tablespoon is for the baking dish)
- 3 extra-large eggs
- 1/2 cup milk
- 1/2 cup all-purpose flour
- 1 teaspoon pure vanilla extract
- a pinch of salt
- warm pure maple syrup
- sprinkling of confectioners sugar
- fresh fruit, if desired
M e t h o d
Preheat the oven to 425 degrees.
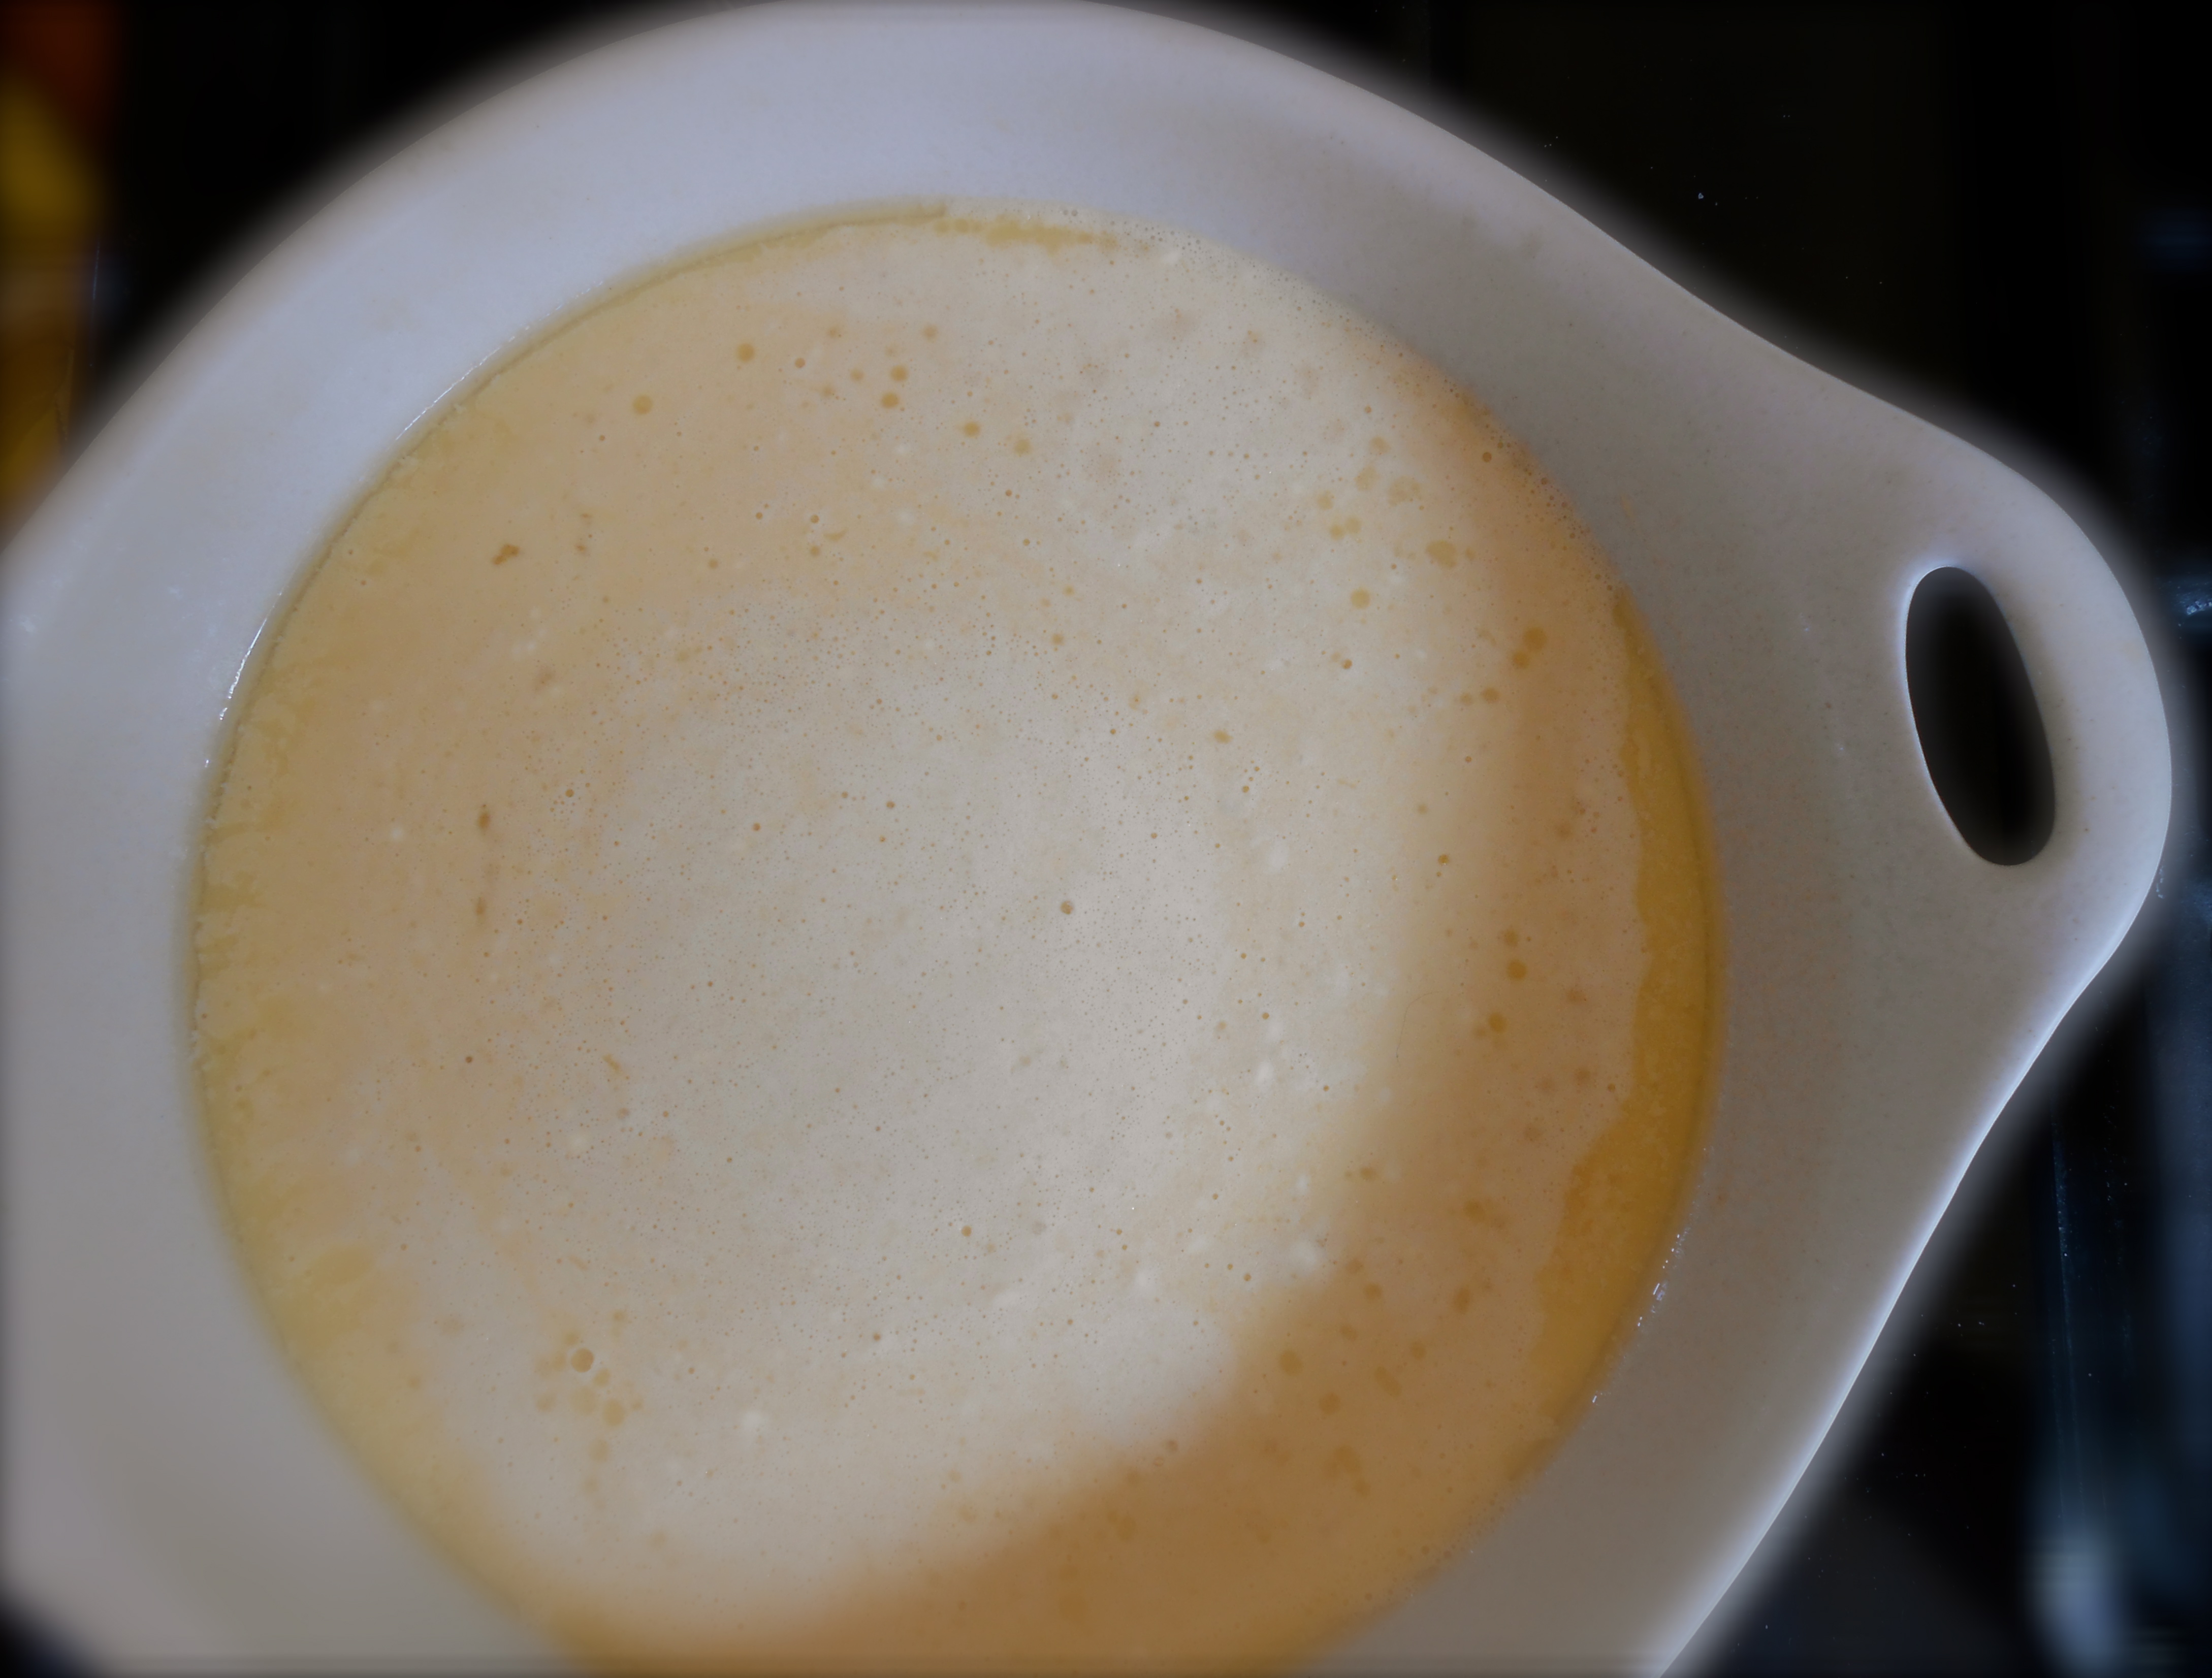
Place 1 tablespoon butter in your baking dish and set aside. Crack the eggs into a medium bowl and using a hand mixer beat on medium speed until mixed. Add the milk and combine. Slowly add the flour, vanilla, 2 tablespoons melted butter, and the salt and mix just until smooth.
Place your baking dish in the oven for a couple of minutes, until the butter is hot and bubbly. Make sure the butter covers the bottom of each dish. Pour in your batter and bake for 12 to 14 minutes, until puffed and lightly browned.
Serves 2.
penne regate with garden fresh parsley pesto and tomato sauce
August 13, 2013 § 56 Comments
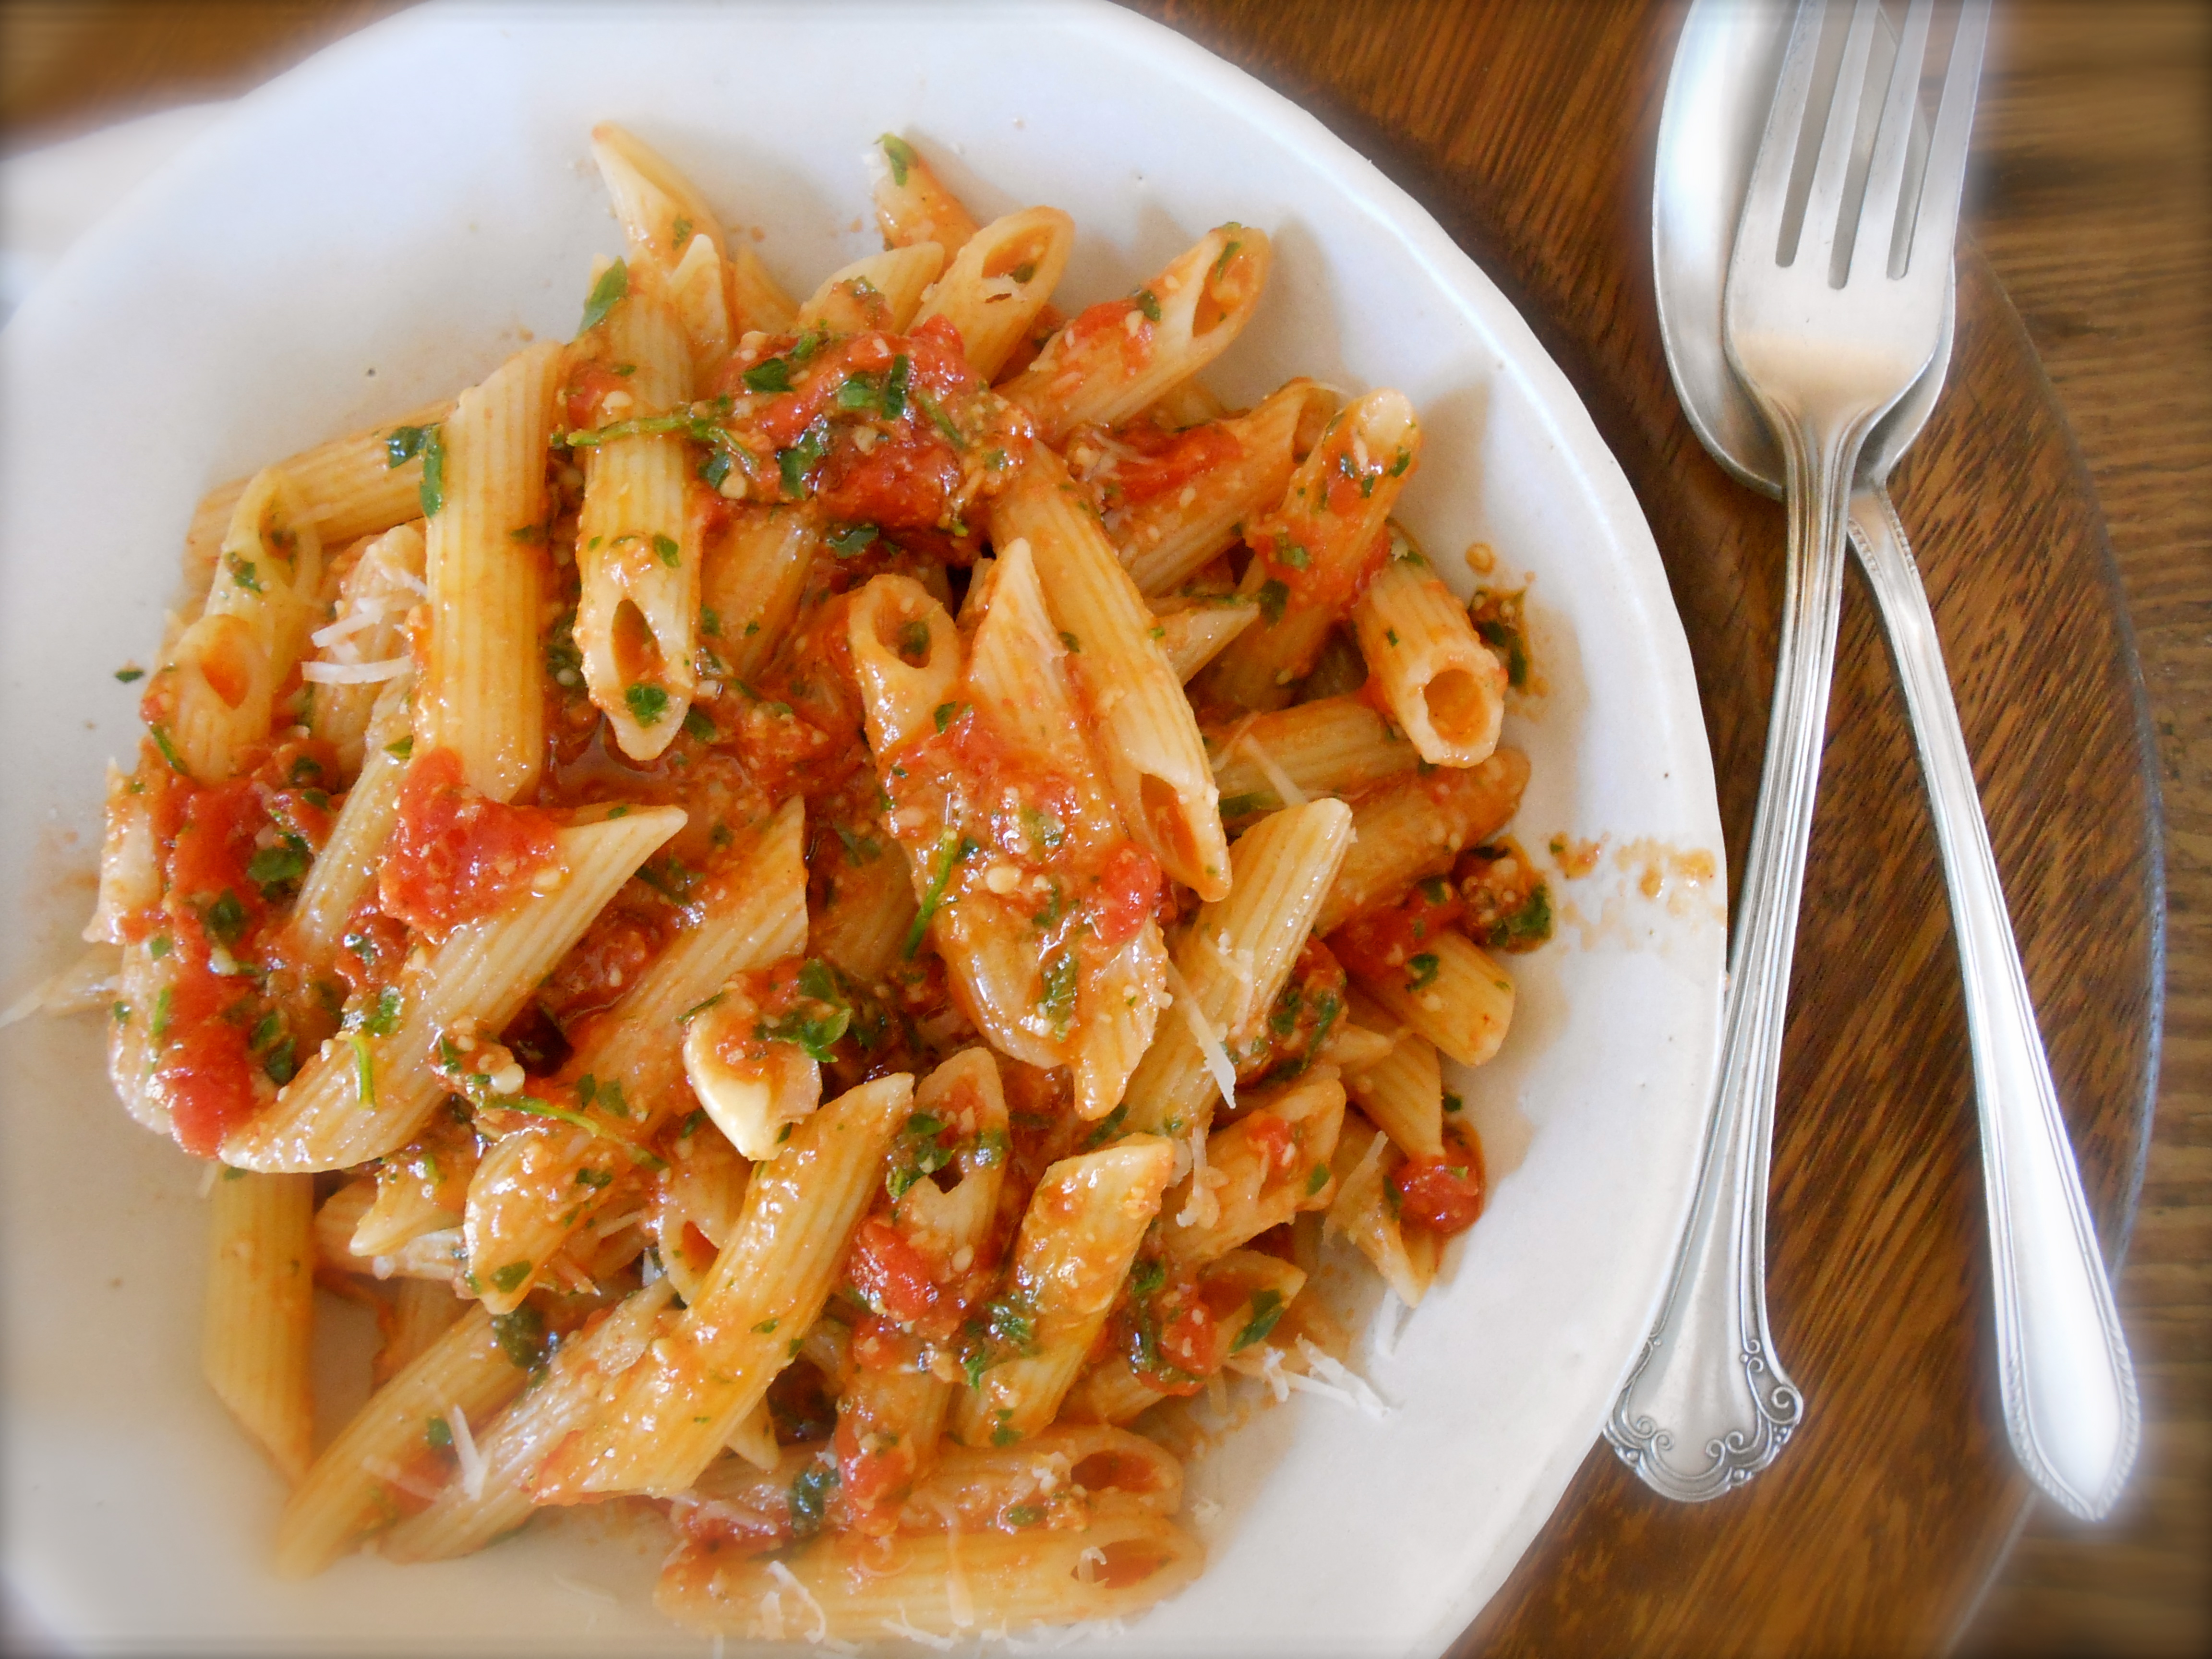
We all have a “go to” dish we have perfected to our liking over time and repetition. Perhaps if you have been checking in with this blog you would guess mine would involve pasta. Cottage Grove House is still very new and there is already sixteen pasta recipes posted. Today’s recipe is my “go to” pasta sauce. When it seems as though there is nothing to eat or prepare in the kitchen I always find some parsley in the crisper (or in this occasion the garden) and a large can of tomatoes in the pantry, perfect to make both pesto and tomato sauce pasta.

Our parsley plant needed a trim so I decided to make a pesto for lunch. I discovered cutting parsley off the plant and promptly using it certainly intensifies the flavor of the pesto. The freshly cut parsley really gave a distinctive flavor to the sauce, as though the herb was still very much alive. For no particular reason I chose to leave out any type of nut for this pesto. And using penne regate pasta was a very good idea seeing that the sauce found it way deep into the hollow center, as well as holding to the exterior ridges.
I n g r e d i e n t s
- 1 pound of good quality penne regate
tomato sauce
- 2 cups whole, peeled, canned San Marzano (if possible) plum tomatoes, with their juices (one 28-oz. can)
- 1/4 cup extra virgin olive oil
- 4 cloves garlic, peeled and crushed
pesto
- handful fresh parsley (about 1 cup once it is finely chopped)
- 1/2 cup freshly grated parmesan
- 3 cloves garlic, peeled
- 1/2 cup extra virgin olive oil
- salt (about 1/2 teaspoon)

m e t h o d
Put a large pot of water on the stove over high heat and bring to a boil. In the meantime, heat 1/4 cup of olive oil in a saucepan over medium high heat. Add the crushed garlic and cook until aromatic. Carefully add the tomatoes, and break them up with the back of a wooden spoon. Bring to a gentle boil, turn heat to lowest setting and simmer, stirring occasionally.
Put the parsley, parmesan, garlic, and salt in a food processor and pulse for a few seconds to combine. Scrape down the sides of the bowl, then pulse again. Drizzle in the olive oil while the machine is running just long enough to incorporate the oil. Set aside while waiting for the pasta to cook.
Once your water is at a roaring boil add a tablespoon of coarse grain salt and drop your pasta in. Cook until al dente, penne regate cooking time is approximately 9 minutes. Drain the penne and return to the pot. Toss with the pesto sauce until well coated, then pour in the tomato sauce and continue to gently toss until well combined.
Serves 4.
fresh corn soup topped with roasted corn guacamole
August 9, 2013 § 64 Comments

The other day I stopped off at Whole Foods on my way home from work to gather something quick for dinner. It was already pushing 6pm and I am usually home and have most of the dinner prep work completed by this time in the evening. Perhaps a caesar salad and something else from the deli would suffice. I walked through the door and the fresh yellow and white corn display brought me to a sudden halt. I could just pick up a few ears to add to the salad idea, but no, my first thought was corn soup! I considered bringing the corn home, look into a soup recipe and make it for dinner tomorrow. Well, knowing corn needs to be prepared the same day you bring it home I decided to step aside and search for a corn soup recipe, right then and there, in Whole Foods. (thank goodness for smart phones) After glancing through the ingredient list from several recipes I found this fresh, spicy, naturally creamy corn soup recipe on Epicurious. I gathered the few ingredients I needed and headed home. Simple enough.

This is similar to a corn chowder, yet lighter and texturally alive with the roasted corn guacamole on top. We loved using fresh corn right off the cob for this soup and we upped the heat a little by leaving the seeds in the jalapeño. It was one of those special soups you’ll never forget. And I always love to hear, “can we have it again…tomorrow?” If you are considering to prepare this soup…which I urge you to do, please be aware I am posting the method exactly the way I prepared it, however, see my note at the bottom of the recipe “Next time I prepare this soup….”
Adapted from Epicurious (reprinted with permission from Simply Mexican by Lourdes Castro).
i n g r e d i e n t s
roasted corn guacamole
- kernels from 3 ears fresh corn
- 1 tablespoon olive oil
- salt and pepper
- 1 tablespoon finely chopped red onion
- 2 tablespoons fresh cilantro, finely chopped
- 1 lime, finely grated zest and juice
- 1 jalapeño, stemmed, 1/2 seeded, finely chopped
- 1 avocado, pitted and diced
soup
- kernels from 5 ears fresh corn
- 2 tablespoons olive oil
- 3 garlic cloves, crushed
- 1/2 red onion, chopped
- 1 jalapeño, stemmed and chopped
- salt and pepper
- 1 1/2 cups stock (vegetable or chicken)
- cilantro sprigs, to garnish
m e t h o d
Preheat your oven to 450°F. Ask someone to “shuck” the corn for you while you start to clean, peel, chop, dice and grate all of the ingredients.
Put the corn on the cob on a parchment lined baking sheet and brush with olive oil, sprinkle salt and pepper and roast for 30 minutes until corn turns a golden brown. Remove the corn for the oven and allow to cool. Slice the corn kernels off of the cob and set aside.

soup
Combine the oil and garlic in a soup pot over medium heat. Once the garlic is aromatic add the onion and jalapeño. Season with salt and pepper and sauté until the vegetables are soft and translucent, about 5 minutes. Add the corn to the pot and using a hand blender puree until it has a smooth texture.
Turn up the heat to medium high and slowly add the stock to the pot while stirring. Bring to a boil, lower the heat to a simmer and allow to cook for 15 minutes.
roasted corn guacamole
Combine the roasted corn, red onion, cilantro, lime zest, lime juice and jalapeño in a bowl and mix well. Gently stir in the avocado. Season with salt and pepper.
Ladle the soup into bowls. Place a generous spoonful of the guacamole in the center of each bowl and a sprig or two of cilantro. Serve right away!
Serves 4.
Next time I prepare this soup…
After preparing this soup I learned it is better to remove the kernels from the cob before roasting them. Not only is this quicker because you do not have to wait for the corn to cool off before slicing the kernels, but it also helps caramelized the corn during roasting which intensifies the flavor of the soup. After cutting the uncooked kernel off of the cob toss in olive oil, salt and pepper and scatter onto a parchment lined baking sheet and roast for 20 minutes in a 450°F oven.
peaches and strawberry shortcake
August 7, 2013 § 52 Comments
Juicy tree ripen peaches are showing up at the markets right now! I just purchased my first bunch and every one of them were ripe, sweet, juicy and ready to eat. We have a market here in Seattle featuring the most delicious organic peaches from both Washington and California State. They put together a website with valuable peach information as well as some nice recipes too. If you love peaches as much as I do take a look here. It is very uplifting to walk through the door of this market and not only see…but smell the peaches during Peach-O-Rama!
Peaches and cream or strawberry shortcake? Here I combined both for a fresh summer treat. These rustic cakes are very moist and not too sweet. And I added honey to sweeten up the fruit just a little. For us this is a bit heavy following a sit down dinner. Occasionally we have had this as a mid day treat, instead of lunch.
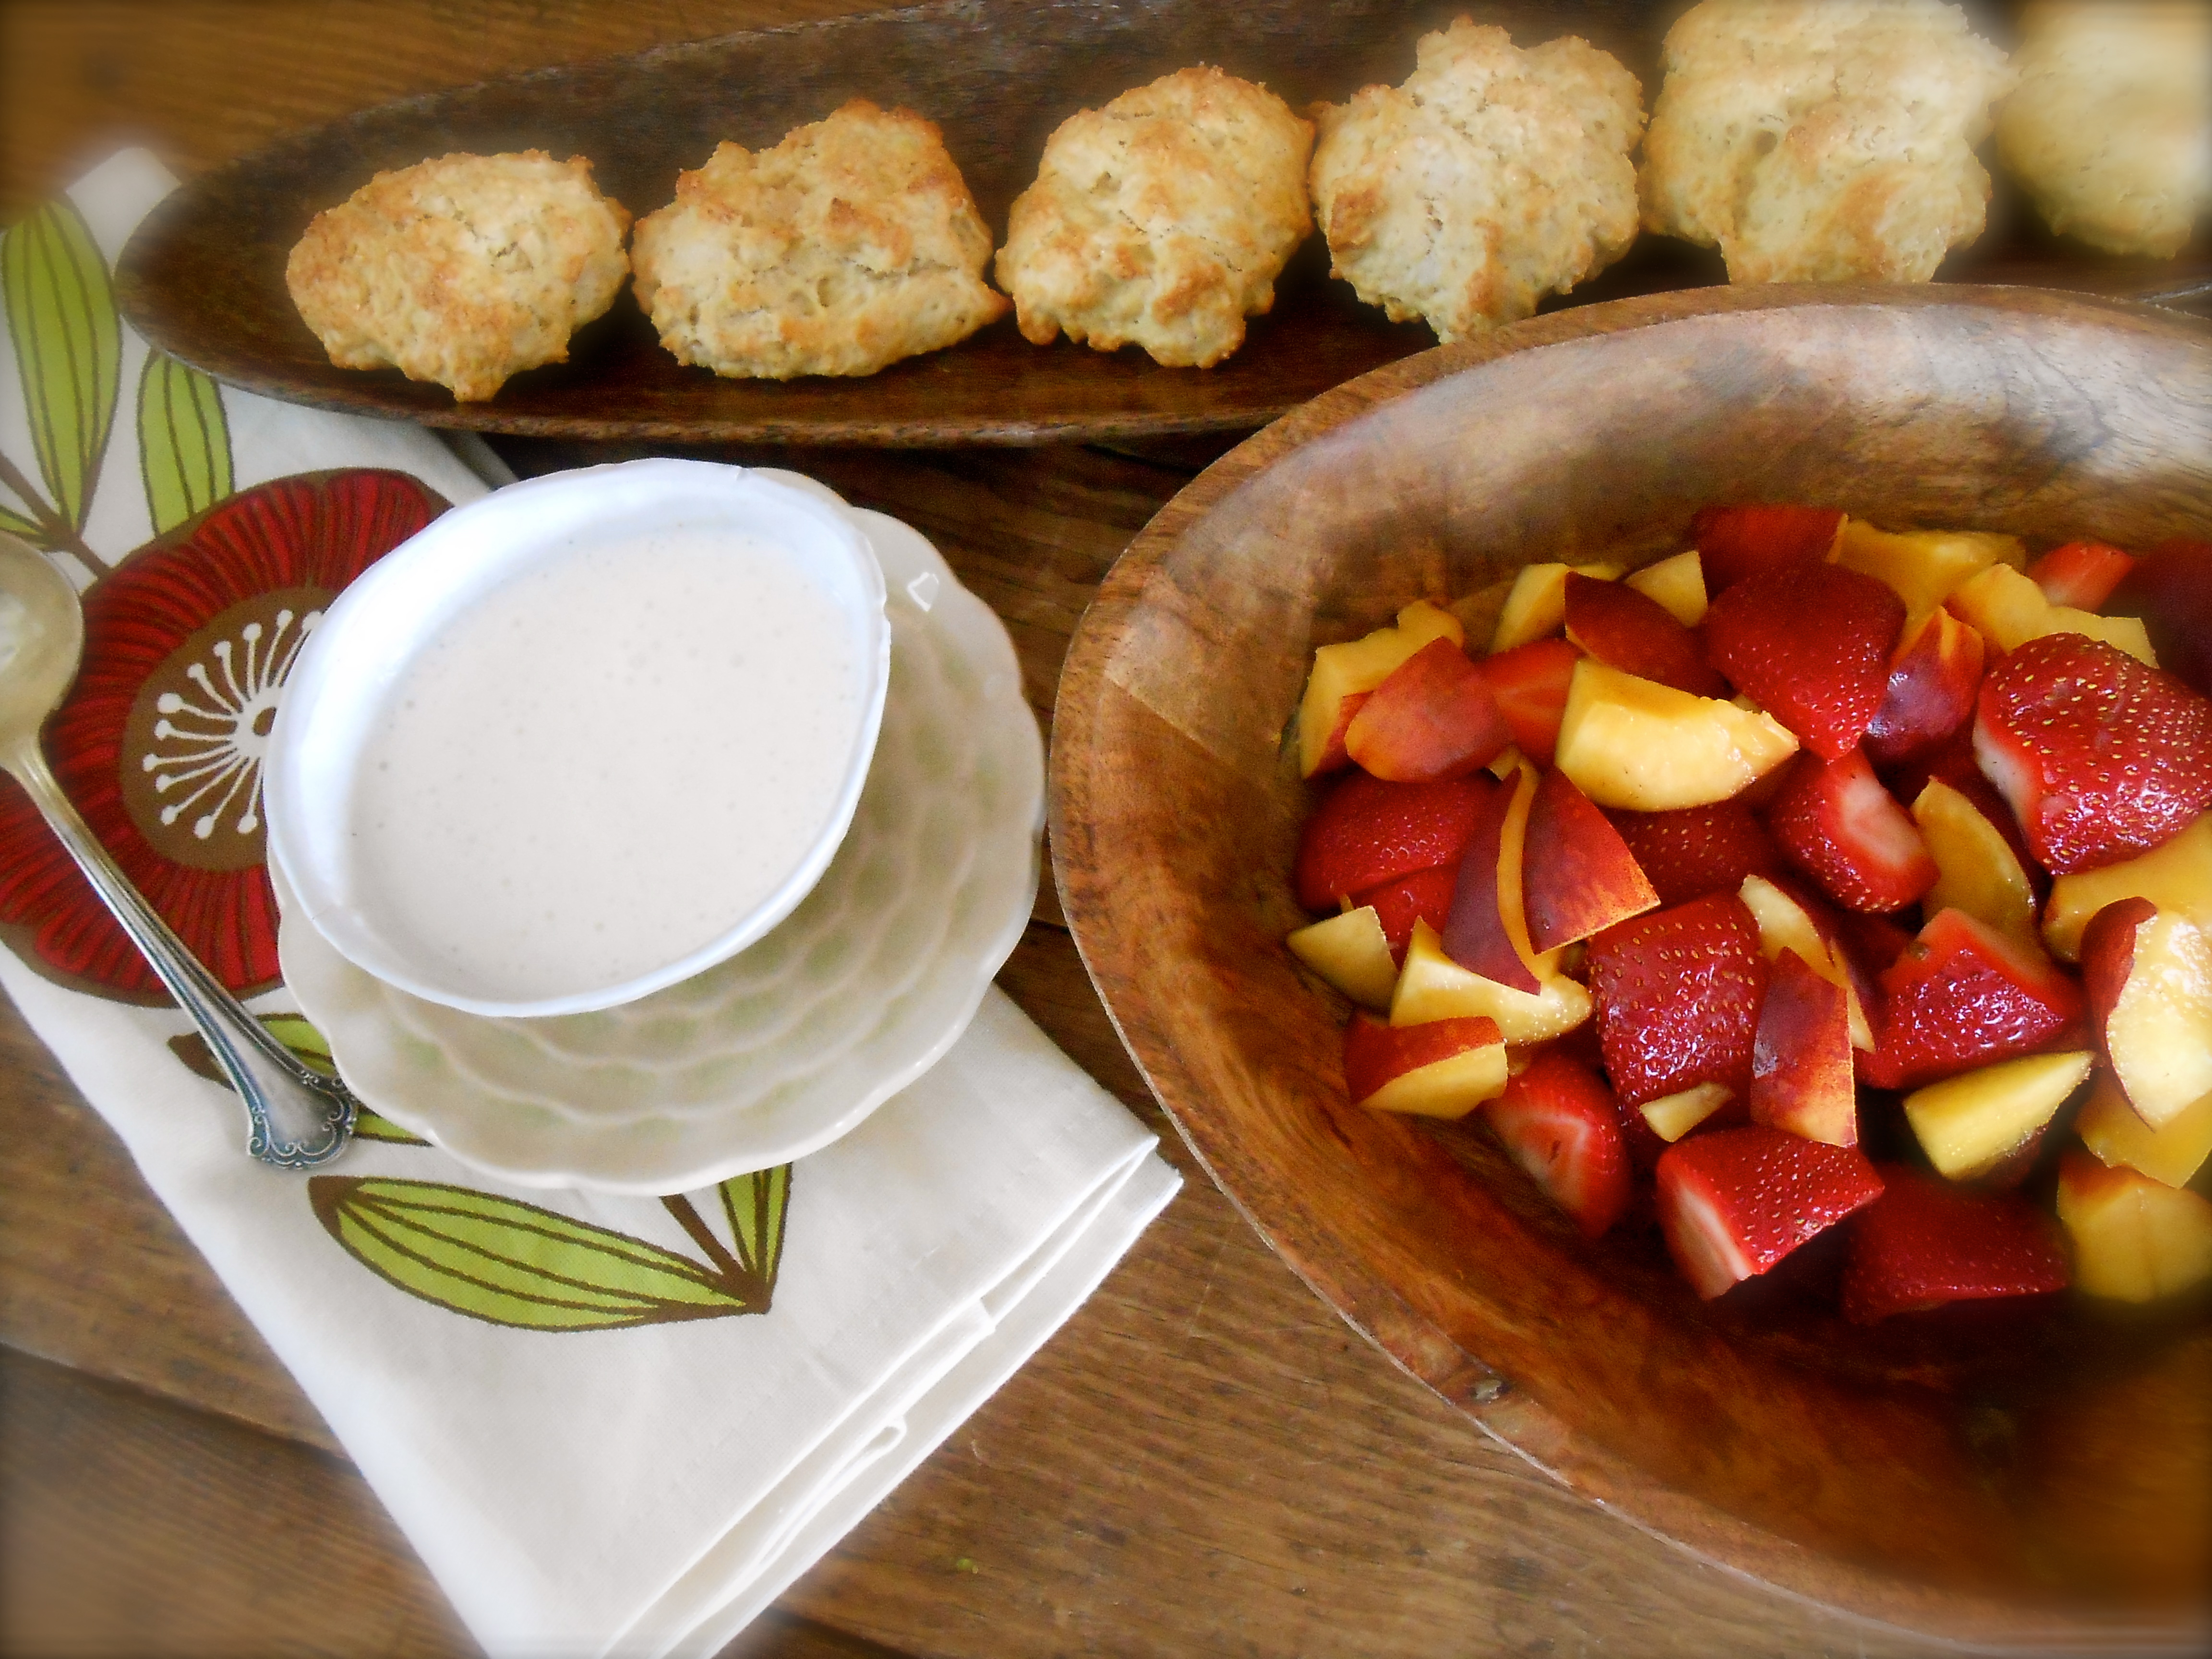
I n g r e d i e n t s
- 3 cups all-purpose flour
- 1 tablespoon baking powder
- 1 teaspoon baking soda
- 1/2 teaspoon fine sea salt
- 1/2 cup sugar
- 3/4 cup (1 1/2 sticks) cold unsalted butter, cut into pieces
- 1 cup whole milk
- 1 pint strawberries, cleaned and halved
- 3 plump juicy peaches, diced
- 1 tablespoon honey
- 1 cup heavy whipping cream
- 1 teaspoon vanilla
- 1 tablespoon confectioners sugar
s h o r t c a k e
Heat oven to 400° F. Whisk together the flour, baking powder, baking soda, salt, and 1/2 cup sugar in a large bowl. Add the butter. Using your fingers blend until crumbly. Add the milk and stir until just combined (do not over mix)
Drop 6 large mounds of the dough 1 inch apart on a parchment lined baking sheet. Brush with 2 tablespoons of heavy cream and sprinkle with a little sugar. Bake, rotating the baking sheet halfway through, until golden, 18 to 20 minutes. Transfer to a wire rack to cool completely.
f r u i t
Combine strawberries, peaches and honey in a bowl and mix well breaking up slightly to create a little juice.
w h i p p e d c r e a m
In a large bowl, whip cream until stiff peaks are just about to form. Beat in vanilla and sugar until peaks form.
Assemble cakes as desired making sure to give each a generous amount of whipped cream.
Serves 6.
orecchiette with potatoes and arugula
August 2, 2013 § 33 Comments
I could not be happier about this pasta recipe. Years ago, on a number of occasions I frequented an Italian restaurant called La Vecchia Verace and was so enamored by this particular pasta dish. I ordered it every time I visited. Occasionally I think about this pasta and living hundreds of miles away from La Vecchia Verace showing up is not an option. Having said that, the other day I was thumbing through a pasta cookbook “Four Seasons Pasta” by Janet Fletcher and there it was, a recipe for my favorite pasta dish served at La Vecchia Verace restaurant!
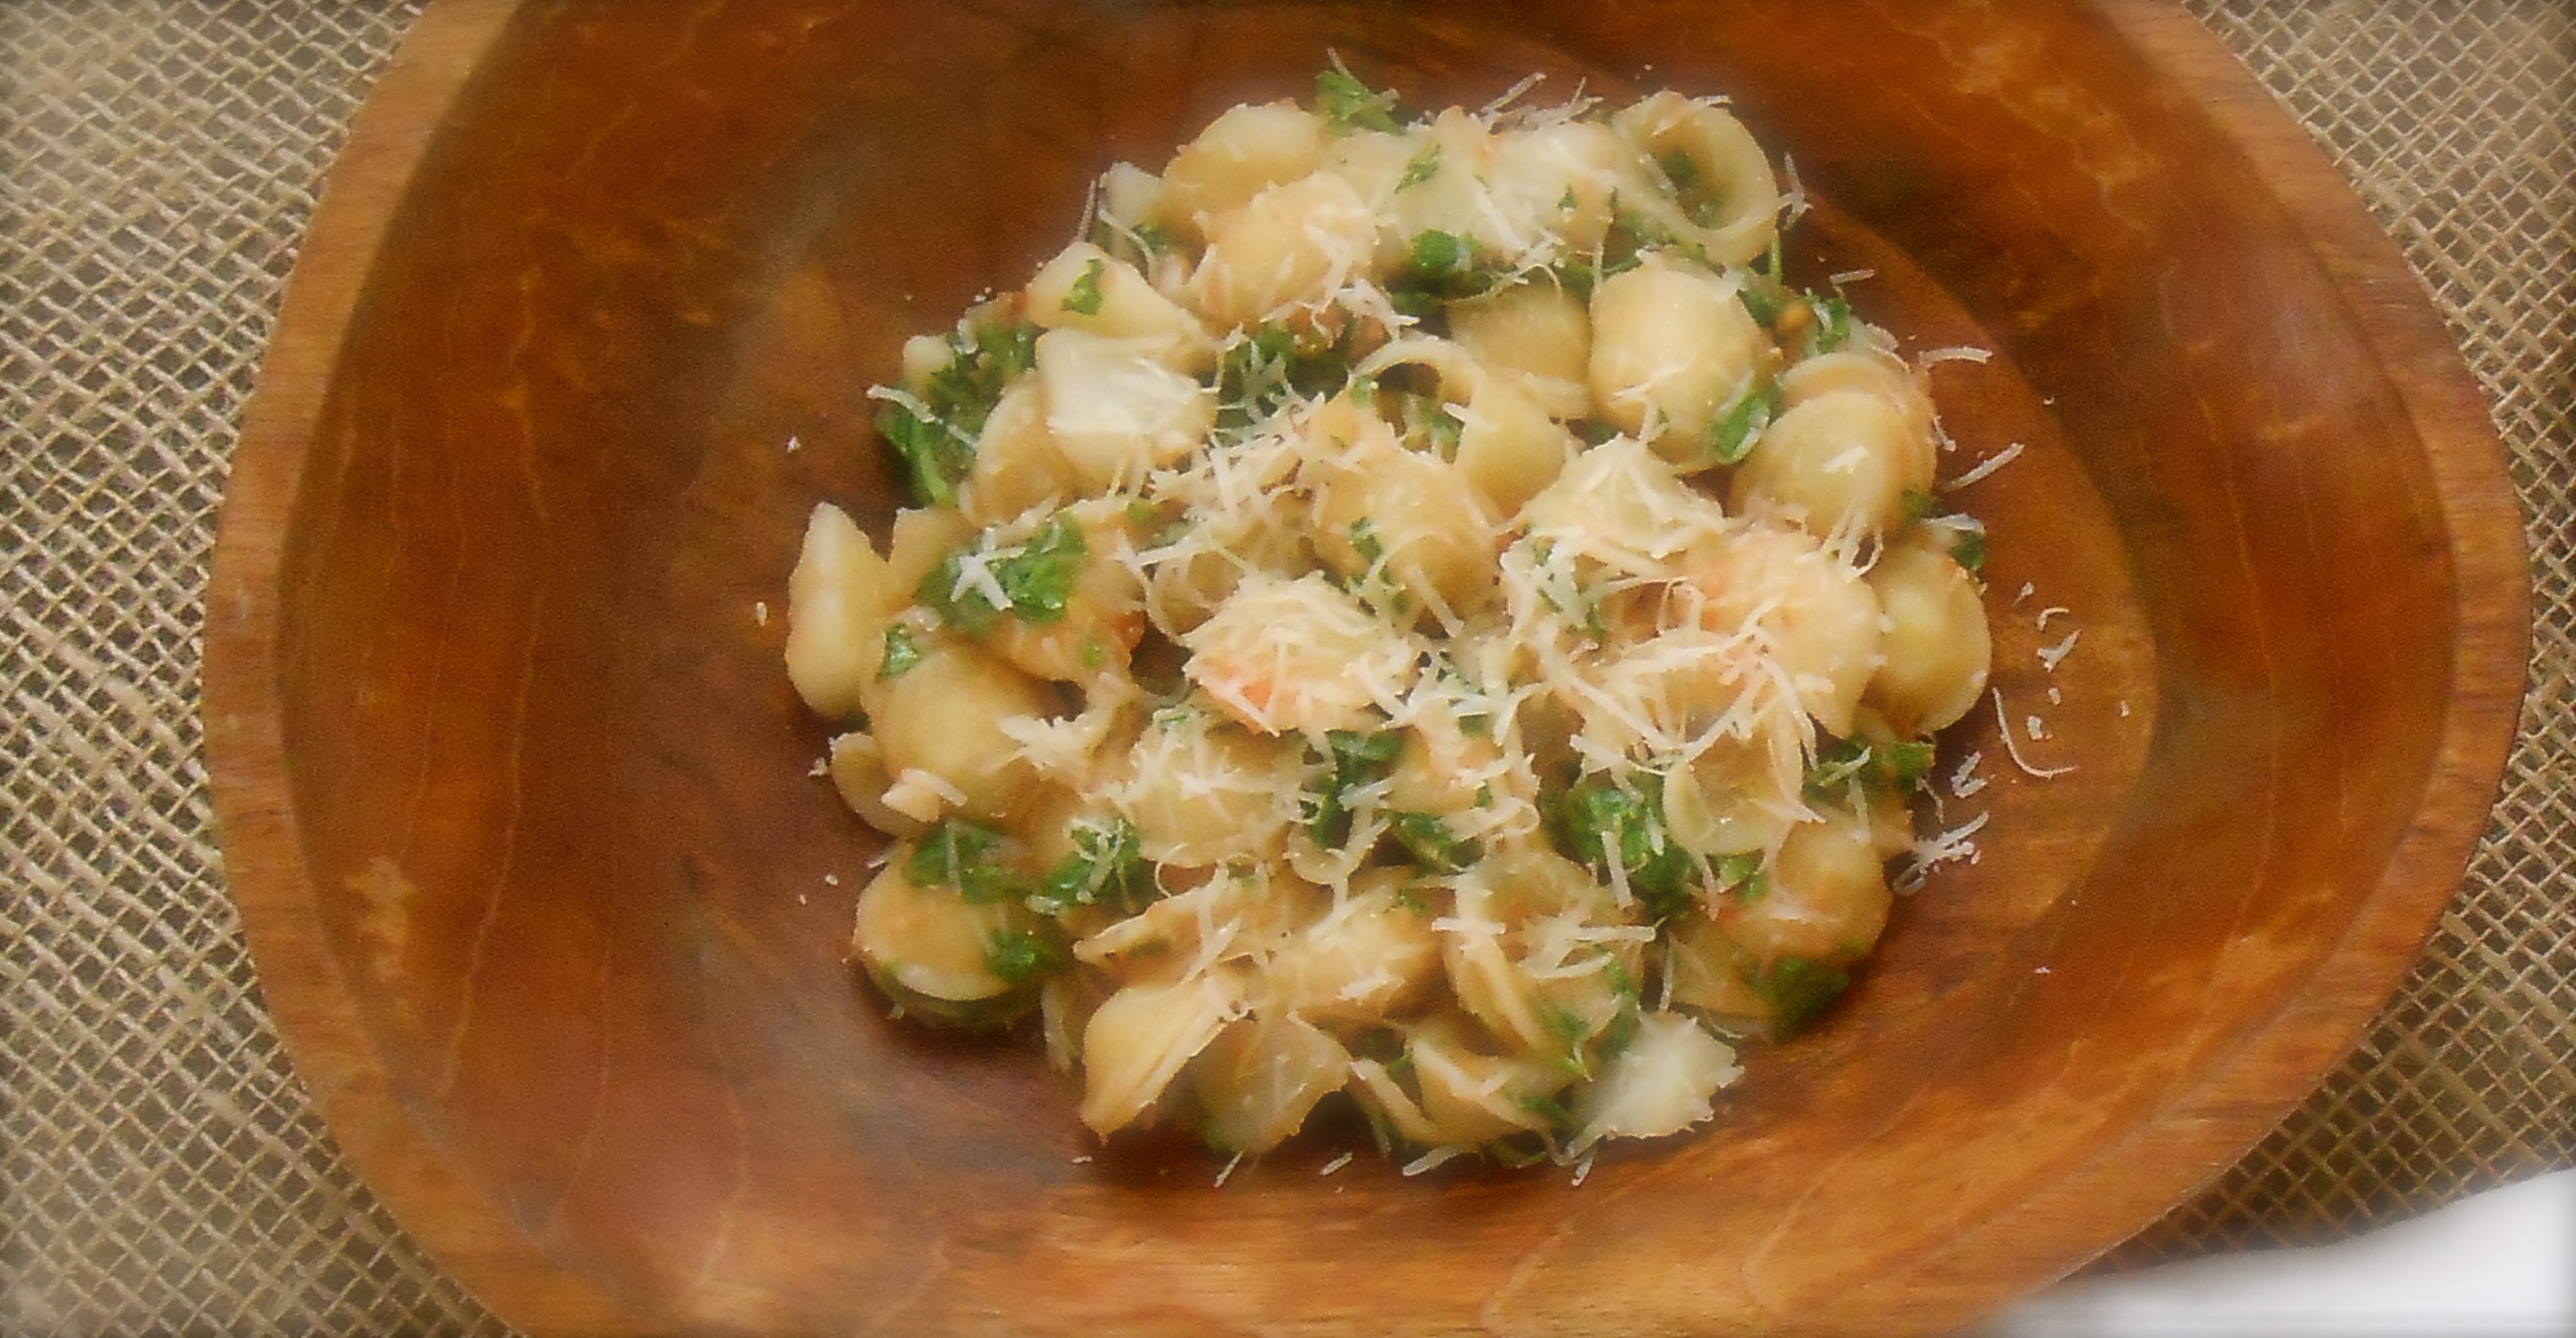
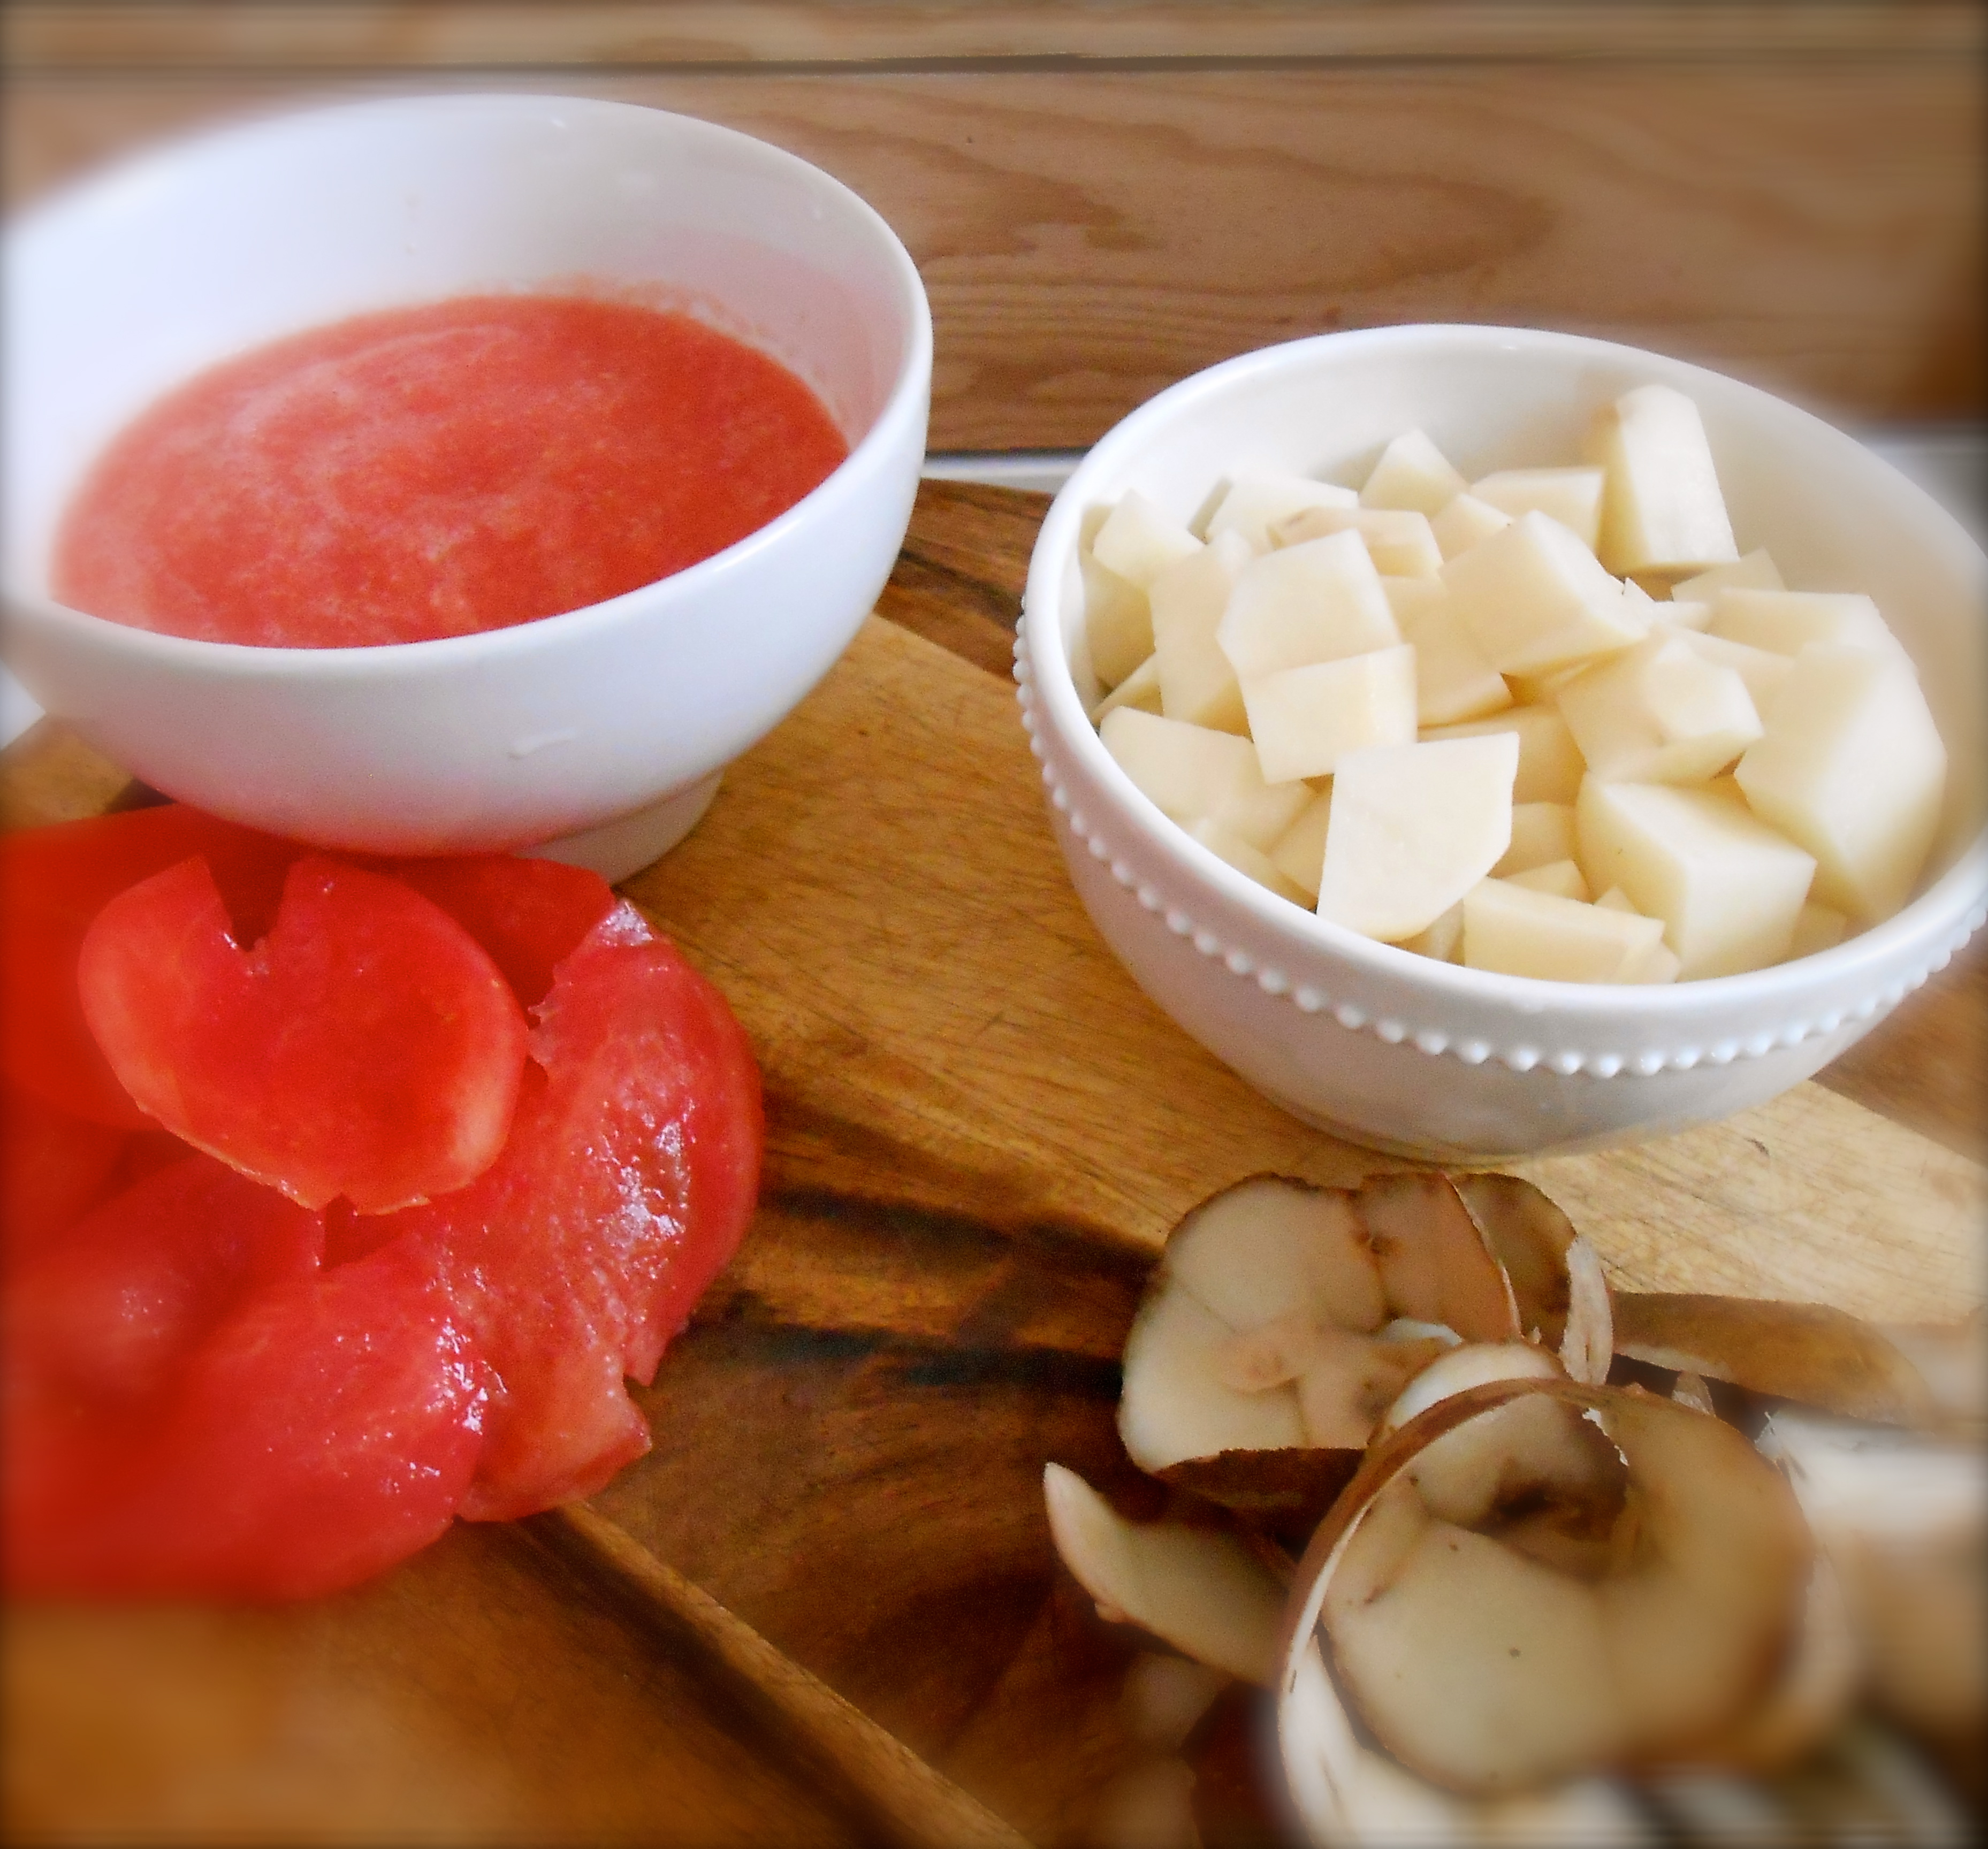
This sauce is garden fresh and the end result is a texturally thick somewhat starchy bowl of summer comfort. Potatoes are boiled in with the pasta until al dente and gently tossed in a fresh tomato sauce with wilted arugula. The potatoes break up just enough to nicely coat the orecchiette. In this cookbook I learned how to use fresh grated roma tomatoes to create a thick, tasty sauce. Roma’s are used because of their high proportion of flesh to juice and they are grated to produce a skinless, seedless pulp. A considerable alternative using fresh tomatoes while in season, rather than open a can of puréed tomatoes.
To grate tomatoes, cut the tomatoes in half and scoop out the seeds and juice with your fingers. Holding the cut side of a tomato half against the grater’s holes, grate until only the thin skin remains in your palm.
Here is a bit of useful information. I read this recently in a Bon Appetit article: “Don’t dump the pasta water. Starchy, salty pasta water is the secret ingredient in most sauces. Scoop out some of the cloudy water (it’s supposed to look like that) with a coffee mug or measuring cup, and pour a few splashes into the sauce. Save the rest; you might need more than you’d expect. Then simmer until the water and oil emulsify and begin to form a slightly creamy sauce. It’s a little like deglazing a pan with stock or wine, a simple step that gives a dish body and flavor.”
For this recipe reserve a cup or two of the pasta water before draining and use it after tossing with the sauce to help the sauce adhere to the pasta. It brings the flavors together and helps moisten the pasta without adding more oil.

I n g r e d i e n t s
- 1/3 cup extra virgin olive oil
- 4 large cloves garlic, minced
- tablespoon hot pepper flakes
- 1 1/2 pounds ripe roma tomatoes, grated
- salt
- 6 ounces (large handful) arugula, coarsely chopped
- 1 pound russet potatoes, peeled, 1/2 inch diced
- 1 pound orecchiettte
- freshly grated grana padano or parmesan
Heat olive oil in a large skillet over moderate heat. Add the garlic and hot pepper flakes and cook for about 1 minute to release the garlic fragrance. Add the tomatoes and salt to taste. Cook, stirring often, until the tomatoes soften and become sauce-like, 15 to 20 minutes, adding water if the tomatoes threaten to cook dry. Stir the arugula into the sauce and cook just until it wilts, about one minute (once the pasta is al dente).
Bring a large pot of salted water to a boil over high heat. Add the potatoes and pasta and cook until the pasta is al dente. Set aside at least one cup of the pasta water, then drain the pasta and potatoes and return them to the warm pot over low heat. Add the sauce and stir gently to avoid breaking up the potatoes. Moisten with some of the reserved pasta water as needed. Divide among warm bowls, top with freshly grated grana padano and serve immediately.
Serves 4.
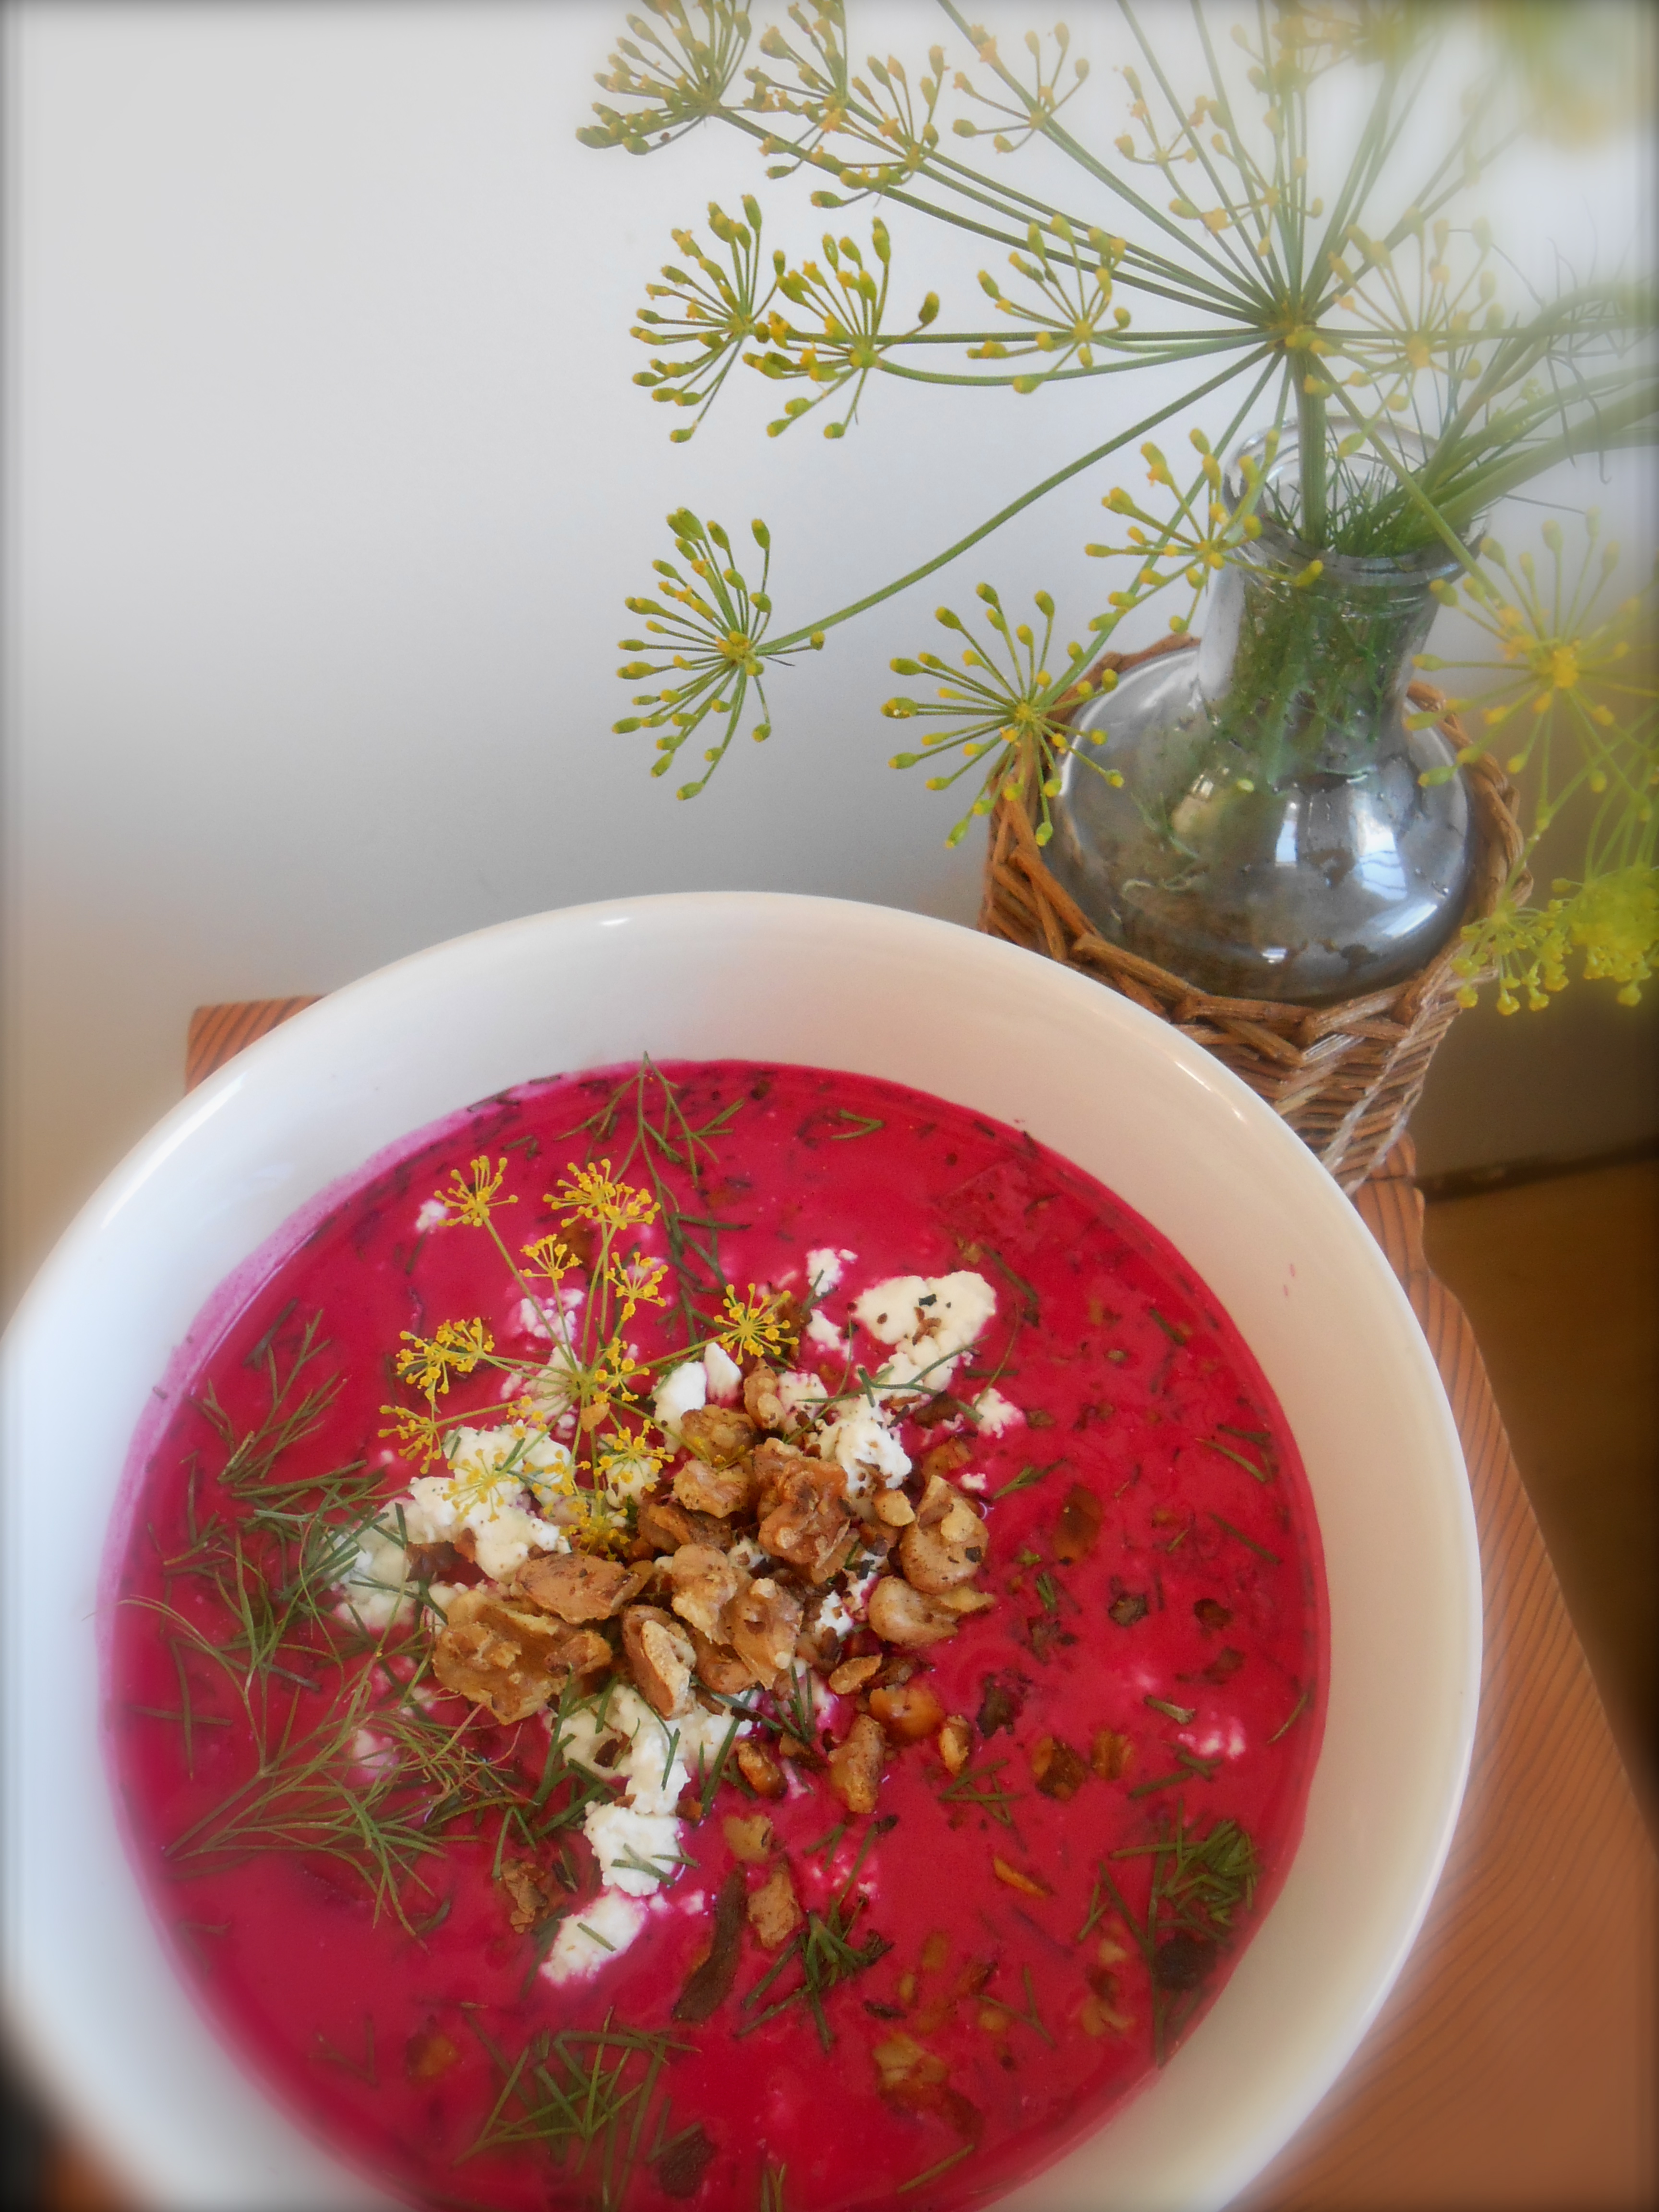
cool summer borscht
July 31, 2013 § 57 Comments
We have a serious affection for beets around here. I have been baking beets every week for the past several, therefore it only seemed natural to seek out a beet soup recipe. I prefer my soups warm with the exception of gazpacho, which to me is much like salsa. I can eat bowls and bowls of gazpacho! Knowing we love beet salad with toasted walnuts and goat cheese I had a feeling we would also enjoy a cool borscht. I read a few recipes, gathered a few ideas and came up with my own palate pleasing soup. Bringing in the beet salad idea we used toasted walnuts and goat cheese crumbles to top it off. A soup and salad in one bowl!
I n g r e d i e n t s
- 5 medium fresh beets
- 2 cups vegetable stock
- 16 ounces greek yogurt
- 2 tablespoons freshly squeezed lemon juice
- 2 teaspoons red wine vinegar
- 1 large cucumber, seeds removed and diced
- 1/2 cup chopped scallions
- 1/2 cup chopped walnuts, dry toasted
- crumbled goat cheese
- 2 tablespoons chopped fresh dill, plus extra for serving

Place the beets in a large pot of boiling salted water and cook uncovered until the beets are tender, 30 to 40 minutes. Remove the beets to a bowl with a slotted spoon and set aside to cool. Strain the cooking liquid through a fine sieve and also set aside to cool.
In a large bowl, whisk together 1 1/2 cups of the beet cooking liquid, the vegetable stock, yogurt, lemon juice, vinegar, salt and pepper.
Peel the cooled beets with a small paring knife or rub the skins off with your hands. Dice the beets into small/medium bite size pieces. Add the beets, cucumber, scallions, and dill to the soup. Cover and chill for at least 4 hours or overnight.
Prior to serving, place the walnut bits in a dry, non stick skillet over medium heat and cook until toasted and brown, giving the skillet a shake every now and them.
Season soup with salt and pepper, serve cool with a sprinkling of crumbled goat cheese, toasted walnuts and an extra sprig of fresh dill.
chicken chilaquiles and jicama slaw
July 29, 2013 § 46 Comments
The other day I roasted a chicken and we didn’t even eat it for dinner! It was one of those days. We are remodeling this old cottage and the weekends are completed devoted to just that, sun up to sun down. I had purchased a whole chicken and didn’t want to freeze it so I roasted it knowing we were not going to be able to have a sit down dinner. I am glad I did because using the chicken the next day for chilaquiles was a delight. Served with jicama slaw.

I n g r e d i e n t s
- 1 small roasted chicken, shredded
- 2 tablespoons olive oil
- 4-5 cloves of garlic, chopped
- 1 can (28 ounces) whole peeled tomatoes in purée
- 3 chipotle chiles in adobo, finely chopped
- 1 tablespoon adobo sauce, from same can of chipotles
- handful of cilantro, 1/2 cup chopped
- tortilla chips, at least 4-6 cups
- 1/2 cup greek style yogurt
- 1/2 cup cotija or feta cheese
Combine the oil and garlic in a large heavy bottom pot. Cook over medium heat, stirring occasionally until the garlic is fragrant, 1 to 2 minutes. Add the tomatoes with their purée, chipotles and adobo sauce and 1 cup of water. Break up the tomatoes, season with salt and bring to a boil. Reduce the heat and simmer until lightly thickened, about 10 minutes. Add the chicken and continue to simmer for 10 minutes. Turn off the heat and add 1/2 cup chopped cilantro. Place a handful of chips in a serving bowl and top with chicken chilaquiles. Make sure to spoon a little extra sauce on each serving. Garnish with cilantro sprigs, greek yogurt and crumbled cotija cheese.

Jicama is such a curious root. “The root’s exterior is yellow and papery, while its inside is creamy white with a crisp texture that resembles raw potato or pear. The flavor is sweet and starchy, reminiscent of some apples or raw green beans, and it is usually eaten raw, sometimes with salt, lemon, or lime juice and chili powder. It is also cooked in soups and stir-fried dishes.” (wikipedia) I simply added lime, a little thinly sliced red onion, cilantro, salt and pepper. This was so cool and refreshing alongside the warm, spicy chilaquiles. This was a perfect matched dinner, texturally speaking. The soft spicy chilaquiles, creamy yogurt, crunchy tortilla chips and the crispy cool jicama all together sang in harmony with each bite.
I n g r e d i e n t s
- 1 medium jicama, peeled and juliennned
- 1/4 – 1/2 small red inion, thinly sliced
- 1/2 cup coarsely chopped fresh cilantro
- 3 tablespoons fresh lime juice
- coarse salt and pepper
I did not want the red onion to be dominant in this slaw. Use what your palate enjoys and play around with the lime juice as well.
In a medium bowl place all the ingredients and toss well. Serve right away, or allow to marinate in the refrigerator for up to 6 hours.
Serves 4.
fresh made tortilla chips and tomatillo salsa
July 26, 2013 § 45 Comments
I learned how to make tomatillo salsa when I was a community supported agriculture (CSA) member and receiving weekly boxes of fresh fruits and vegetable from a local farm here in the Pacific Northwest. I remember discovering a large bag of tomatillos in my box and not knowing what to do with them. I was familiar with salsa verde and set out to find a recipe. By definition a tomatillo is a small green fruit, similar to a tomato, with a paper-like husk. They are very tart in flavor and aside from salsa verde I have not experimented with them. This is a wonderful salsa served warm with freshly made tortilla chips.

I n g r e d i e n t s
- 10 tomatillos, papery skins removed and washed
- 2 shallots, roughly chopped
- two large jalapeños, split and seed removed
- 5 cloves garlic, peeled
- large bunch cilantro, washed and roughly chopped
- sea salt
M e t h o d
Remove the papery skins off of a pound of tomatillo (roughly 10 tomatillos). Place them (whole) in a saucepan and cover with water. Add one roughly chopped shallot, two large jalapeños (depending on your machismo) and five whole cloves of garlic.

Boil until very tender, about 7-10 minutes. Drain out all but one cup of water and return to the pan. Blend into a salsa consistency using a hand blender. You may use a blender if you do not have a hand blender. If you are using a blender start slow so the hot liquid does not splash on you. Puree until mostly smooth. Add a handful of cilantro and a pinch of sea salt. Transfer to a serving bowl. Finely chop another shallot and add to the bowl of salsa. Stir to incorporate.
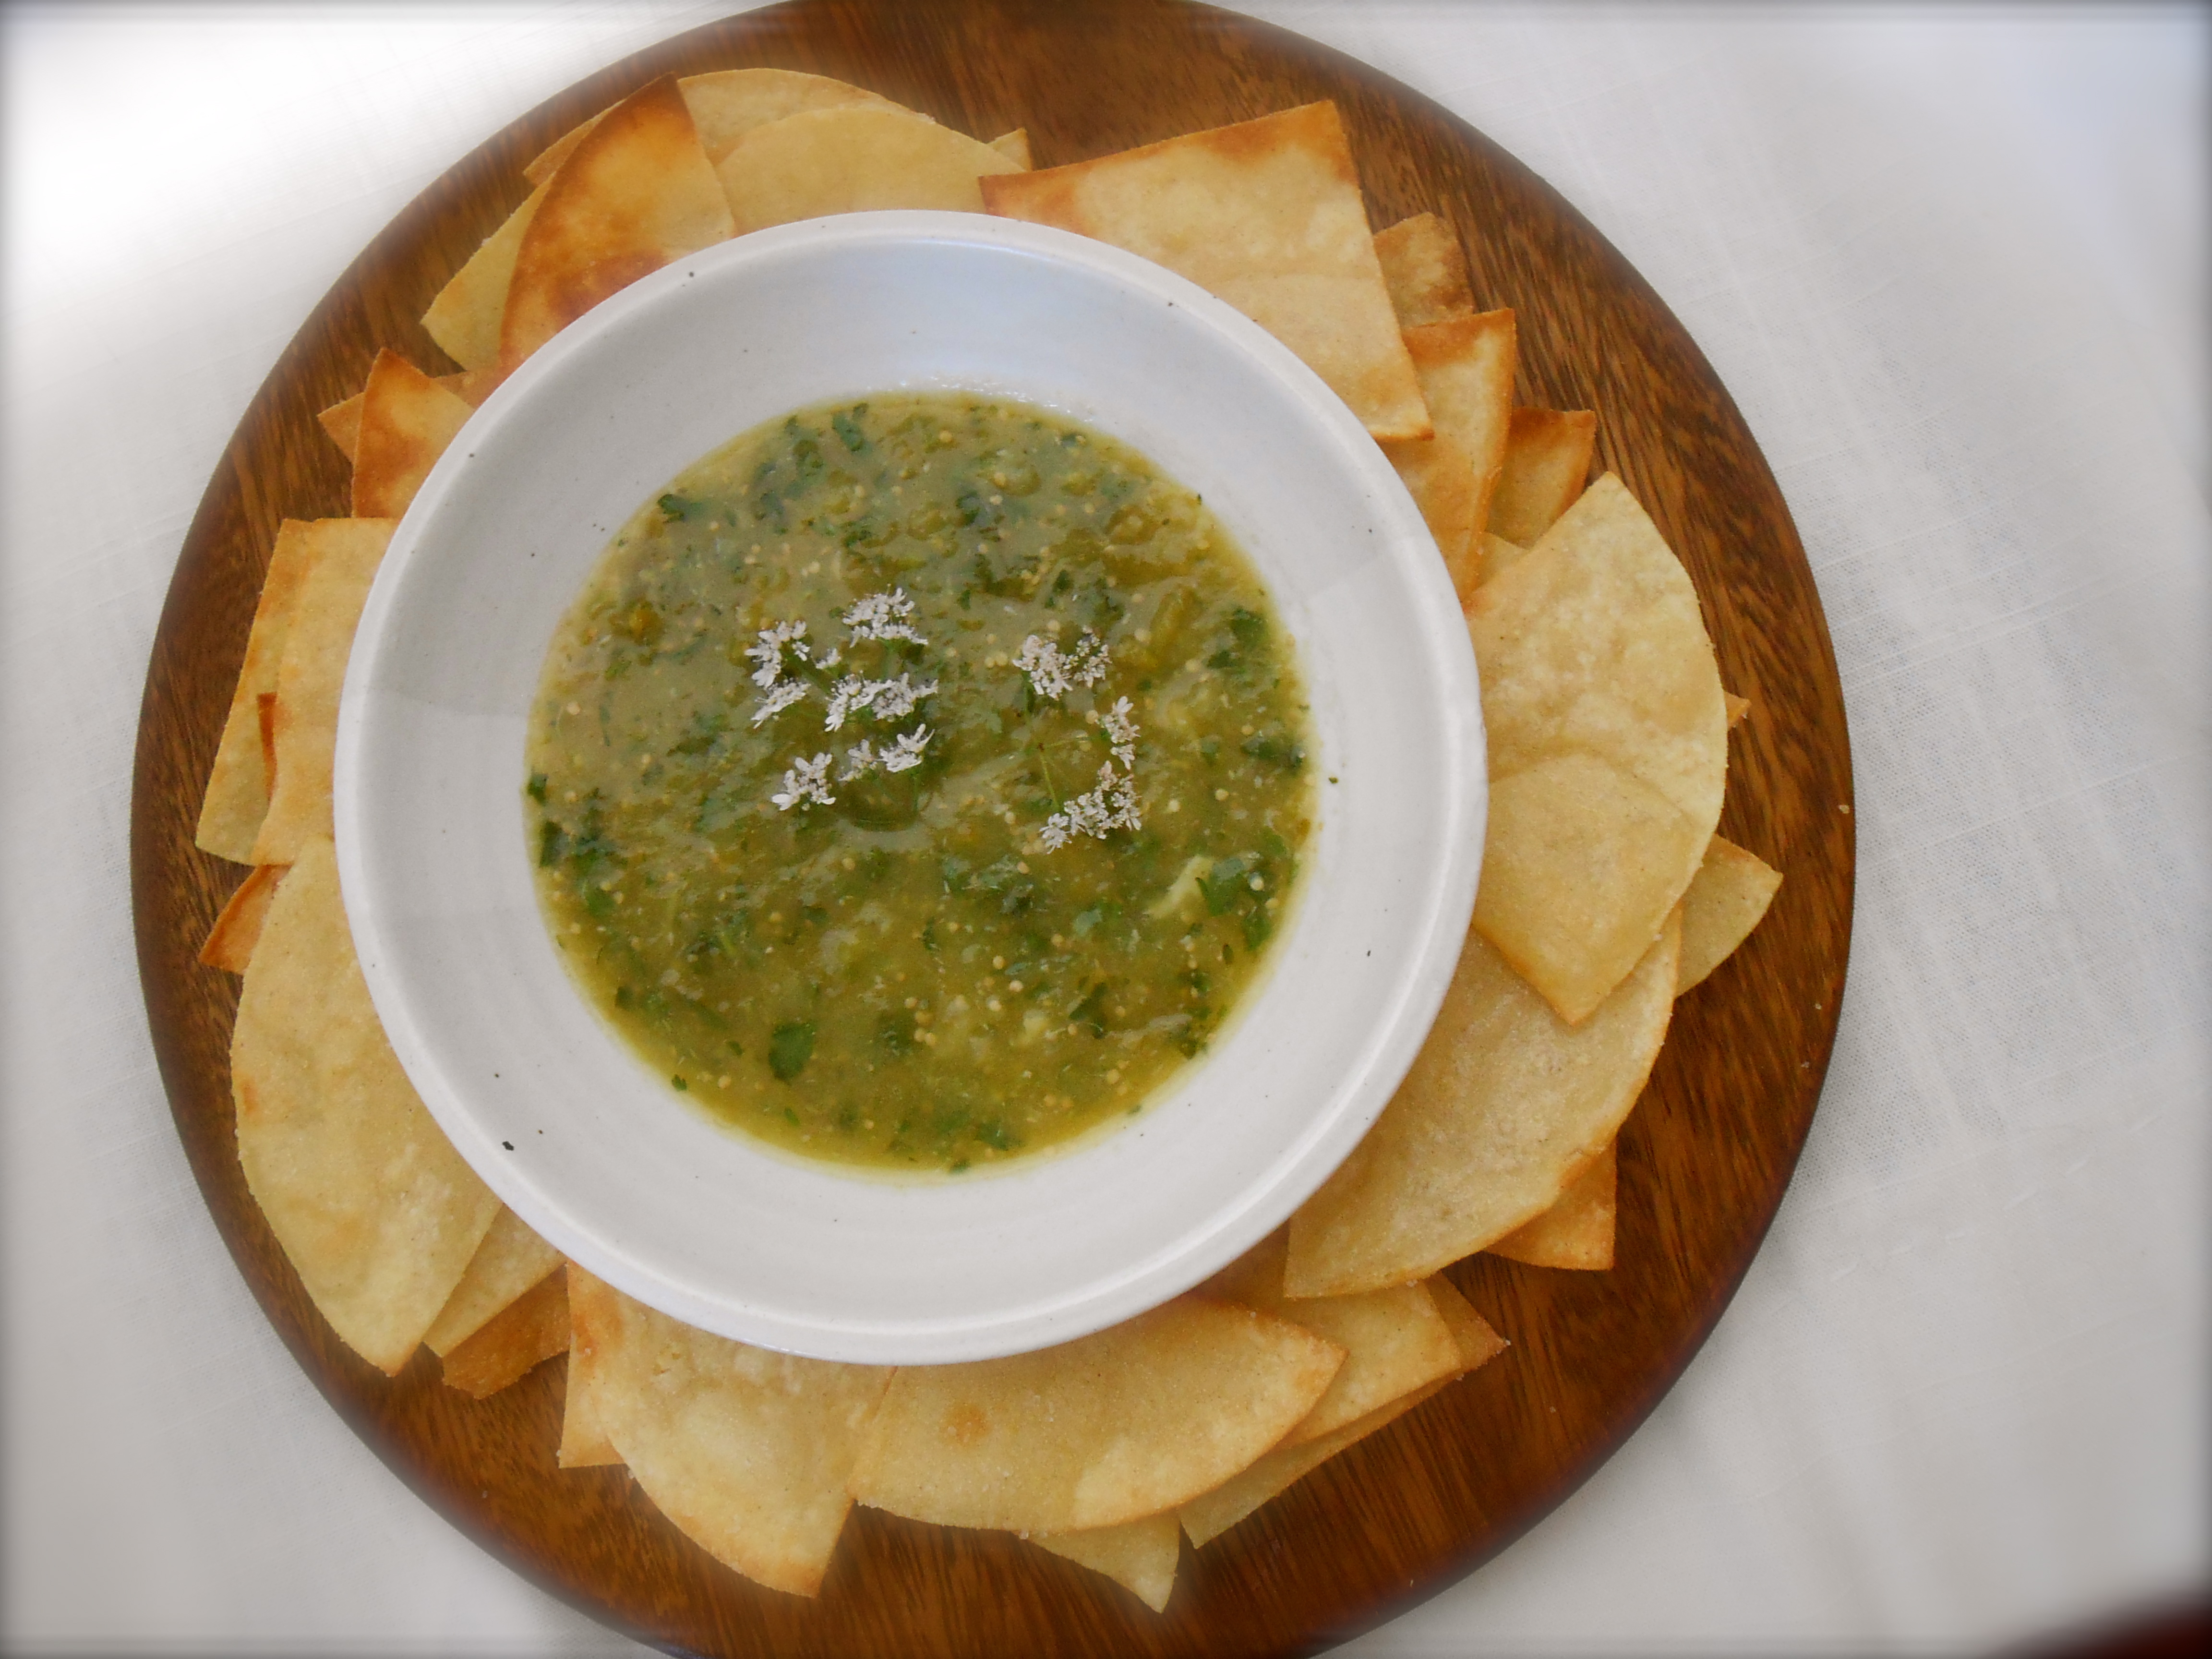
We like to eat this salsa warm, but it also keeps in the fridge. Served with fresh homemade tortilla chips.
Tortilla Chips
- 1 dozen good quality corn tortillas
- at least 1/2 cup olive oil
- salt
Heat a good amount of olive oil in a non stick skillet over medium high. Cut your tortilla’s into desired shape, fry until crisp, using tongs to turn. Remove to paper towel, salt and let them cool. Transfer to your serving basket or bowl.
Serves several as an appetizer.
