vegetable risotto (risotto di verdure)
May 24, 2013 § 48 Comments
In a previous post I mentioned my admiration for Tessa Kiros and her fine cookbook Apples for Jam. I adore this cookbook and in my opinion it is written for me. My particular copy is far from being gently used. The dust cover is tattered and torn and many of its pages are a bit warped and spattered with the ingredients the recipe is calling for. I thought about picking up a nice new crisp copy, but then realized I couldn’t possibly replace my characterized volume. On a visit to the library the other day I acquired another one of Tessa’s cookbooks, Venezia. Looking through the recipes I stumbled upon this vegetable risotto. With all ingredients in season I decided we would have this for dinner. Being a borrowed book from the library I just better keep the pages clean!
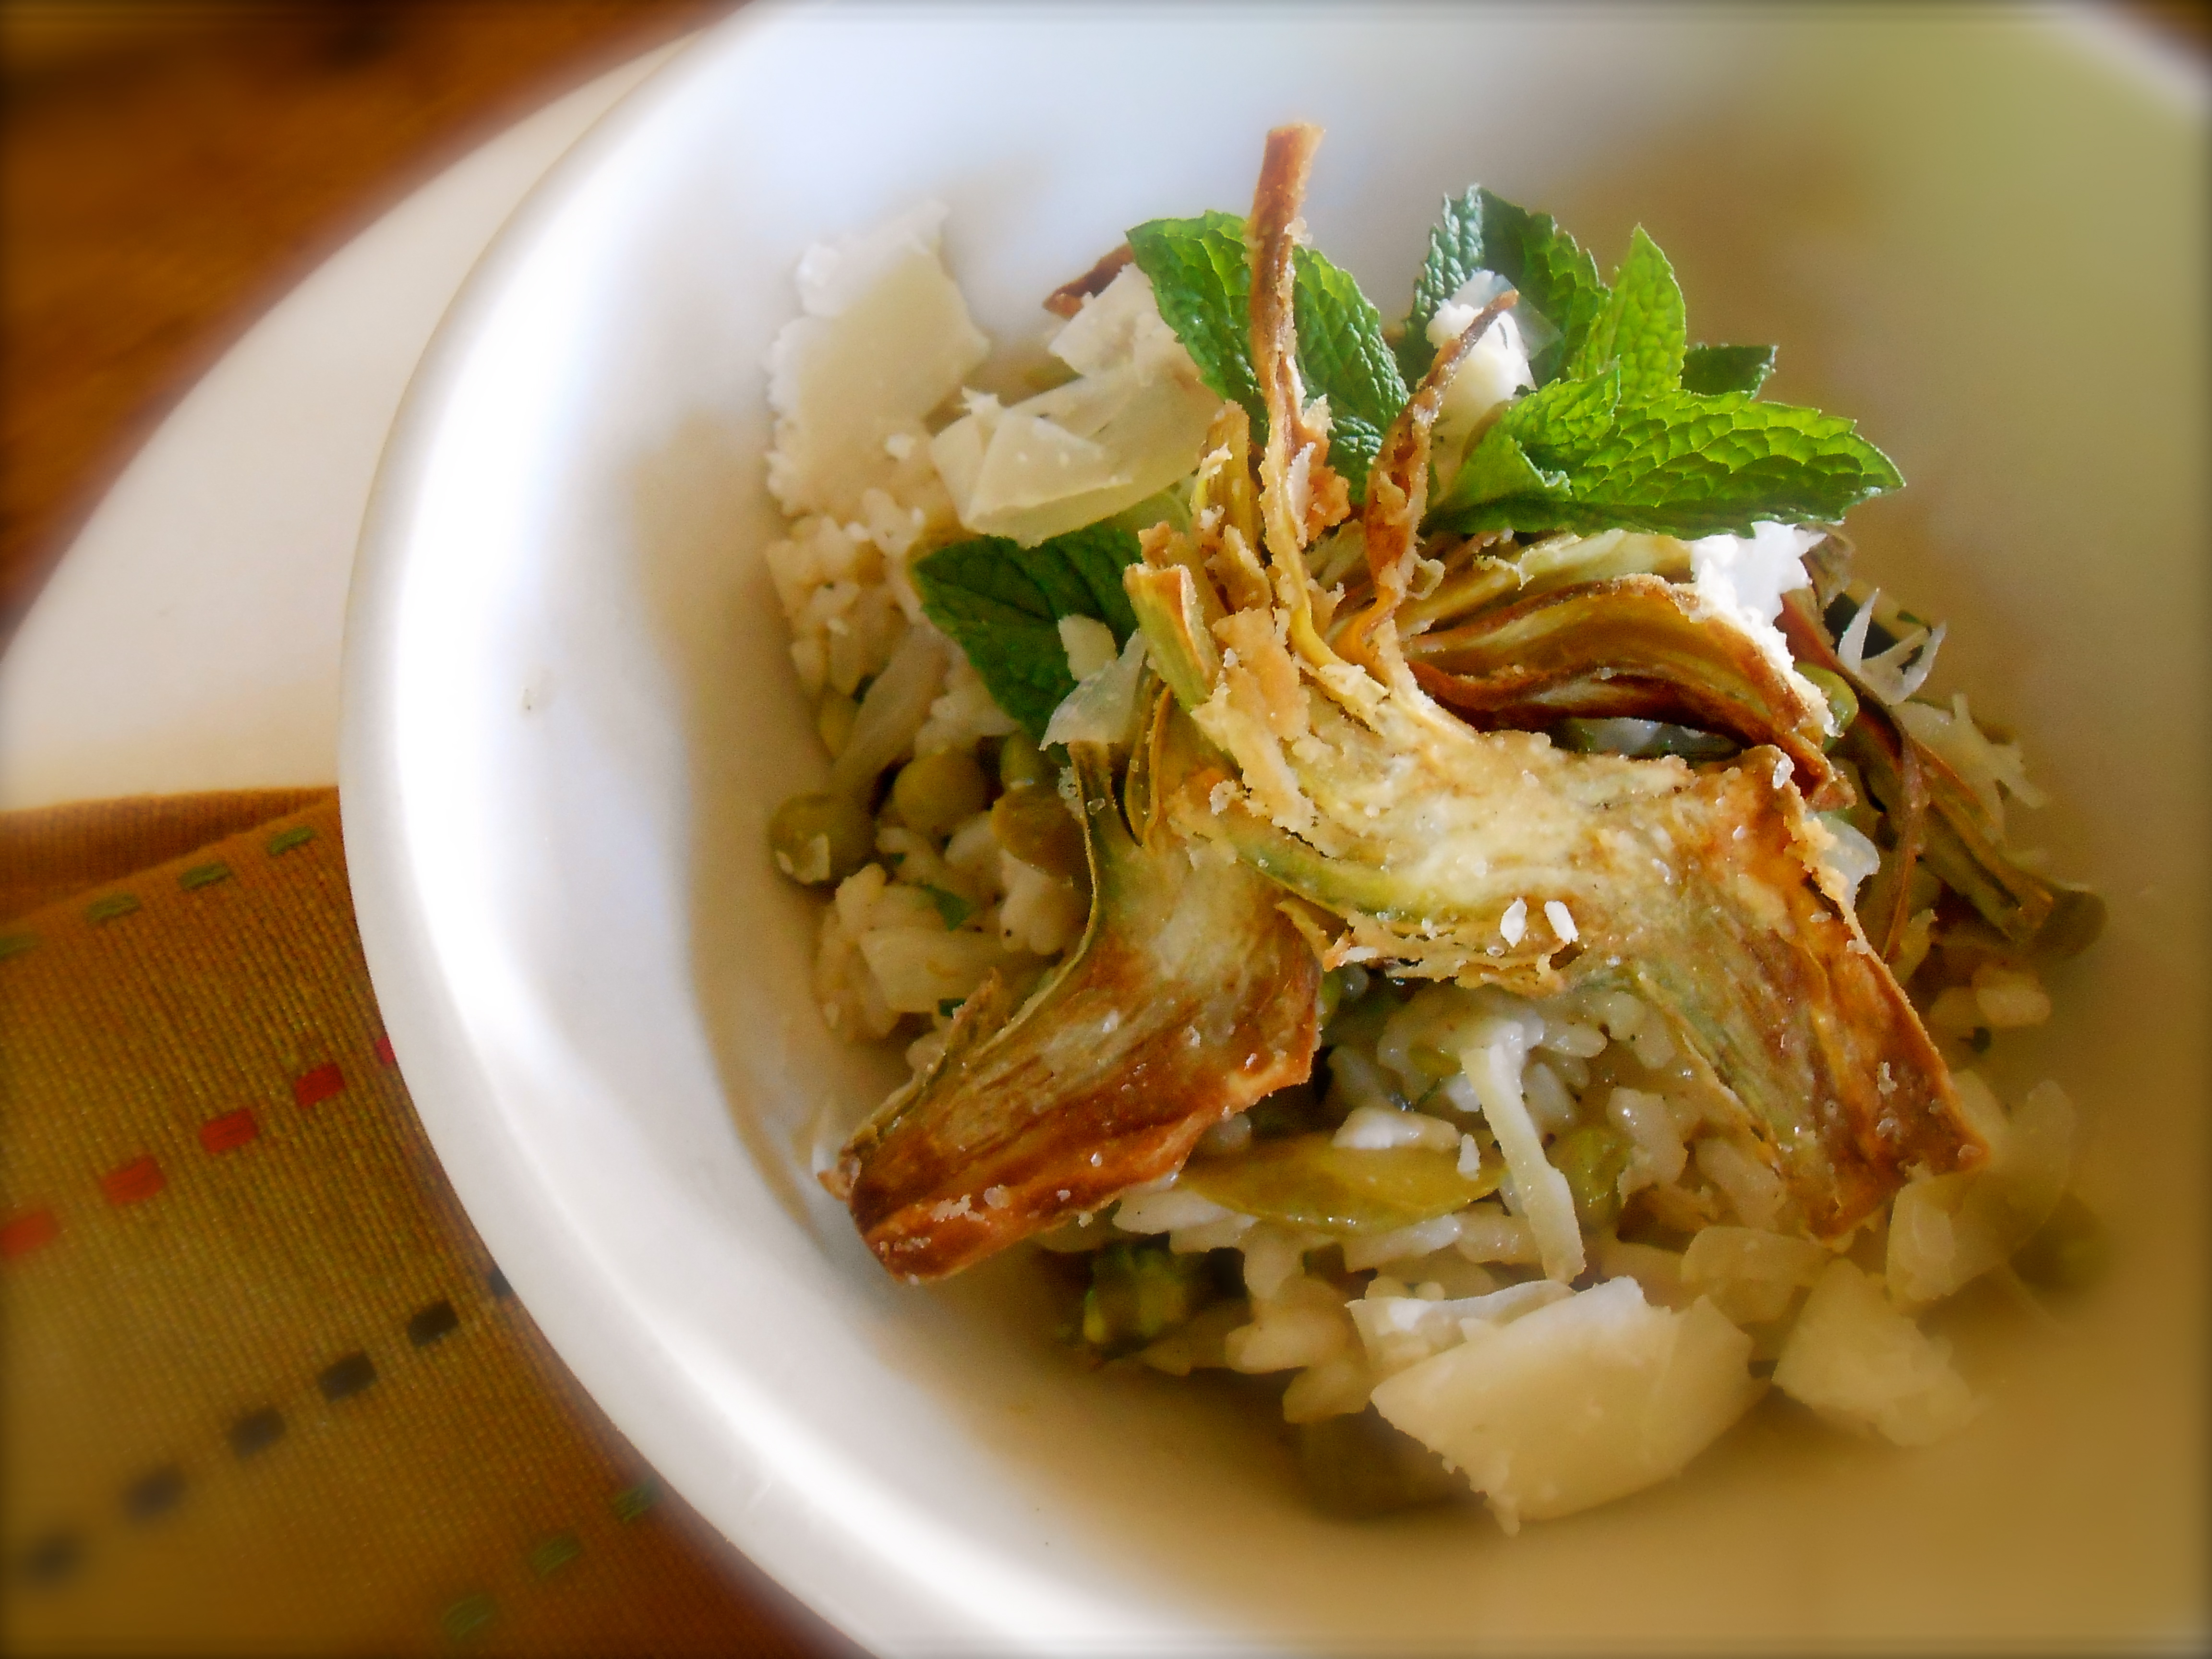
This risotto recipe was terrific. It had all the substantial textures and flavor you want from a spring vegetable risotto. The crispy artichoke was a impressive way to top it off. When you prepare the artichokes I found it is very important to make sure you completely cut the tough parts of the leaves off. Next time I prepare this I will use baby artichokes if they are in season. I treasure baby artichokes because the whole globe is tender therefore no need to cut so much away and the hairy choke is nonexistent.

Ingredients
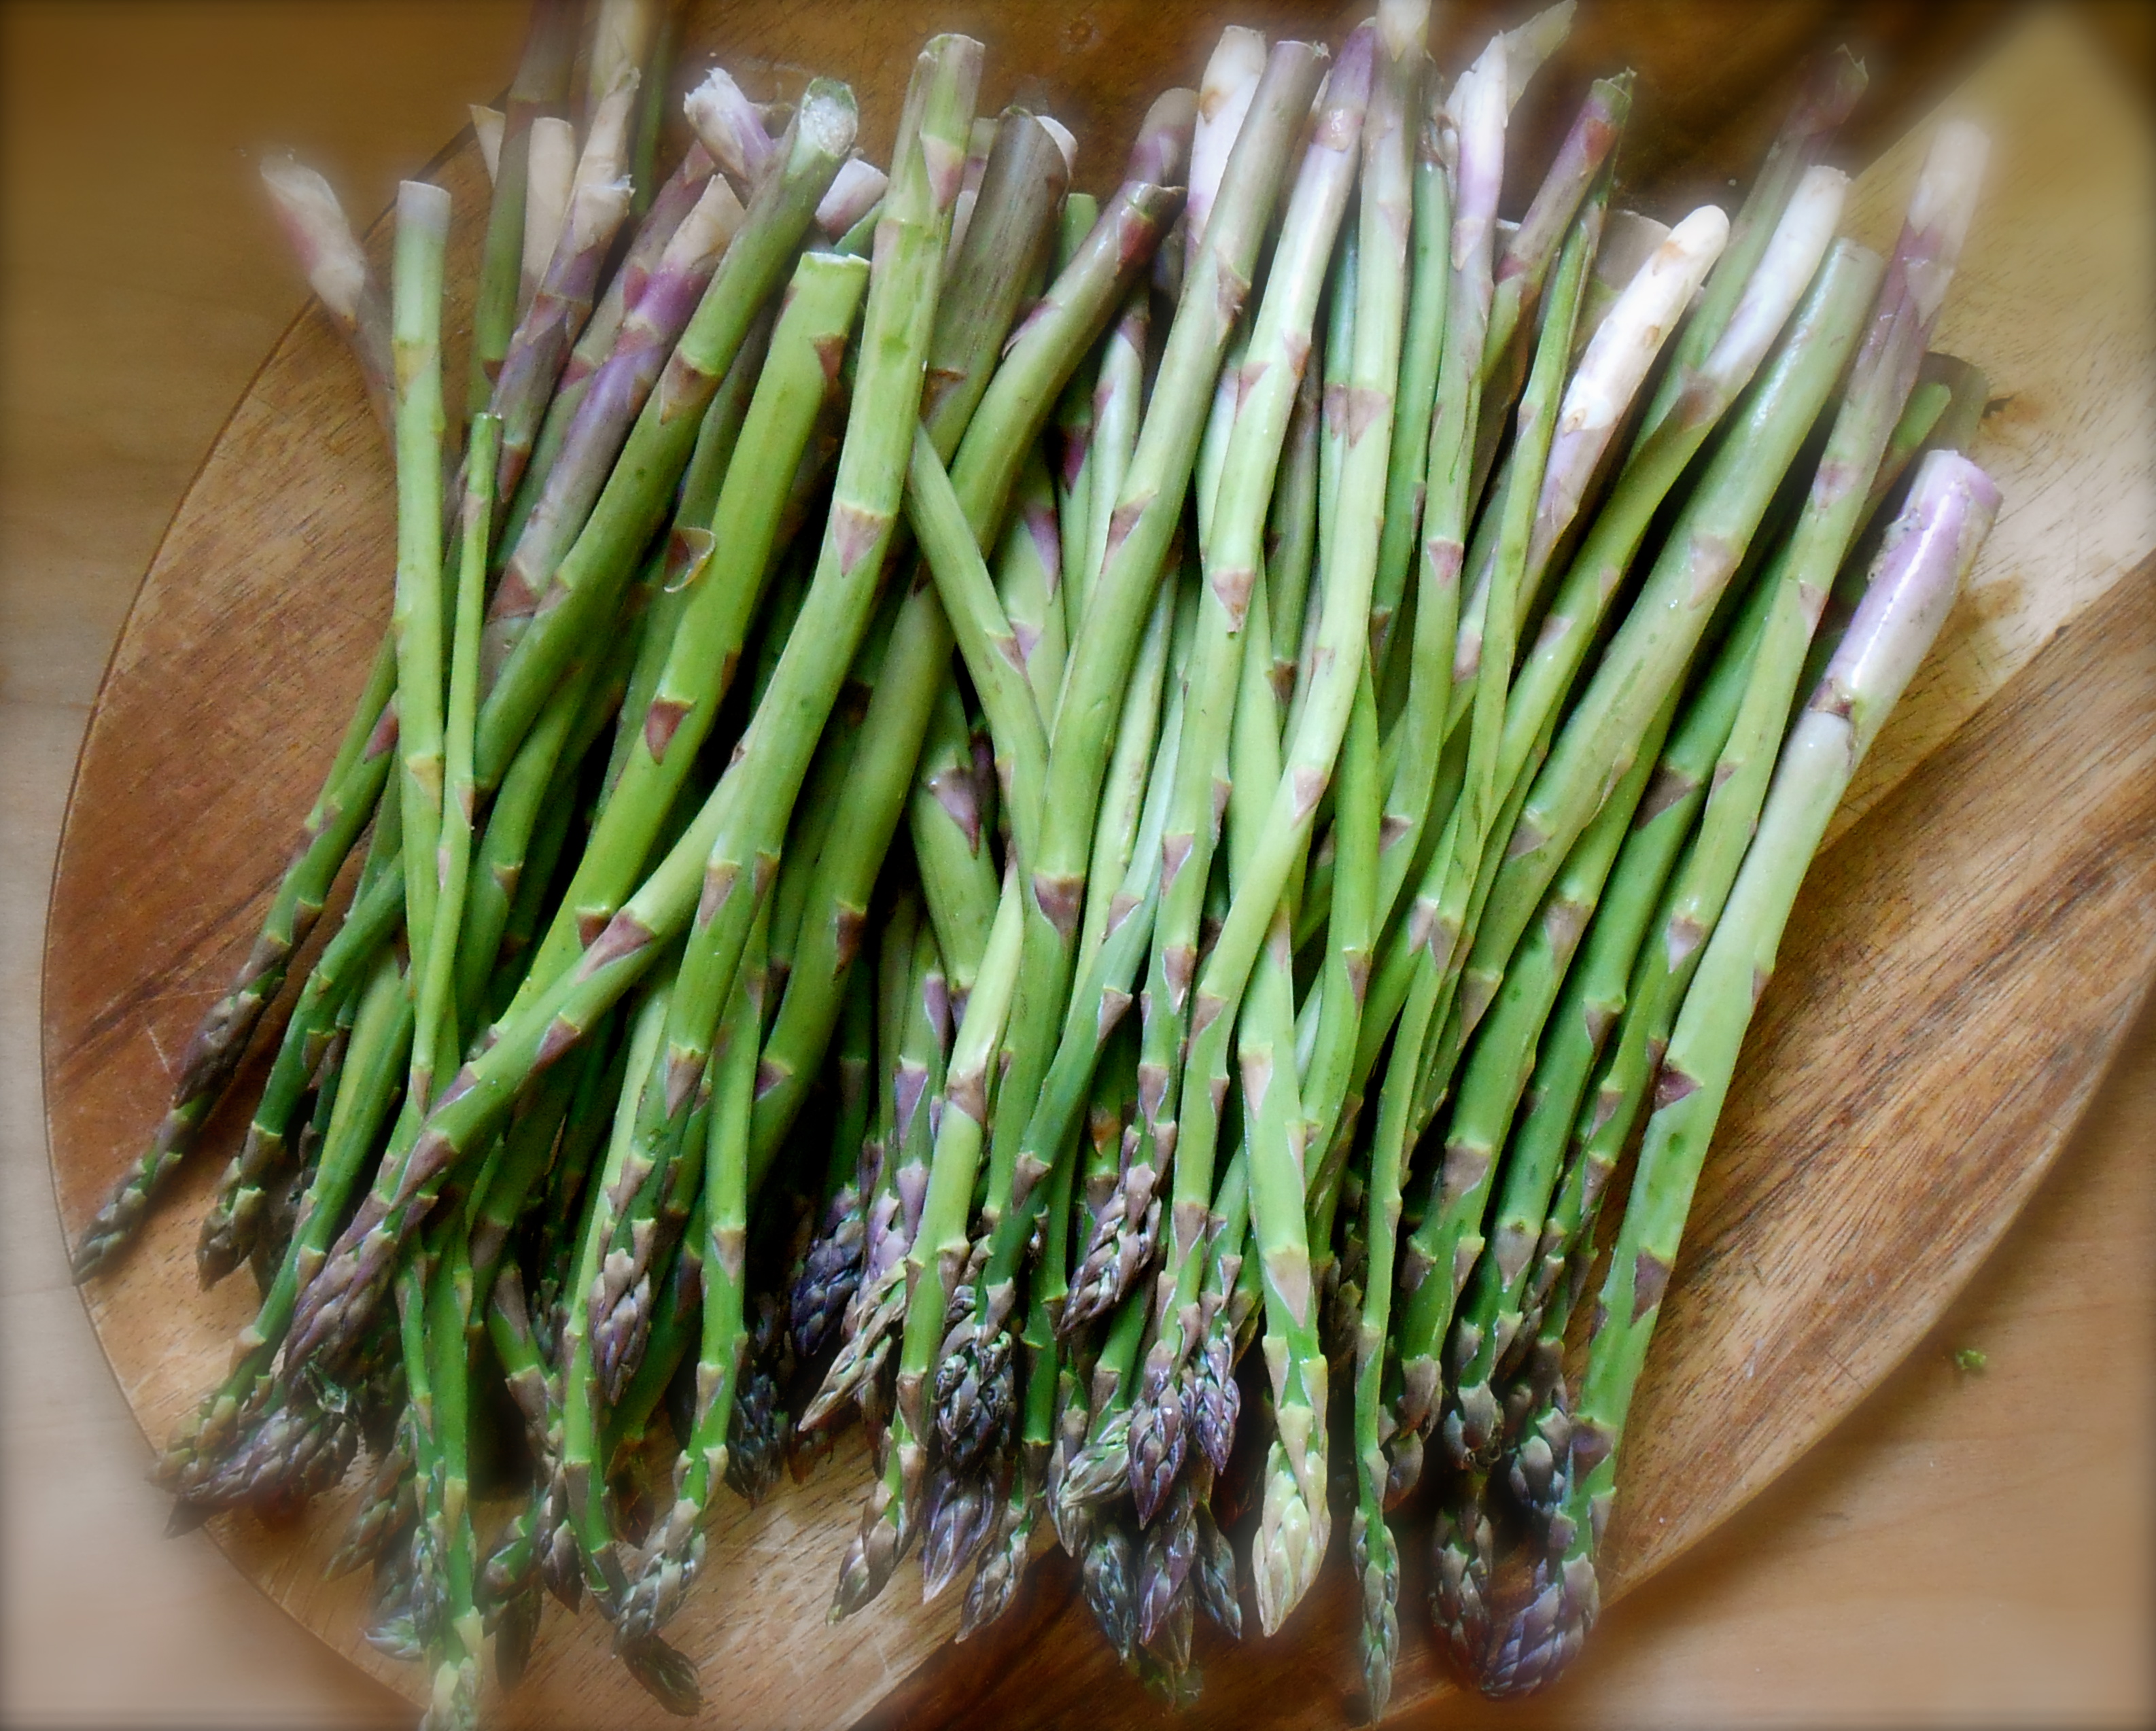
- 1 bunch of asparagus (about 12)
- 5 cups of hot vegetable broth
- 1 large artichoke (6 baby artichokes)
- juice of 1/2 lemon
- 4 tablespoons olive oil
- 1 small white onion, chopped
- 3 or 4 young zucchinis, sliced
- 1 cup fresh or frozen peas
- 1 cup arborio rice
- 1/2 cup white wine
- 2 tablespoons butter
- 4 tablespoons freshly grated parmesan
- 2 tablespoon chopped parsley
- all-purpose flour, for coating
- light olive oil
- handful of mint sprigs
Method
To prepare the artichoke, trim away the tough outer leaves and slice off the top. Halve the artichoke and remove the hairy choke. Cut into thin slices. Place in a bowl with cold water and lemon juice to prevent them from darkening.
To simplify the process, have all your ingredients prepared and measured before you start cooking the risotto.
Heat the olive oil in a large deep skillet and sauté the onion until softened. Add the asparagus, zucchini and peas and sauté on high heat for a few minutes. Add the rice, mix through the vegetables to coat well. Season with salt and pepper, add the wine and allow it to bubble away. Add 2 cups of hot broth, lower the heat and simmer for about 10 minutes until the broth has been absorbed. Add another cup of hot broth, stirring gently. Do not allow the risotto to get too dry. Continue to add a cup of hot broth when necessary as it is absorbed, for about 20 minutes, or until the rice is tender. Remove from heat and gently add butter, parmesan and parsley.
Just before your risotto is ready, drain the artichokes, pat dry with paper towels and lightly dip each side in flour. Using a non stick skillet cover the bottom with olive oil and fry artichokes until golden and crisp on both sides. Transfer onto paper towels to s0ak off excessive oil.
Serve the risotto with a heap of fried artichokes, fresh mint and extra parmesan.
Serves 4.
buon appetite!
greek chicken cutlets and tzatziki
May 22, 2013 § 26 Comments
Here is a delicious Greek chicken recipe for you to make. I have been able to find chicken cutlets at most markets these day. If you can not find cutlets you may simply slice a chicken breast horizontally into three flat slices. You could pound them out a little more with a meat mallet if you like. Served with tzatziki, spanokópita, mache’ salad and greek olives.

Ingredients
- 4 chicken cutlets
- a dusting of all purpose flour
- 5 tablespoons olive oil
- 3 cloves of garlic, peeled and smashed
- salt and pepper
- juice of 1/2 lemon
- 2 tablespoons of large capers, chopped
- 3 tablespoons parsley, finely chopped
- 3 tablespoons of hot water
Method
Lightly pat both sides of chicken in flour. In a large skillet, heat the olive oil with the smashed garlic over medium high heat and cook until the garlic is aromatic. Add the chicken and fry until golden. Turn the chicken over, season with salt and pepper and continue to cook other side until golden. Turn again, season and squeeze in the lemon juice, add the capers, parsley and hot water. When it starts to bubble put a lid on the pan and cook for a few minutes. Turn off the heat and serve right away.
t z a t z i k i

Ingredients
- 16 ounces of full fat plain greek yogurt (I really like Fage)
- 1 large cucumber, peeled and grated
- 1 handful of dill, finely chopped
- 2 cloves garlic, finely minced
- juice of 1/2 lemon
- 2 tablespoon olive oil
- salt
Using your hands, after you peel and grate the cucumber, squeeze out the excessive juice. Place in a bowl and mix well with all the other ingredients. Taste and add salt to your liking.
serves 4
buon appetite.
spinach pie (spanakópita)
May 20, 2013 § 40 Comments
While traveling abroad I had the opportunity to learn a bit about Greek culture and become acquainted with traditional Greek cooking. During this time I spent several weeks with family and friends in Athens as well as on a small island called Siphnos. I learned Greek cooking to be simple, wholesome and solely based on fresh seasonal ingredients. There is no place for canned or packaged foods in a Greek kitchen. My fondest memories are gatherings around tables in a quaint taverna savoring slow braised lamb, a freshly shredded cabbage salad, tzaziki, dolmades, and one of my favorite comfort foods gigandes plaki…giant white beans. Potatoes were sliced and fried in olive oil right then and there if your ordered french fries. I still have a clear image of a taverna owner walking out to the seashore, pulling in a net, collecting a fish and returning to his kitchen to cook it for me after I requested it from his menu. Fresh, simple and organic. 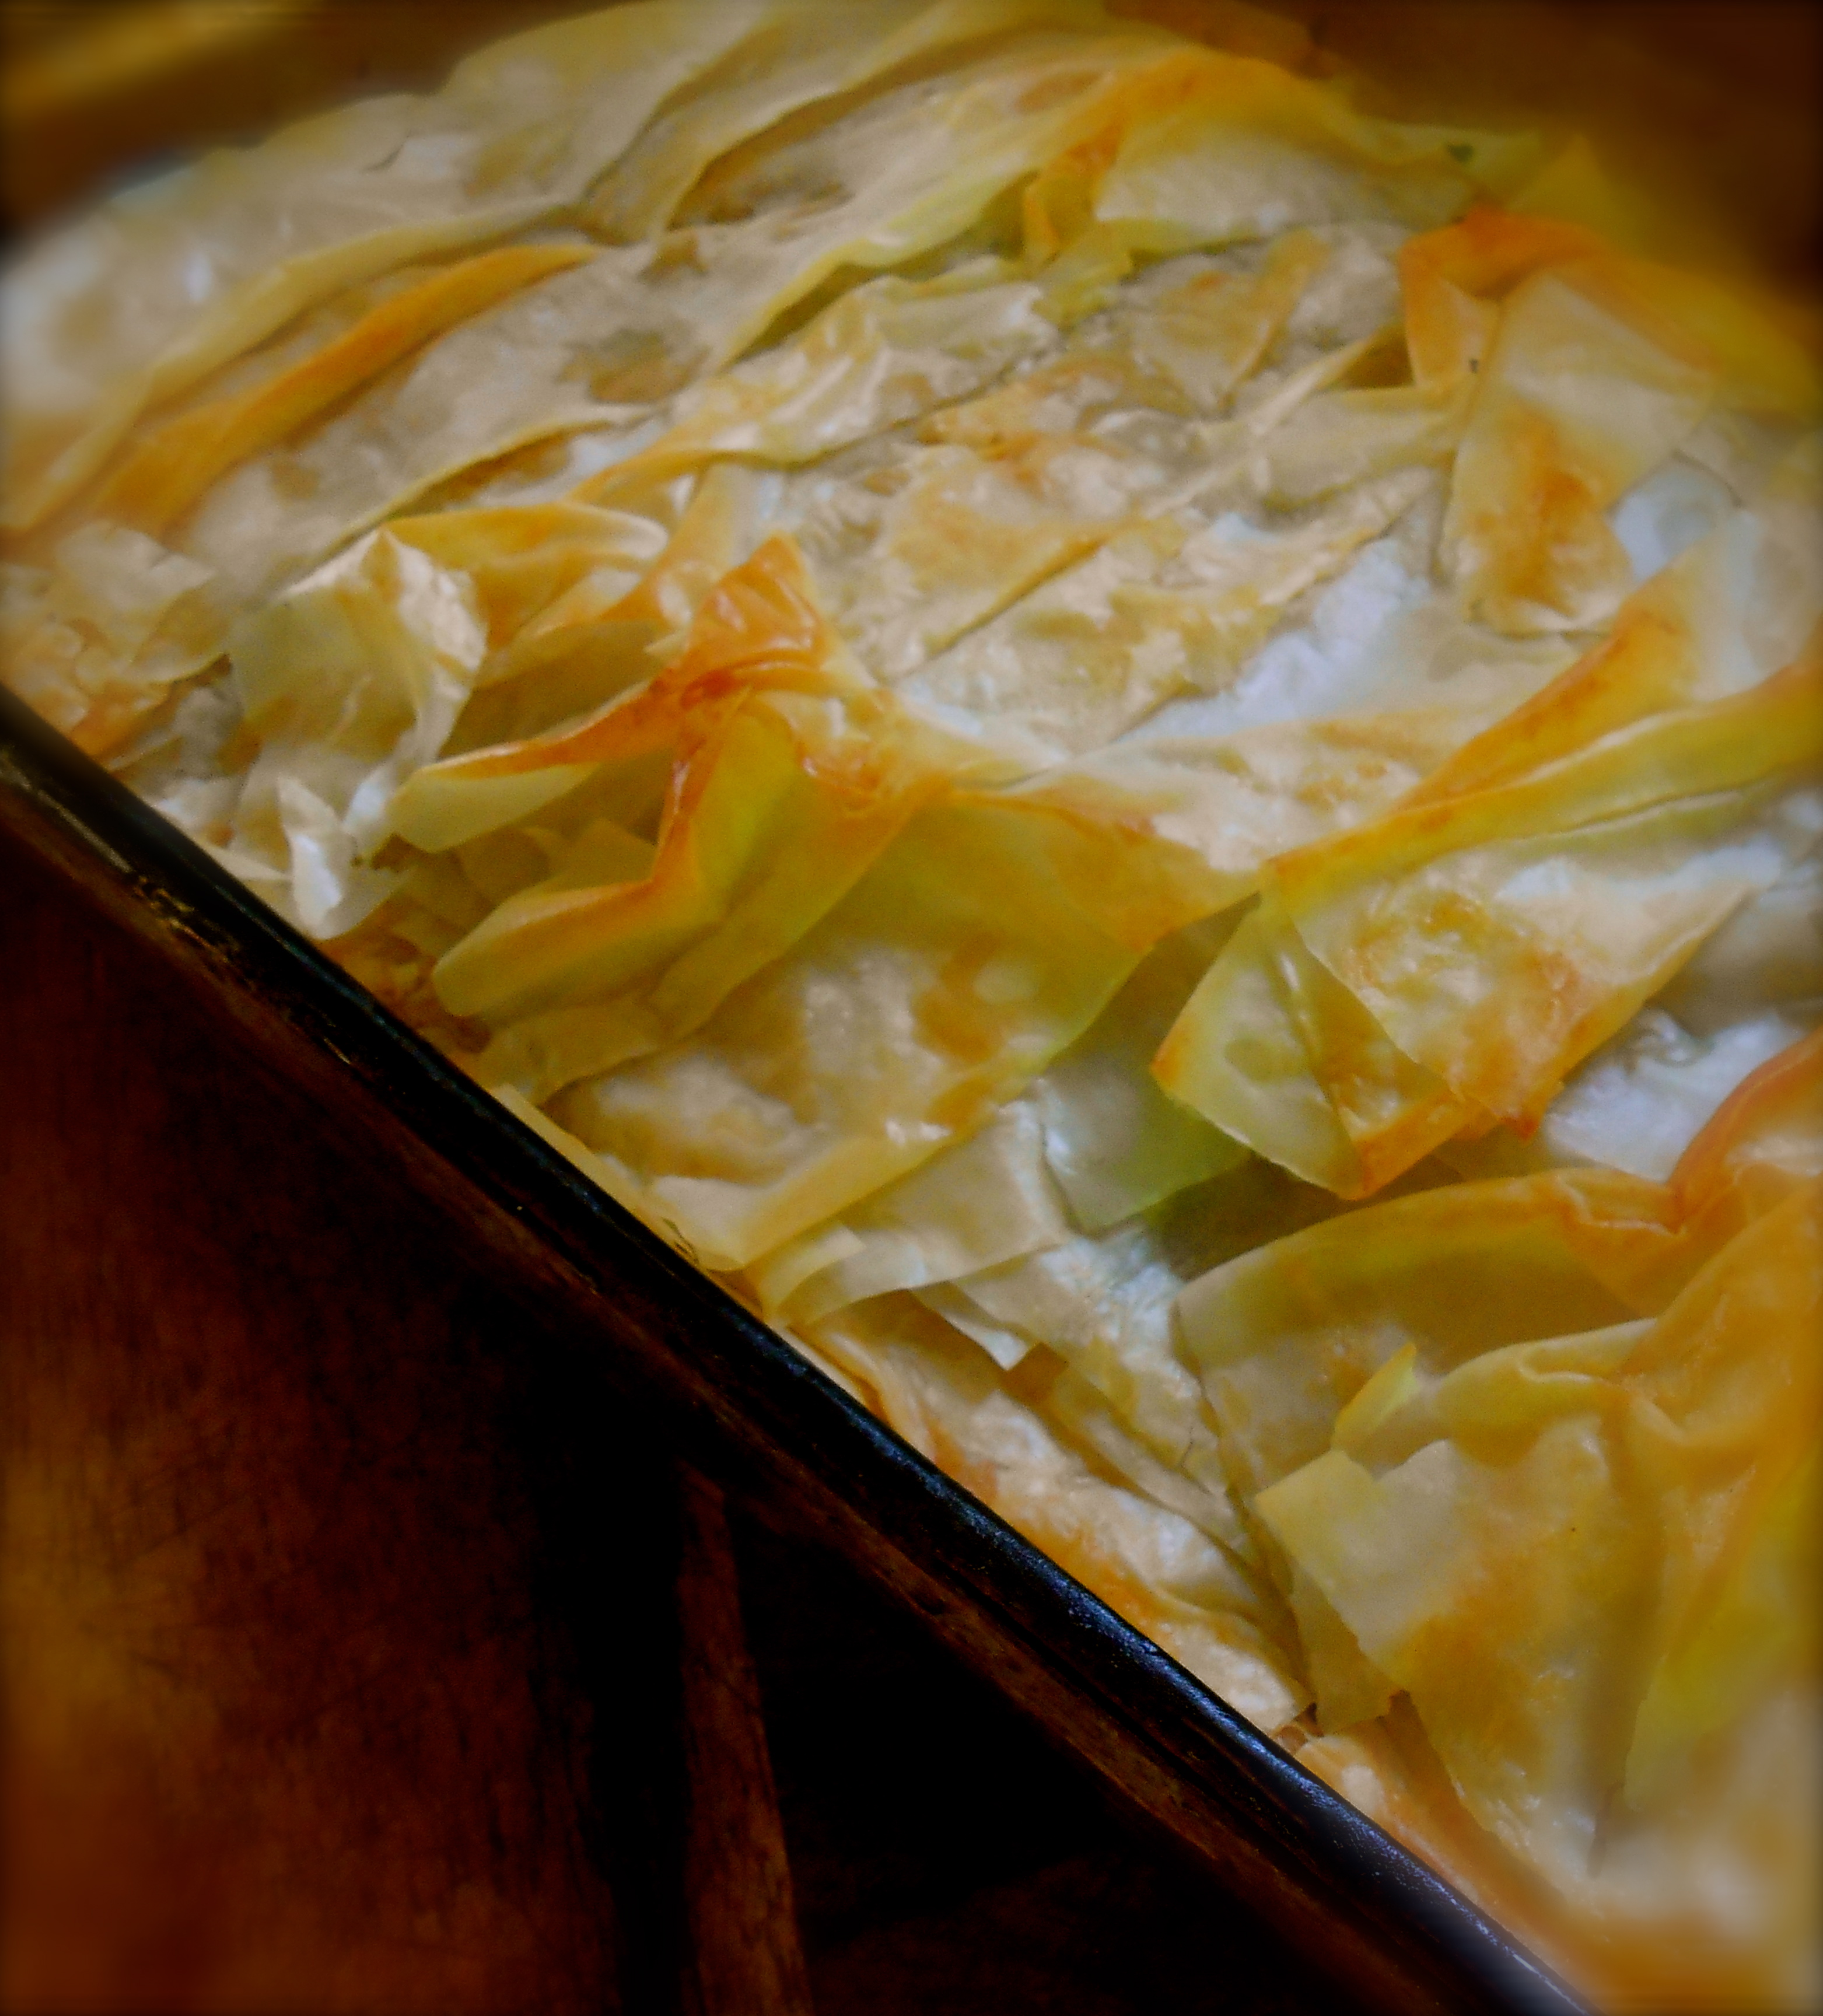 Spanakopita was one of many dishes I learned to prepare from a very dear acquaintance while staying in her family’s home in Athens. Not long after she rose out of bed she would begin cooking the meal of the day. The aromas coming from her kitchen kept your appetite stimulated throughout the day. Spanakópita is such a delightful side dish and quite easy once you get the hang of working with the fillo. It is important to keep the fillo humid by lying it flat in between a clean, damp kitchen cloth, preventing it from drying out. Purchase a good quality feta cheese. If possible find a bright white sheep feta packed in brine. Most spanakópita recipes call for cooking the spinach filling prior to “filling” the pie. I think the cooking time in the oven is sufficient. Ingredients
- 2 large bunches of spinach, washed, dried and chopped
- bunch of spring onions, chopped
- handful of dill, chopped
- small handful parsley, finely chopped
- 6 ounces feta cheese, crumbled
- 2 eggs, lightly beaten
- 1 package of fillo sheets
- 1/2 cup butter melted (1 cube)
Method Preheat oven to 350°. If you are not using pre-washed packaged spinach, wash spinach very well and dry. Cut off stems and chop. Place in a large bowl and add chopped spring onion, chopped dill, feta and eggs. Using your hands mix well until all ingredients are fully combined. Season with salt and pepper. Melt the butter and brush a little onto a 9 x 12 baking dish. Open your fill0 package and lay them flat in between a clean damp cloth folded in half. Place two fill0 sheets on the bottom of your baking dish and brush with butter. Make sure to keep your fillo sheets covered at all times to keep them from drying out. Continue placing two sheets at a time and brushing with melted butter until you have a good bottom base, approximately 10-12 sheets. Put your spinach filling in and continue layering fillo two sheets at a time and brushing with butter for another 12 sheets. I create a little more dramatic top by folding the fillo as you would a fan and placing them on top to fully cover. Drizzle the remaining butter on top and place in over for approximately 30 minutes until the top is well browned. Serves 4-6 as a side dish buon appetite.
linguine pesto and roasted tomatoes (linguine e pomodori arrostiti)
May 18, 2013 § 26 Comments
I wish I had more time to spend in the kitchen in the middle of the week. I am so content when I am able to chop by hand instead of using a food processor. Normally midweek I return home just before 6pm. I am usually very hungry and you can only imagine how ravenous my 15 year old athletic son feels. I do not like to purchase convenient pre-made packaged foods, and for this reason I keep my Tuesday to Thursday dinners simple. Two or three ingredients, nothing too fancy, wholesome and satisfying. With all that said, this dinner fits well into a midweek menu. I understand the best pesto is hand made, not using a food processor. If you have the time it is well worth chopping this by hand. Otherwise, it is a very nice mid week “whirled in the food processor” dinner!
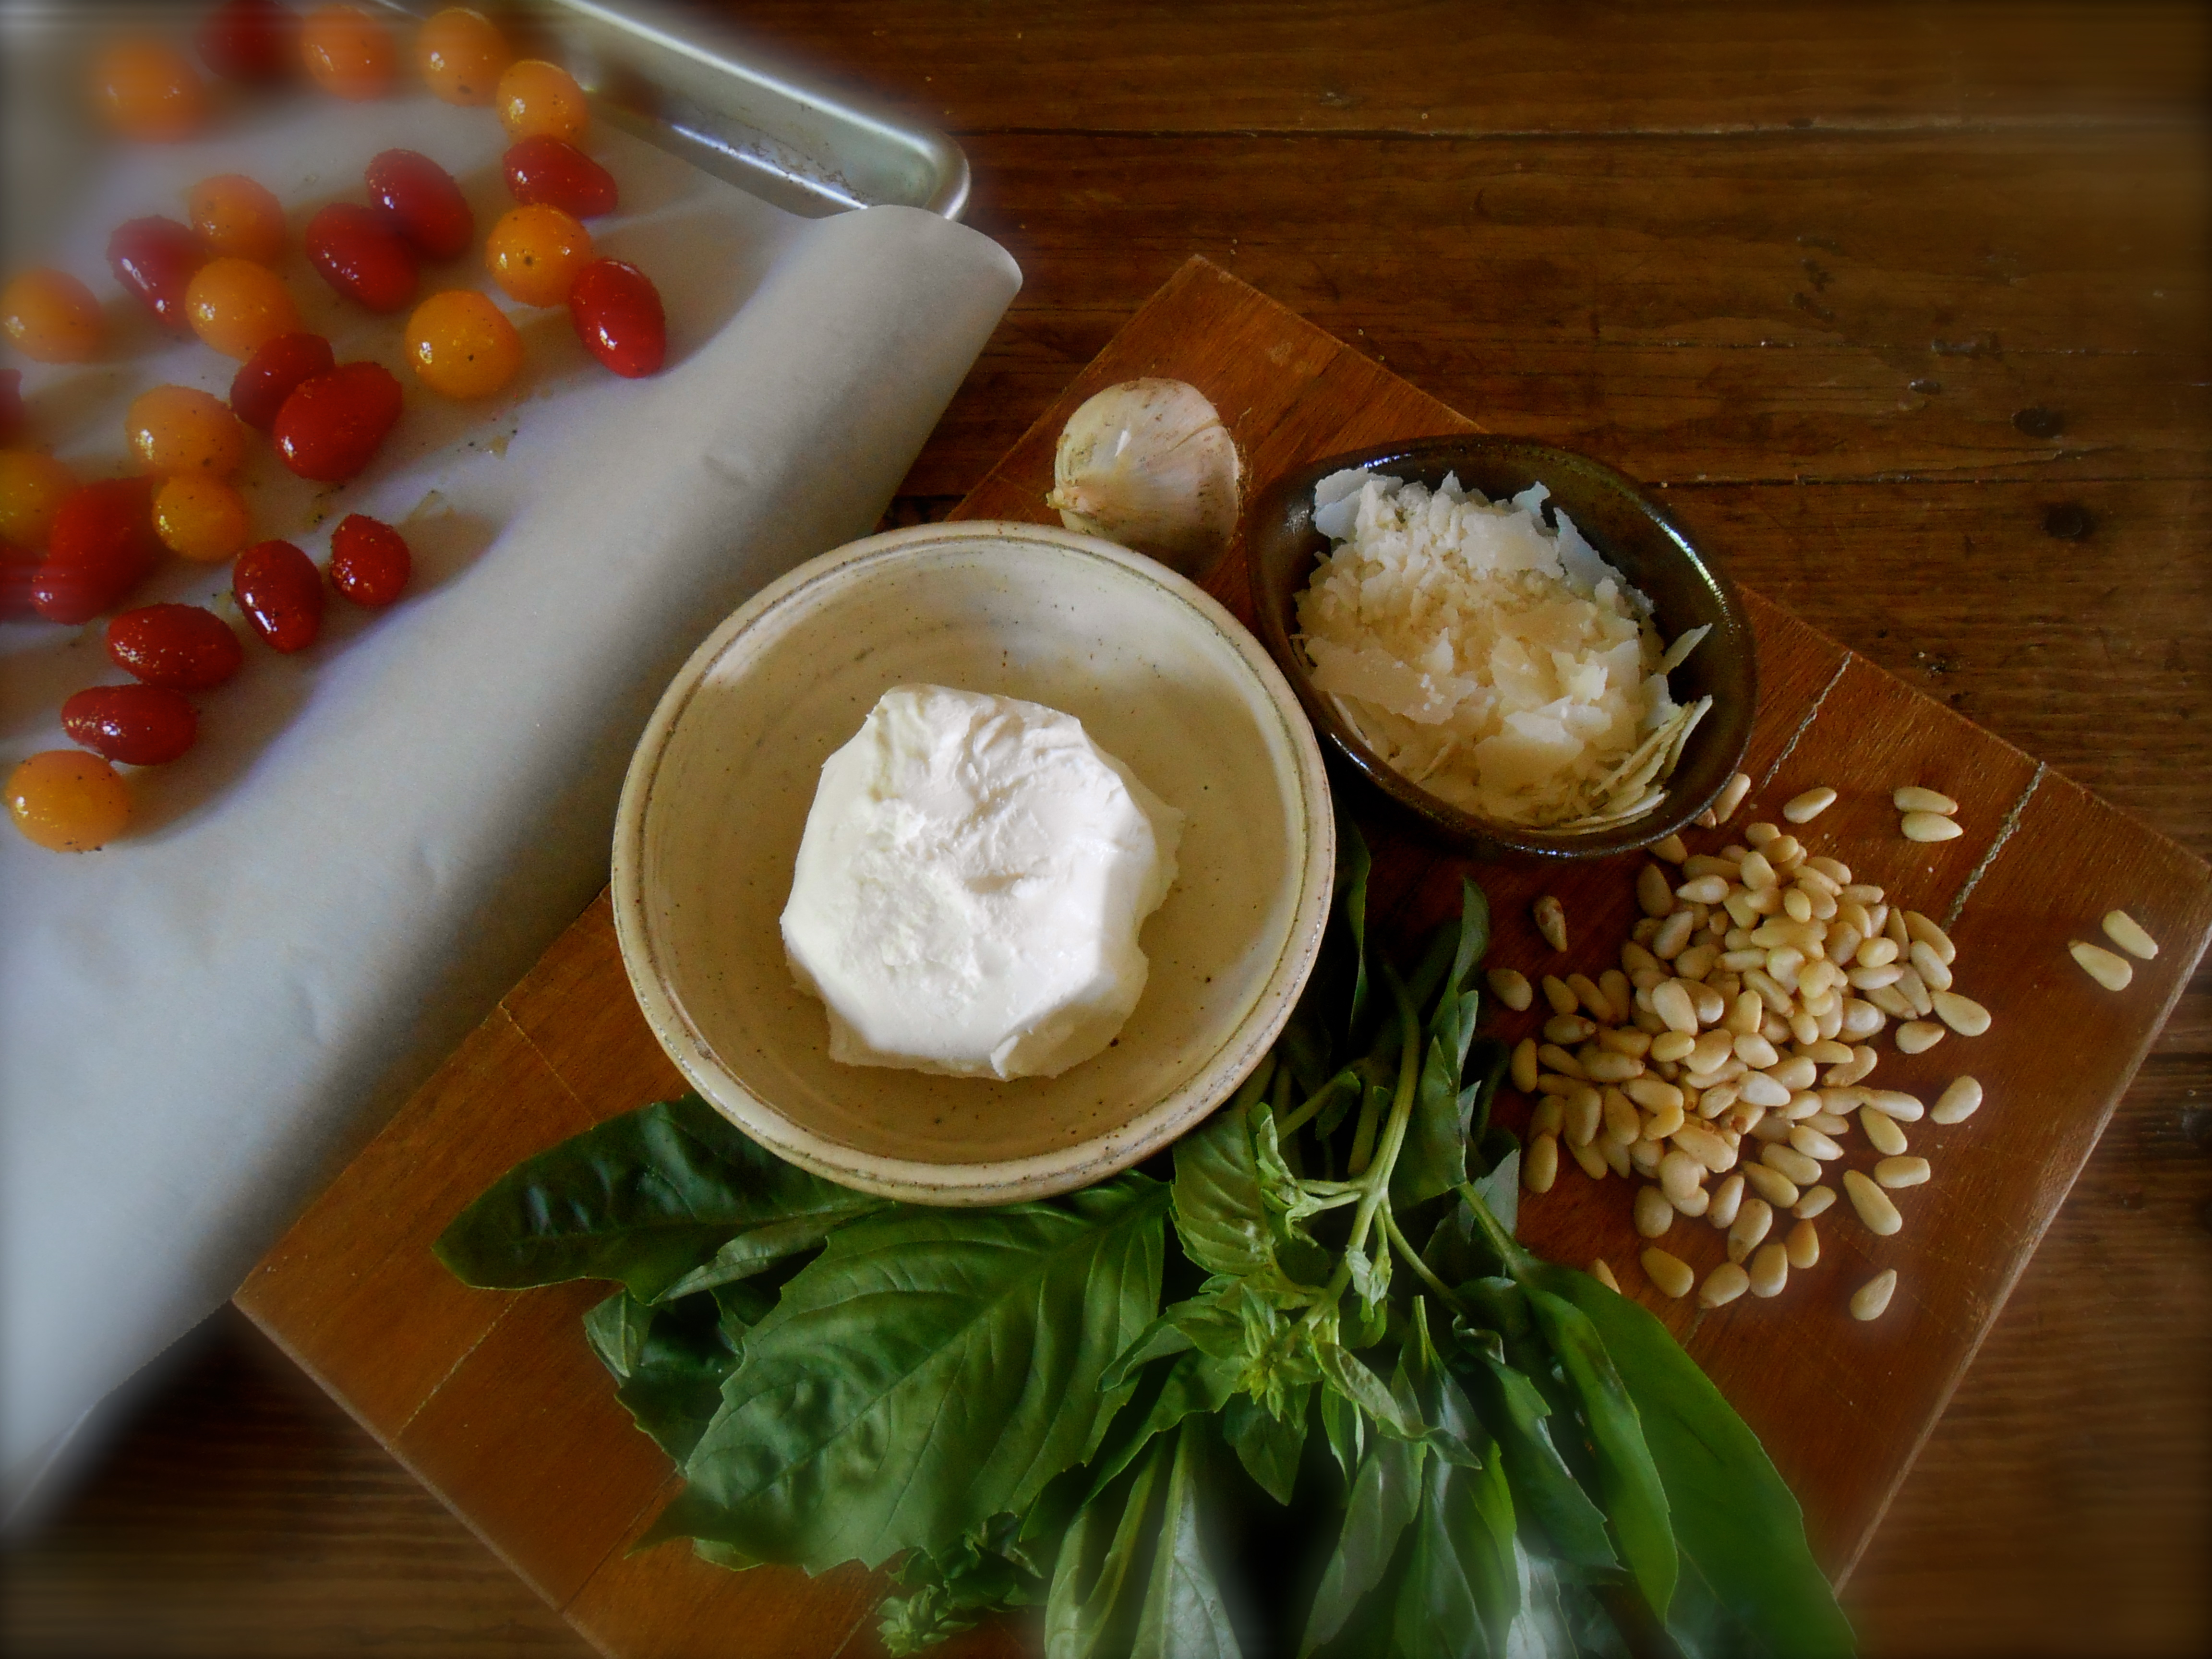
For an extra creamy texture I added 4 ounces of soft goat’s cheese to this pesto.
Preheat oven to 375°.
Put a large pot of water on the stove over high heat. Prepare tomatoes for roasting and make the pesto while you are waiting for the water to boil.
r o a s t e d c h e r r y t o m a t o e s
- 24 cherry tomatoes
- 2 tablespoons olive oil
- salt
Toss tomatoes with olive oil and a pinch or two of salt. Place them on a rimmed baking sheet and roast in oven for approximately 20 minutes, depending on what size you are using. Once the skins are wrinkly and they look roasted remove from oven and set aside.
p e s t o
- 1 large bunch of basil, leaves only
- 3 cloves of garlic
- small handful of raw pine nuts
- 4 ounces soft goat’s milk cheese
- 3/4 cup freshly grated good quality parmesan
- approximately 1/4 cup extra virgin olive oil
Place all ingredients in a food processor and whirl until blended.
Once your water is at a roaring boil add a tablespoon of coarse grain salt and drop your pasta in. I used one pound of linguine. Cook until al dente, linguine cooking time is approximately 9 minutes.
Drain pasta, return it to the pan (off the heat) and toss with pesto.
Divide into serving bowls and serve with roasted tomatoes and freshly grated parmesan on top.
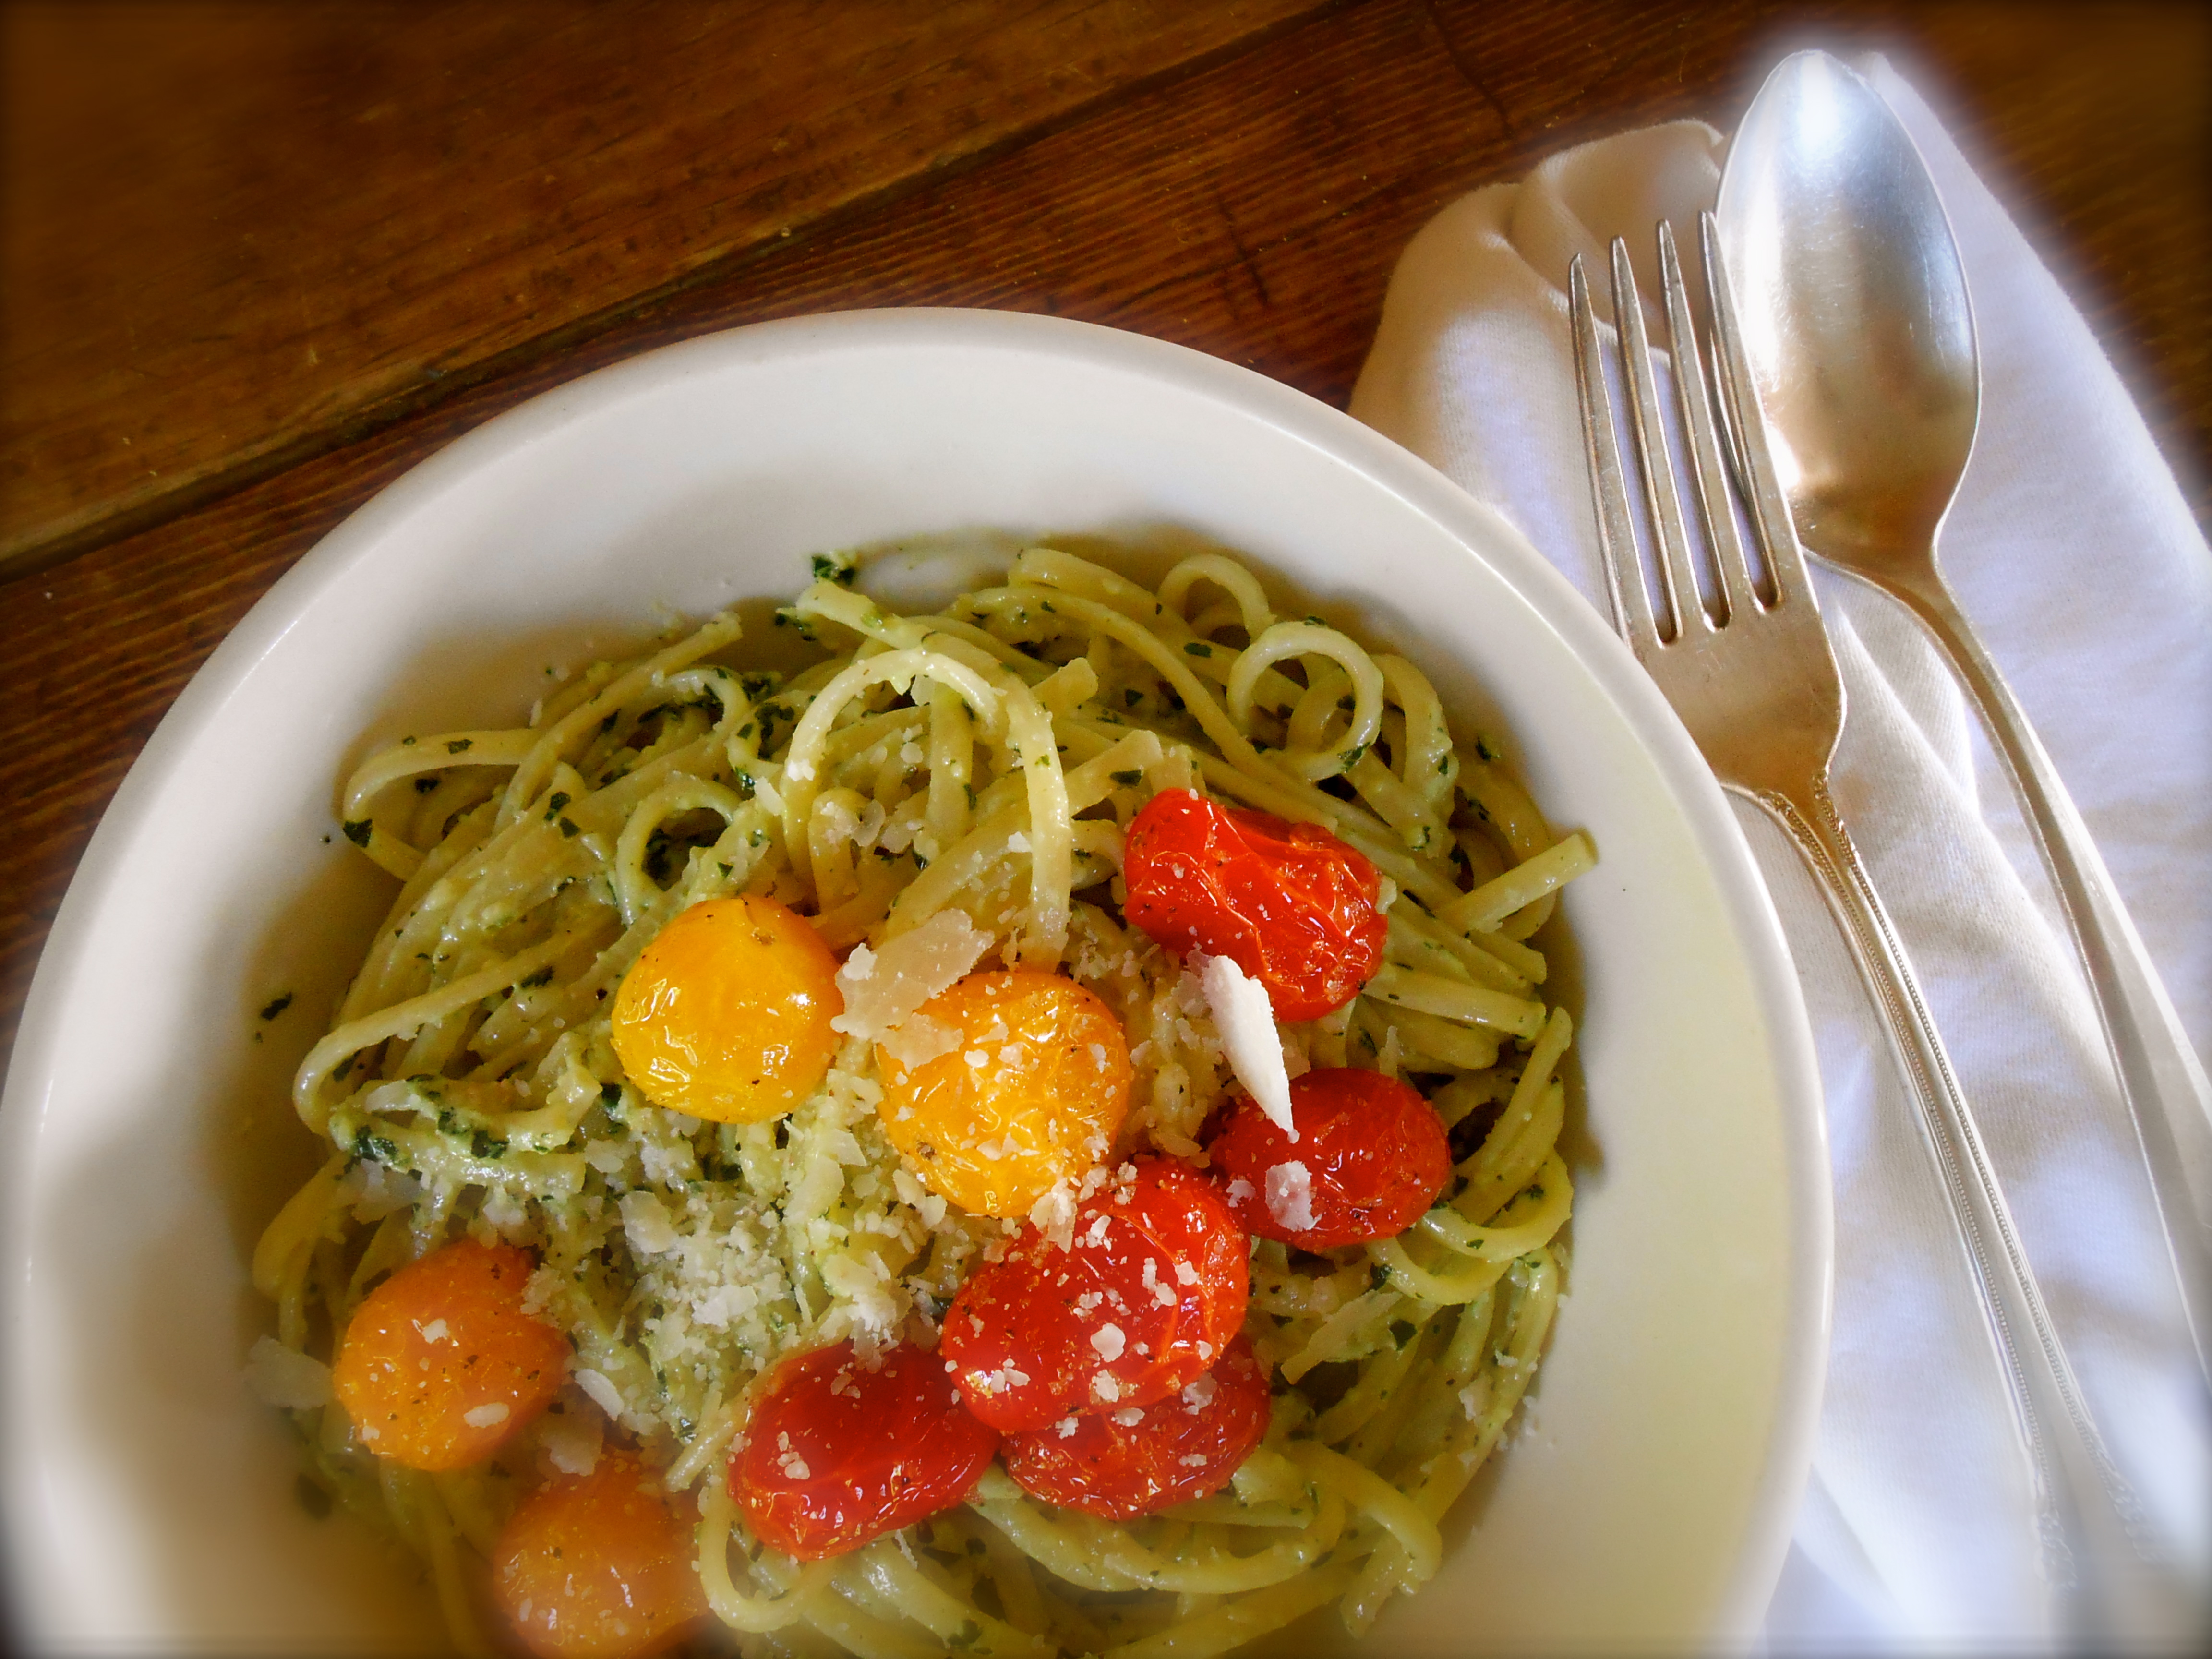
Serves 4
buon appetite!
asparagus potato soup with a lemony drizzle
May 16, 2013 § 20 Comments
Last week I was profoundly inspired while reading a beautiful post in My French Heaven. Stephane’s Simple Crème d’asperge was magnificent! I loved her minimal ingredients and simplistic method of cooking asparagus soup. I happened to have asparagus in my refrigerator and decided right then and there we were going to have her soup. Her recipe was indeed wonderful. We loved every silky spoonful!
Next trip to the market I was awe struck at the sight of a mountain of asparagus! I had to buy some more. I picked out a nice bunch and then noticed the price per pound. I do not think I have ever seen asparagus so modestly priced. Do you think I bought too many? Obviously we are having a very productive asparagus growing season here in Washington state. Our temperatures have been warming up for several weeks topping out at 80° for a couple of days. This week the rain is falling and it has cooled off to a comfortable 65°…perfect!
This soup recipe is very different from Stephane’s. Her soup was so smooth and much lighter. And the nutmeg added such a nice subtle flavor. Using a blender rather than straining gave this soup a heartier consistency. I added a drizzle of lemon dressing to give it some zing.

Ingredients
- 2 large bunches of asparagus, remove tough lower stem, cut into pieces
- 2 large russet potatoes, peeled and cubed
- 1 medium sweet onion, chopped
- 3 tablespoons butter
- 1 quart of vegetable broth
- 1/2 lemon
- 1/4 cup olive oil
- 2 garlic cloves, pressed or chopped fine

Method
In a heavy soup pot heat butter over medium high heat and cook the onion until soft. Add the potatoes, asparagus, salt, pepper and stir to coat well. Pour the vegetable broth in and bring to a boil. Lower the heat and slow boil until potatoes are tender. Blend the soup to desired consistency.
L e m o n y D r i z z l e D r e s s i n g
- 1/4 cup olive oil
- 2 cloves garlic, pressed or finely chopped
- juice of 1/2 lemon
- a pinch of salt
Mix all three ingredients in a small bowl and stir with a fork. Drizzle on top of individual servings.

Serves 4, with leftovers.
buon appetite.
caramelized onions and hamburgers
May 13, 2013 § 25 Comments
This is simply delicious. I love to make a nice spicy sauce for our buns and top with caramelized sweet onions. This evening I served these with roasted potatoes, garlic aioli and a power green salad, which consisted of baby spinach, mizuna, chard and kale.

s p i c y p i n k s a u c e
- 4 tablespoons mayonnaise
- 1 tablespoon lemon
- 1 teaspoon worcestershire sauce
- 1/2 teaspoon sweet paprika
- 1 teaspoon hot sauce (tapatio or cholula)
Put all ingredients in a bowl and season with salt. Mix with a fork until smooth. Set aside, perhaps in the refrigerator.
h a m b u r g e r s a n d c a r a m e l i z e d o n i o n s
Ingredients
- 1 pound of good quality ground chuck
- 3 tablespoons chopped parsley
- 1 egg, lightly beaten
- 1 large sweet yellow onion, sliced into rings
- 5 tablespoons olive oil
- 3 thyme sprigs
- 1 large juicy tomato, sliced
- handful of lettuce of your choice
- 4 sesame buns
Method
Start your barbecue. I use a briquette grill so I need to get it going first. You may use a grill pan on the stove, lightly brushed with olive oil.
Heat 5 tablespoons of olive oil to a nonstick skillet and fry the onions over low heat until they are golden and sticky. Add the thyme sprigs and a pinch of salt and continue to fry stirring with a wooden spoon, for about 15 minutes until they get a little crisp.
Put the ground chuck, parsley and egg in a bowl and season with salt and pepper. Remove your rings and mix well with your hands and shape into four large flat patties. The should be about 4 inches in diameter and not more than 3/4 inch thick.
Grill the patties over a hot grill until they are nicely browned. Make sure they don’t get smoked and try not to allow them to dry out by cooking too long. They should be cooked through but moist and juicy. If you prefer to have a cheese burger, cover your patty with a slice of cheese and let it melt. Gouda or gorgonzola is a nice cheese to use.
Place all of your condiments on the table in separate bowls. Heat the buns on the grill of a couple of seconds. Put the patties inside the buns and serve right away, letting everyone around your table make their own by adding sauce, tomatoes, lettuce and warm onions as they like.

r o a s t e d p o t a t o e s
- 3 russet potatoes, scrubbed
- 1/4 cup olive oil
- 2 tablespoons fresh chopped rosemary
- salt and pepper
Preheat oven to 450°. Cut your potatoes into your desired shape and place in a large bowl. Add olive oil, rosemary, salt and pepper to the bowl and toss well to fully coat the potatoes. Place on a parchment lined baking sheet and roast until nice and brown, approximately 45 minutes. Make sure to give the baking sheet a shake now and again and turn your potatoes over for even browning.
The g a r l i c a i o l i I made was a very simple version I discovered a few years back. I just use mayonnaise with a little olive oil and a few pressed garlic cloves. Sometimes I add different herbs to add another nice flavor.
Serves 4
buon appetite.
pasta with baby artichokes (orecchiette con carciofini)
May 9, 2013 § 37 Comments
The majority of my dinner inspiration occurs while taking a stroll through the produce area of the market. On this visit I came to a halt in front of the baby artichoke arrangement. Instantly I knew I was going to try them in a sauce for pasta. 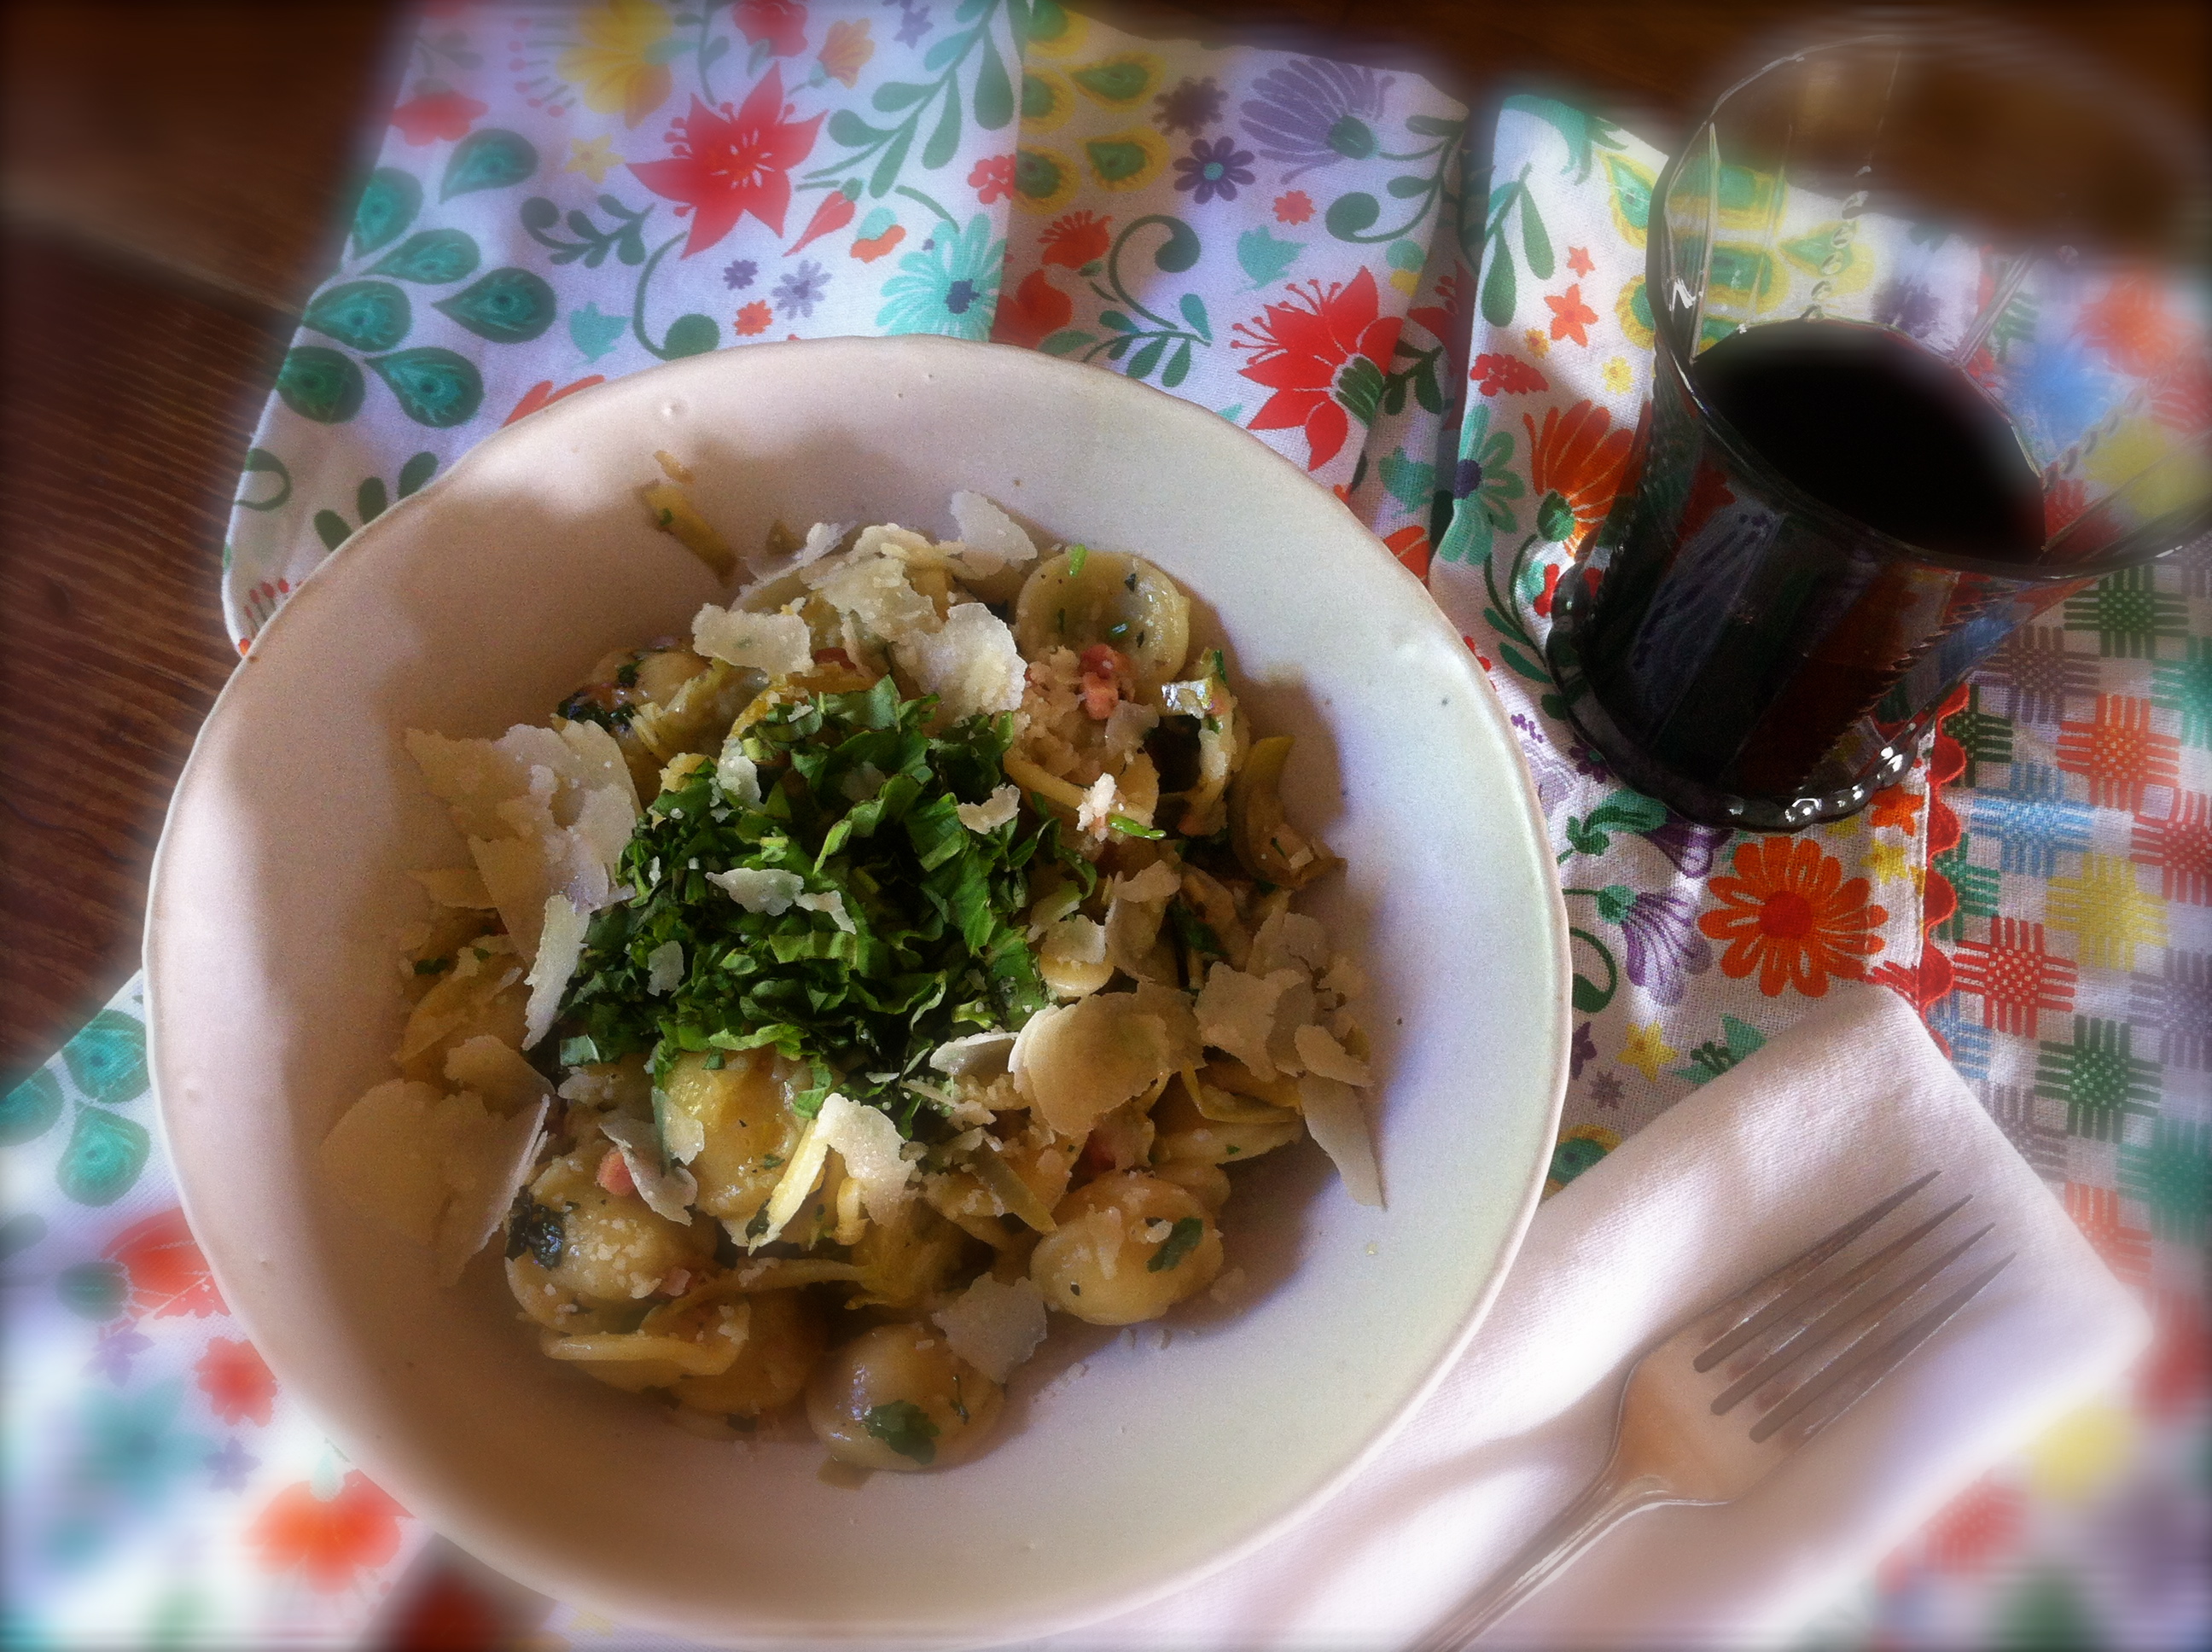
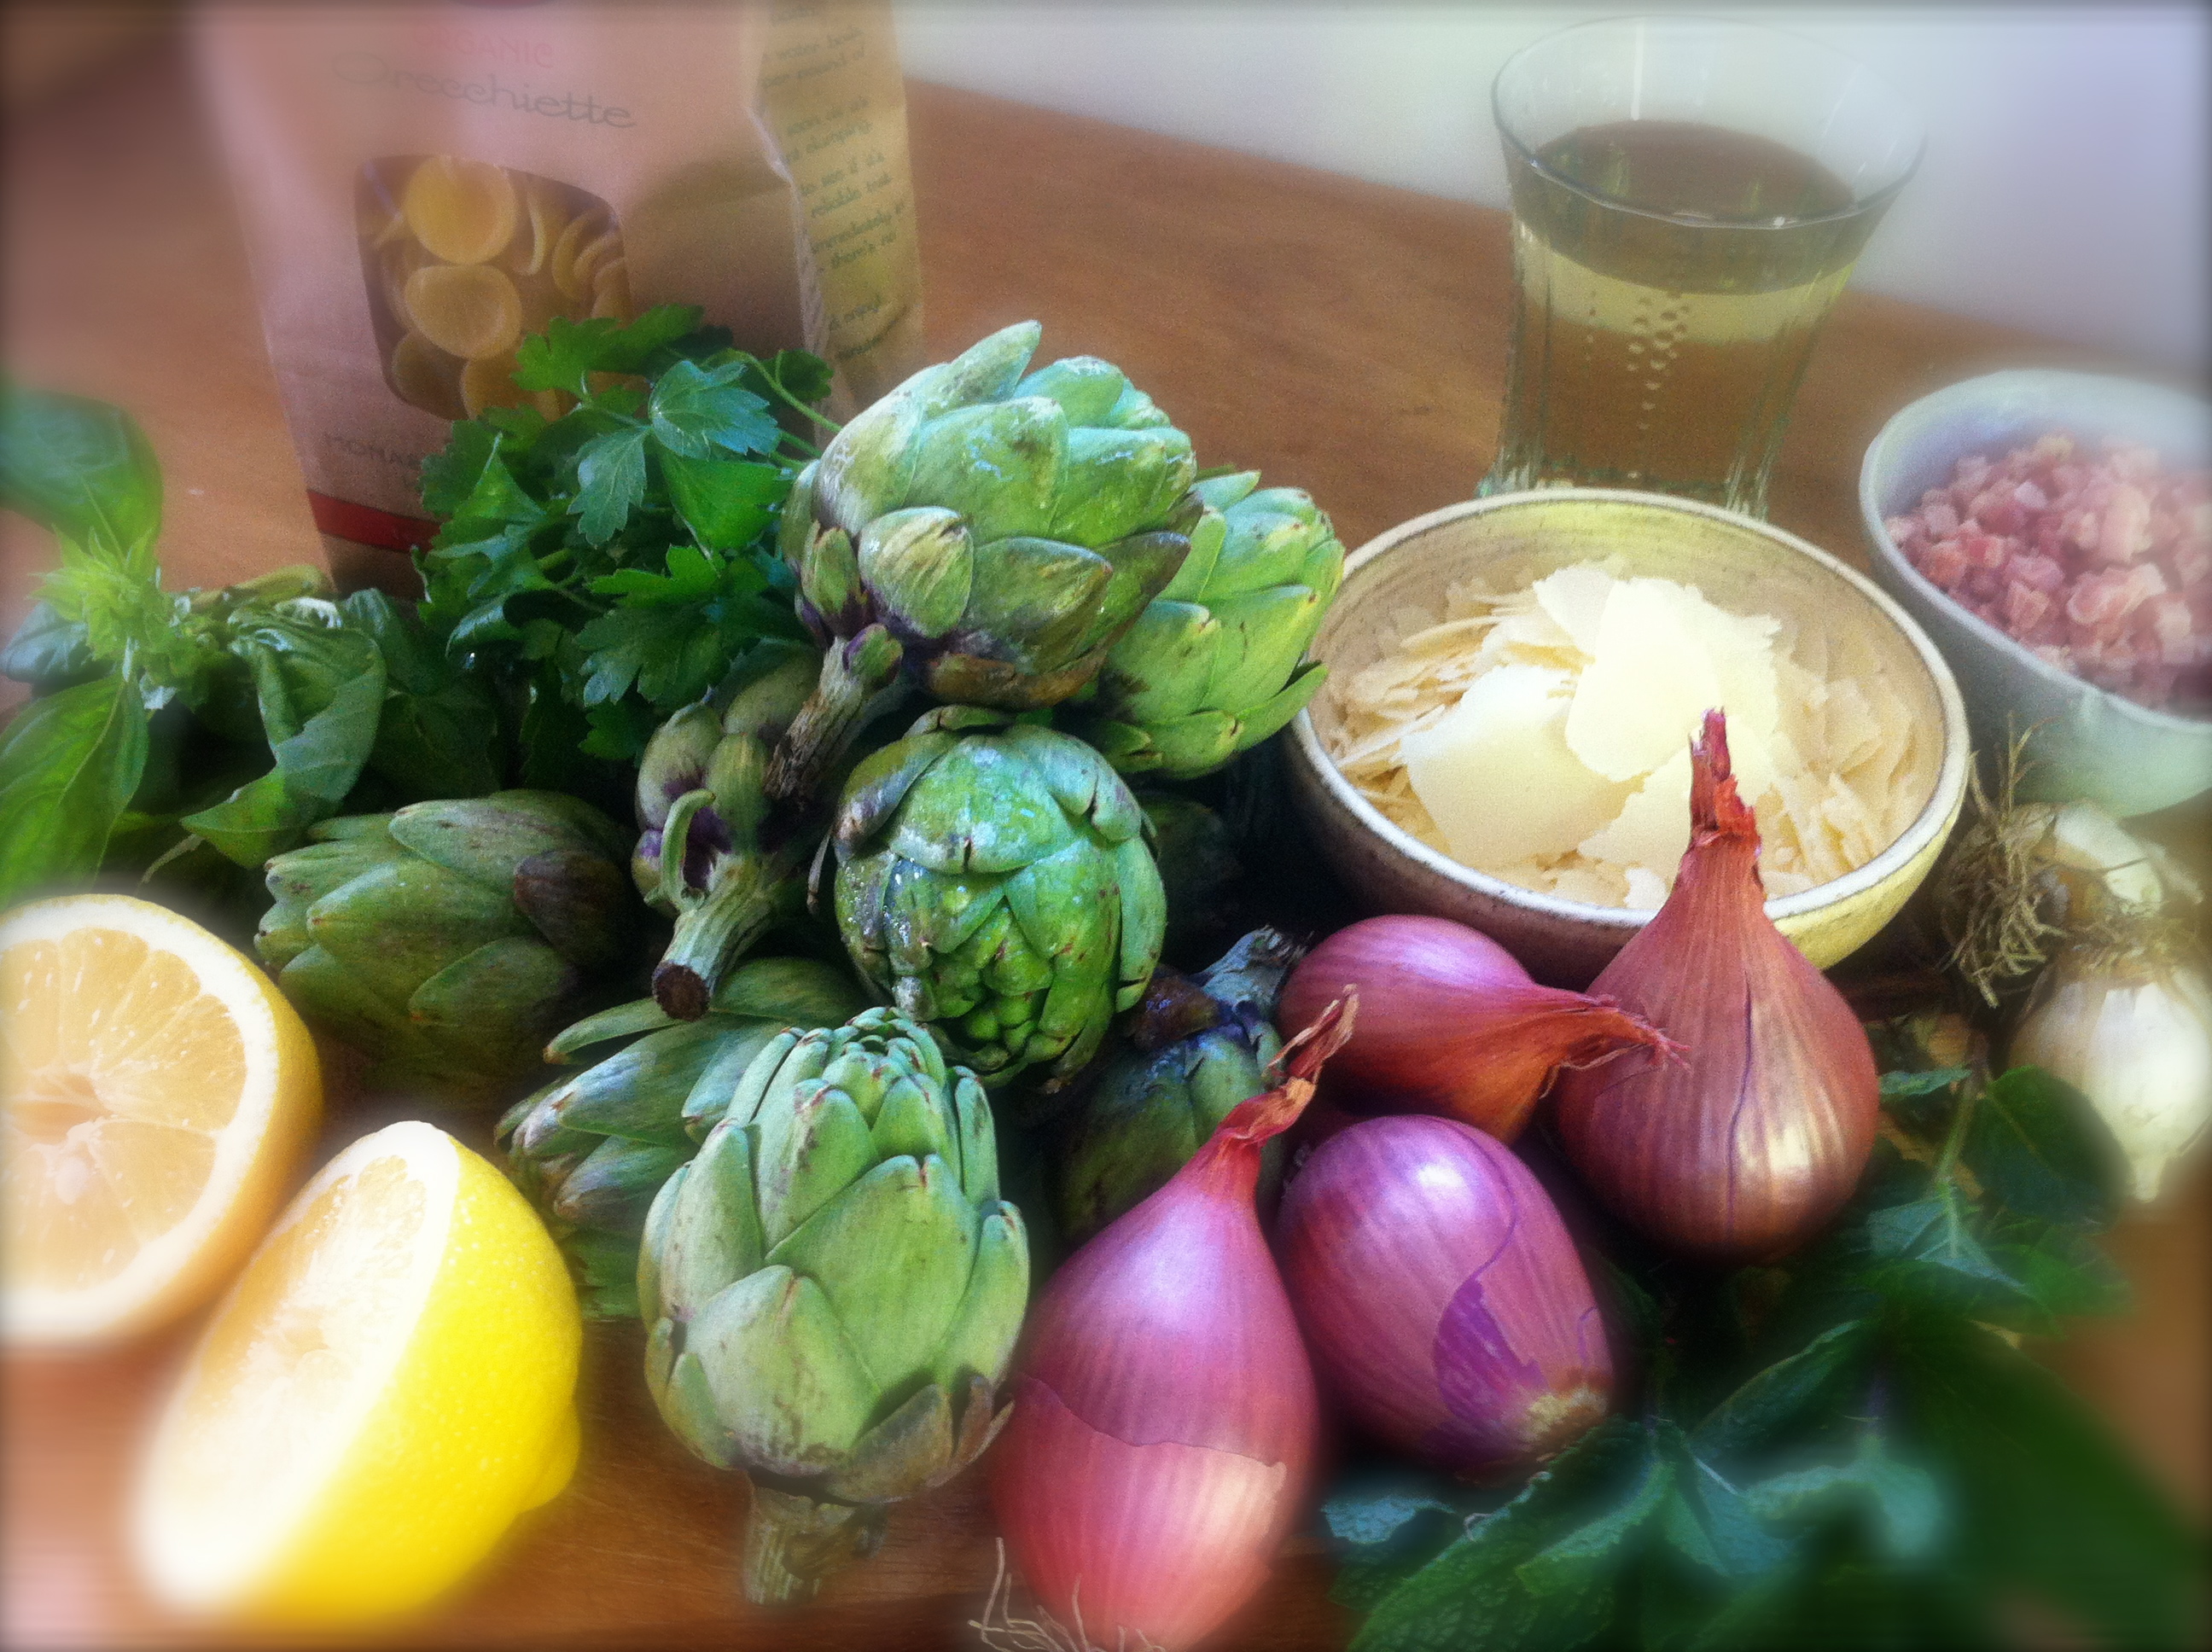
Never having prepared baby artichokes before I knew with a little trimming you may eat the whole thistle. After a little research I found it is very necessary to soak your trimmed artichokes in lemon water, otherwise they turn an unsightly brown hue. I read a couple of appetizing sautéed baby artichoke recipes and came up with an idea. Shallots instead of onions. Herbs from the garden. And one of my favorite pasta sauce ingredients, pancetta.
This is very simple and not too rich. The three herbs really give it a fresh spring-like flavor. For this dish I chose orecchiette because it is my son’s favorite. He calls them hard hats.
Ingredients
- 12 baby artichokes, cut the tops and stems off and pull off any thicker outer leaves
- 1 lemon, halved
- 4 shallots finely chopped
- 4 cloves garlic, finely chopped
- 1/4 pound pancetta, diced
- 1 cup dry white wine
- 1 pound orecchiette pasta
- handful parsley, finely chopped
- handful mint, finely chopped
- handful basil, finely sliced
- freshly shaved grana padano parmesan
Method
Squeeze your lemon into a large bowl of water and drop the lemons in too. As you are slicing your artichokes add them to the bowl so they do not turn brown.
Bring a large pot of water to boil for the pasta.
In a large skill, over medium heat add your olive oil and pancetta and cook until brown. Add shallots and garlic and cook another 4 or 5 minutes. Drain the artichokes and add them to the skillet. Raise the heat to medium high and cook until the edges have turned a nice golden brown. Add wine and reduce. Cover pan, lower the heat to simmer and cook another 8-10 minutes. Season with salt and pepper to taste.

While pasta is cooking chop the parsley and mint together. Slice the basil into little strips.
After your pasta has cooked and before you drain, reserve 1/2 cup of your pasta liquid.
Stir the reserved pasta water into your artichoke sauce and bring to a soft boil. Add drained pasta and parsley to the sauce and toss to combine and coat well. Turn off heat. Serve right away topped with cheese and basil.
Serves 4
buon appetite.
roquette salad
May 6, 2013 § 16 Comments
Here is a very nice salad recipe I think you will enjoy. This tangy dressing was a satisfying alternative to my usual “go to” olive oil and balsamic blend. I think any seed or nut would work well as long as they are roasted and salted first. I had both sunflower seeds and pine nuts in my cache, so I chose sunflower seeds. I kept imagining pumpkin seeds would have been perfect, roasted and salted.
And, of course, along with my new obsession of “putting an egg on top” I just had to include one.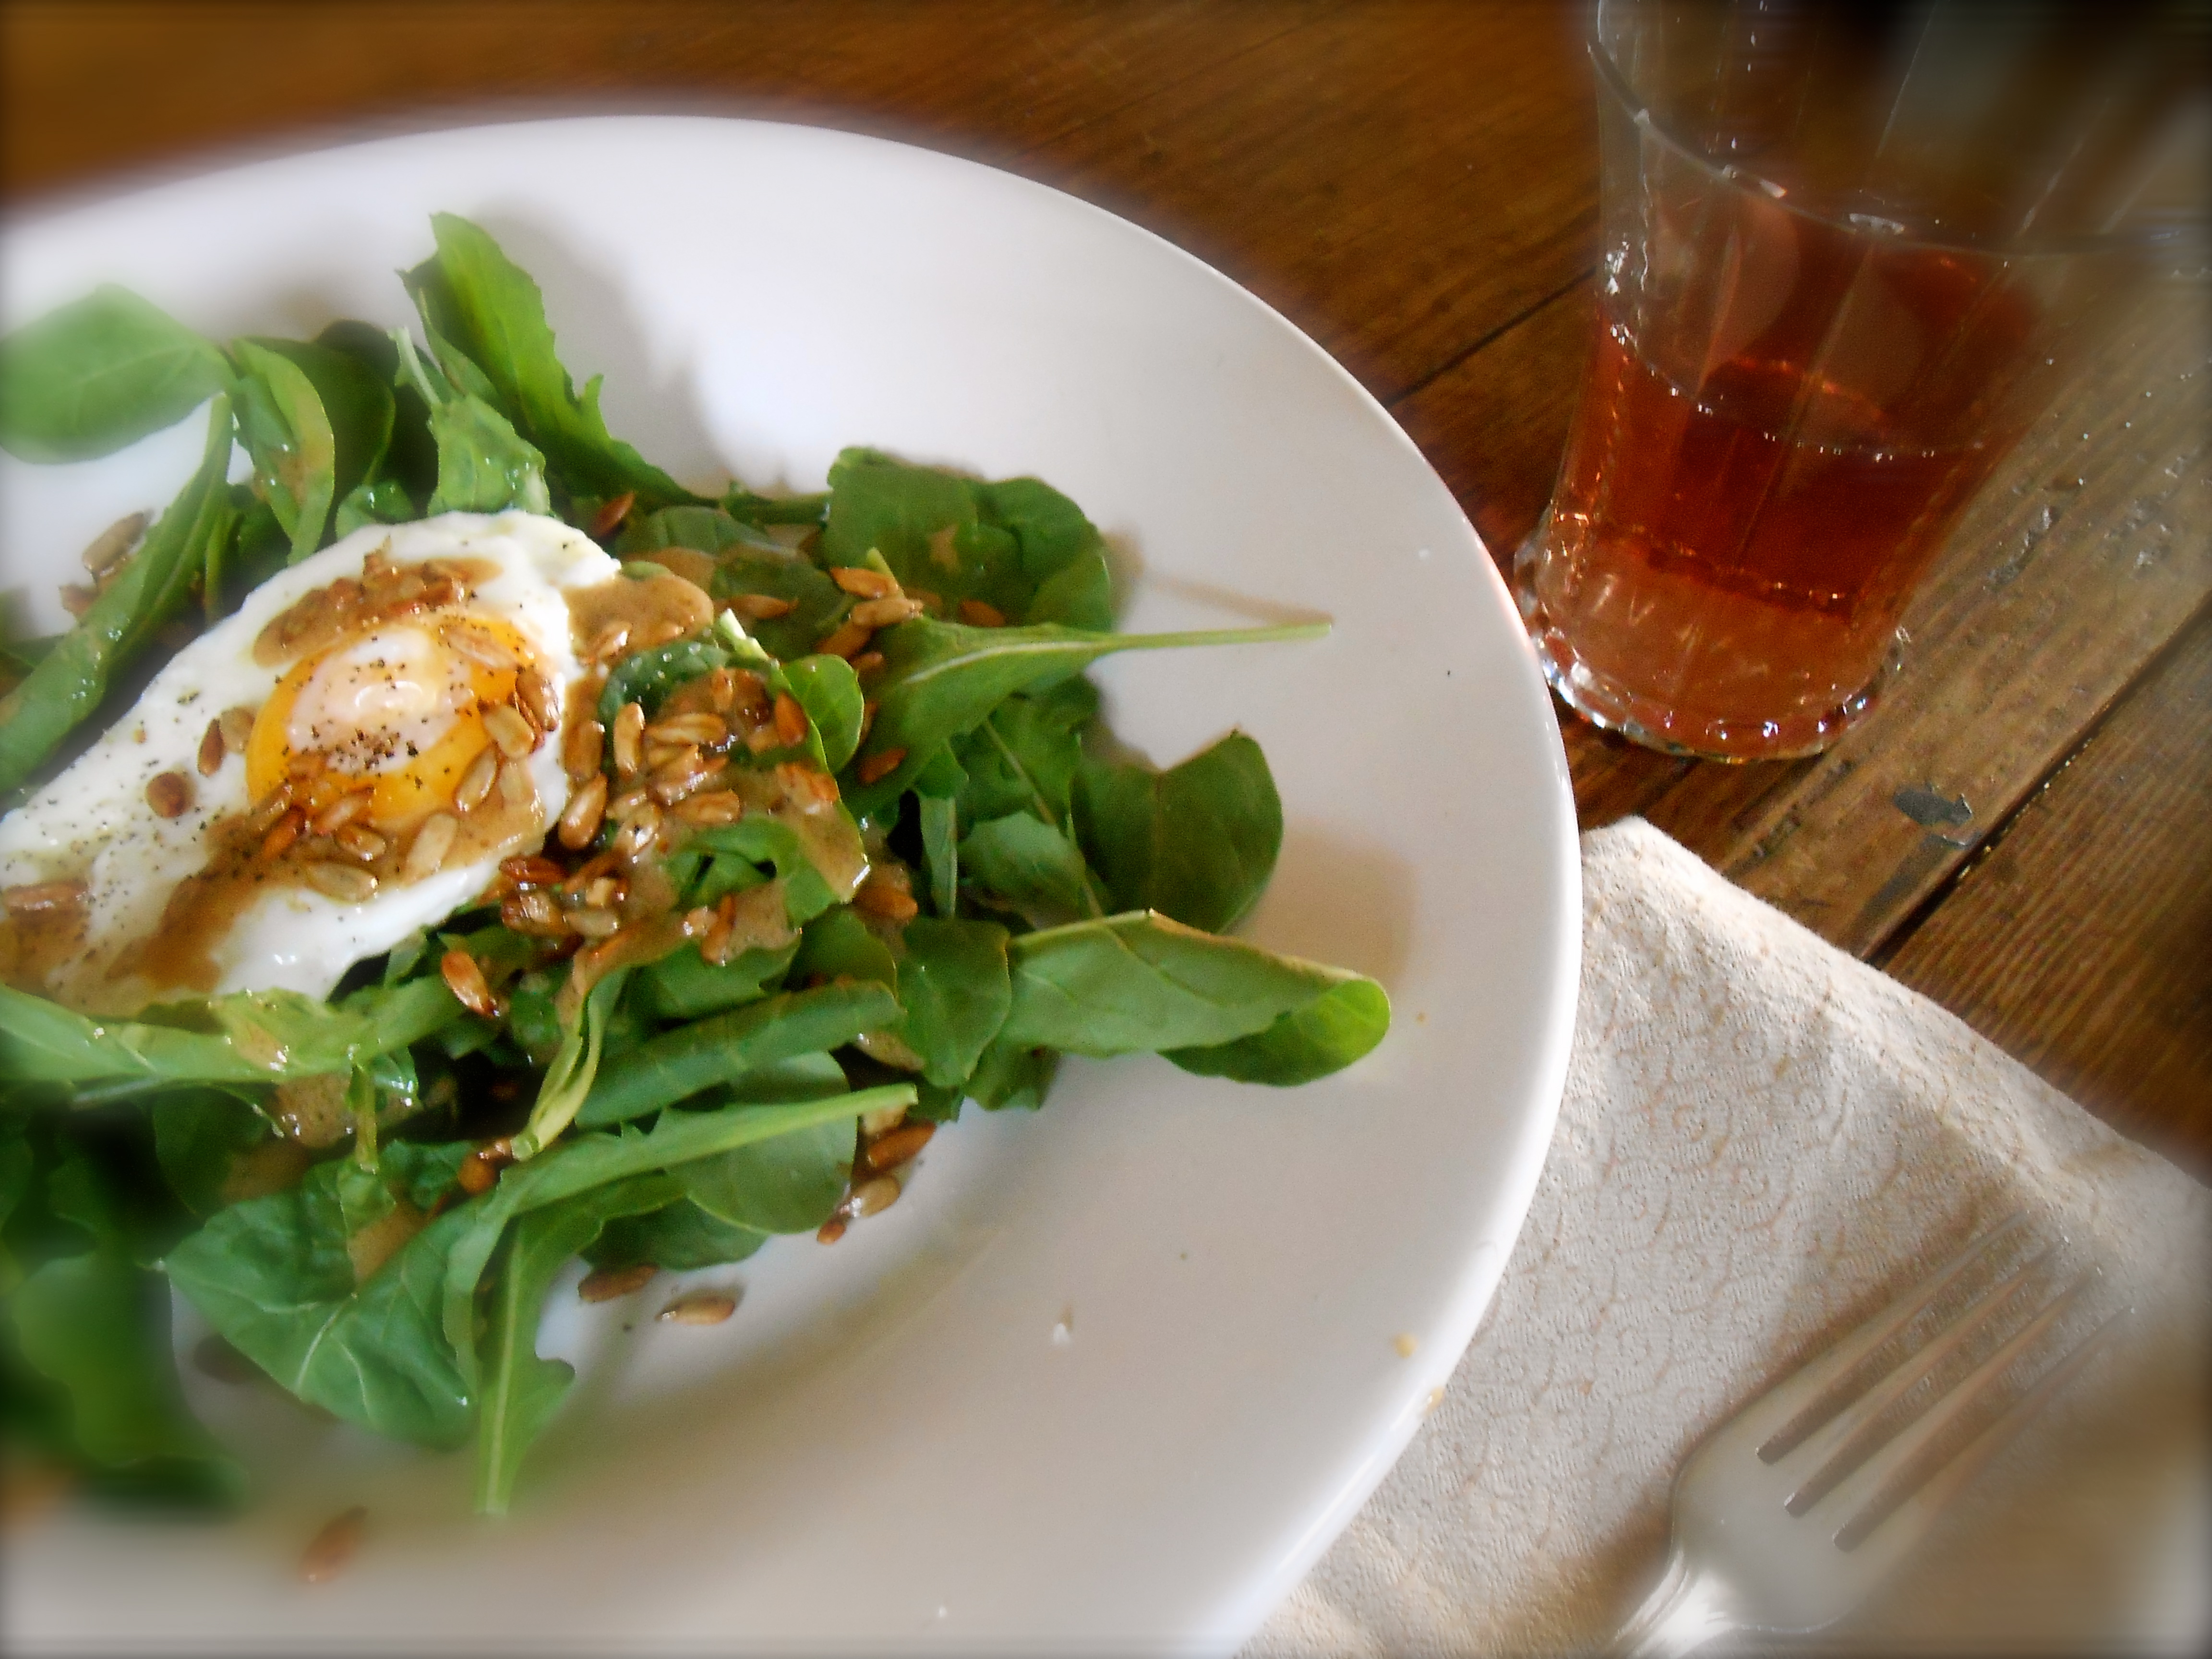
served with a nice glass of dry rose”…
Ingredients
- 3 large handfuls of spring greens….I used arugula
- 1 cup sunflower seeds
- sea salt
- olive oil for coating
- 4 eggs
dressing
- 4 tablespoons olive oil
- 2 tablespoons sherry vinegar
- 2 teaspoons dijon mustard
- sea salt / pepper
Method
Heat oven to 400°. Line a baking sheet with parchment paper and scatter your seeds, season with salt and pepper and drizzle with olive oil, scrape around with a spatula until well coated. Roast for 15-20 minutes until golden brown. Remove from oven and let them cool.
Make your dressing by whisking all the ingredients together in a small bowl.
Divide your salad greens among serving plates, top with seeds and drizzle dressing over each.
Heat 1-2 tablespoons olive oil over a medium heat in a non-stick skillet. Fry your eggs according to your preference.
Top each plate with a fried egg and serve with dressing on the side.
Serves 4.
buon appetite.
company eggs for dinner
May 1, 2013 § 23 Comments
When I was a little girl I remember having a good laugh with my mom over our neighbor’s salad spinning technique. After washing her lettuce she would put it in a pillow case, take it outside and spin it around and around like a propellor. The water would spin off brilliantly! She would spin a few times, stop, shake the lettuce a little, then spin again until she had perfectly clean, dry lettuce. It was a comical site to see. When I grew up I purchased a really spiffy salad spinner. I used it, however, it took up an enormous amount of space in my small kitchen. One day, by accident, I dropped the spinner and the bowl cracked in half. Left without a choice that evening I turned to the pillow case spinning. I was stunned. It worked beautifully. I was laughing as I spun and spun. Needless to say, I did not replace my salad spinner. I have a pillow case in my kitchen towel drawer specifically for my greens. You may want to try it for the swiss chard in this recipe…
The other day I opened up the latest issue of Bon Appetite magazine and saw a beautifully photographed baked swiss chard and egg recipe. I have been seeing a lot of gloriously baked dinners with eggs on top. Loving eggs as we do in our family, I have been cracking them on top of thick creamy soups, baking them on pizzas and now….casseroles. This is not your usual company egg recipe. The company egg recipes I have read are more like a frittata; scrambled eggs combined with cheese and mixed with other ingredients, then baked until firm. Swiss chard is abundantly in season right now and suddenly I knew what we were going to have for dinner that night.

When I stopped at the market to buy the swiss chard, I picked up a delightful aged white cheddar. I imagine a typical cheddar would be fine in this recipe, however, the flavor of this mature cheddar was extraordinary. When I make this recipe again I will use 4 bunches of swiss chard. I felt the “bed” the eggs laid on was a little thin. The original recipe used 12 eggs. With three of us around our table I only used 4 eggs. Add more according to your appetite and number of gathered guests. I used half and half instead of heavy cream, only because that is what I had in the refrigerator. I served our company eggs with warm naan and roasted beets topped with garden fresh chives.
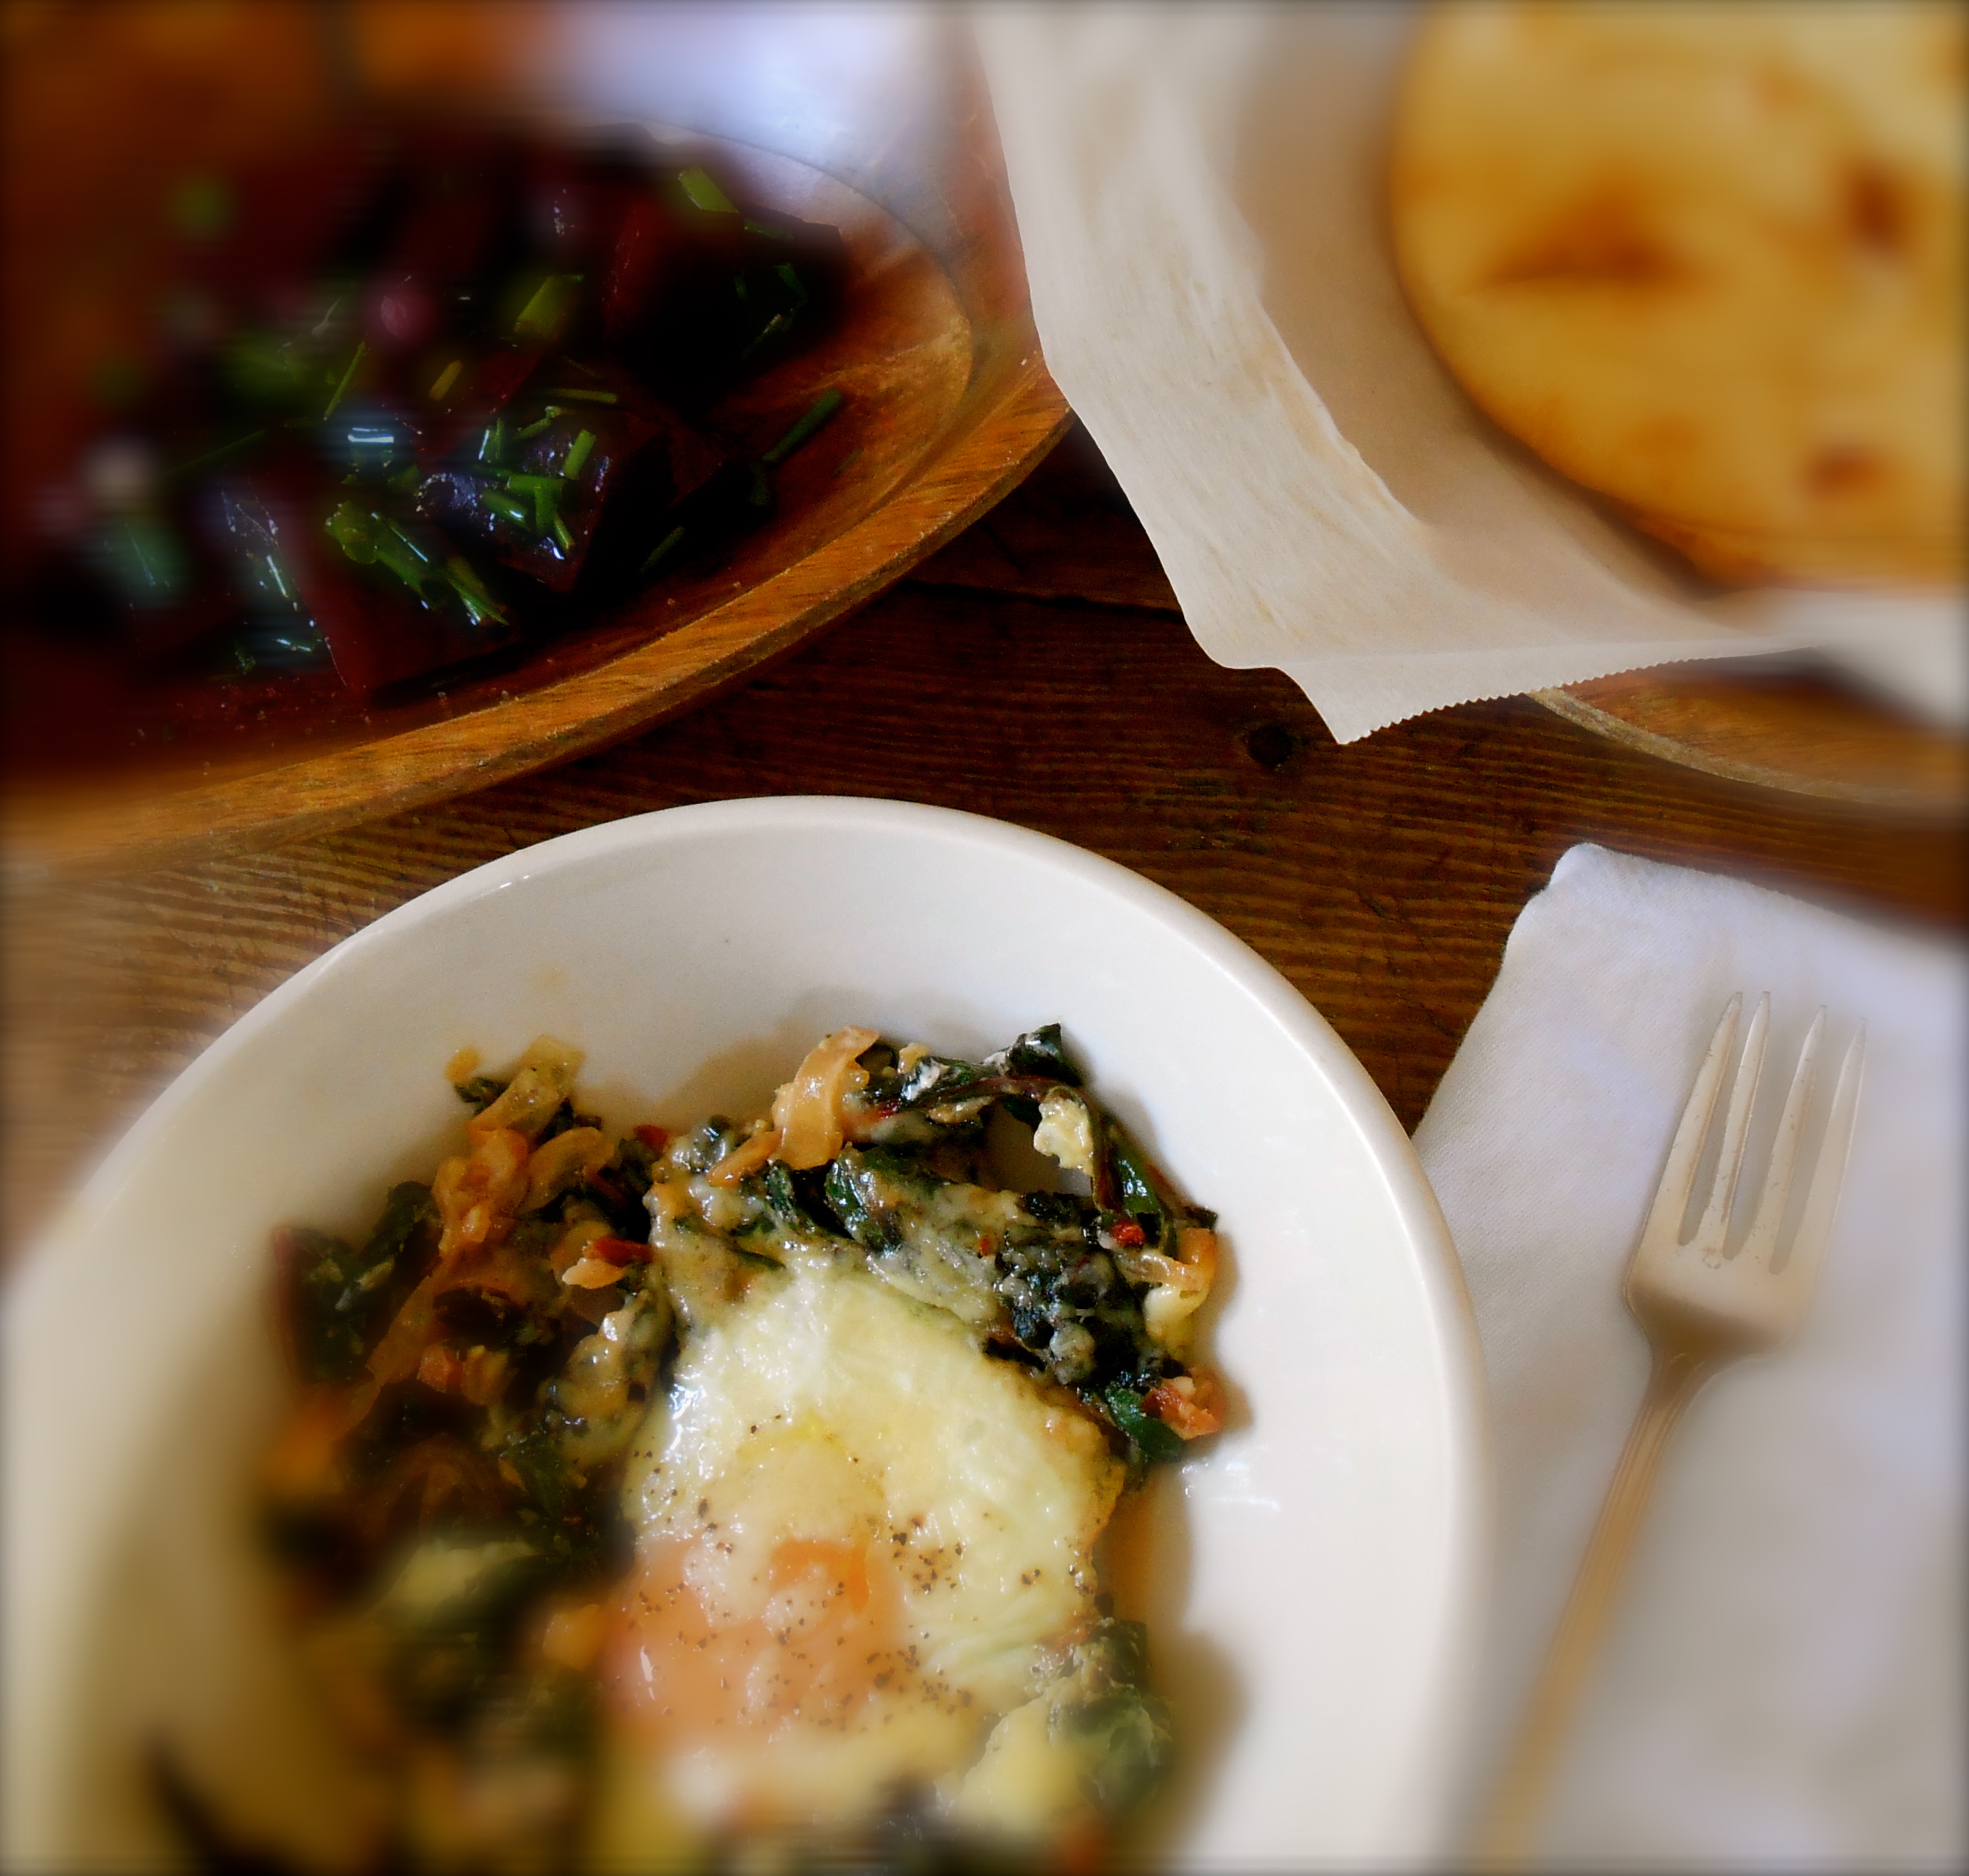
Ingredients
- 2 tablespoons olive oil
- 1 small onion, thinly sliced
- 4 garlic cloves, finely chopped
- sprinkling of sea salt and pepper
- 2 bunches Swiss chard, thick center ribs and stems removed, washed, dried and coarsely chopped (about 12 cups)
- 1/2 cup half and half
- 4 large eggs
- 2 ounces aged white cheddar, grated (about 1/2 cup)
Method
Preheat oven to 400°. Heat oil in a large skillet over medium heat. Add onion, garlic and a sprinkling of salt and pepper. Cook, stirring occasionally, until onion is softened, 5-8 minutes. Add chard to the skillet by the handful, tossing to wilt between additions. Cook until tender, 5-8 minutes. Add half and half, simmer until thickened and almost evaporated. Place your chard mixture evenly in a 13x9x2-inch baking dish. Using the back of a spoon, make evenly spaced divots in the chard mixture. Crack 1 egg into each divot. Season eggs with salt and pepper. Sprinkle your cheddar all over. Bake, rotating dish once, until egg whites are almost set and yolks are still a bit runny, 15-18 minutes. Let stand 5 minutes before serving while the eggs set.
Served 3
buon appetite.
spiced rubbed halibut (with two simple sauces)
April 29, 2013 § 24 Comments
A number of my dinners are created from a single craving. The other day I had a craving so, I went to the market specifically to buy salmon. The only salmon available was “fresh farm raised” or “previously frozen wild caught”. Because I prefer to purchase fresh wild caught fish I scratched the salmon idea and decided on the halibut. Obviously I really take heed to my cravings. Sometimes I think when I crave a specific food it is because my body needs it. I felt like we needed fish. Feeling very enthusiastic and eager I brought the fish home and started working on a dry rub. To accompany our fish I prepared smashed potatoes with shallots and a hearty mixed green salad. Heavenly.
For some reason when I get to the fish counter I always forget how much fish I need to bring home. Fishmongers have recommended anywhere between 1/2 – 1 pound per person. I imagine it depends on the appetite of your guests. For our family 1/2 pound each is a perfect portion.

For the sauces I used what I could find in the refrigerator. I made a chermoula style pesto using cilantro, garlic, cumin, lemon, olive oil and salt in the food processor. The other sauce I prepared was greek yogurt, garlic, dill, lemon, olive oil and salt. These two sauces were set on the table in little serving bowls to add to our plates as desired.

Ingredients
- 1.5 pound fresh wild caught halibut
- 1 tablespoon olive oil
- 1 tablespoon butter
For the dry rub
- 1 tablespoon ground cumin
- 1 tablespoon chili powder
- 1 teaspoon mexican oregano
- 1 teaspoon garlic powder
- 1 teaspoon coriander
- 1 teaspoon sugar
- 1 teaspoon black pepper
- 1 teaspoon sea salt
Chermoula sauce
- large handful cilantro
- 3 cloves garlic
- 1 tablespoon ground cumin
- large pinch of crushed red pepper flakes
- juice of 1/2 lemon
- 1/2 teaspoon salt
- 1/3 cup olive oil
Yogurt sauce
- 1 cup whole milk greek yogurt
- handful of fresh dill, finely chopped
- 3 cloves garlic, finely chopped
- juice of 1/2 lemon
- 1/2 teaspoon salt
- 2 tablespoons olive oil
Method
Rinse your halibut and pat dry with paper towels. Combine all dry rub ingredients in a bowl and mix well. Using your hands rub both sides of your fish with rub and set aside to “marinade a little”.
Prepare your sauces. For the chermoula, in a food processor chop the garlic first. Then add everything else except the oil. Blend. With the motor still running gradually add the olive oil until you have a loose, pesto-like paste. For the yogurt sauce, in medium size bowl combine all ingredients until well mixed. Place in small serving bowls on your dinner table.
Heat a skillet over medium high heat until it is good and hot, and then add the tablespoon of oil to the pan. Add the butter for extra flavor. Since the pan is already hot, the oil needs only a second or two to heat up. (I have read this is the secret to good searing technique…heat up the pan first.)
Gently lay the fish skin side up in the hot pan. Lower the heat to medium and sear for 3-5 minutes. Flip the fish over. Since most of the cooking was done on the first side, the fish may only need a minute or two on the other side depending on its thickness.
Divide your fish and place onto individual serving plates. We topped ours with a little roasted spring onions.
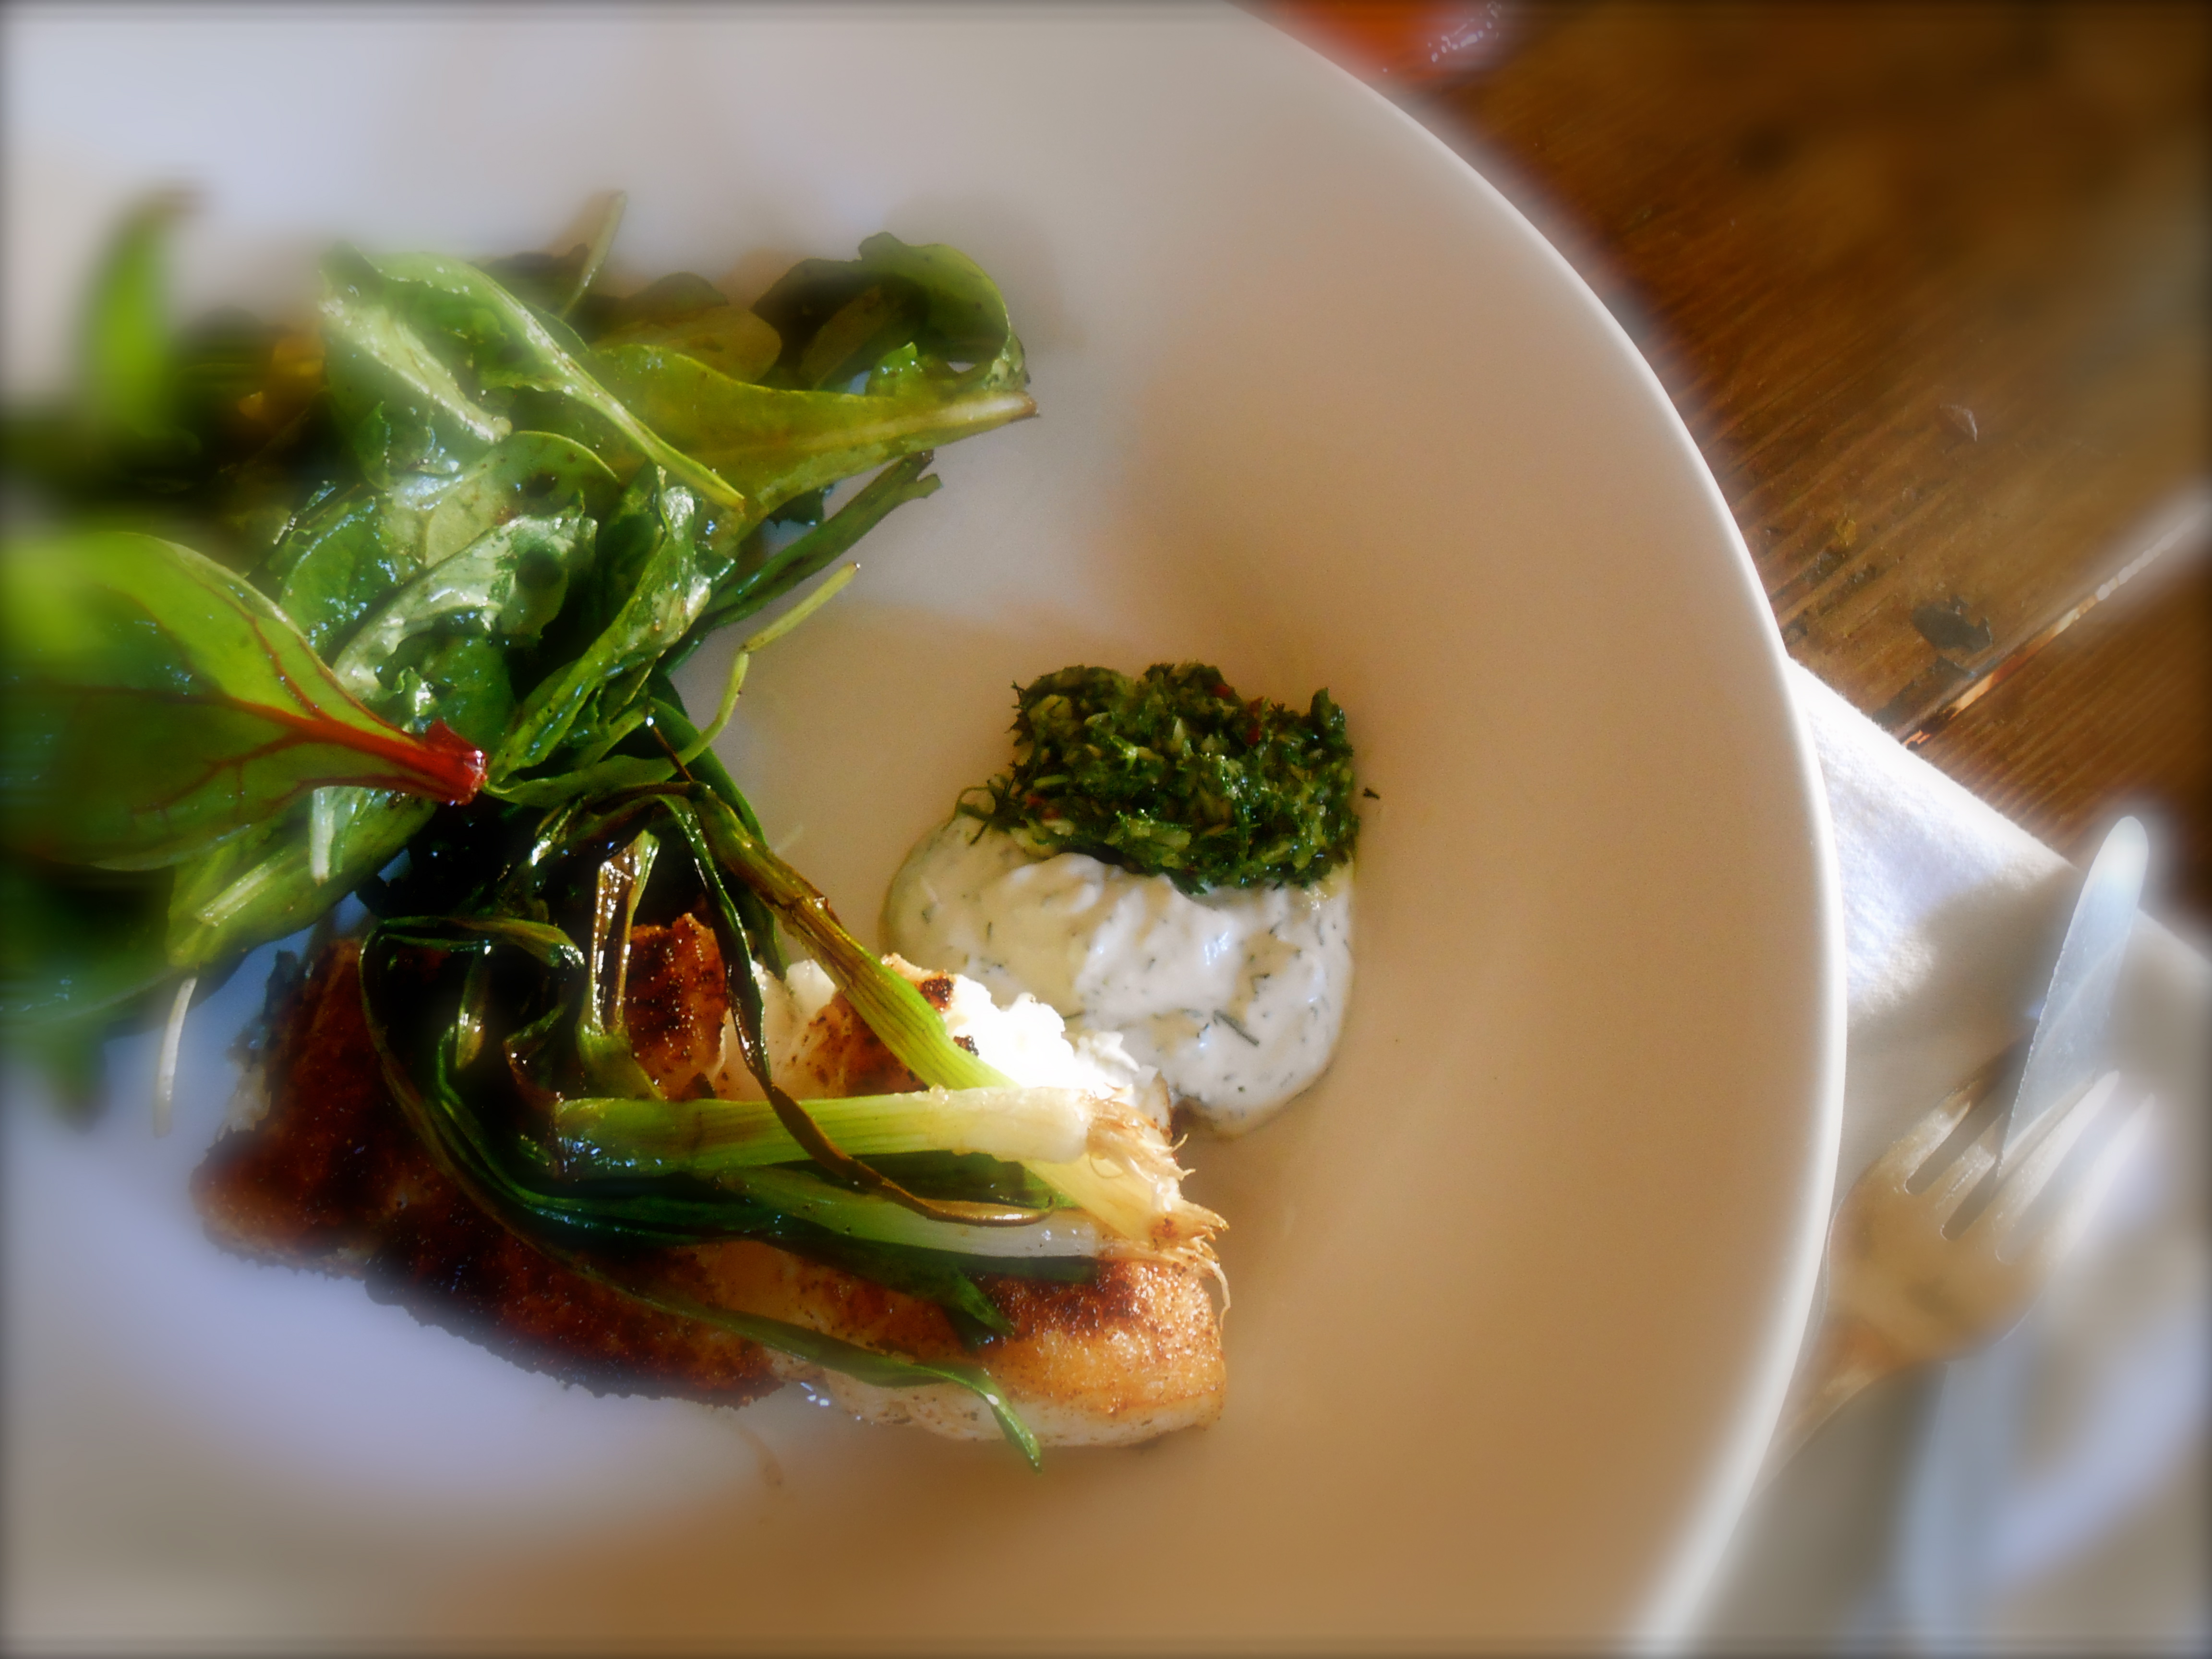
Serves 3
buon appetite.
