coconut curry ramen
October 29, 2015 § 79 Comments
 We visited our Asian supermarket the other day to pick up the makings for sushi and while there I gathered up a few ingredients I thought would make a nice pot of curry noodles; red curry paste, coconut milk, ramen noodles, fresh ginger, jalapeño and kaffir lime leaves, to name a few. What I came up with is this utterly delectable bowl of silky goodness.

We kept the recipe relatively minimal by going easy on the vegetables, light on the spiciness and adding a little tang with a squeeze or two of lime. If you would like to make it vegetarian you could leave out the chicken sausage and the fish sauce and add crispy baked tofu and perhaps a few clusters of bok choy.
I n g r e d i e n t s
- 2 – 15 ounce cans coconut milk
- 2 tablespoons butter
- 3 tablespoons red curry paste
- 1 jalapeno pepper, minced
- 1 pound Italian chicken sausage, removed from casings
- ½ teaspoon sea salt
- ½ teaspoon black pepper
- 3 cups chicken broth
- 2 carrots, peeled and shredded
- 2 tablespoons fresh grated ginger
- 5 fresh kaffir lime leaves*
- 1 tablespoon fish sauce
- 2 tablespoons soy sauce, plus a little more as needed
- 4 tablespoons lime juice
- 1 tablespoon brown sugar
- 3 single wrapped servings of ramen noodles, 9 ounces
- ½ cup fresh cilantro, chopped, plus extra for garnish
In a large dutch oven heat 6 ounces of coconut milk over medium heat. Add the butter and curry paste and stir to combine. Cook for 2-3 minutes, then add the finely chopped jalapeño. Cook until tender, approximately 4-5 minutes. Add the sausage, toss to coat and cook for 8-10 minutes or until the sausage has cooked through.
Once the sausage is cooked, add the rest of the coconut milk and chicken broth. Bring to a boil and lower the heat to simmer. Add the carrots, kaffir lime leaves, fish sauce, soy sauce, lime juice, brown sugar and ginger. While this is simmering boil the ramen noodles in a separate pot until done. Rinse with cool water. Add the ramen noodles and cilantro to the pot and serve, garnished with cilantro.

*A word about kaffir lime leaves: The glossy, dark green leaves of the kaffir lime tree are quite peculiar. Kaffir lime leaves look like two attached leaves and are most often used as a crucial ingredient for flavoring many Asian dishes such as soups and curries. The flavor profile is best described as a bright floral aromatic. Similar to bay leaves, whole fresh Kaffir leaves are generally removed from the dish prior to serving.
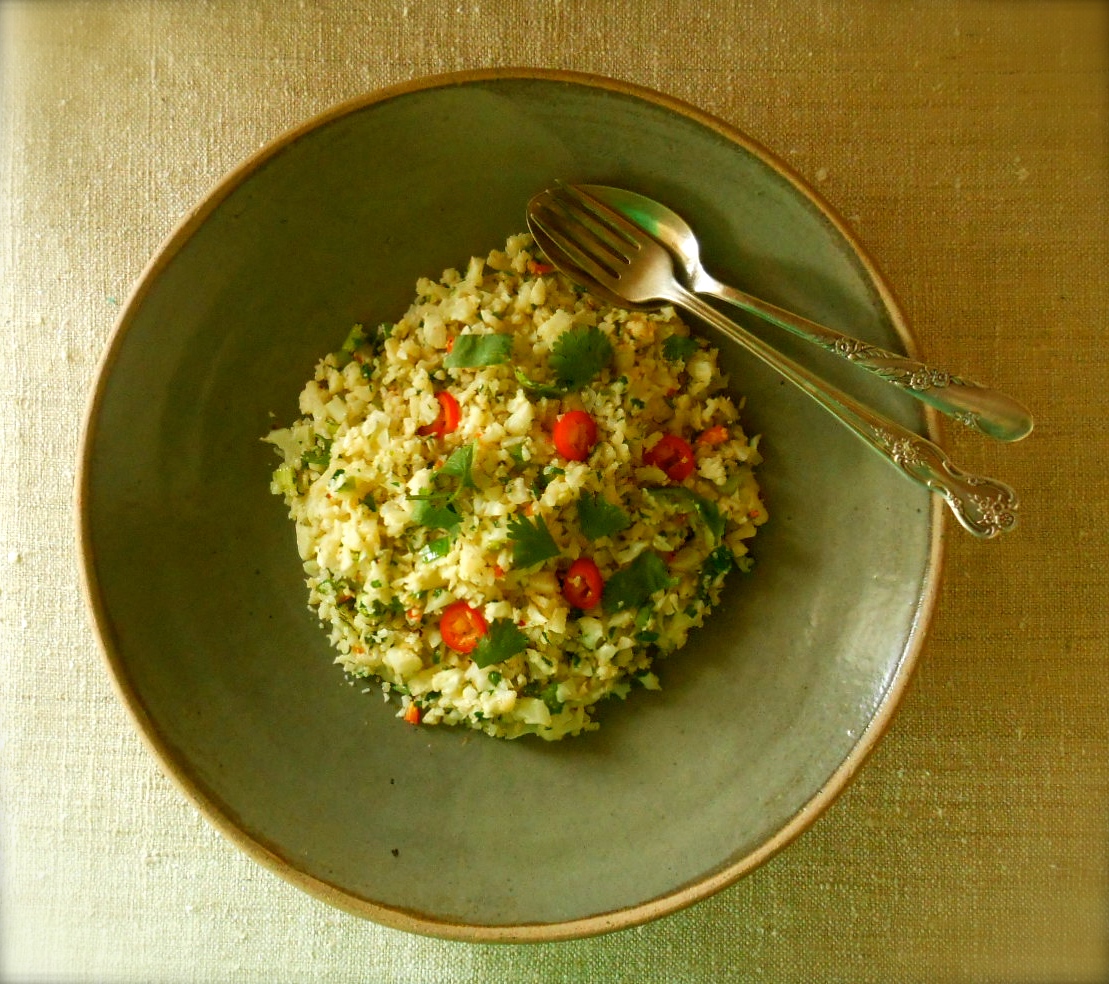
cauliflower with lemon and chili’s
November 21, 2014 § 82 Comments

I have this funny thing about recipes. When I find one I like I get stuck on it and make it over and over again for weeks. Well, repetition is the mother of skill, right? Reruns of last week’s dinner gives me time to learn the recipe so I can make it without following directions, and there is usually some sort of modification made to suit our own taste. This is definitely one of those recipes. After making it for the fourth time I decided I had to make it again but only this time take photo’s and post it, because it is delicious and you should try it.

Speaking of repetition, I baked four apple pies in two weeks! Pie number one was inspired by some gorgeous winesap apples I happened upon at the market. I baked a lovely pie and after dinner that evening it was a little late to eat a slice and I imagined how nice it will be the next day. Well, the next morning I got up to an empty pie plate. Yes, my son ate the whole pie in one evening. How?! So I baked pie number two, this time using granny smith apples and I made sure to have a slice. I was very unhappy with the mushy apple texture, so a few days later I baked pie number three, this time using honey crisp apples. Third time’s a charm! The apples held their texture and they were naturally sweet enough that I only added a tablespoon of sugar to the apples. Indeed another lovely pie. And then pie number four was the result of another visit to the market where I had originally picked up the gorgeous winesap apples. Once again I couldn’t pass them up and fact of the matter, I was still trying to get over missing out on a slice of pie number one. See what I mean about getting stuck on a recipe?
Back to the cauliflower with lemon and chili’s…

Chopping the cauliflower into tiny bits creates a nutty non-cruciferous flavor. If you or someone you cook for doesn’t like cauliflower you could try serving this. They will be surprised they are eating cauliflower. The little cauliflower bits will make you think you are eating cous cous. This nutty cauliflower dish has a perfectly balanced touch of heat from the red jalapeños and a bit of tang from the lemon.
Recipe slightly adapted from Taste Food Blog posted by Lynda Balslev. A lovely blog, I hope you will visit.
I n g r e d i e n t s
- 1 head cauliflower, chopped into tiny bits
- 2 tablespoons olive oil
- 2 tablespoons butter
- 1 teaspoon salt
- 2 garlic cloves, minced
- 1/2 teaspoon crushed red pepper flakes
- 1 teaspoon sweet paprika
- 1 teaspoon cumin
- 4 scallions, thinly sliced
- 1 red or green jalapeño pepper, remove seeds, finely chopped
- 1/2 cup cilantro leaves, chopped
- juice from 1/2 lemon (or lime)
- 1/2 teaspoon freshly ground black pepper
If you have a food processor, pulse the florets until they are finely chopped. Otherwise chop the cauliflower until it closely resembles cous cous. I left out the thicker stem part and will add them to a soup later. Heat the oil and melt the butter in a skillet over medium heat. Add the cauliflower and salt and cook for 5 – 7 minutes. Add the garlic, red chili flakes, paprika and cumin. Combine well and continue to cook for 5 minutes or until the cauliflower is tender. Remove from heat and stir in remaining ingredients. Serves 4.
plum kuchen
August 21, 2014 § 77 Comments
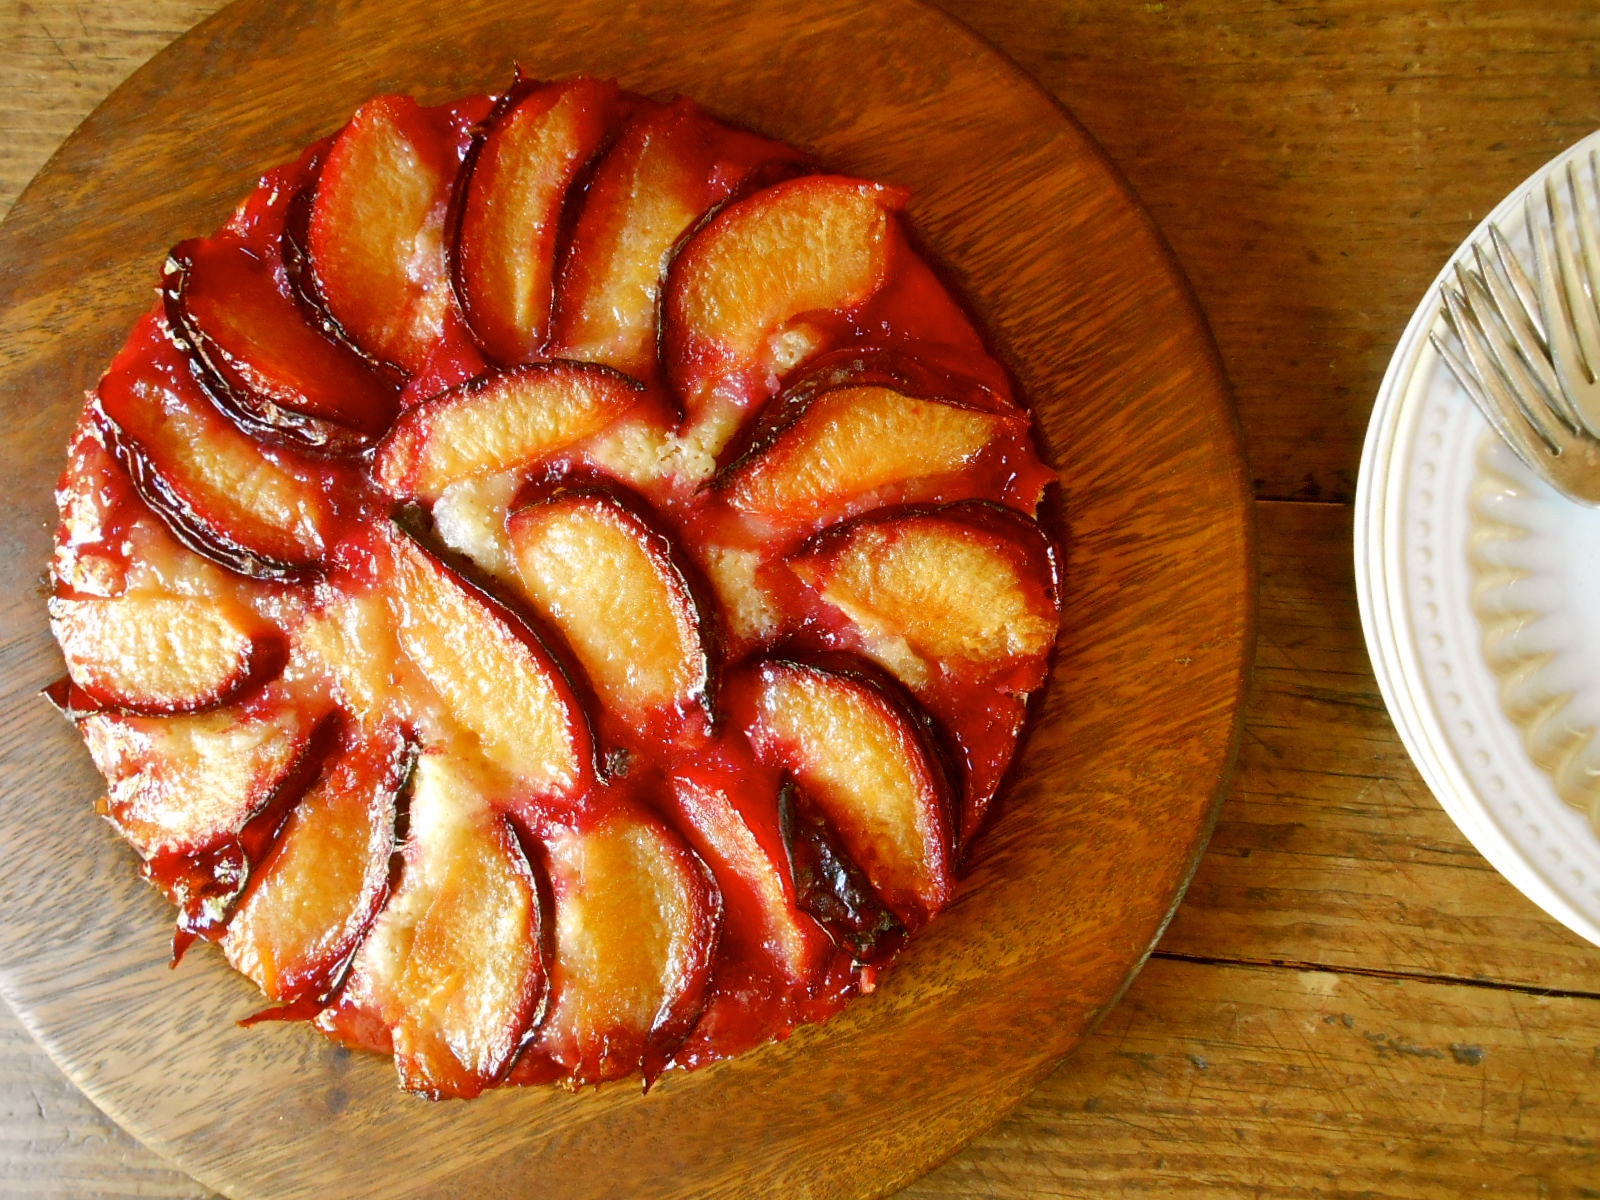
Plum season is upon us and it is time to bake a delicious plum cake! I don’t typically do a whole lot of baking. I’m more of a savory kind of person as opposed to sweet (unless it’s a fruity pie or cake). This is the kind of dessert that gets me baking, especially with stone fruit in season. The wonderful thing about this cake is as the fruit bakes on top, the plums soften into a jammy consistency, which contrasts nicely with the light bready cake underneath.

I was bit surprised when I released the edge of the 9-inch spring form pan and the cake was only an inch and a half tall. Not what I expected, but still humbly impressive with it’s beautfiully baked plums. As it turns out I liked the thin cake, it was much lighter, a little less decadent. Although there are several ways to make plum kuchen this recipe is wonderfully rustic and light. You could use a mix of black, red and yellow plums for contrasting flavor and color, or forego the plums and use your favorite stone fruit, such as apricots or peaches.
Recipe from Cooking Light Magazine.
I n g r e d i e n t s
- 1 – 1/2 cups all purpose flour
- 2/3 cups plue 2 tablespoons sugar
- 2 tablespoons brown sugar
- 1 teaspoon baking powder
- 3/8 teaspoon salt (a pinch)
- 1/4 teaspoon ground cardamom
- 7 tablespoon butter, divided
- 1/2 cup milk (I use full fat)
- 1/2 teaspoon vanilla
- 1 large egg
- 1-1/2 pounds plums, quartered and pitted
- 1 teaspoon grated lemon rind
Preheat oven to 425°F. Combine flour, 2 tablespoon sugar, brown sugar, baking powder, 1/8 teaspoon salt and cardamom in a medium bowl, stirring with a whisk. Cut in 4 tablespoons butter with a pastry blender or two knives until mixture resembles coarse meal.
Combine milk, vanilla and egg in a bowl, stirring with a whisk. Add milk mixture to flour mixture, stirring just until combined.
Spoon batter onto a 9-inch (prepared) springform pan. Arrange plums in a circular patter over batter. Combine remaining 2/3 cup sugar, remaining 1/8 teaspoon salt and lemon rind in a small bowl, stirring well. Melt remaining 3 tablespoons butter either on stovetop or microwave and stir into sugar mixture. Sprinkle plums evenly with sugar mixture. Bake at 425°F for 35 minutes or until browned and bubble. Cool in pan 1 hour on a wire rack before removing springform.
hominy hash
May 19, 2014 § 68 Comments
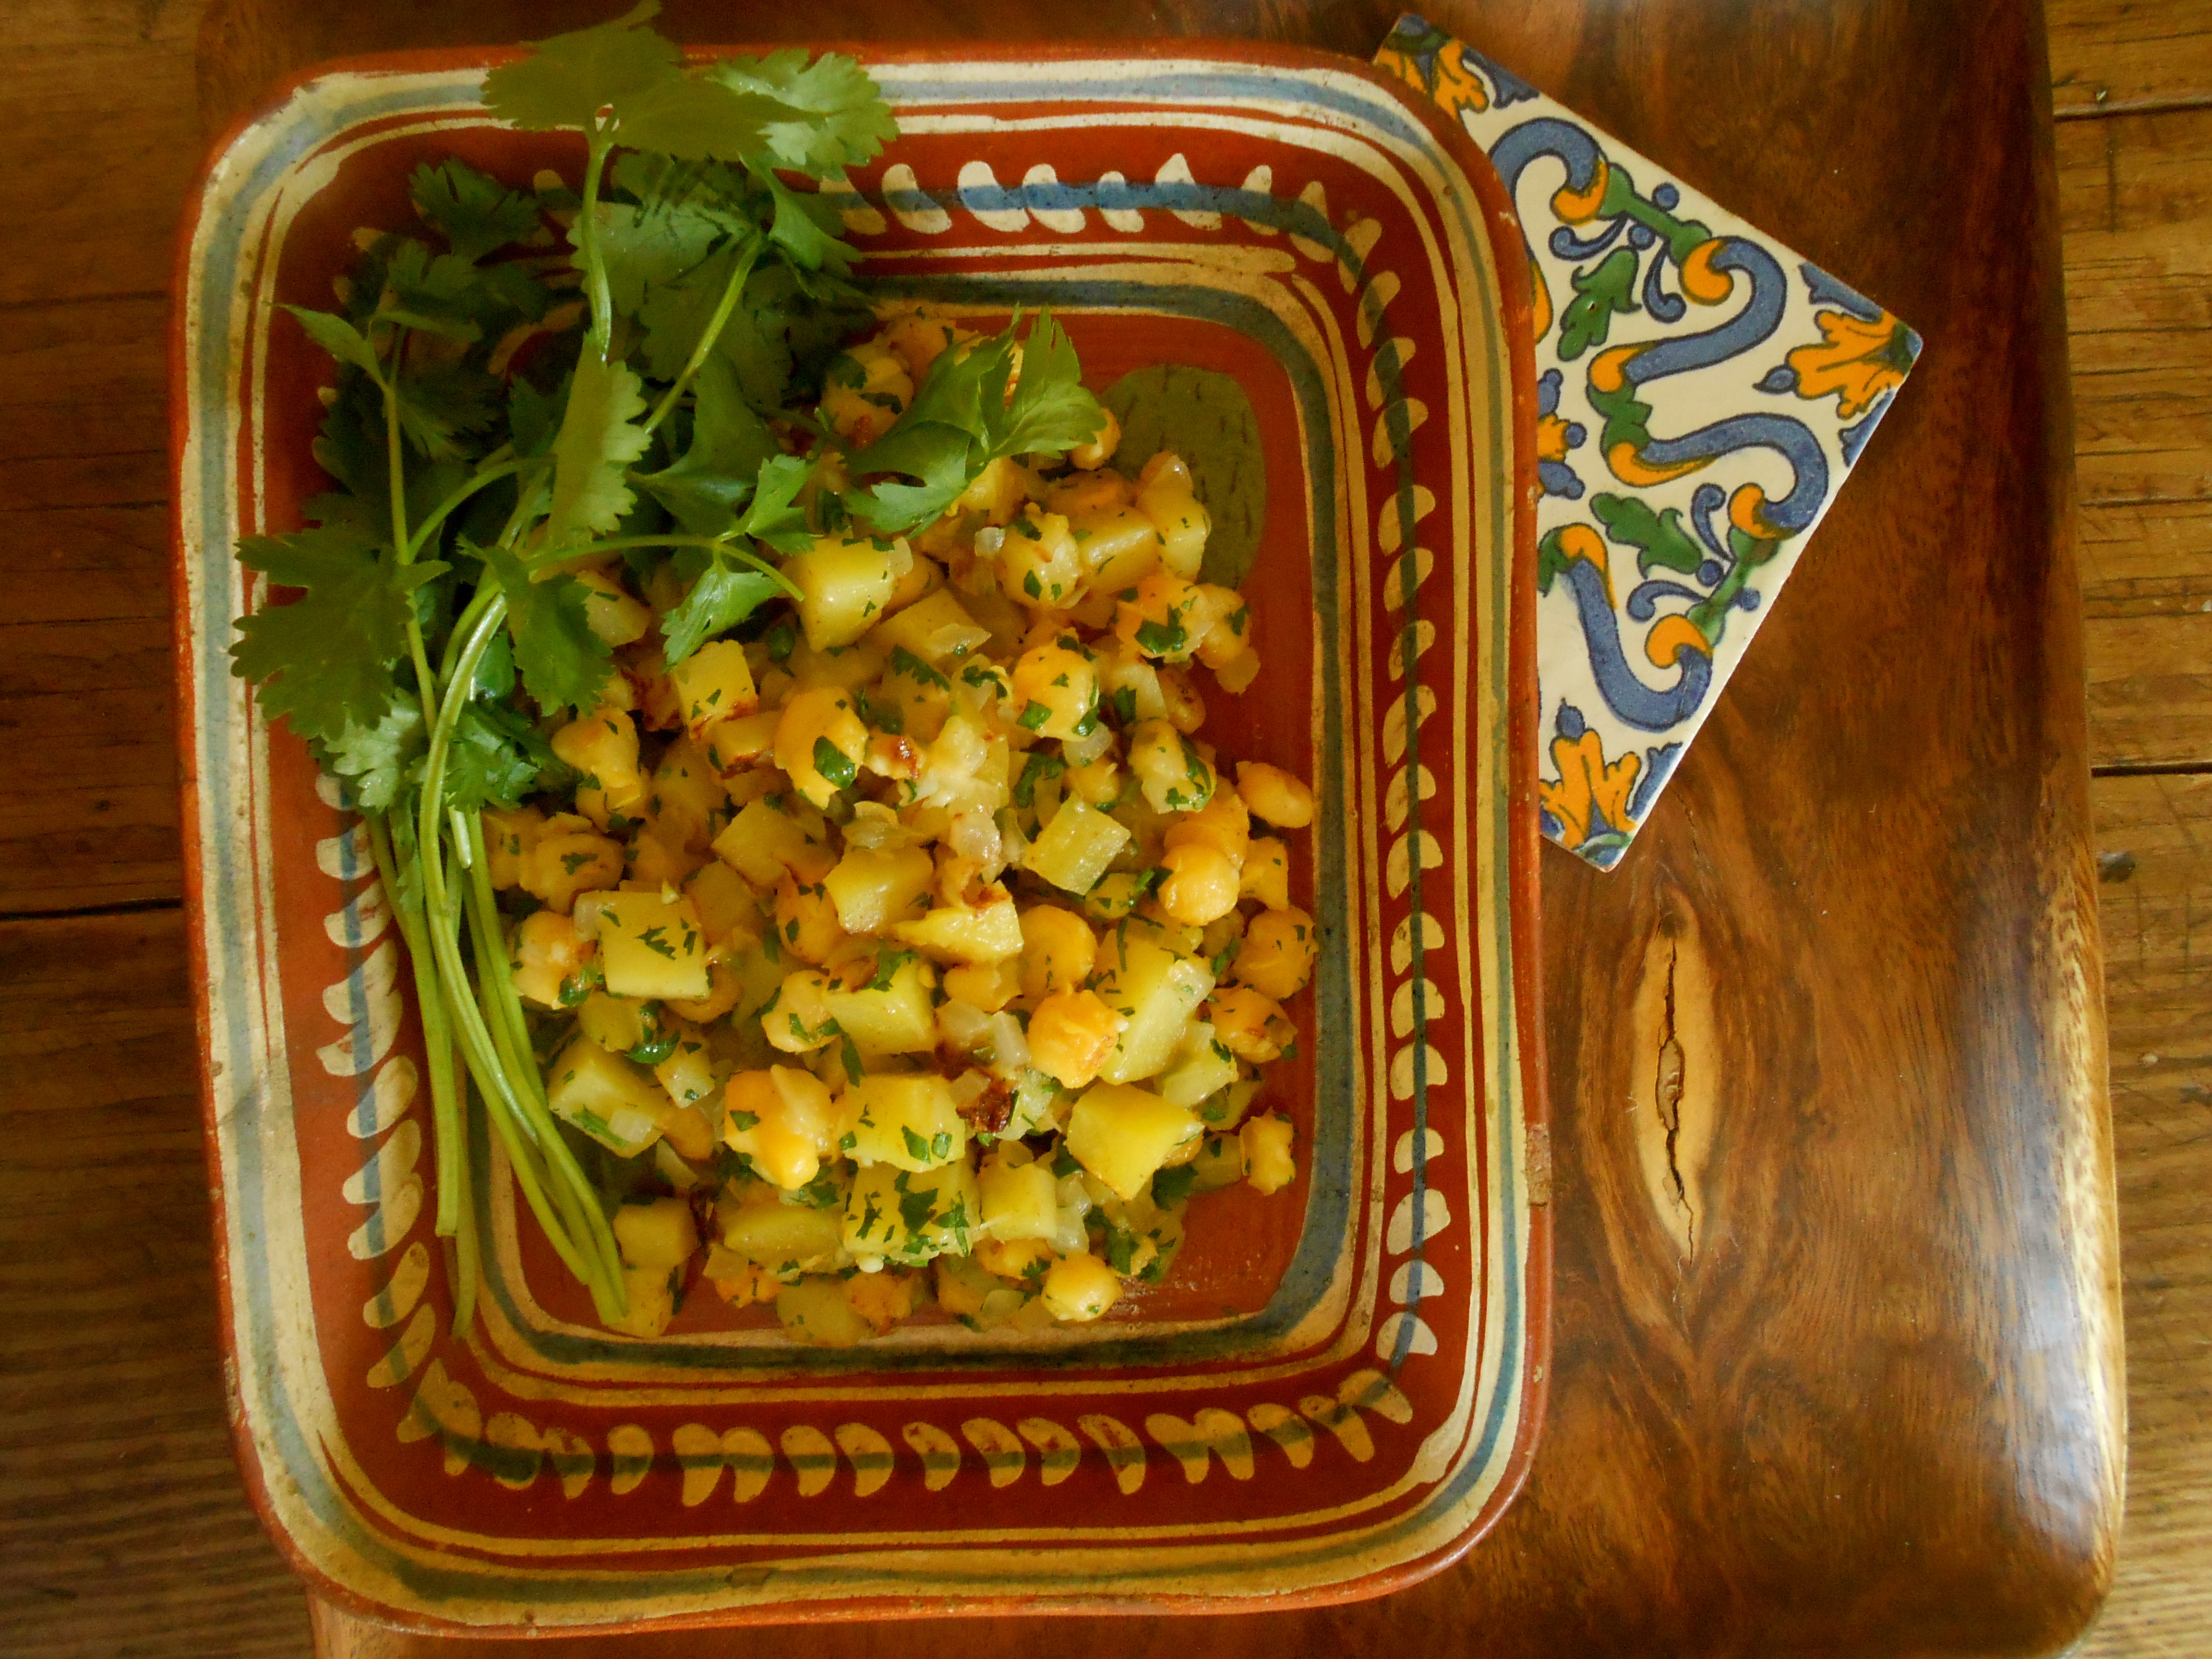
I am going to toot my horn and say, I created a perfect hominy hash! It all started a few days ago when a very kind family brought lunch to the school for us from a local Mexican walk-up. They gave us menu’s a few days in advanced and asked what we would like to order. The menu had a few unique items and I chose a salad with hominy hash. Although it was fantastic it left me unsatisfied because if I were to measure the amount of hominy hash my salad had on it I think it would leave some room in a 1/4 cup measure. Perhaps dissatisfaction is a good thing because I set out to re-create hominy hash, and it was delicious.
Serves 4.
I n g r e d i e n t s
- 2 yellow potatoes, peeled and diced in small squares
- 1 sweet onion, finely diced
- 1 jalapeño pepper, finely diced
- 2 garlic cloves, minced or pressed
- 2 tablespoons olive oil
- 1 tablespoons cumin
- 1 – 29 ounce can of hominy
- salt to taste
- handful cilantro, coarsely chopped
- lime
M e t h o d
Heat olive oil in a large skillet over medium high heat. Add garlic and cook a one minute until aromatic. Add onions, jalapeño pepper and potatoes and toss around with a spatula until well combined. Season with salt and cook for 20 minutes or until potatoes are tender. Add hominy and cook for 10 minutes. Add fresh cilantro, a squeeze of lime and serve.

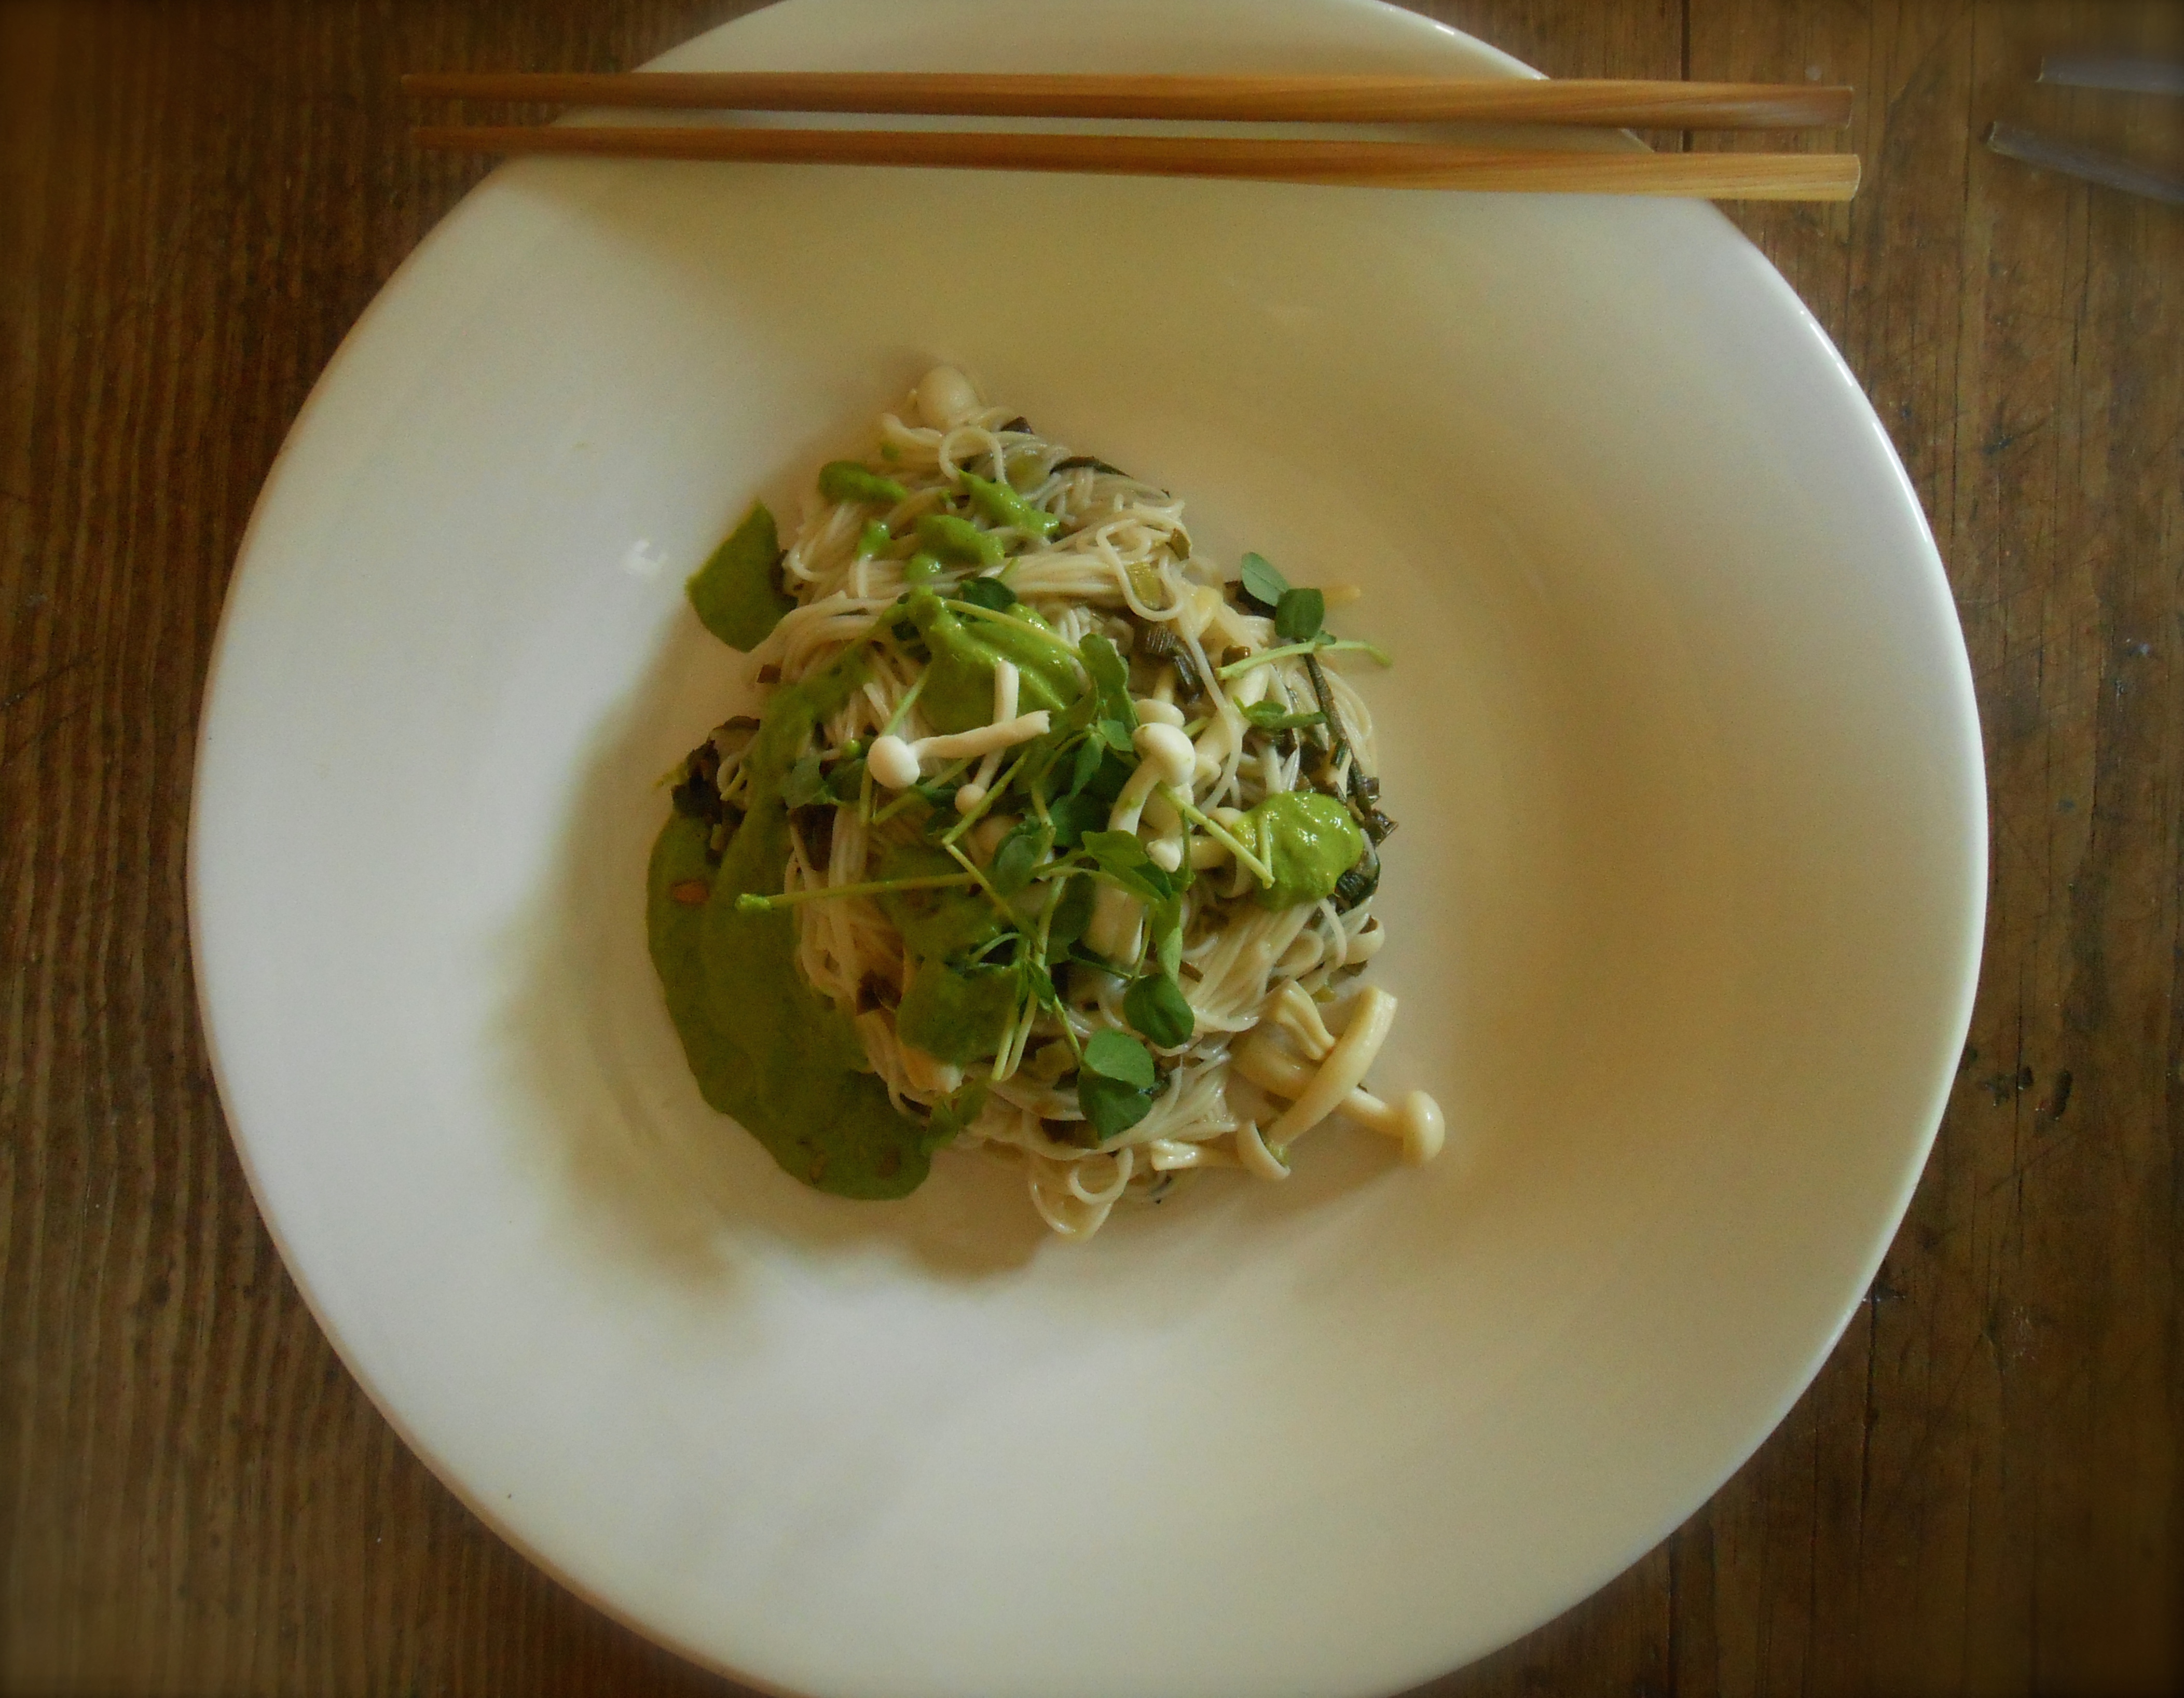
somen noodles with wild garlic & pea shoot pesto
May 15, 2014 § 79 Comments

I had the day off yesterday, well actually it was a day on considering all the work I accomplished around the house. Isn’t it satisfying when you are “on” and everything seems to fall into place? Six loads of laundry washed and put away, tomatoes planted, front garden edged and weeded, a much needed nap and a fantastic somen noodle dinner.

It wasn’t until 5:30pm when I realized the day got away from me and I didn’t have a dinner plan. The last grocery trip I made was a bit unorganized. I shopped without a list or the week’s menu plan, which I love to do occasionally, but isn’t helpful at all when it’s time to put dinner together. I was lost in sensory overload as I walked through the market picking fresh peas, ramps, pea shoots, enoki mushrooms (because they are cute), garlic, somen noodles and Thai eggplants, which I will use later.

I decided on somen noodles with ramps and mushrooms with a pea shoot pesto.
I n g r e d i e n t s
- 1-2 bunches ramps, or 1 regular leek, halved through the root and tough greens removed
- 2 tablespoons extra virgin olive oil
- 2 small sprigs fresh thyme, leaves stripped and chopped
- 1 bunch of enoki mushrooms
- Juice of 1 small lemon
- 2 bunches of somen noodles, 1 cup of cooking water reserved
- 2 tablespoons freshly grated Parmesan cheese
- Sea salt and freshly ground black pepper, to taste
M e t h o d
Cut the roots off the ramps and clean any dirt or old skin off the white parts of the stems. Rinse well and pat dry. Thinly slice the whites and stalks of the ramps. Shred the green leaves in a chiffonade (a style of slicing meaning to cut into long, thin ribbons). Set aside.
Put the olive oil into a wide skillet over medium-high heat. When the oil is rippling, add the white parts of the ramps. Sauté until they start to soften, then add the thyme. Cook for a minute. Add the mushrooms and a pinch of sea salt. Sauté until the mushrooms have colored slightly. Add the shredded ramp leaves. Mix well and continue cooking until the ramp greens have wilted, about 1 minute. Add the lemon juice, stir to mix and remove pan from heat and cover. Leave it to stand while you cook the soba noodles.
Uncover the mushroom mixture and heat through over a medium-high flame. Add half the reserved soba water, ground black pepper and grated cheese. Bring to a simmer and cook just long enough to melt the cheese, which will thicken the sauce. Add the drained soba noodles. Cook, stirring, until the noodles are heated through and well coated with sauce and vegetables, for about 1 minute. Add a little more soba water if the pan looks dry or the noodles start to stick. Serve immediately with a grind of black pepper and freshly grated Parmesan cheese and a spoonful of pea shoot pesto.

p e a s h o o t p e s t o
- 1/2 cup pumpkin seeds, pan roasted
- 3 cups pea shoots, roughly chopped
- 1/2 cup grated Parmesan Reggiano
- 2 cloves garlic, chopped
- Sea salt to taste
- 1/3 to 1/2 cup extra-virgin olive oil
M e t h o d
Place a small skillet on medium high heat and add the pumpkin seeds. Roast until browned occasionally giving the skills a good shake.
In a food processor or blender, combine pumpkin seeds, pea shoots, parmesan and garlic. Pulse until roughly chopped. Add salt to taste. With motor running, slowly drizzle in olive oil and a little water. Blend until well-combined and you reach your desired thickness.
hummingbird cake
May 9, 2014 § 129 Comments

I love the look of this cake. Just the titling alone is enough to make you stop and pay attention. It is earthy and rustic, but charming at the same time. Hummingbird cake is a vintage blue ribbon cake. The first known publication of this recipe was in the February 1978 edition of Southern Living Magazine. It was elected the magazine’s favorite recipe at one point, and won the Favorite Cake Award at the 1978 Kentucky State Fair, as well as several blue ribbons at other county fairs. If you enjoy banana bread you will love this cake. Similar to carrot cake, however, if you don’t care for carrots in your cake, try this as an alternative. Three layers with pecans, mashed bananas, crushed pineapple and a cream cheese frosting. A county fair type of cake.

And talk about a sense of urgency…I’m taking my cake and I am on my way to Fiesta Friday #15. I took one look at Selma’s Asparagus and Feta Cigars and I couldn’t get this cake frosted fast enough.
Recipe adapted from Kinfolk.
I n g r e d i e n t s
For the cake:
- 2 tablespoons unsalted butter, at room temperature
- 3-1/4 cups all purpose flour
- 3 bananas, finely chopped
- 1 cup raw cane sugar
- 1 cup brown sugar
- 1 teaspoon baking soda
- 1 teaspoon ground cinnamom
- 1 teaspoon salt
- 3 large eggs, beaten and at room temperature
- 1-1/2 cups vegetable oil
- 1 cup crushed pineapple
- 1-1/2 teaspoons vanilla
- 2-1/4 cups pecans, chopped
For the frosting:
- Two 8 ounce packages cream cheese, at room temperature
- 2 sticks unsalted butter, at room temperature
- confectioners’ sugar, approximately 3 cups
- 1 teaspoon vanilla
Position two racks in the upper third and lower third of the oven and preheat the oven to 350°F. Grease three 9-inch round cake pans with the butter. Dust the pans with 1/4 cup flour and knock out any excess; set aside.
In a large bowl whisk together the remaining 3 cups flour, the sugar, baking soda, cinnamon, and salt. Add the eggs and oil and stir just until the dry ingredients are moistened. Stir in the pineapple, vanilla, and half of the pecans.
Divide the batter equally among the prepared pans. Set two pans on the top rack and one on the bottom. Bake, rotating and alternating the cakes halfway through the baking time, for 25 to 30 minutes or until a tester inserted in the center of the cakes comes out clean. Transfer the cakes to racks and cool in the pans for 10 minutes, then invert them directly onto the racks and cool completely, about 1 hour.
While the cake cools prepare the frosting. Beat the cream cheese and butter with an electric mixer on medium speed until light and fluffy, about 3 minutes. Decrease the speed to low and add the confectioners’ sugar and vanilla. I usually do a taste test to see how much sugar is needed to my desired sweetness. It is usually less than the recipe calls for. Beat until light and fluffy, about 3 minutes.
To assemble, spread the frosting between the layers, scattering some of the remaining pecans in between. Continue spreading the frosting on the top and sides of the cake and sprinkle the remaining pecans on top.
************************************************************************************

And speaking of vintage, this little guy has been watching over me in the kitchen since Christmas. One day I mentioned to my teenage son how I wanted a Pillsbury Doughboy when I was a little girl, but my wish never came true. He searched and found one on Etsy and this was his gift to me. It’s vintage…1971. A vintage cake and a vintage doughboy. His real name is Poppin’ Fresh.
torta pasqualina
May 1, 2014 § 74 Comments

A portion of my cooking inspiration comes from a handful of cookbooks that are sitting on our bookshelf, as well as two magazine subscriptions I receive every month. However. nearly all of my inspiration comes from all the wonderful food blogs I love to read. I finally got a handle on my bookmark bar the other day where hundreds of recipes are parked and waiting for my attention. It is like having a hundred cookbooks at my fingertips. This dreamy pie recipe was at the top of my list to prepare.

A week or so ago while visiting Lindy’s Love in the Kitchen the only thing keeping me from standing up, walking to the kitchen and getting started on this pie was the fact I did not have ricotta cheese. I love that sense of urgency to get up, run out to the market, gather the ingredients and prepare a meal inspired by seeing a beautifully presented post. I like to call this sense of urgency pure inspiration. And this was one of those posts. Without a doubt this recipe brought Love in the Kitchen.
Knowing this torta was going to be fabulous I did not alter or adapt the recipe in any way. Thank you Lindy. We loved your torta pasqualina.
Recipe from Love in the Kitchen.
I n g r e d i e n t s
- 5 hard-boiled eggs, peeled and cut in half lengthwise
- 1 egg, uncooked and lightly beaten
- One large tub – 312 grams or 11 oz fresh (preferably organic) spinach, washed, dried and trimmed
- 2 tbsp extra-virgin olive oil
- 1 large onion, finely chopped
- 400 grams (just less than 1 lb) of ricotta cheese
- 1 cup sharp cheddar, grated
- ⅓ cup parmesan, grated
- ½ tsp salt
- freshly ground black pepper
- 397 grams (or closest equivalent including 1lb) ready-made puff pastry

M e t h o d
Preheat the oven to 400F/200C. Lightly grease a deep dish pie plate.
In a large fry pan, cook the onion in the olive oil until the onion is lightly browned. Add the spinach and cook over medium-low heat 3-4 minutes or until the spinach is just wilted. Remove from the heat and add the ricotta, cheddar, parmesan, half of the beaten egg (reserve remainder for brushing the pastry) and seasonings.
Roll out half the puff pastry to about .5cm or ¼ inch thickness and line the pie dish. Fill with half the spinach mixture. Add the hard-boiled eggs, yolks down, evenly spaced. Top with remaining spinach mixture.
Roll out remaining pastry and top the pie, taking care to seal the edges of the pie.
Using a pastry brush, glaze the top of the pie with the remaining half beaten egg. Make several small incisions in the top of the pie to allow steam to vent.
Bake 25-30 minutes or until risen and golden brown. Remove from oven and allow to cool at least ten minutes before slicing and serving. Also good served at room temperature.

sopa seca de fideo con pollo
March 3, 2014 § 69 Comments

d r y n o o d l e s o u p w i t h c h i c k e n
Imagine how delighted I was when I stumbled upon this Mexican casserole, which isn’t like a casserole at all, but rather a spicy pasta. Thin pasta (fideo), such as capellini is cooked in a spicy tomato soup until the noodles absorb all the liquid; resulting in a dry soup (sopa seca).

After breaking the capellini into two inch pieces and cooking in a skillet with a little olive oil they swell and become crunchy. Mixing them into the spicy tomato soup and baking for 2o minutes a wonderfully textured combination of a soft and crunchy pasta is achieved. We like it spicy and this recipe has quite a bit of smoked jalapeños in adobo sauce. Add chiles according to your HOT threshold. This recipes calls for chicken, but of course you could omit and enjoy this vegetarian style.
This dish has similar qualities of chilaquiles which was posted here last July. Chilaquiles are basically corn tortilla pieces that are fried, cooked in a spicy tomato salsa, and sprinkled with cheese. Often served for breakfast with an egg. My version of chilaquiles is served on top of crunchy tortilla chips.

c h i l a q u i l e s – posted last July.
I n g r e d i e n t s f o r s o p a s e c a d e f i d e o c o n p o l l o
- 3 tablespoons olive oil
- 12 ounces dried capellini pasta, broken into 1 inch pieces
- 1 medium onion, chopped
- 3 cloves garlic, minced
- 1/2 teaspoon dried coriander
- 1- 28 ounce can of san marzano tomatoes
- 2 cups of vegetable or chicken stock
- 2 – 4 tablespoons canned chipotle chile peppers in adobo sauce, minced
- 1 tablespoon snipped fresh oregano
- sea salt and pepper
- 2 cups shredded chicken (optional)
- 3/4 cup oaxaca or mozzarella cheese
- 1 avocado, chopped, for serving
- fresh snipped oregano, for serving
M e t h o d
Preheat oven to 375°F. Lightly butter a 2 quart baking dish or oven proof skillet; set aside. In a skillet heat 2 tablespoons of the oil over medium heat. Add pasta; cook about 5 minutes or until evenly toasted, stirring occasionally. Transfer pasta to a plate; set aside.
Using the same skillet heat remaining 1 tablespoon oil over medium heat. Add onion and garlic; cook for 7 to 10 minutes being careful not to brown, cook only until tender. Stir in coriander and cook for one minute or until fragrant. Stir in tomatoes, stock, chipotle chile peppers and oregano. Season with salt and pepper. Bring to boiling. Reduce heat and simmer for 10 minutes, stirring occasionally.
Carefully stir in chicken and pasta. Pasta will need to be stirred gently. Transfer mixture to prepared baking dish. Top mixture with cheese. Bake for 20 minutes or until casserole is bubbly and starts to brown. Serve with avocado and freshly snipped oregano.
Serves 6.
simple tomato risotto
December 2, 2013 § 65 Comments
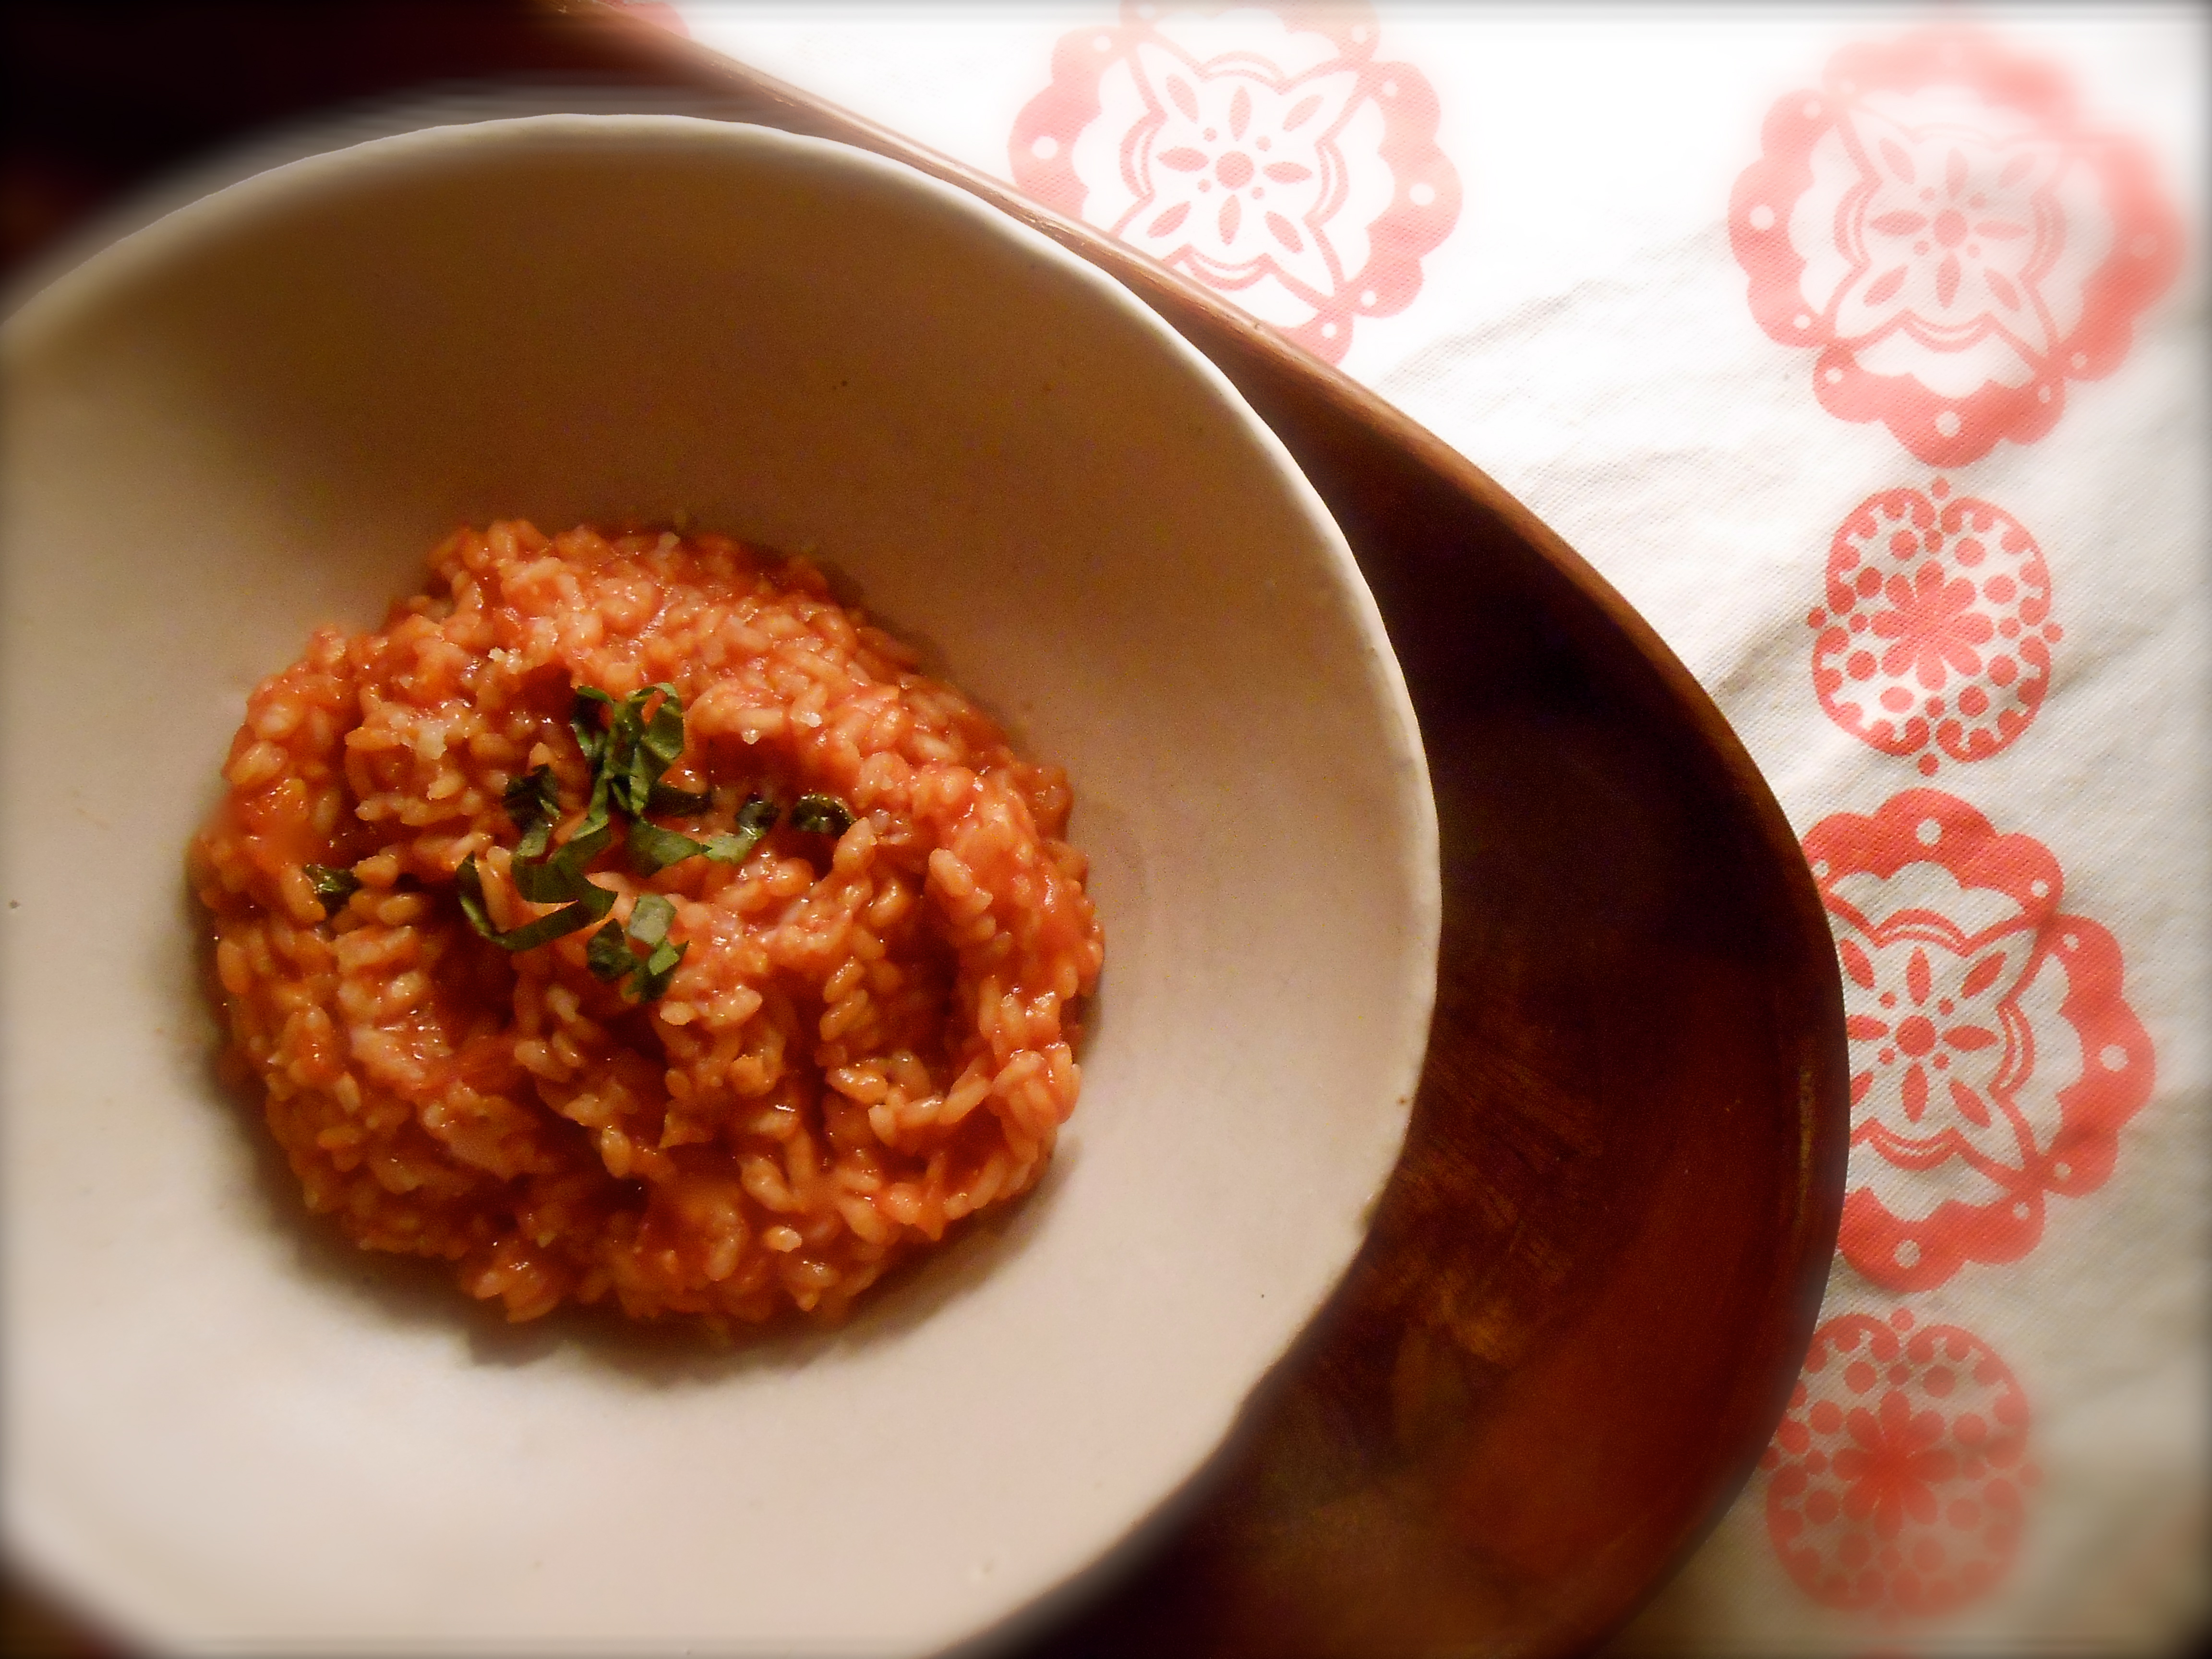
The recipe for this risotto comes from Tessa Kiros and her wonderful book Apples for Jam. I often feature recipes from Tessa and it is only because every recipe she writes is outstanding and very simple to prepare. My only problem is every time I prepare this risotto I never seem to make enough. I have been wanting to make fried risotto balls with the leftovers, however, this is well liked by all and we manage to finish off the entire pot every time. Doubling the recipe is highly recommended, or quadruple if you are planning to have leftovers (which is what I am going to do next time!). This recipe serves three. I titled it simple because you do not have to stand over the pot continually stirring and adding broth. You can just allow it to cook and stir occasionally.
It is suggested to serve this with little cubes of mozzarella stirred through near the end. We have had it both ways, however, I prefer to leave it out. If you like stringy melted mozzarella by all means add it at the end of cooking, just before serving.
I n g r e d i e n t s:
Broth
- 1/2 onion, peeled
- 1 small carrot, peeled
- 1 leafy celery stalk
- 3 parsley sprigs
- 1/2 small tomato
- 5 cups water
- salt
Risotto
- 4 tablespoons olive oil
- 1/2 onion, finely chopped
- 2 cloves garlic, smashed, peeled, left whole
- pinch or two chile flakes
- 1 cup risotto (arborio or carnaroli rice)
- 1 cup canned tomatoes, pureed
- 2 large basil leaves, torn
- 1/4 cup parmesan cheese
- 2 1/2 tablespoons olive oil, to serve
- grated parmesan, to serve
- freshly grated black pepper, to serve
For the broth, put the onion, carrot, celery, parsley and tomato in a pan with 5 cups of water. Add water and bring to a boil. Reduce the heat to low and simmer for 30 minutes, then turn down the heat as low as it will go and leave the pan over the heat.
Heat the olive oil in a wide heavy bottomed pot. Sauté the onion and garlic over low-medium heat for 5 minutes, or until lightly golden. Stir in the chile flakes and risotto, and cook for another minute. Add half the tomato purée, half the basil and 1 1/2 cups of the hot broth. Reduce the heat to low and simmer 10 minutes. stirring now and then. Add the rest of the tomato purée and the remaining broth, and simmer for 10 minutes, or until the risotto is cooked (if it needs another few minutes or a little more liquid, just use hot water). Tessa recommends you remove the garlic cloves and throw them away. We keep them in and eat them! Stir in the Parmensan and remaining basil. Serve drizzled with olive oil and a good grating of black pepper and pass around the extra Parmesan.
roasted succotash
October 17, 2013 § 49 Comments
We visited a nice little Italian Restaurant near our home the other night and succotash was a featured menu item. Up until this moment the thought never crossed my mind to make succotash. It was wonderful and I knew I had to figure it out. After spending a little time looking through succotash recipes and finding several variations to this sensational mix of vegetables (specifically corn and typically lima beans) I settled on the idea of roasting root vegetables, and using edamame instead of lima beans.

What we enjoyed about the succotash at the Italian Restaurant was the corn was fully roasted. Knowing corn is no longer in season I decided I would buy frozen corn and “pre-roast” it prior to adding to the mélange. However, I discovered frozen “roasted” corn at the market! I highly recommend using roasted corn kernels for this recipe. Buying it pre-roasted or roasting it for 30 minutes in a 350°F oven will certainly add wonderful flavor to your roasted succotash!

The combinations of both texture and flavor created an exceptional autumn side dish.
I n g r e d i e n t s
- 3 sweet potatoes, peeled and diced
- 3 large parsnips, peeled and diced
- 1 large red onion, chopped
- 3 garlic cloves, minced
- 3 tablespoons olive oil
- salt & pepper
- 2 cups of shelled edamame
- 2 cups of corn kernels, roasted
M e t h o d
Preheat oven to 400°F. Toss the sweet potatoes, parsnips, red onion and garlic with olive oil and place on a parchment lined baking sheet. Make sure to spread in a single layer. Sprinkle with salt and pepper. Roast until vegetables are tender, occasionally moving around with a spatula for about 30 – 45 minutes. Mix in the edamame and corn. Roast until all vegetables are tender, about 10-15 minutes longer.
Serves 4-6.
